Automatically link incidents and problems in Zendesk
When a crisis hits agents should focus on resolving problems and informing customers, not waste time on assigning and categorising incident tickets. This article shows you how to automate this flow!
Automatically link incidents and problems in Zendesk

On this page
Customer Service desk experience two types of tickets: some are one offs, unique tickets that can be handled on a 1:1 basis. The other type are a wave of similar tickets created because something broke, changed or got disrupted.
Both scenario's can and should be handled by a good self service flow. A customer who forgot their password should easily find the article explaining the password reset procedure, and your bot should offer this article in return to any inquiry about loss passwords.
But sometimes something bigger breaks. A ship blocks a canal and all your deliveries are delayed. Your authentication platform experiences downtime and no customers can login. These kind of events often trigger a long list of tickets related to the issue, and since these issues are structural, they can't easily be solved at once.
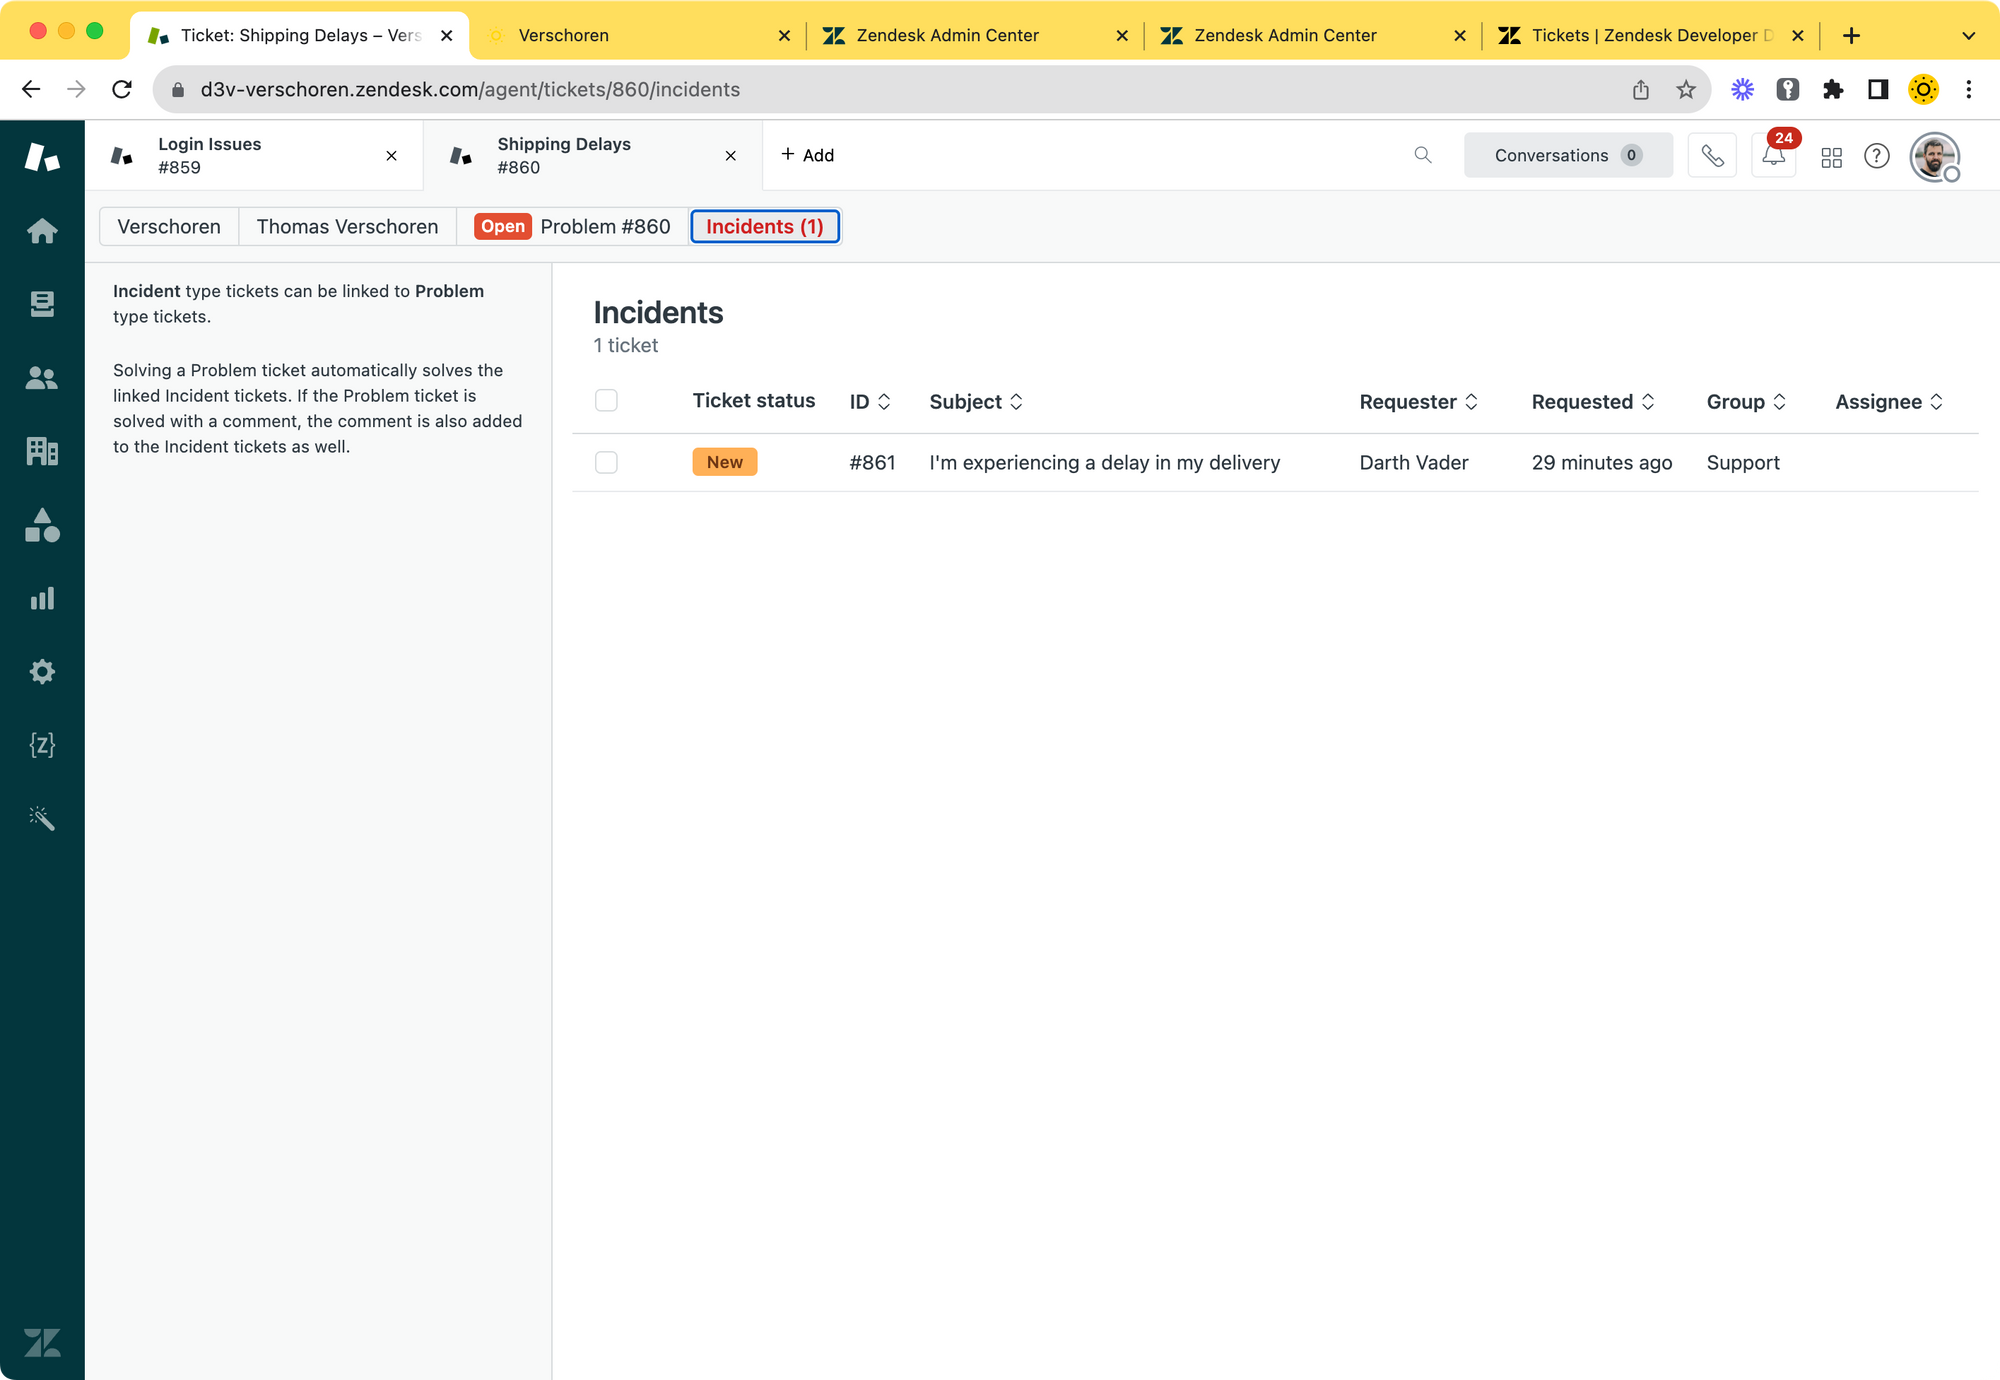
This is where the Problem and Incident feature of Zendesk comes to the rescue. The Problem tickets option allows you to create a single parent ticket (e.g. "Authentication issues") and link all tickets from customers reporting the issue as incidents under that one main ticket.
Any update you do to the main ticket (e.g. "we expect to resolve this issue within the next hour) will get send to all customers, and you can get a clear insight in how many customers reported the issue, and more important, are still experiencing issues after the main event has been resolved.
Classic Approach
In any normal Zendesk setup your approach might be similar to this:
- You notice a lot of tickets about the same issue
- An agent creates a Problem Ticket and starts linking Incidents to it
- You create a Help Center article that explains the issue in order to start deflecting tickets
- You keep linking new tickets to the problem
- You update the article with the latest information
- You keep linking new tickets to the problem
- You resolve the issue
- You keep linking new tickets to the problem
- You solve all tickets by sending out a final reply
- You update the article with a post mortem.
This is a pretty good approach to deflect, monitor and report on these kind of events, but you notice that there is one step that gets repeated a lot: linking tickets to the problem ticket.
A manual step that is repeated throughout the event, takes time away from agents and should be automated so that agents only spend time on either updating the problem ticket, or all tickets not related to the event.
Every time an agent manually handles the incidents tickets is a waste of time that should be spend on other things.
How do we fix this?
As you'd probably guesses, this article defines a problem, and will offer a solution. The next steps will explain you how to automatically link incidents to a specific problem without agent intervention and by leveraging your end-users.
The approach shown in the movie above automates the entire incident-problem assignment.
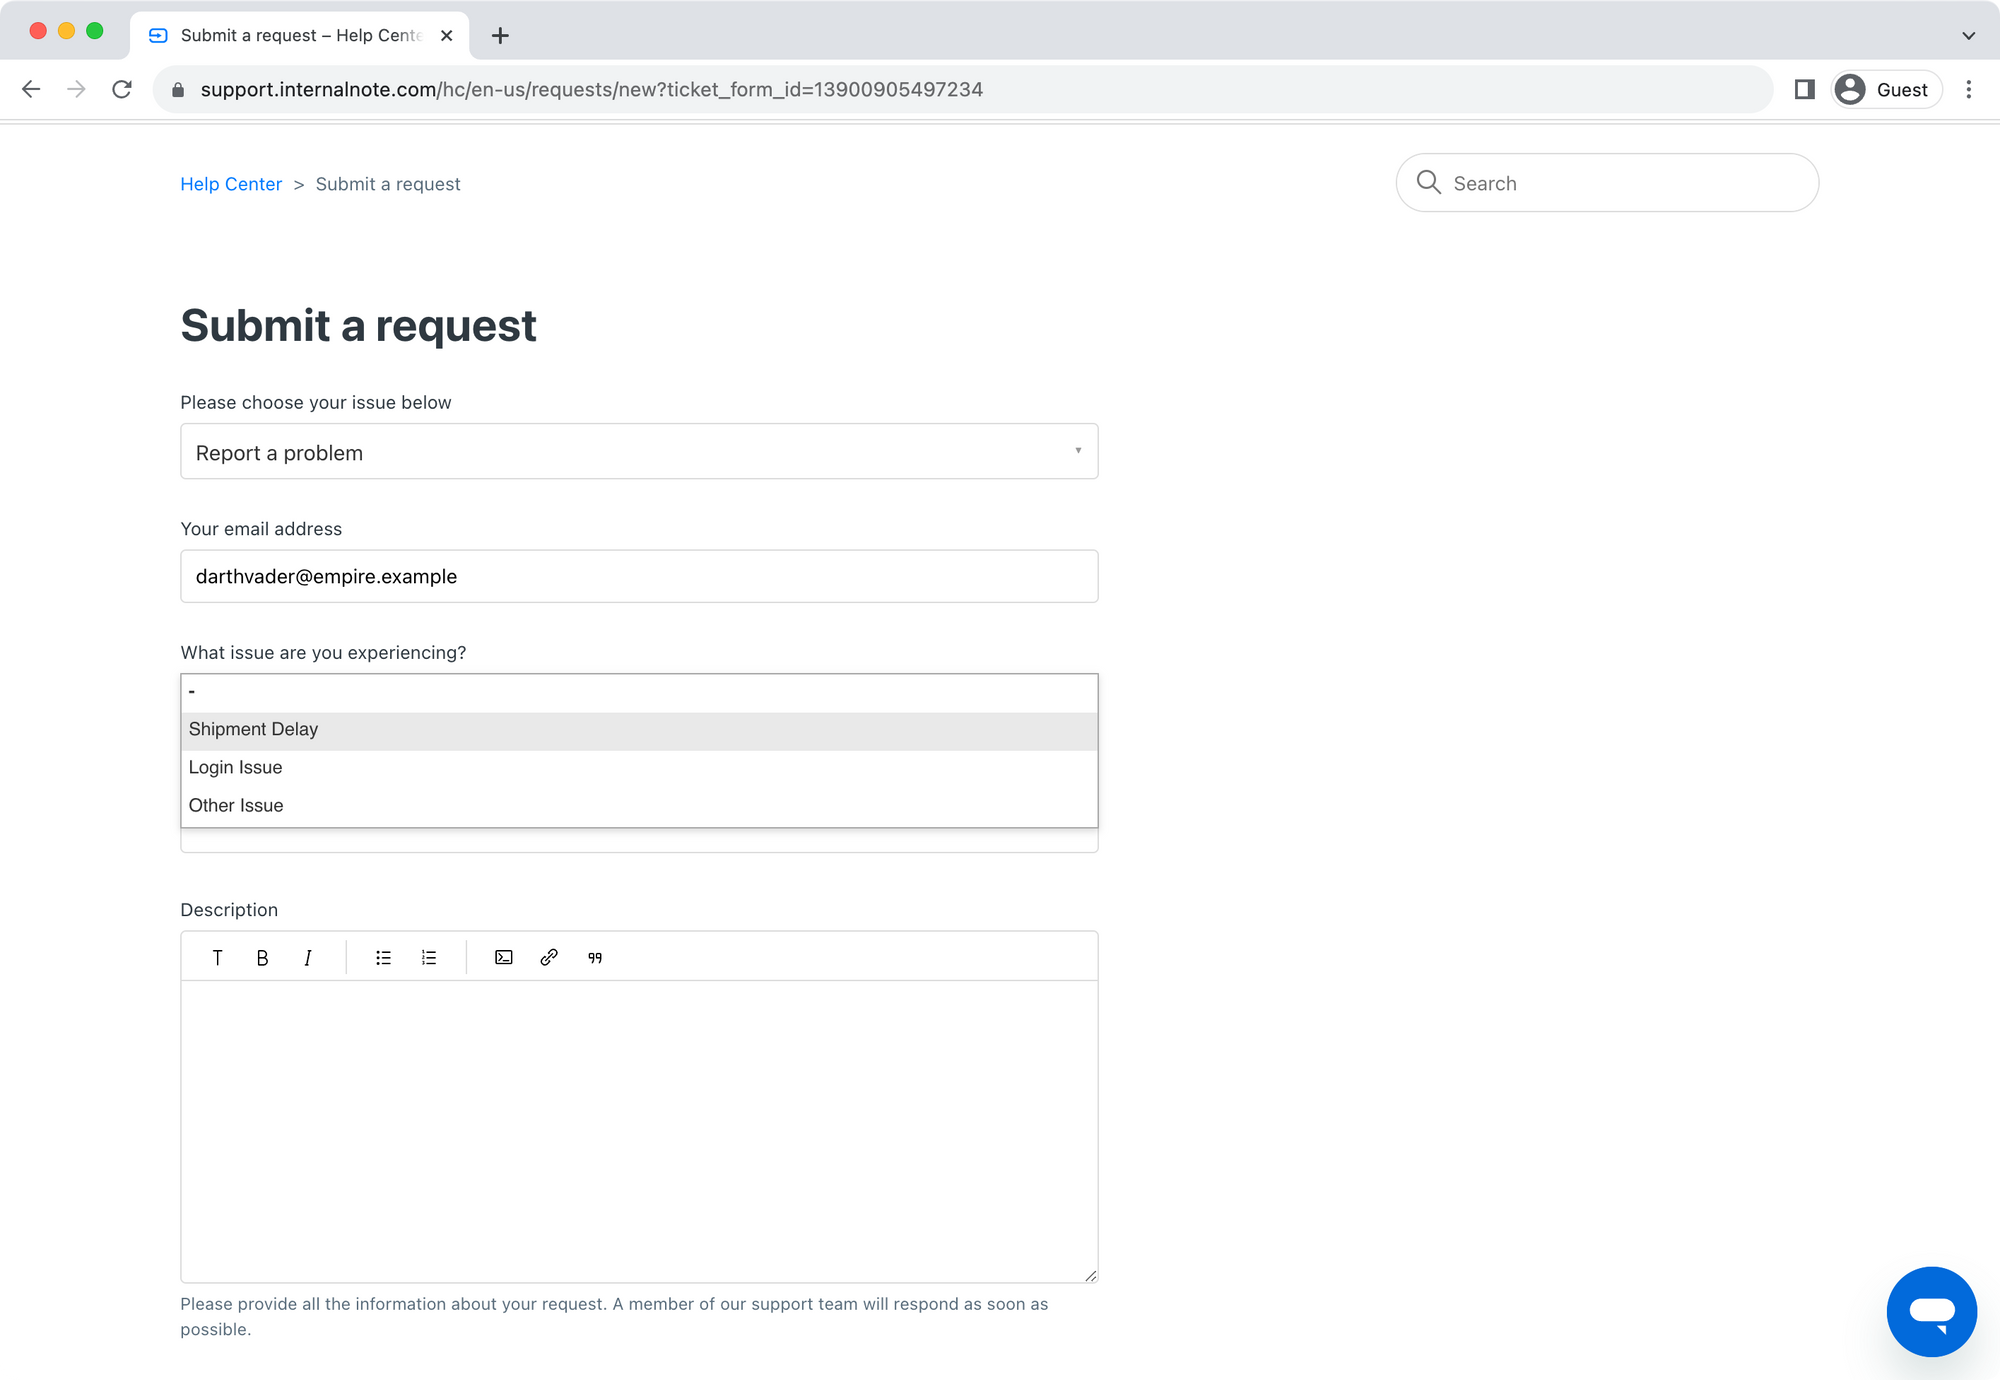
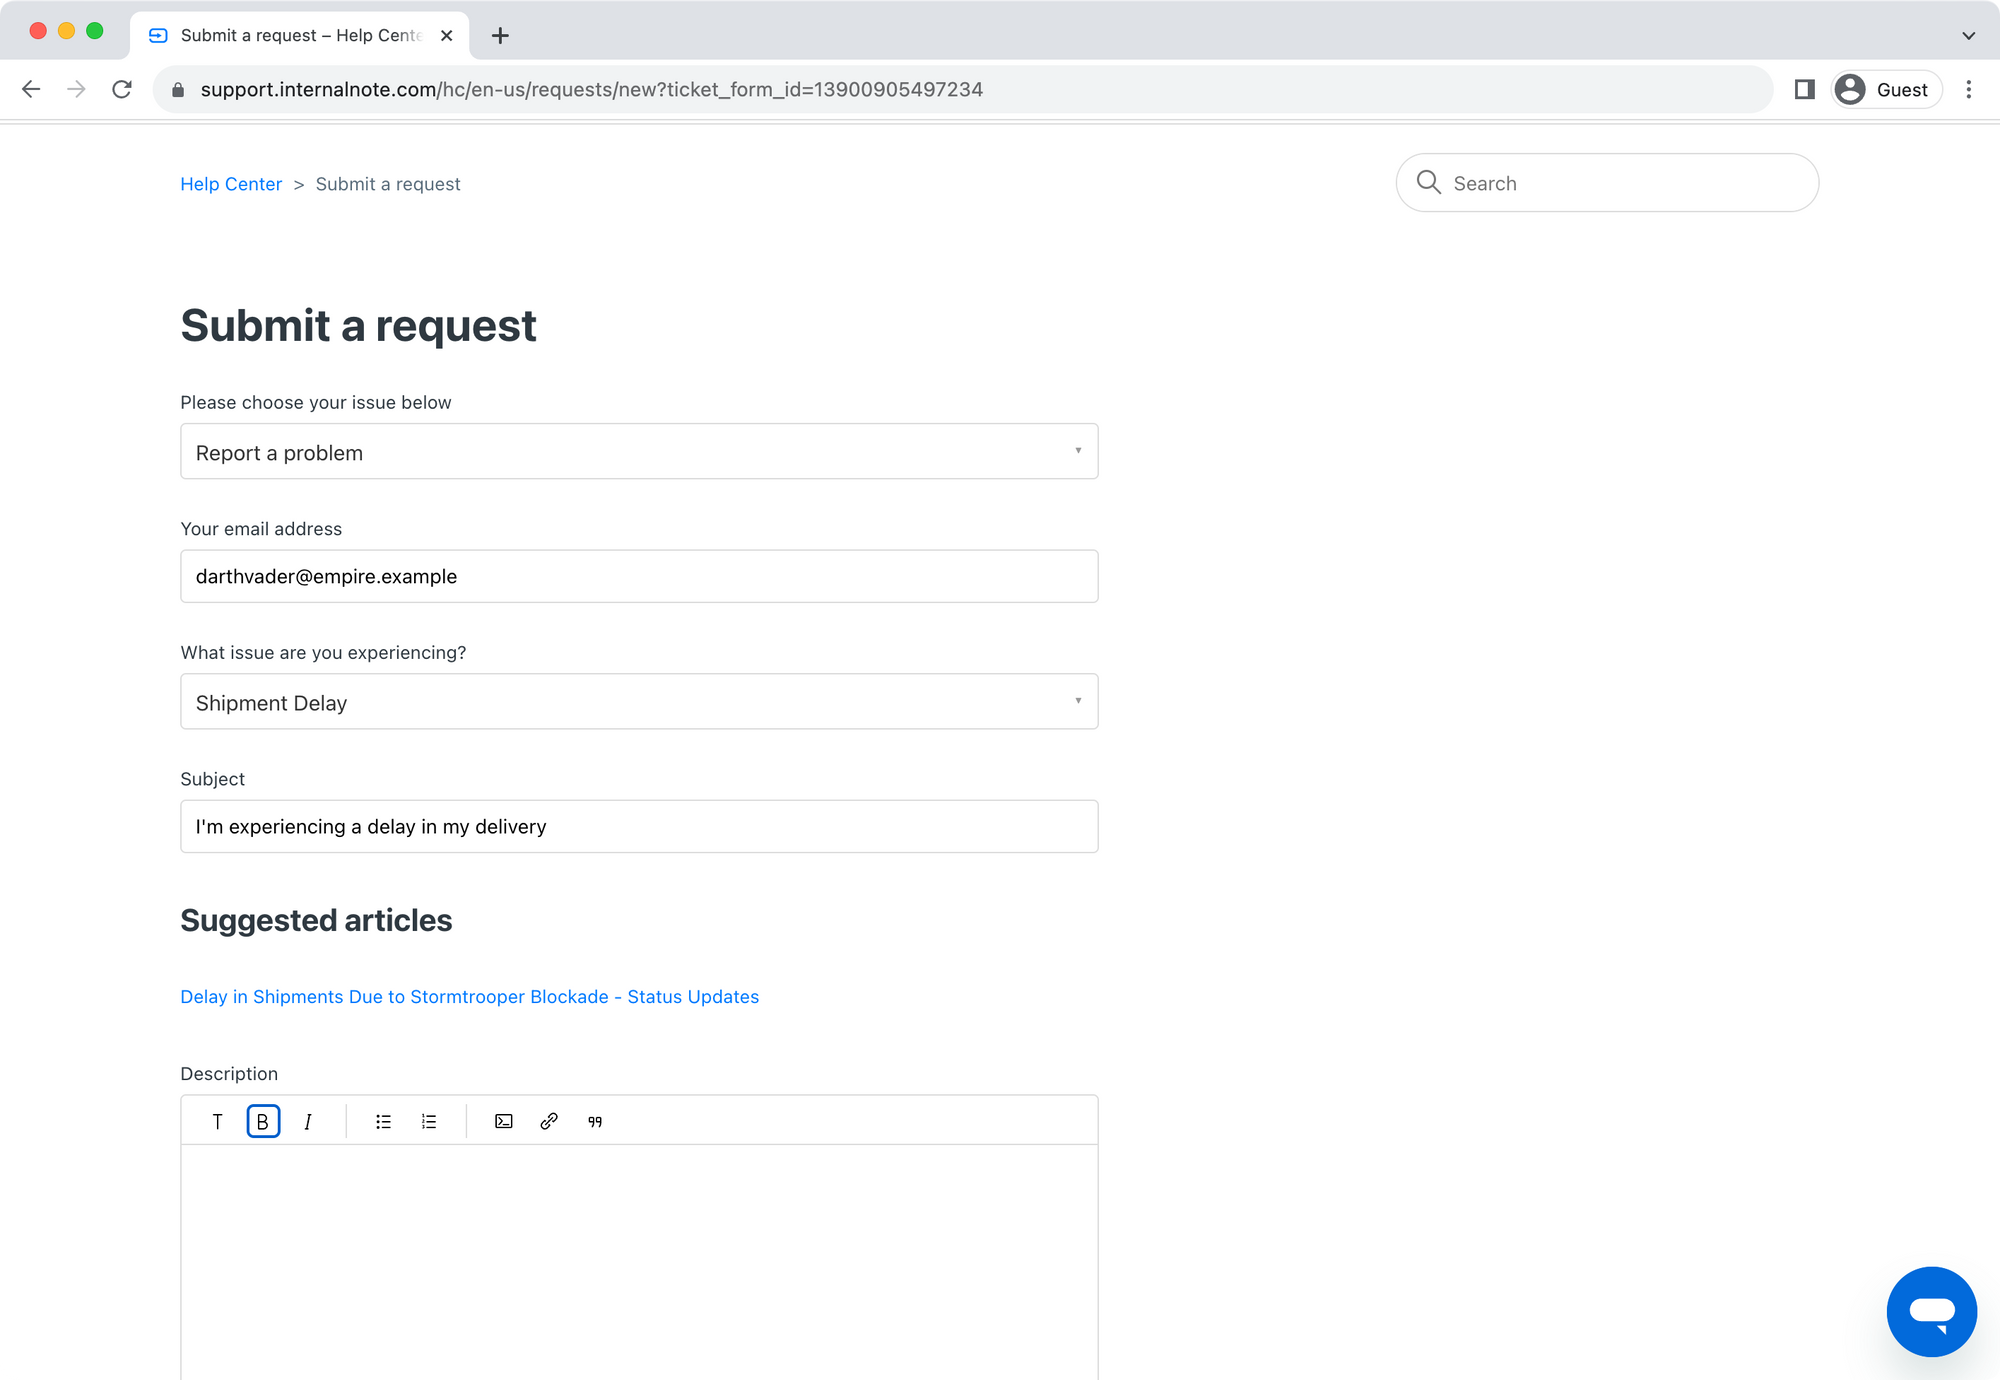
End-users are presented with a dropdown in the webform that asks them what the issue is about. The movie above shows a traditional webform, but naturally this also works in the Messaging Widget via an ask for details step that presents the same field.
Once the ticket is created we have a trigger that reads the chosen problem and uses that to update the ticket by setting the chosen problem as the problem_id linked to that ticket. We also turn the ticket into a Ticket Type incident.
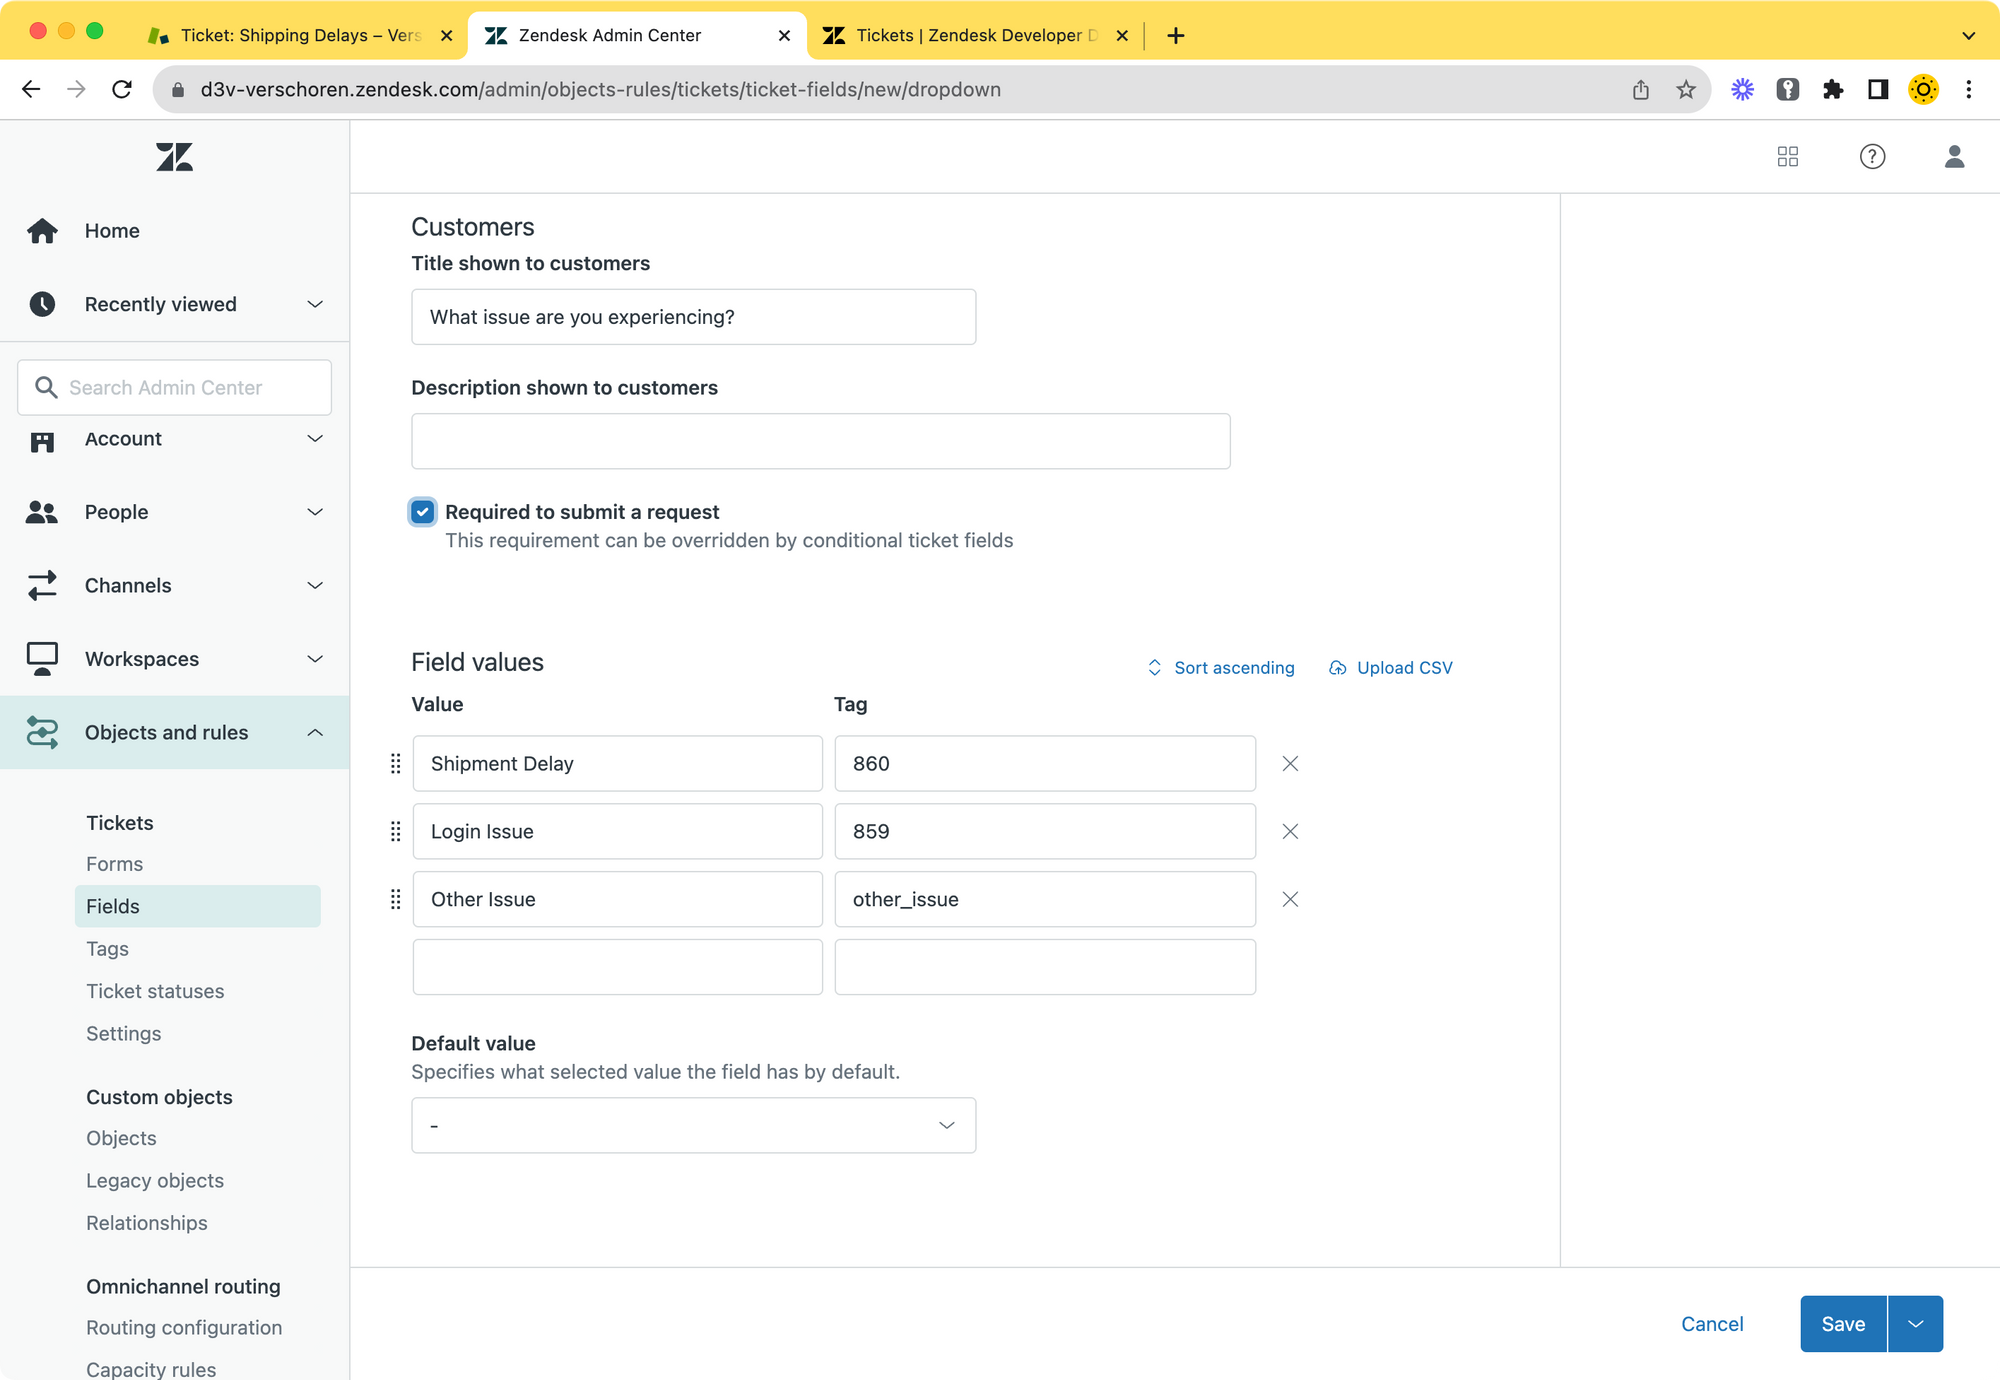
The magic step is that our dropdown of problems is structured as follows:
| Value | Tag | Comment |
|---|---|---|
| Shipment Delay | 100 | ID of a problem ticket |
| Login Issue | 101 | ID of a problem ticket |
| Other issue | other_issue | Fallback |
So without any agent intervention, by making the end-users select a predefined list of active problems, we automatically sort all incoming tickets to the right problem.
The Setup
A Problem Ticket
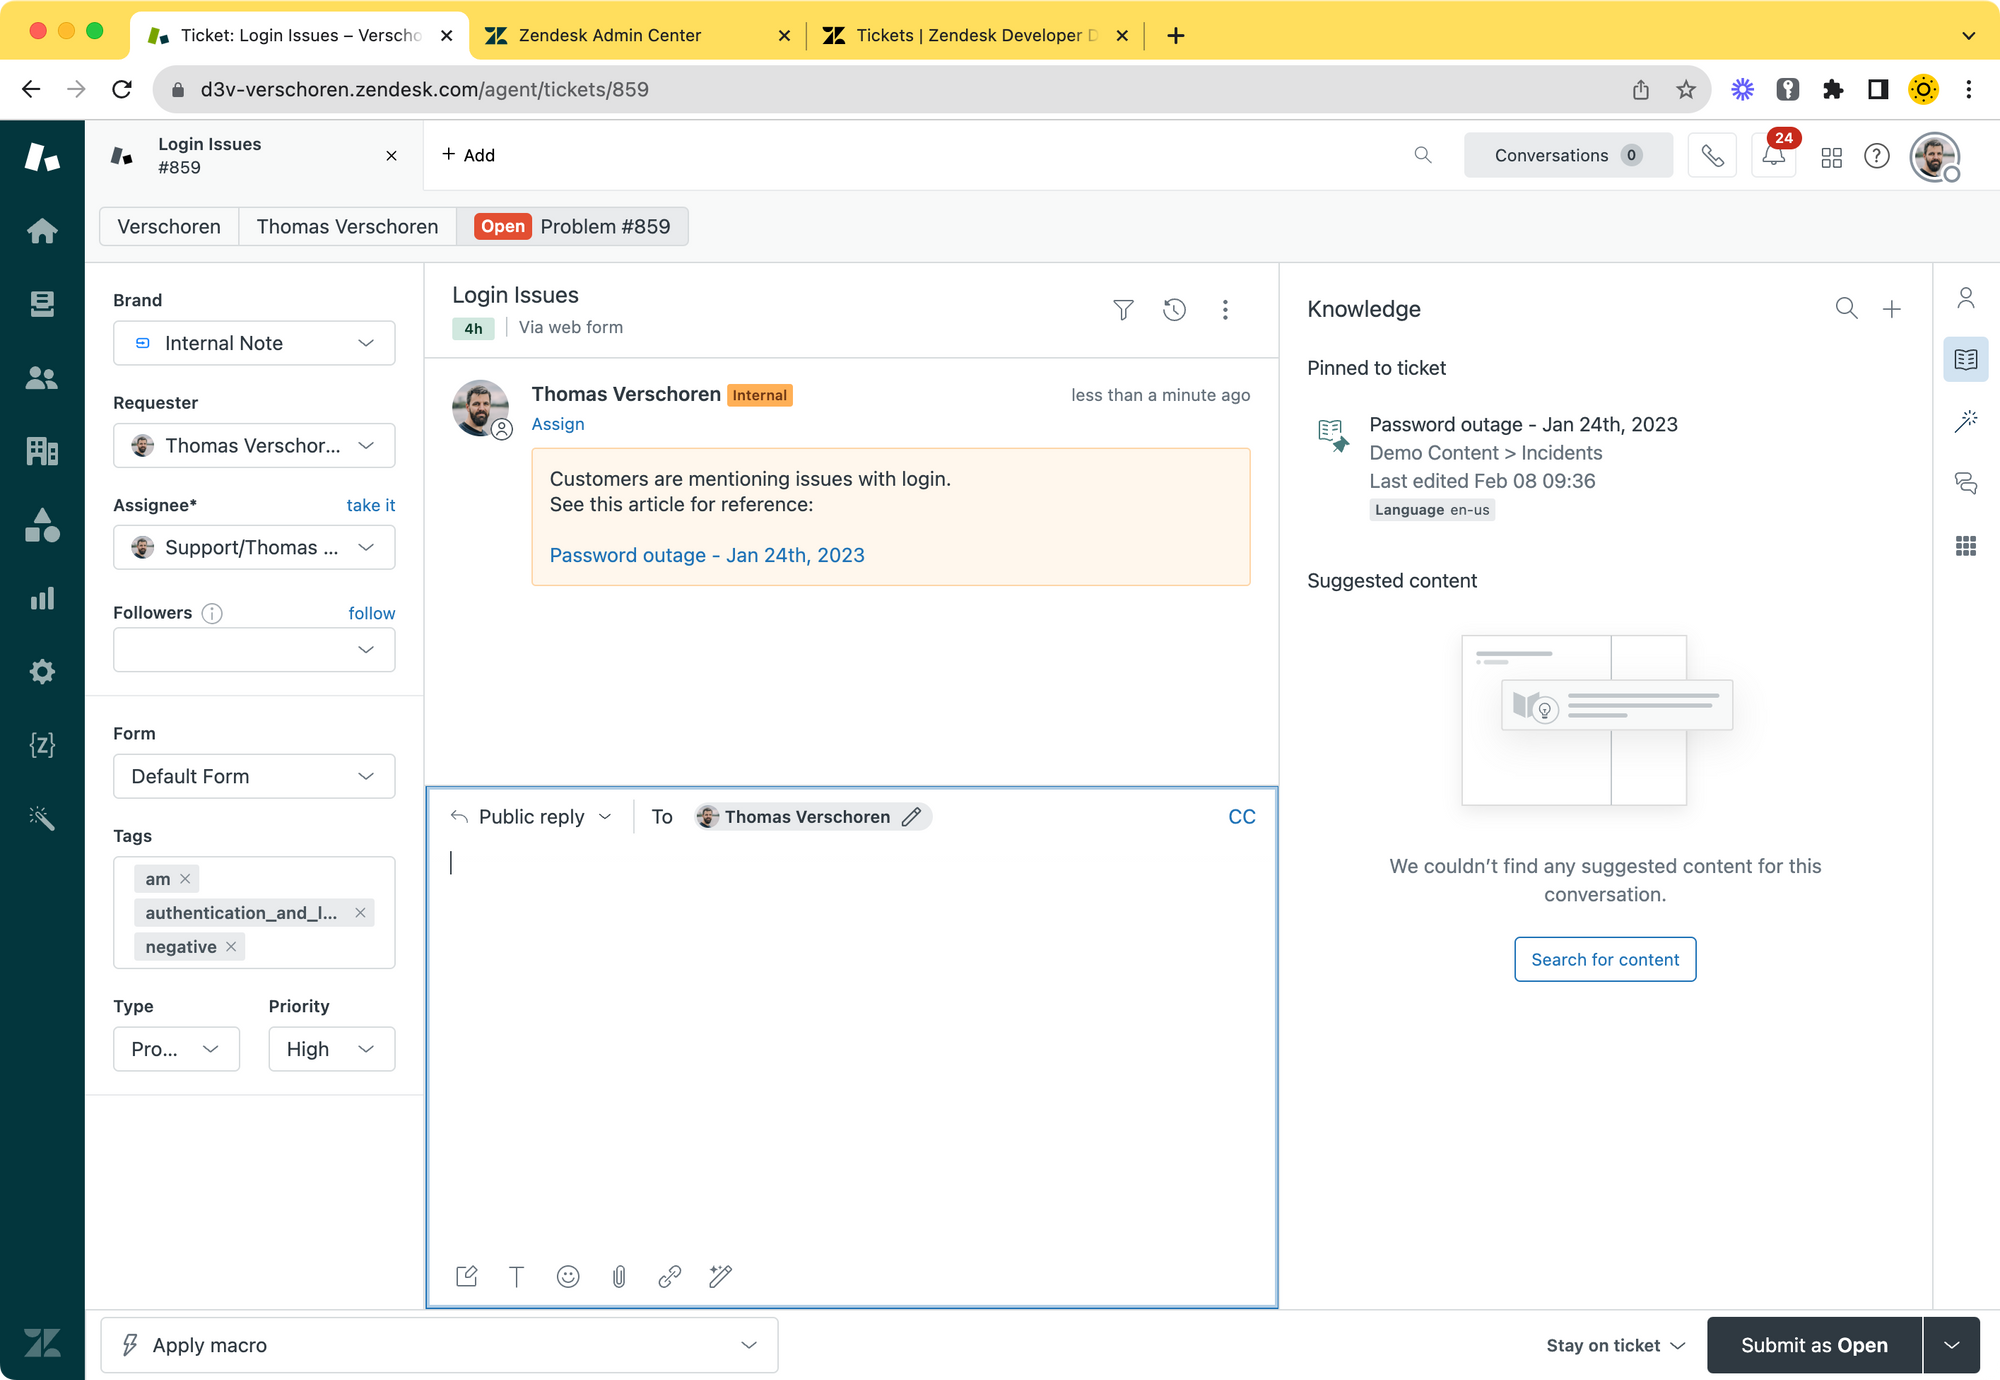
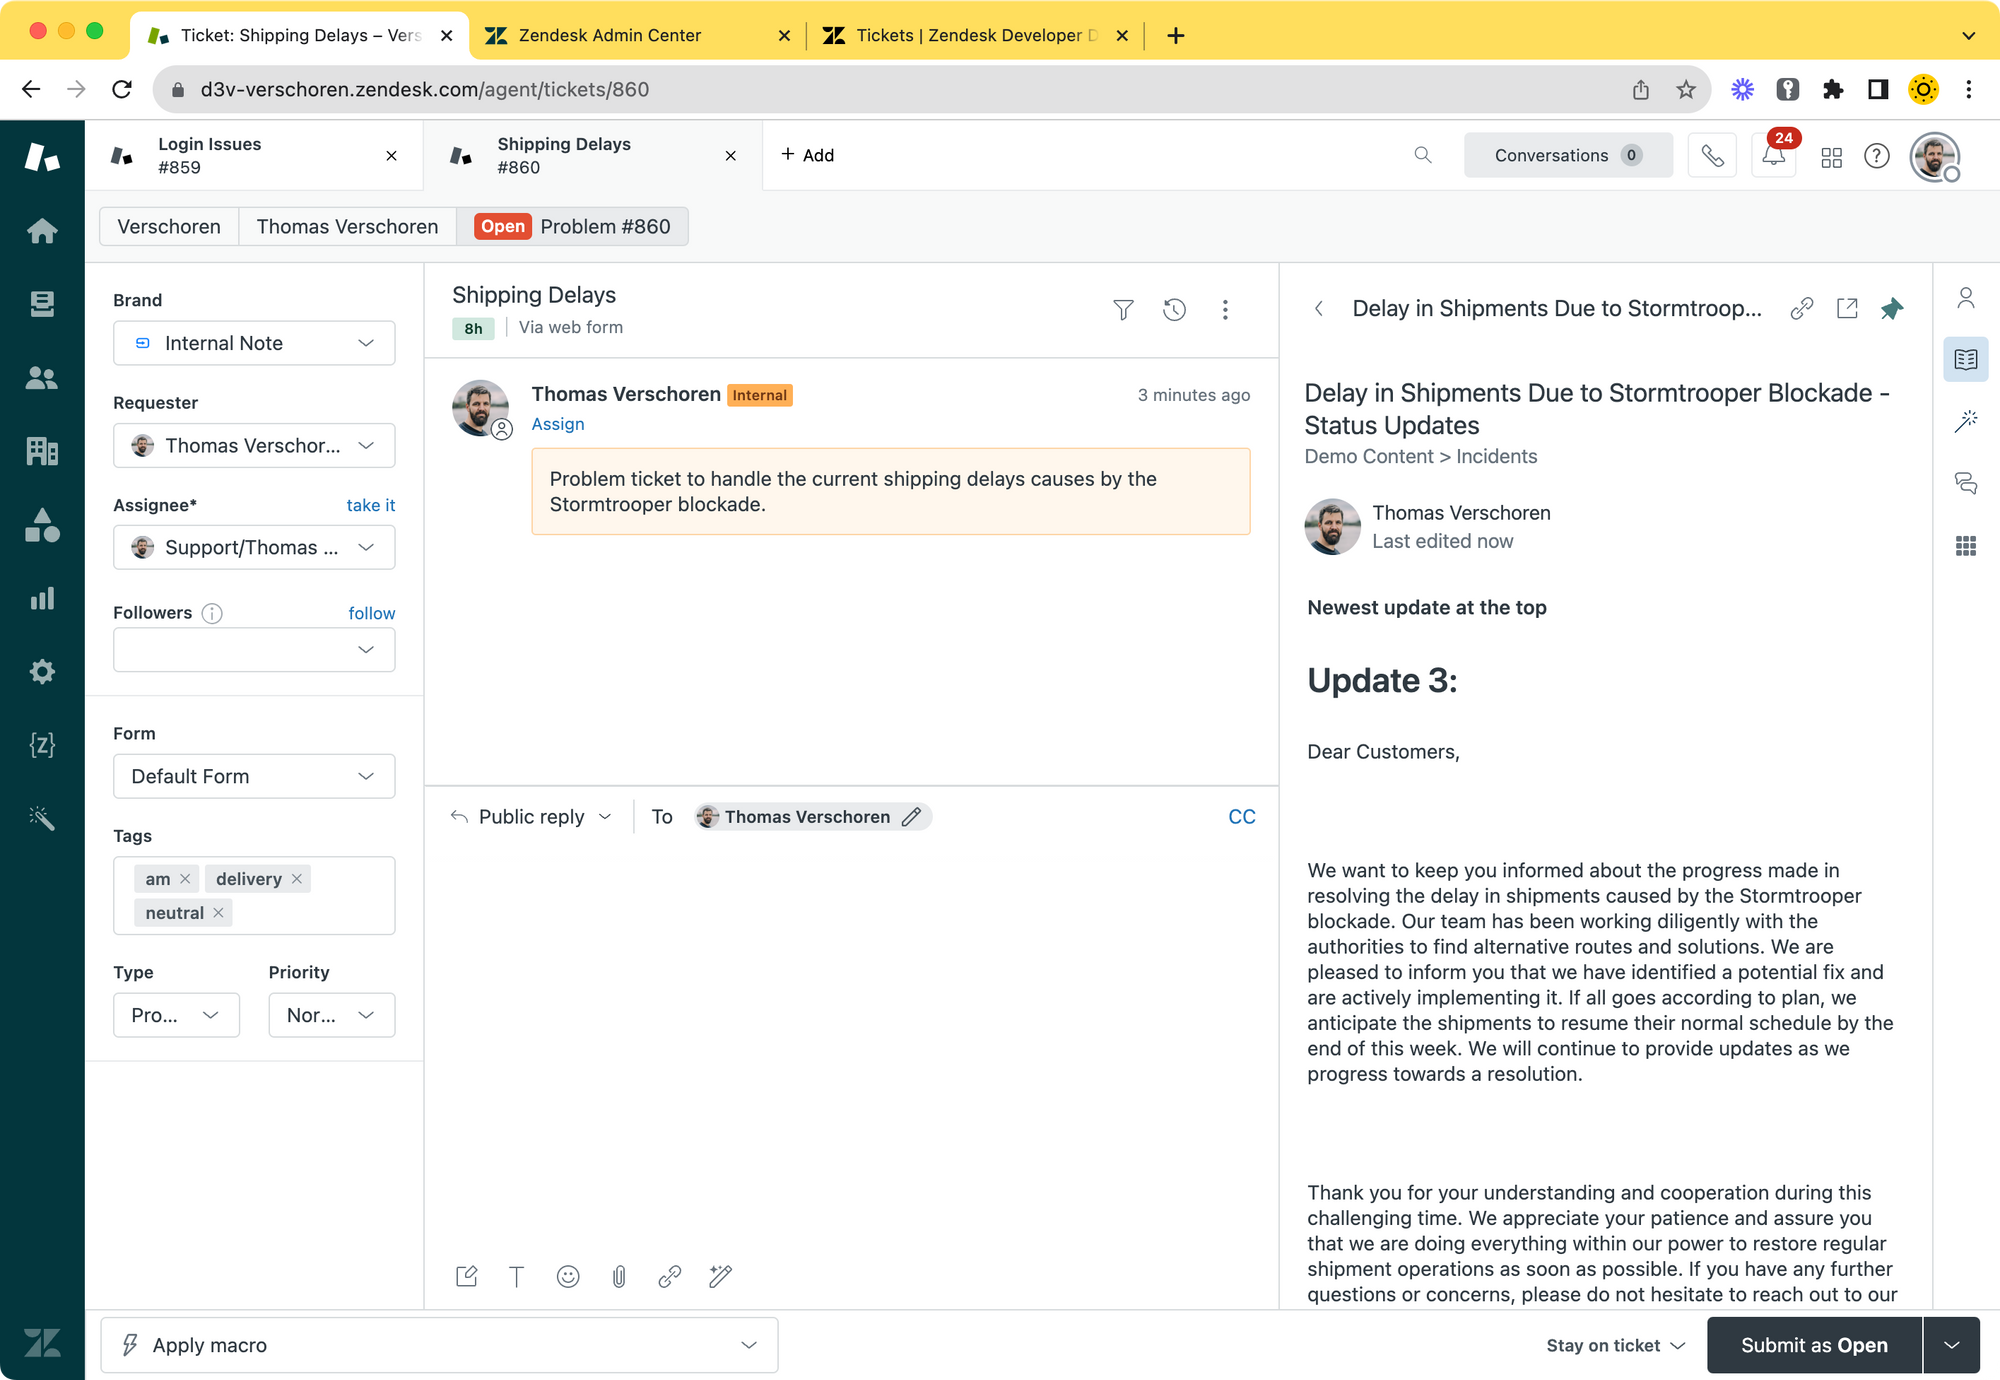
To test and validate this flow it's easiest if you create a problem ticket in Zendesk. While doing so, it's the perfect moment to also test out the new pinned articles feature that will hardline related articles to a specific ticket so they always appear in the knowledge panel.
Note down the id of your problem ticket.
The Custom Field
Create a dropdown field in Zendesk. Make sure end-users can edit the field, and create an initial set of dropdown options.
Set the tag of the Field value to the id of the problem ticket you created above.
To make this field usable in other scenario's too, it's best to add an Other option, or predefine a set list of issues you see a lot, so this field works for both one-off issues and real problem scenarios.
Add the ticket to your Ticket Form and note down it's id

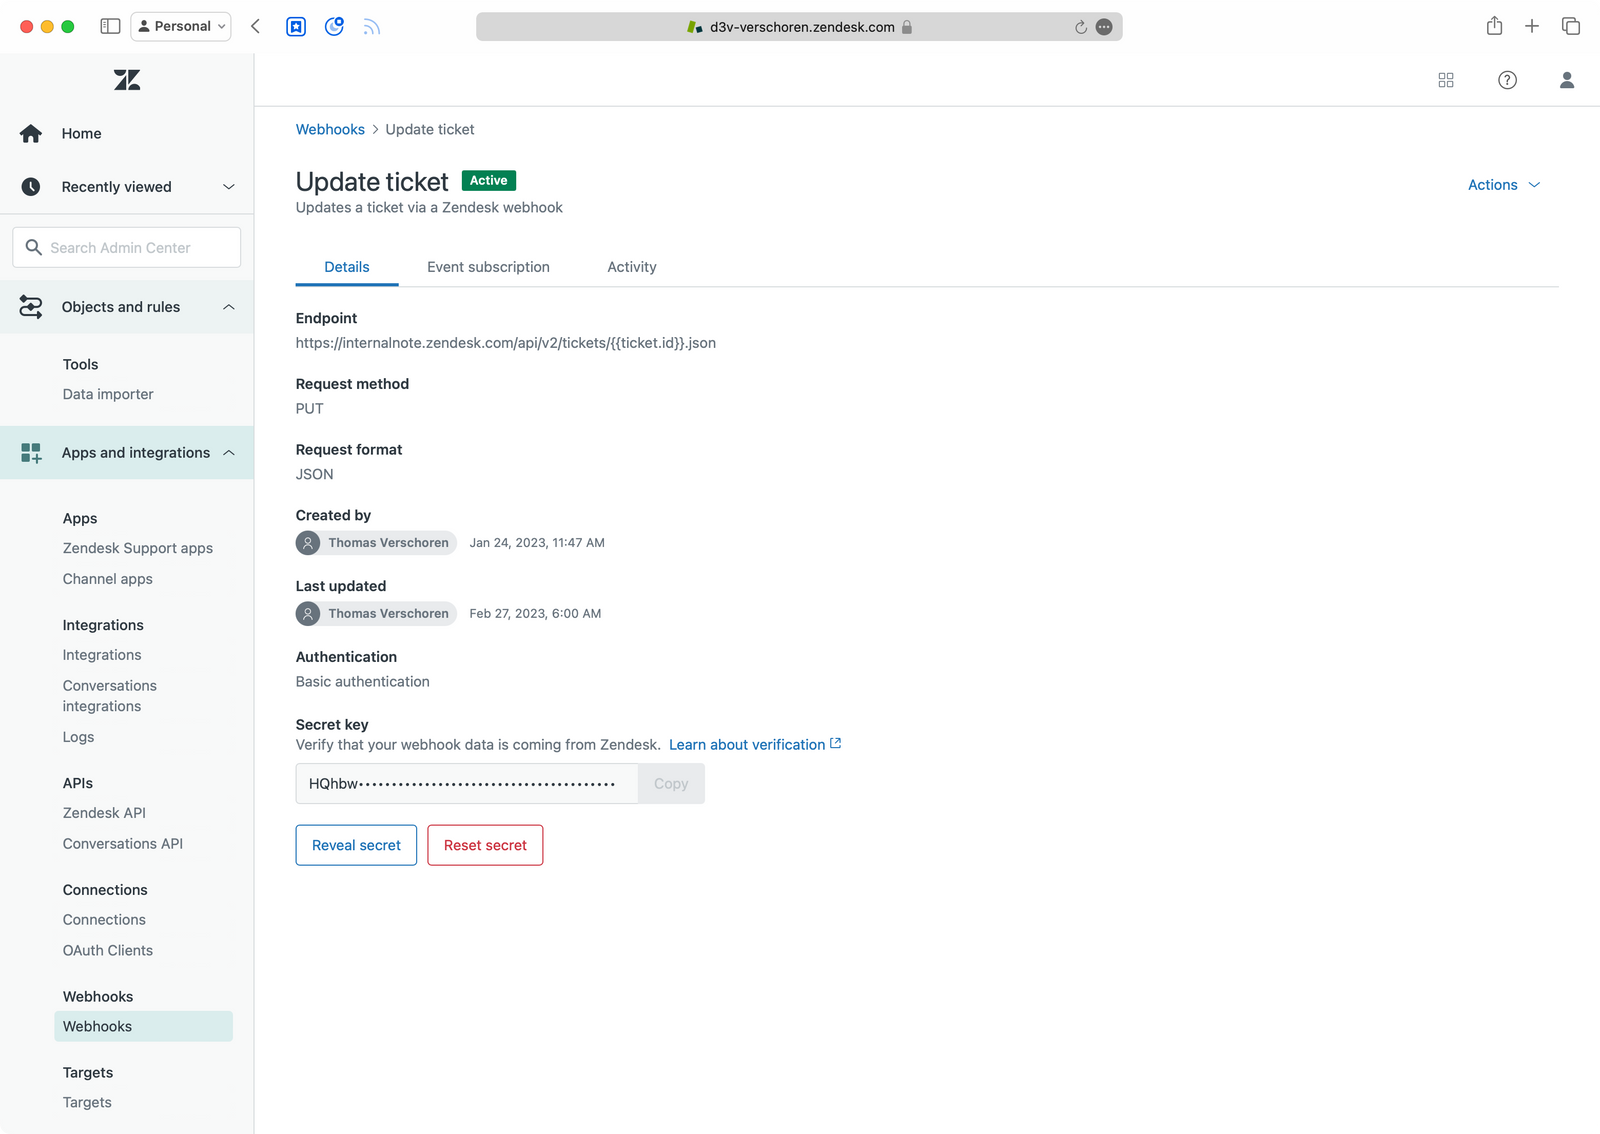
A webhook
If you've already build an update ticket webhook you can re-use that one.
 Thomas Verschoren
- Name: Update Ticket
- Endpoint:
https://subdomain.zendesk.com/api/v2/tickets/{{ticket.id}}.json - Request Method: PUT
- Request Format: JSON
- Authentication: Basic Authentication
- Username:
[email protected]/token - Password: a Zendesk API token
- Username:
The trigger
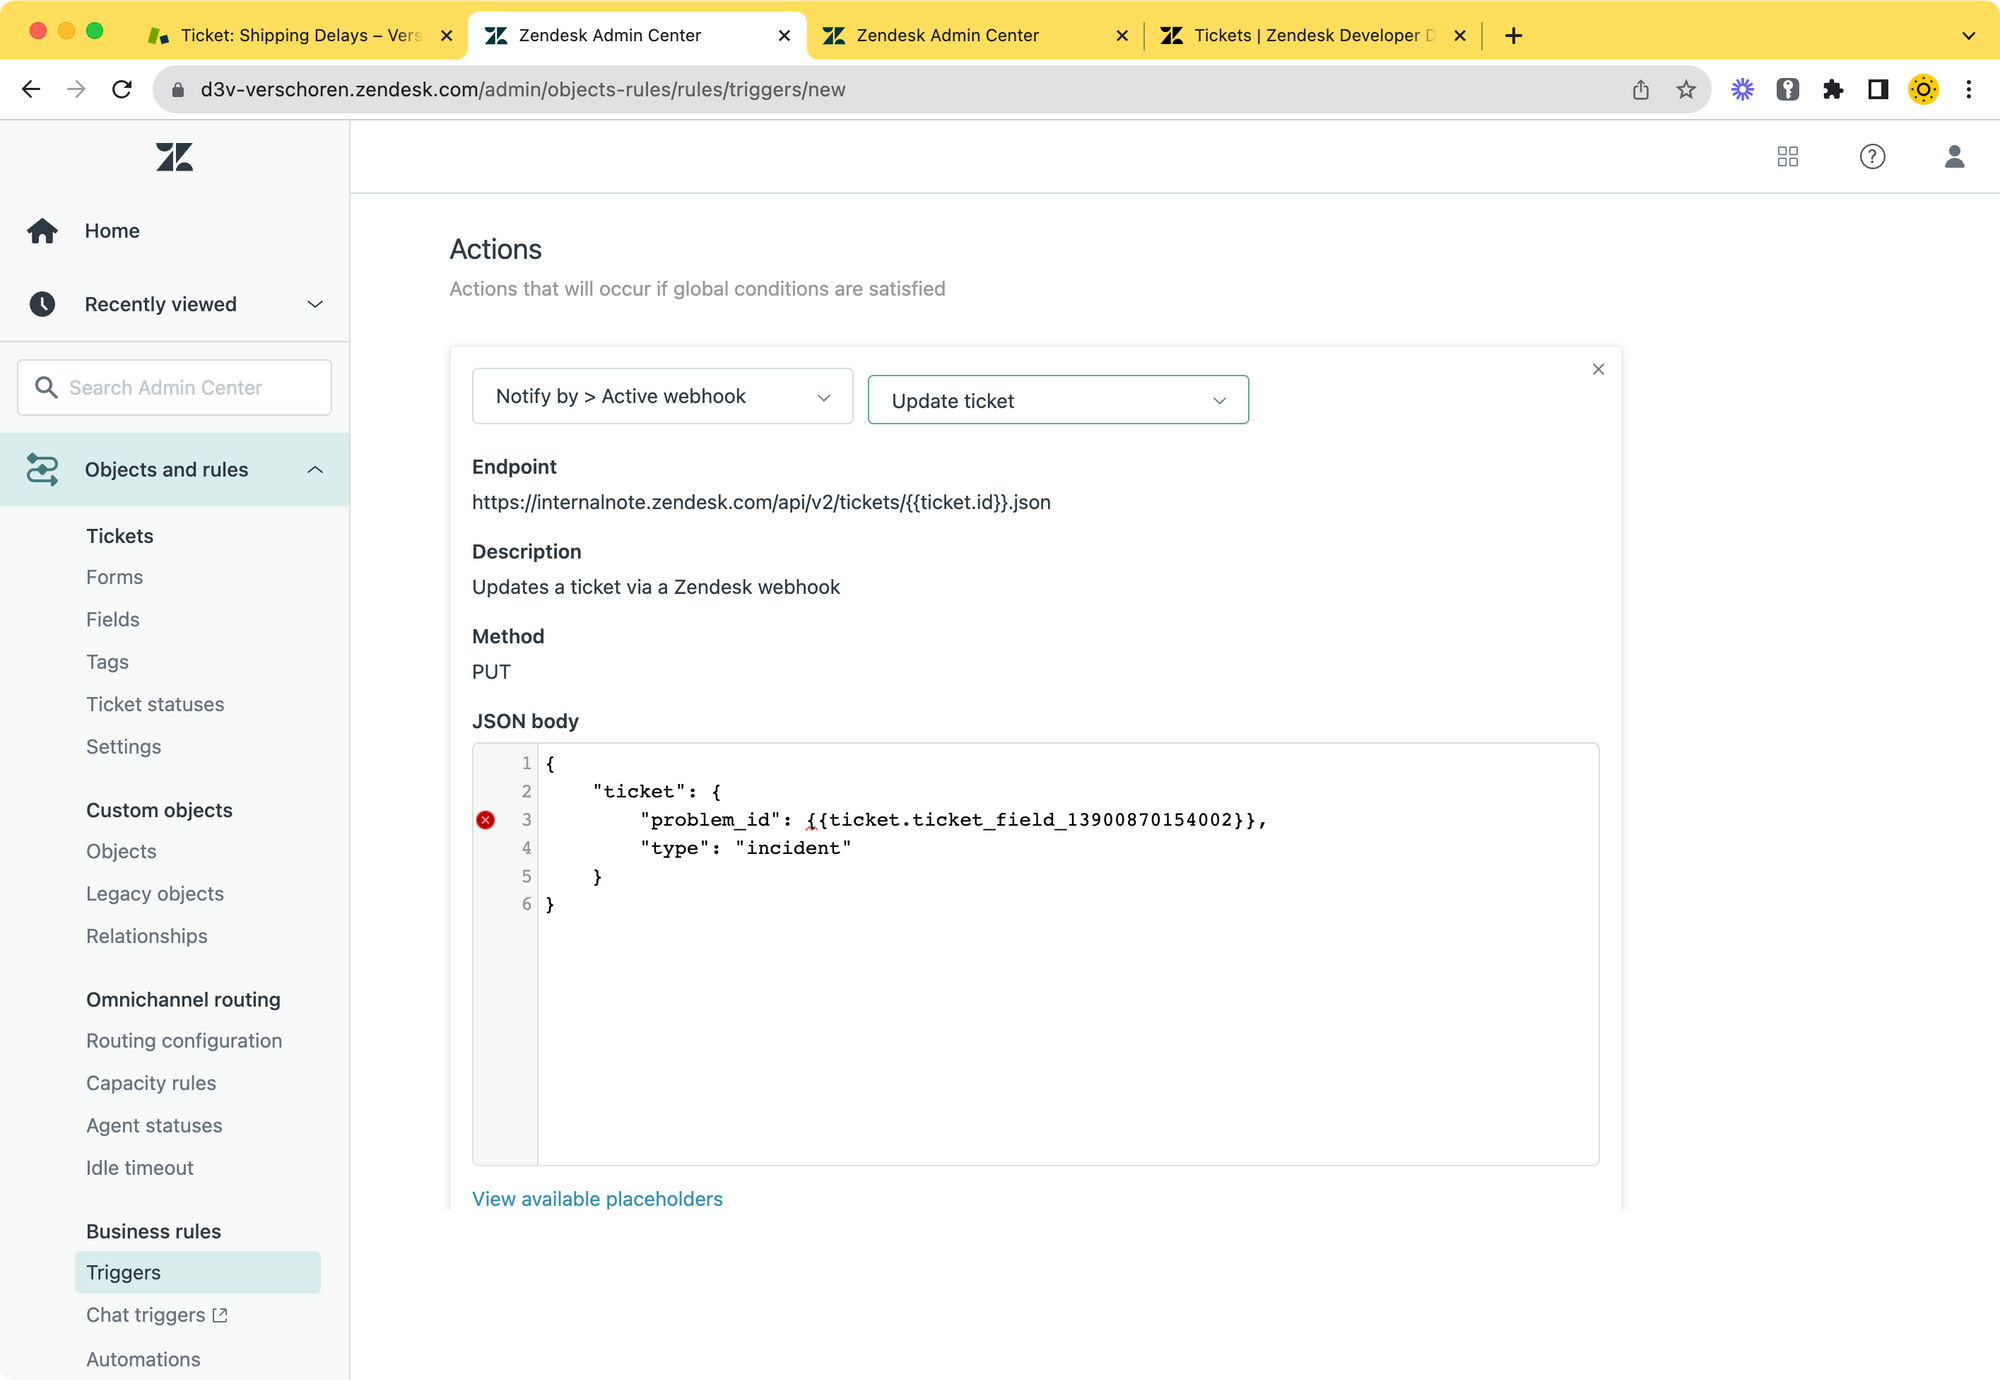
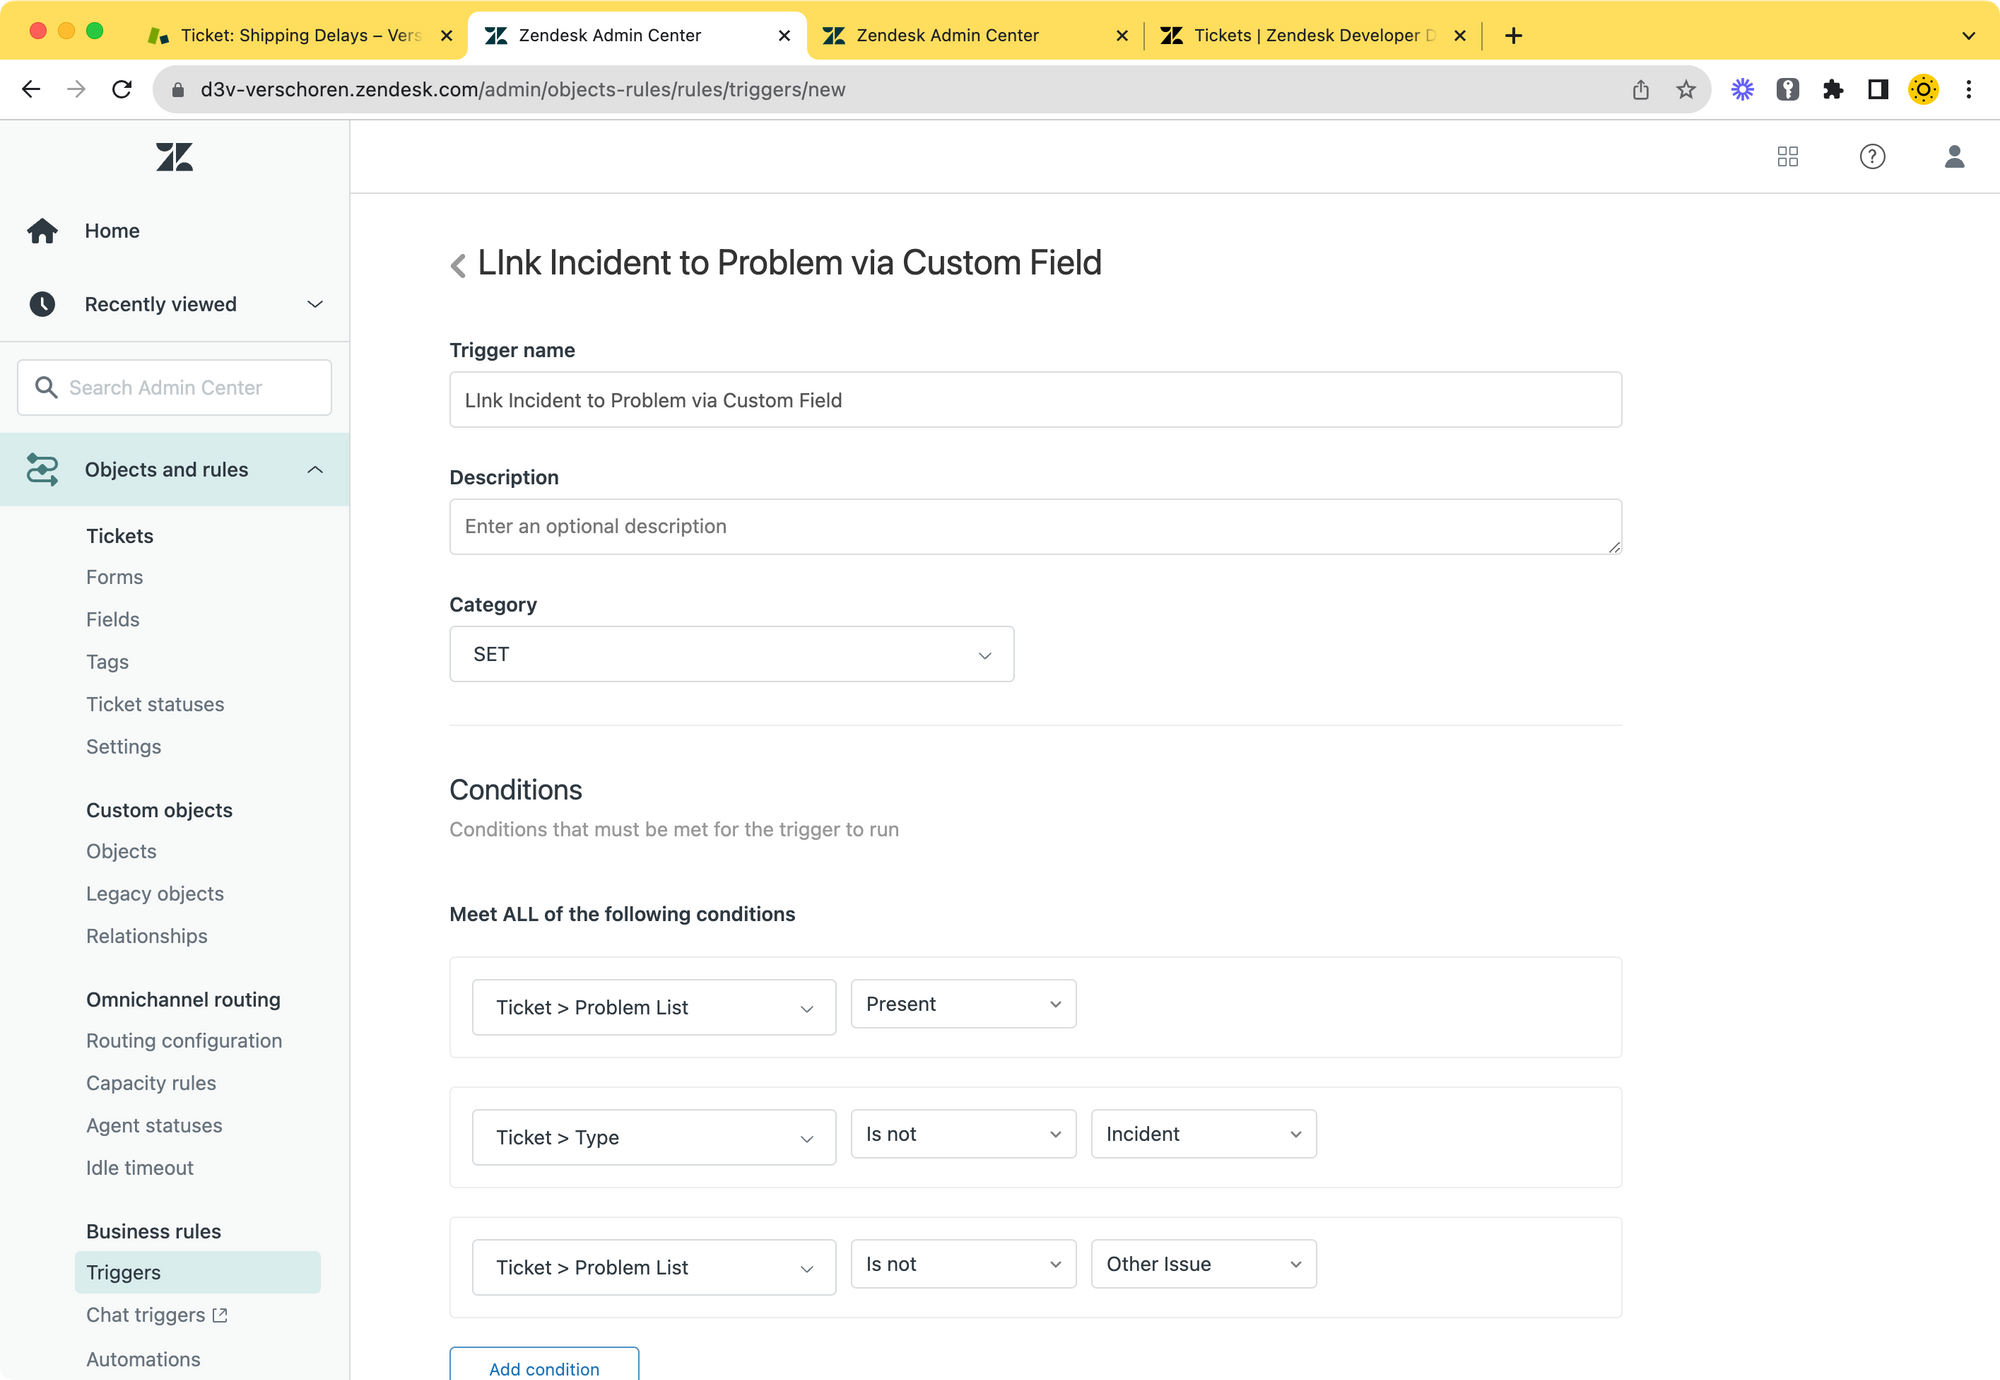
This trigger is the core of the entire process.
Create a new trigger with the following setup:
- Meet ALL of the following conditions:
- Ticket > type is not incident (this make sure the trigger only runs once)
- Ticket > problem list is present
- Ticket > problem list is not other (we only want to update tickets that are actual problems)
- Actions
- Notify By > Active Webhook > Update Ticket
and set the following payload (update the IDs to match your custom field)
- Notify By > Active Webhook > Update Ticket
{
	"ticket": {
		"problem_id": {{ticket.ticket_field_13900870154002}},
		"type": "incident"
	}
}
Let's put this in practice.
With the above in place we can update the 10 steps at the start of the article as follows:
- You notice a lot of tickets about the same issue
- An admin or team lead creates a Problem Ticket and adds its ID to the Problem list custom field
- You create a Help Center article that explains the issue in order to start deflecting tickets
- You update the article with the latest information
- You resolve the issue
- You solve all tickets by sending out a final reply
- You update the article with a post mortem.
As you see we remove the need for manually updating and linking incidents, greatly speeding up the process.
To conclude...
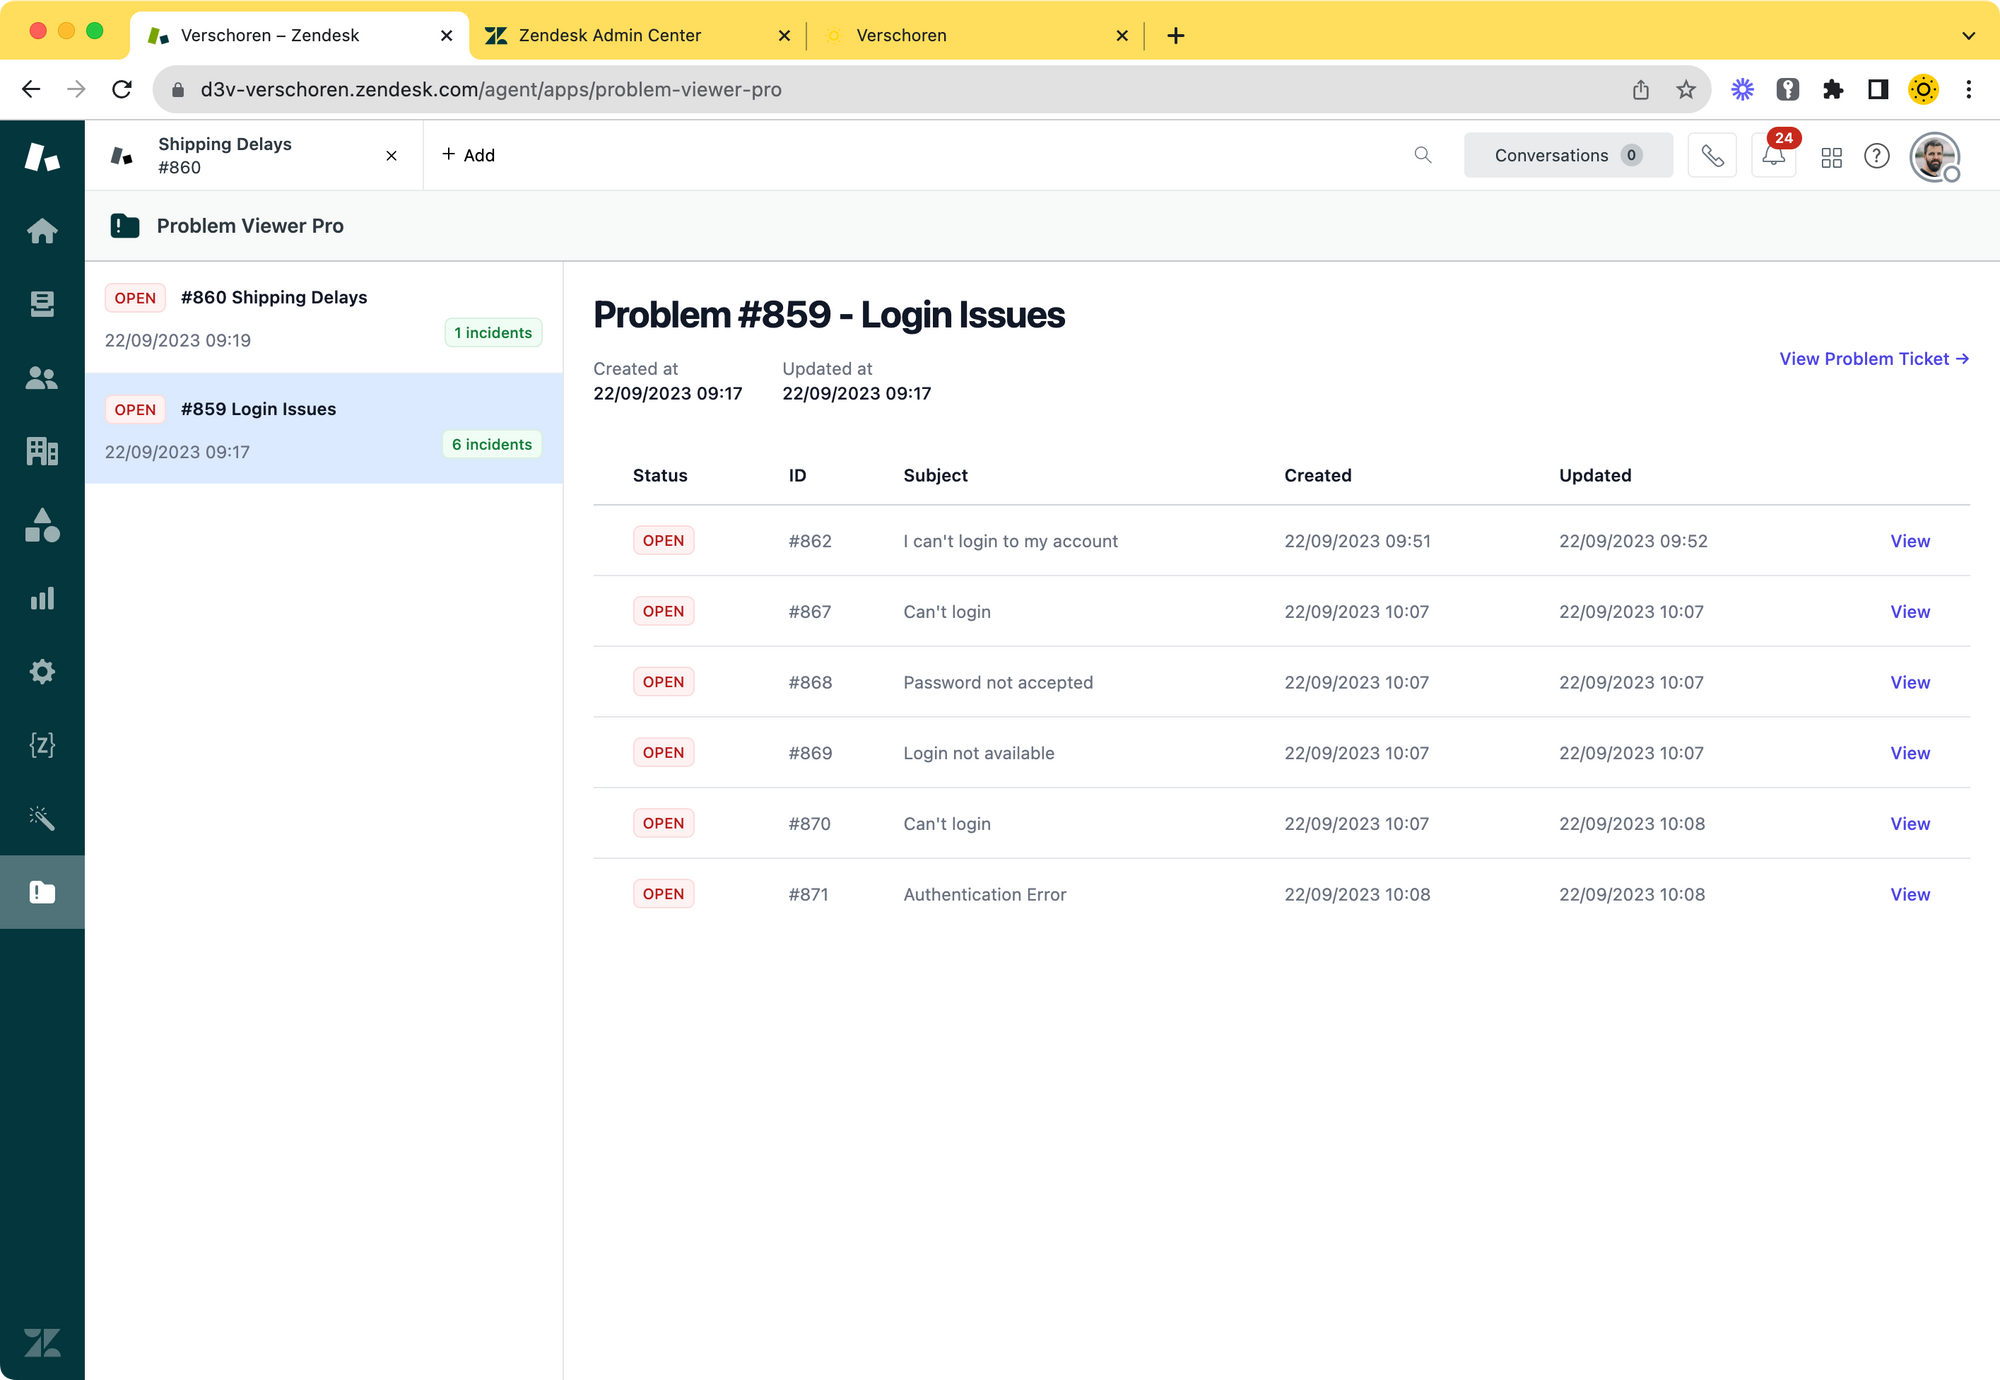
Problem Viewer Pro
Did you know I build an app to give more insights in Problems together with my team at Premium Plus?