
New authentication metadata for AI Agents Advanced
Unlock memory-rich personalization with Zendesk's new Authentication Metadata. We explore how AI Agents can now natively verify users and access Support IDs without workarounds. Learn to use the new authenticated and zendeskId properties for secure, context-aware automation.

On this page
One of the key trends Zendesk identified for 2026 is Memory-rich personalisation. This concept ensures that AI Agents don't just provide concrete answers to a customer's question, but also take the full customer context into account: who they are, what they did, and potentially even predict what they might want to do next.
At the core of a personalised response is the capability to retrieve that context and transform a customer question into intents. But before we can do that, we need to know who we're talking to. We need to know who the customer is, and we need to be sure it's actually them, not someone pretending.
Both identification and authentication play a key role in personalised automation, and Zendesk's conversational platform fully supports both. Within any AI Agent conversation, we can ask for a user's name, email, and other data to use in our procedures. But we can go a step further by leveraging authentication tokens in the Zendesk Web Widget or Mobile SDK. These signed tokens contain a customer's name, email, and external ID, allowing us to be 100% sure we're talking to our customer, and not Ethan Hunt wearing a mask.
If you haven't leveraged authentication for your AI Agents yet, the two articles below serve as a good primer.
The previous limitation
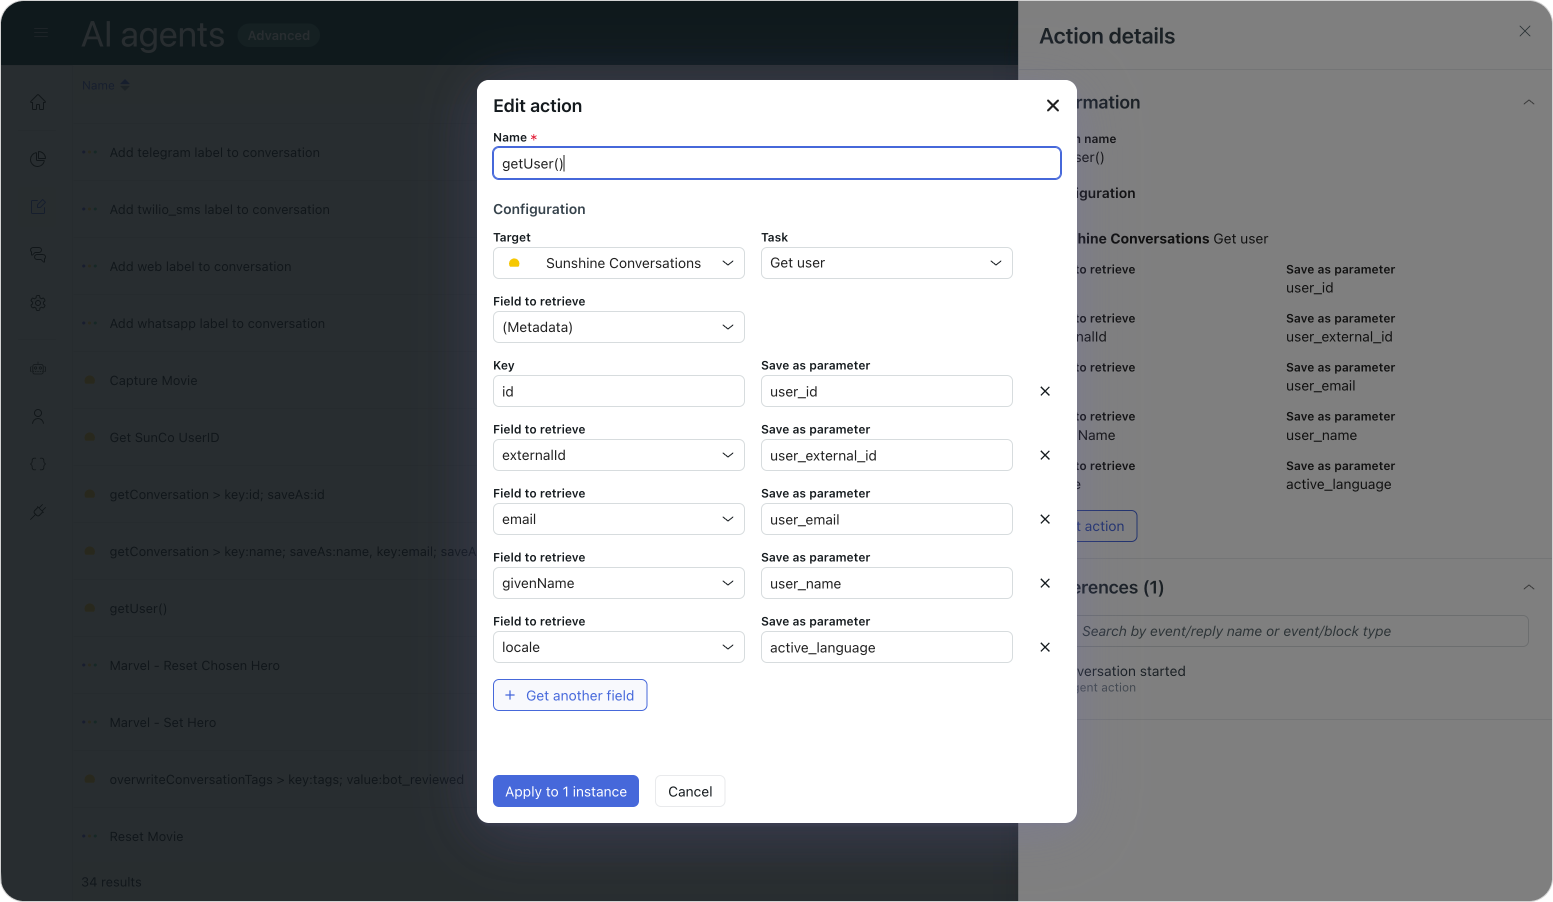
While we've supported authentication for a while, the way it integrated with AI Agents Advanced was always a bit half-baked. Previously, within dialogue flows, you could use actions to retrieve a user object and look for name, externalId, or email properties in the metadata.
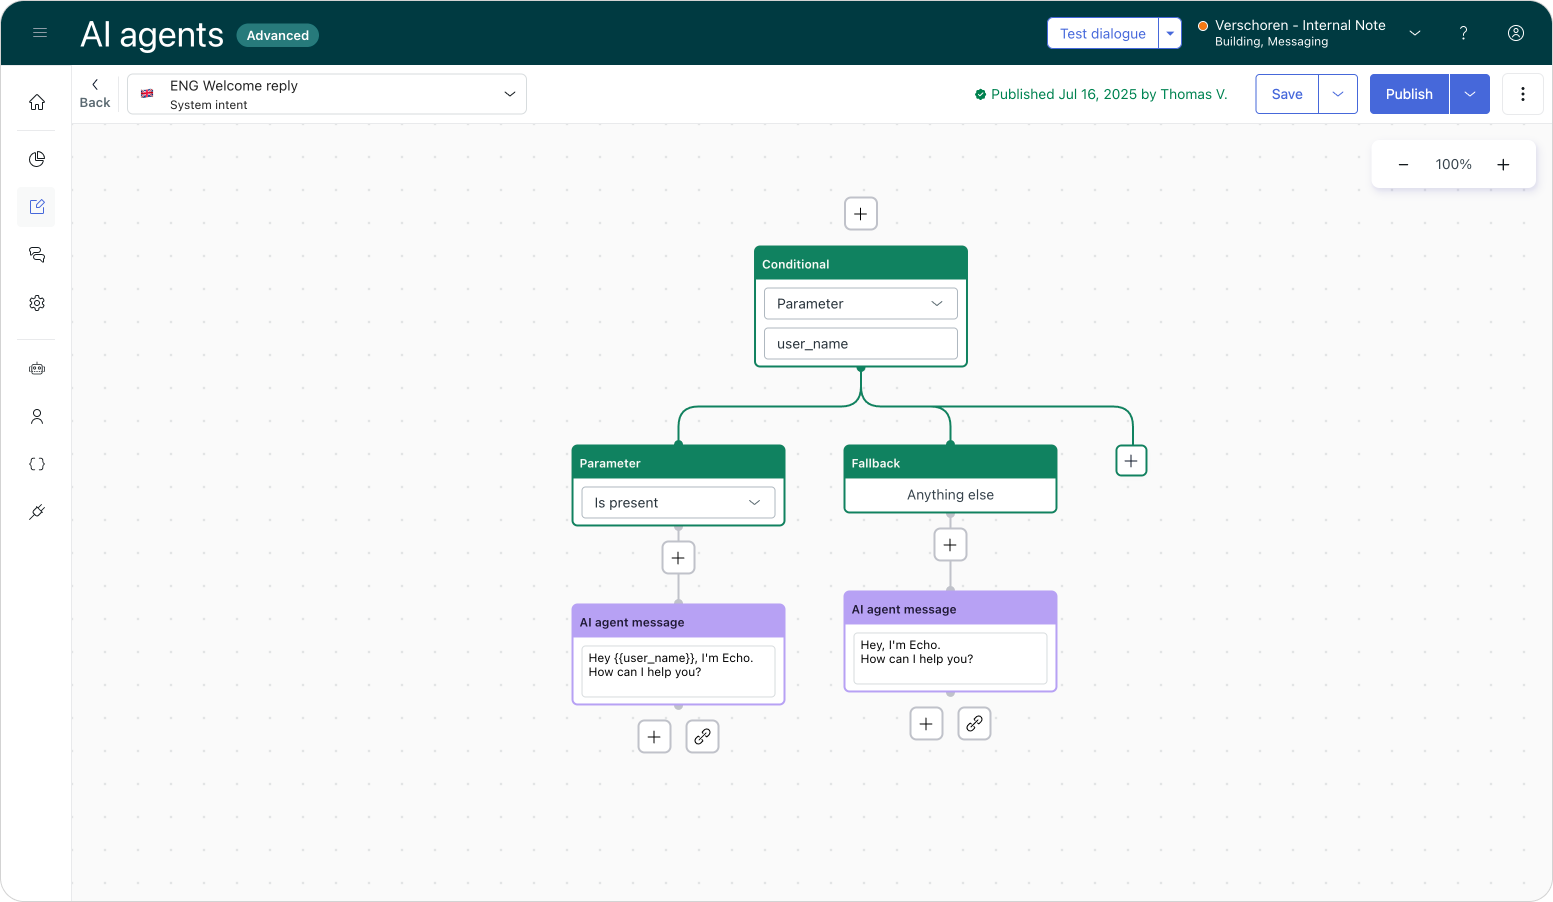
If we retrieved these fields at the start of a conversation, we can check if the name field has a value. If it does, we can leverage that in our welcome flow.
However, we couldn't be 100% sure the user was actually authenticated. We used the existence of a name or email as a proxy for verification. If we didn't ask the customer for their details within the flow, the logic was that the only way those values could exist was via an authentication token. So, checking if a name was present was a valid, albeit imperfect, way of assuming a user was signed in.
Authentication metadata
This is where the new Authentication Metadata comes into play. Any authenticated messaging user has additional metadata stored within their profile that wasn't automatically exposed to AI Agents Advanced.
Previously, you could technically retrieve it via a [GET] /sc/v2/apps/{appId}/users/{userIdOrExternalId} API call, but that was a workaround and far from ideal.
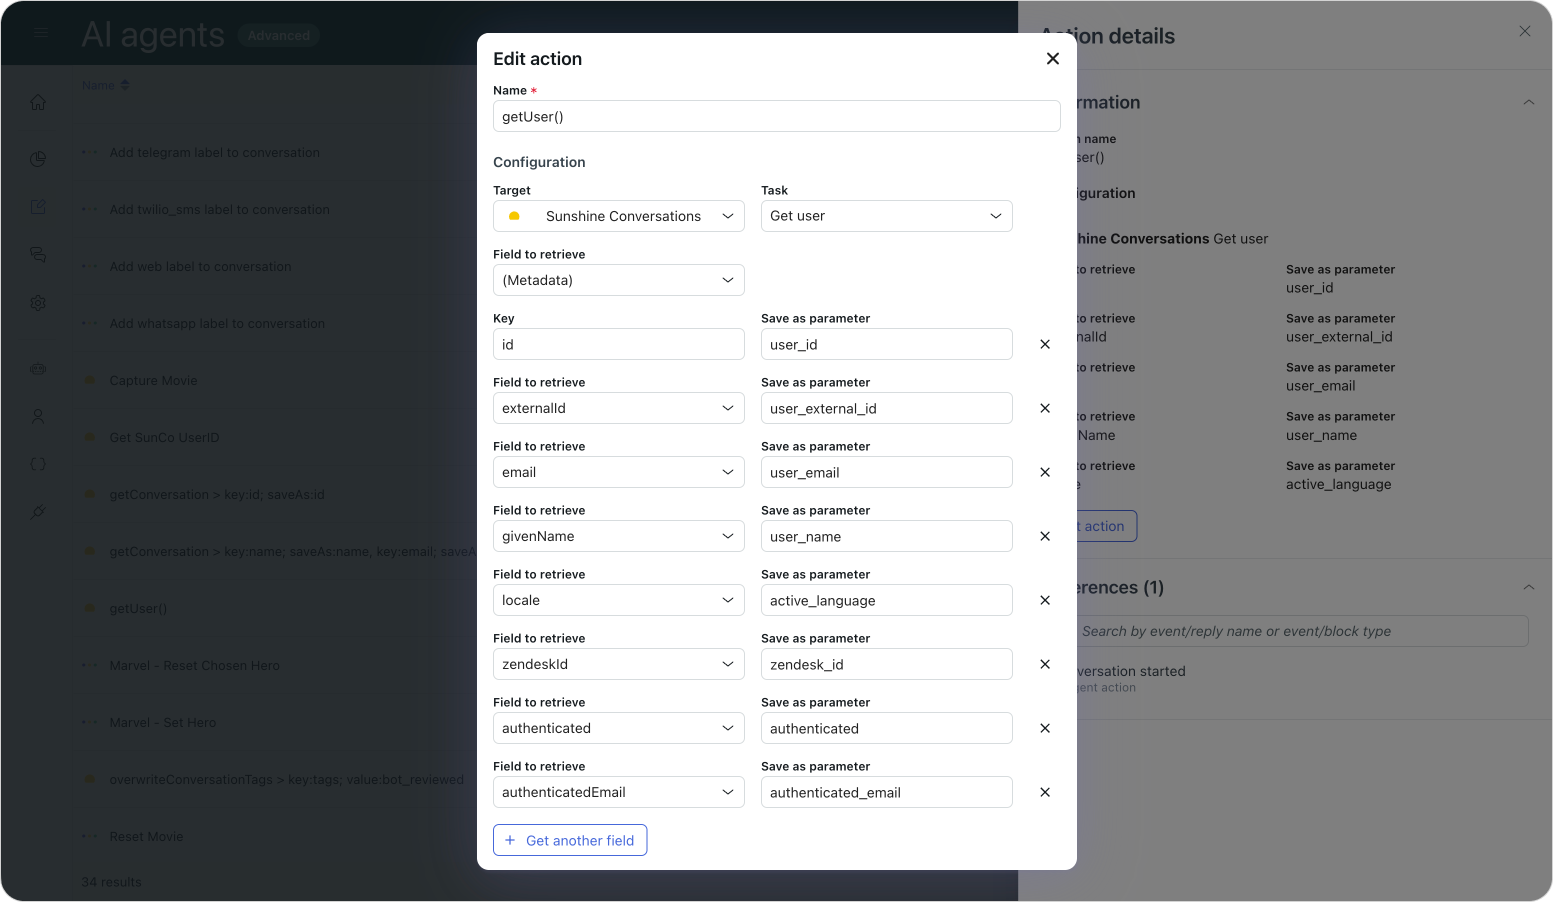
In a recent update, AI Agents Advanced gained native access to three additional properties on top of the existing id, name, externalId, and email elements:
authenticated- a boolean property which mirrors the users authentication statuszendeskId- Identifies the Messaging user's associated Support user. (If available)authenticatedEmail- Contains a user's verified email.
Since this authenticated value cannot be updated via the API or user input, we can finally be certain that the user we're talking to is properly authenticated.
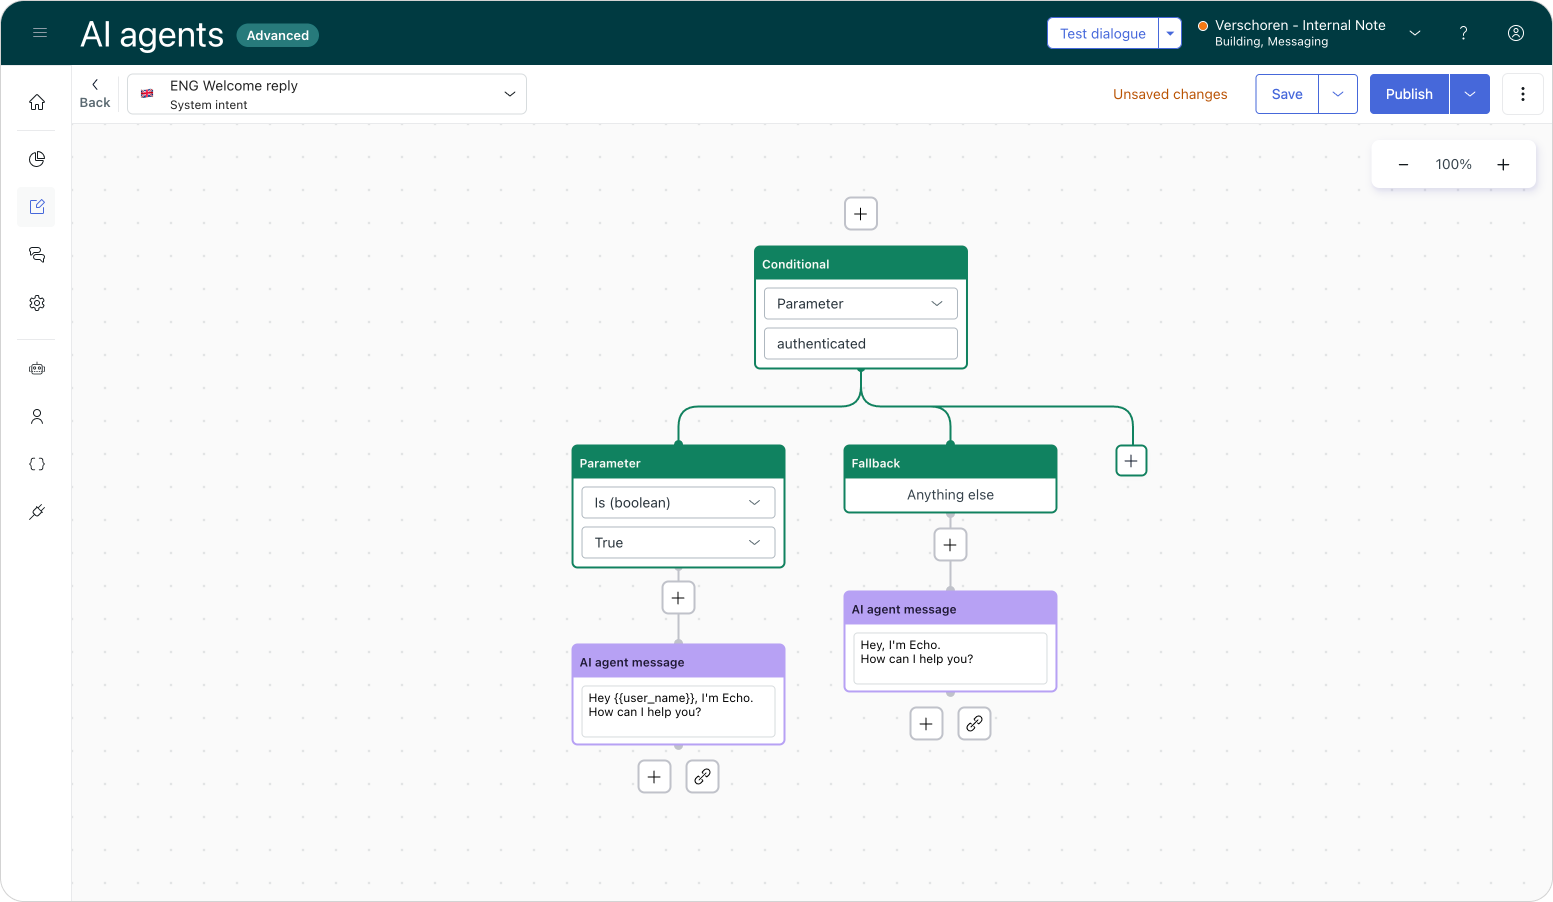
We'll go over the technical aspects of these new values later, but in essence: by having a dedicated authenticated property available, we can update our welcome reply with a real authentication check and act accordingly.
Understanding user objects
Zendesk has two different sets of user profiles, and understanding the difference is vital. On one side, we have the Main User Object that lives inside core Zendesk Support. This is the user you interact with on tickets or when they log into the Help Center.
{
  "user": {
      "id": 123456789,
     "email": "[email protected]",
     "name": "James Bond",
     "external_id": "007",
     "verified": true
  }
That user can have multiple identities, which are the identifiers for the channels a user contacts you from (Email, Phone, WhatsApp, etc.). Crucially for us, this includes Messaging Identities:
{
    "identities": [
        {
            "type": "email",
            "value": "[email protected]",
            "verified": true,
            "verification_method": "full"
        },
        {
            "type": "messaging",
            "value": "692514f59960eb9cbbdd0e32",
            "verified": true,
            "verification_method": "embed"
        }
    ]
}
When a user contacts you via the Web Widget, it associates a messaging identity with that profile. Depending on how they authenticated, this identity will have a specific value for the verified and verified_method properties.
That messaging identity references the second user object: the Sunshine Conversation User. This object contains all the metadata associated with the messaging conversation, and it is this profile's data that our AI Agent uses within the conversation.
{
    "user": {
        "zendeskId": "123456789",
        "identities": [
            {
                "type": "email",
                "value": "[email protected]",
                "verification": "sso"
            }
        ],
        "id": "692514f59960eb9cbbdd0e32",
        "profile": {
            "surname": "Bond",
            "givenName": "James",
            "email": "[email protected]",
            "locale": "en-US"
        },
        "metadata": {
            "conversationId": "690ddff2bd6e45c38c772704"
        },
        "authenticated": true
    }
}
Attentive readers might have noticed two different email properties in the mix: email and authenticatedEmail.
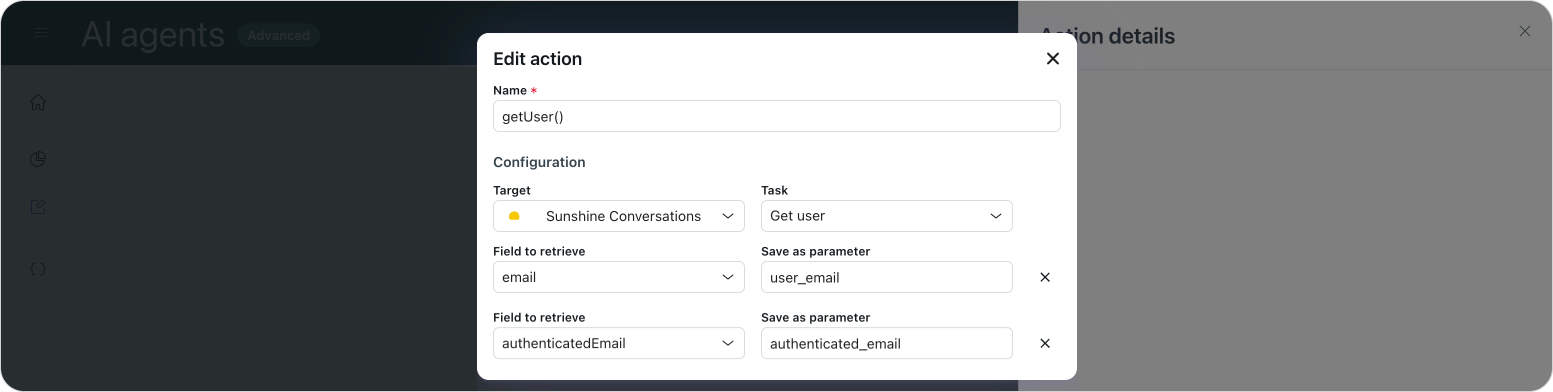
What's actually happening in the background is that authenticatedEmail is a custom value exposed by AI Agents. It is a combination of authentication = true + email provided by JWT. It should only be used to retrieve the user's authenticated email address.
The existing email property is used for collecting unverified addresses from users who have not logged in, or when you ask for an email during the conversation. That value is fine for identification, but it should never be used for security checks
Authentication in Action
Now that we know what's possible with the new authenticated property, let's look at some real-life implementations.
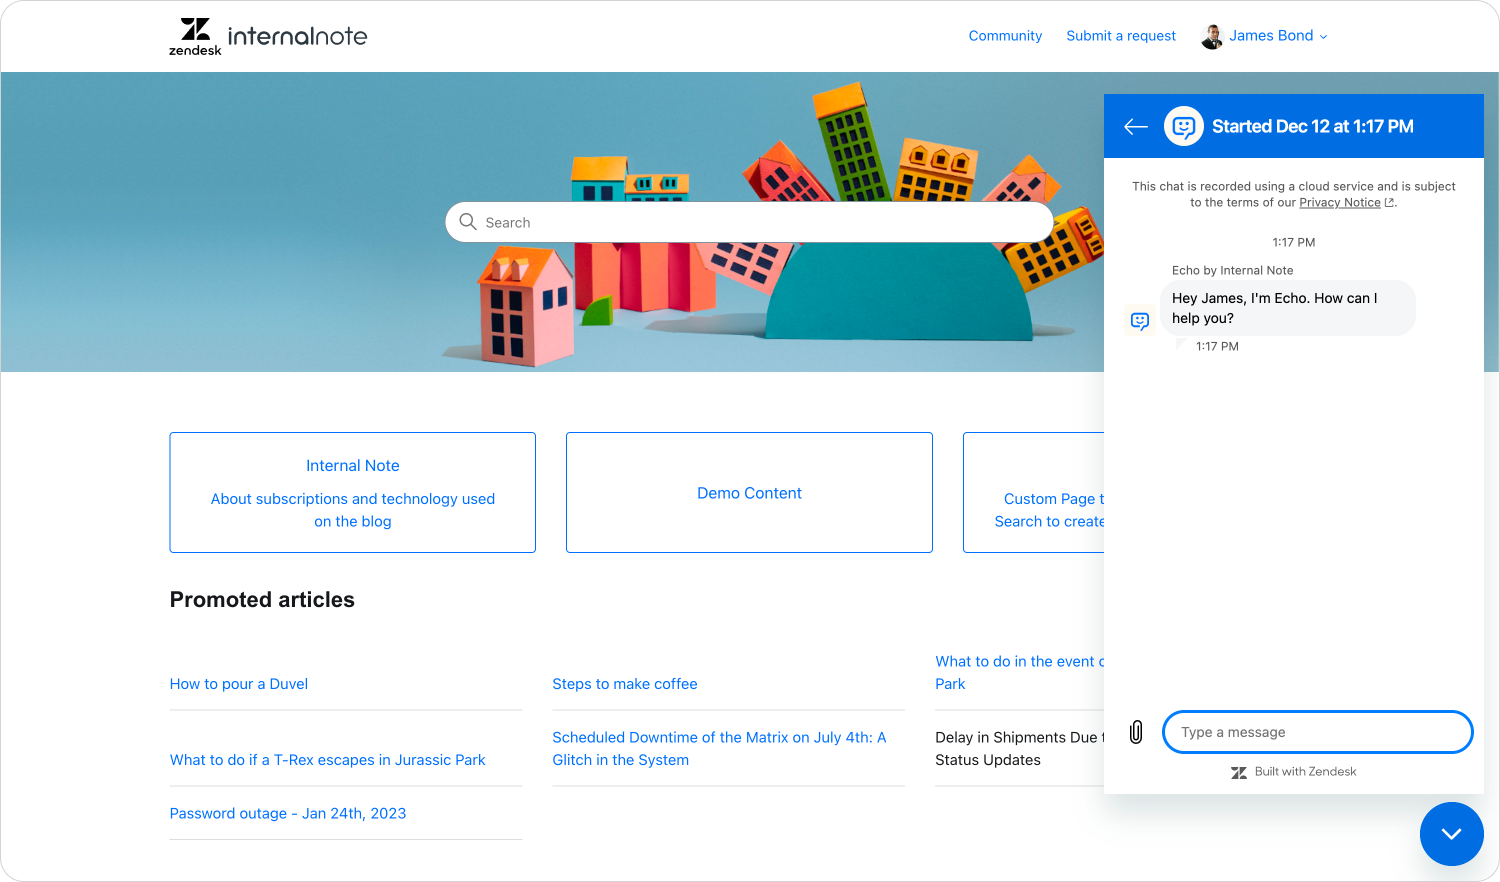
Authentication via the Help Center
In this first demo, we have a user logged into a Help Center. We make use of the new automatic Help Center Messaging authentication to pass the logged-in session to our Web Widget. Using the modified welcome flow we showed earlier, the widget picks up the current user's authentication state and greets them by name.
If we dive into our browser's network inspector, we see the following payload:
{
    "user": {
        "zendeskId": "19777656776082",
        "identities": [
            {
                "type": "email",
                "value": "[email protected]",
                "verification": "sso"
            }
        ],
        "id": "667c6c4f477fbd4e83d5b410",
        "profile": {
            "surname": "Bond",
            "givenName": "user_name",
            "email": "user_email",
            "locale": "en-GB",
            "localeOrigin": "apiRequest"
        },
        "metadata": {
            "conversationId": "690ddff2bd6e45c38c772704"
        },
        "authenticated": true
    }
}
What's interesting here is that because we logged in via the Help Center, we get the zendeskId as part of the payload. This means that (A) this is an existing Zendesk user, and (B) we can use this ID in actions and API calls within our AI Agent's procedures immediately. For example, fetching recent tickets to personalize the welcome message.
Authentication via a Messaging JWT
In this second example, we'll see how the metadata behaves when we implement authentication on an external webpage using a generic JWT service. (You can see a working example on my demo site leveraging the new embedded widget mode).
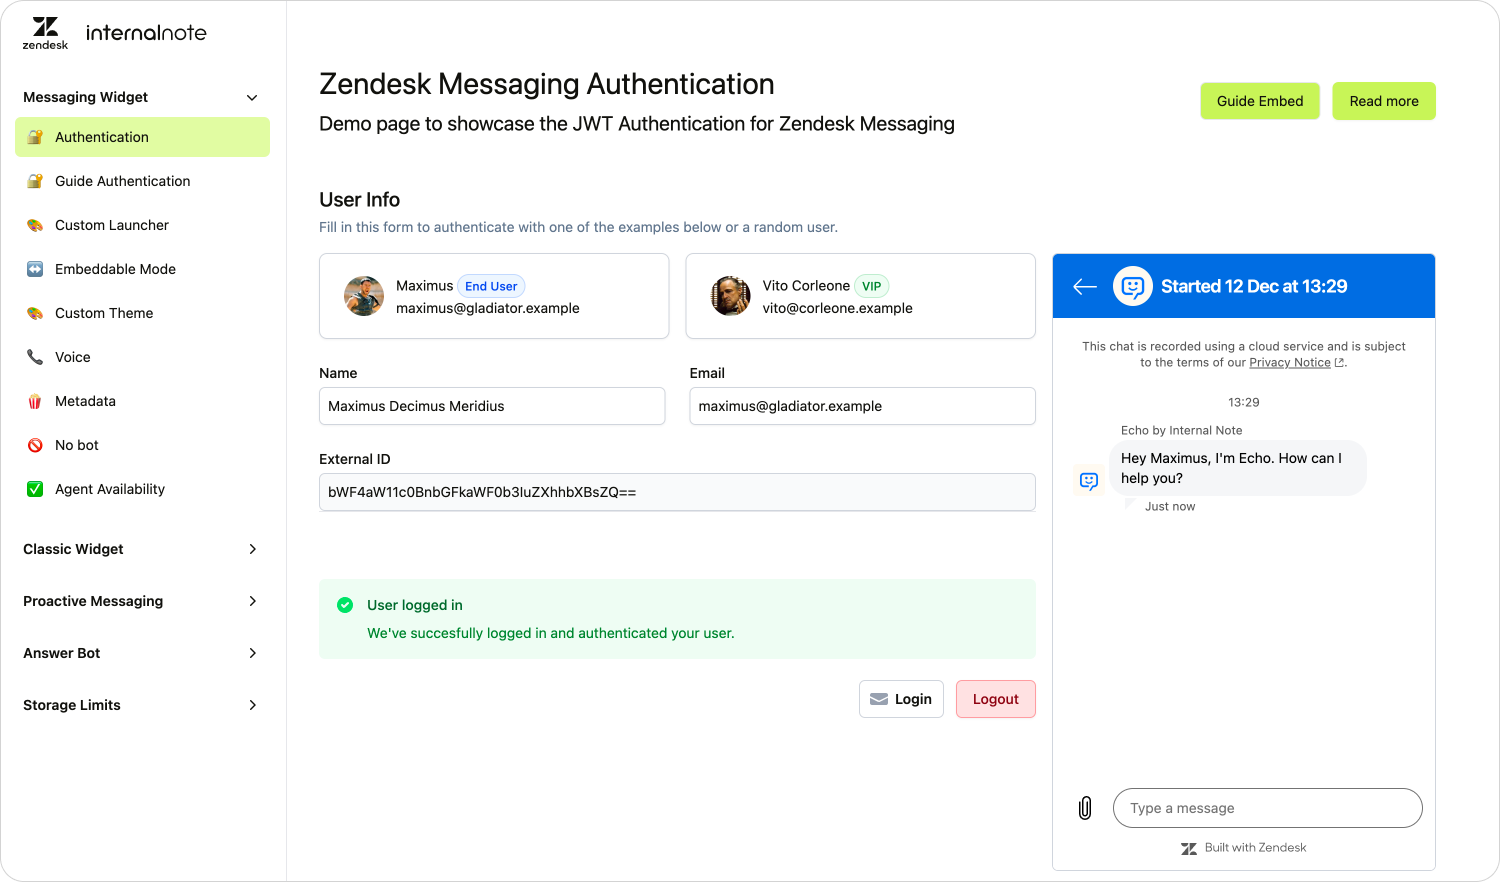
If we explore the payload here, we can see the authenticated value is also true. However, since we used an external JWT service and not the integrated Help Center, we do not get a zendeskId automatically.
{
    "user": {
        "identities": [
            {
                "type": "email",
                "value": "[email protected]",
                "verification": "embed"
            }
        ],
        "id": "65d86b693da63cc78aa4be52",
        "externalId": "bWF4aW11c0BnbGFkaWF0b3IuZXhhbXBsZQ==",
        "profile": {
            "surname": "Decimus Meridius",
            "givenName": "Maximus",
            "email": "[email protected]",
            "locale": "en-GB",
            "localeOrigin": "apiRequest"
        },
        "metadata": {
            "conversationId": "6931b94df9fa944db2b4ad33"
        },
        "authenticated": true
    }
}
A user authenticated via Messaging JWT
If you need the zendeskId for this user, you can retrieve it via an API action in your AI Agent setup. Simply call GET /api/v2/users/search?query=external_id:{externalId} to find the Zendesk user associated with that external ID, and store the result as the Support ID.
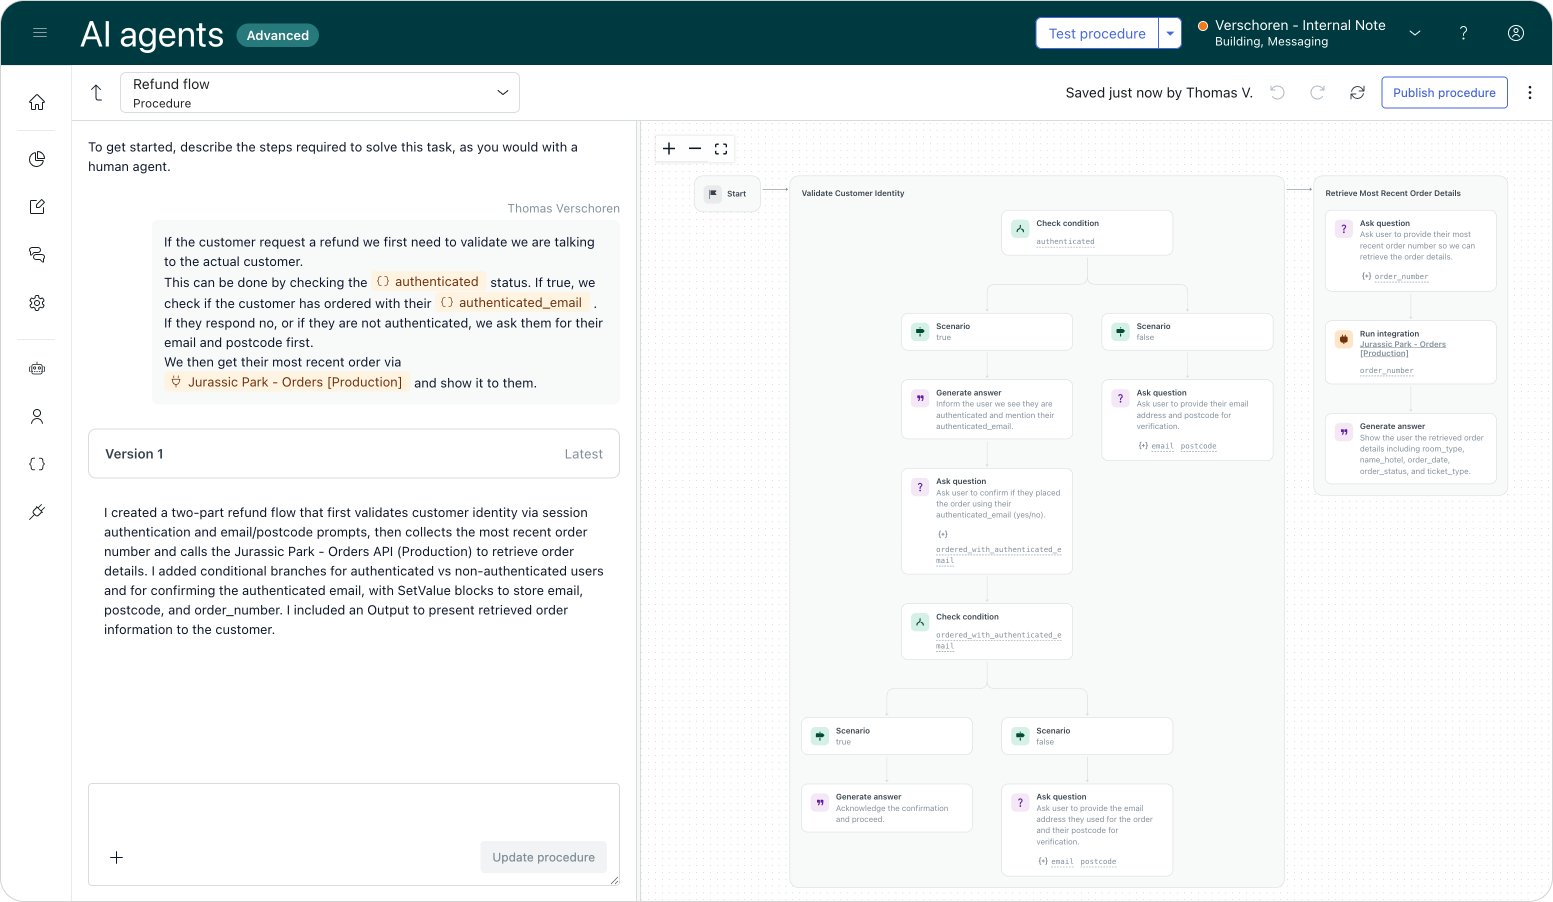
More advanced procedures
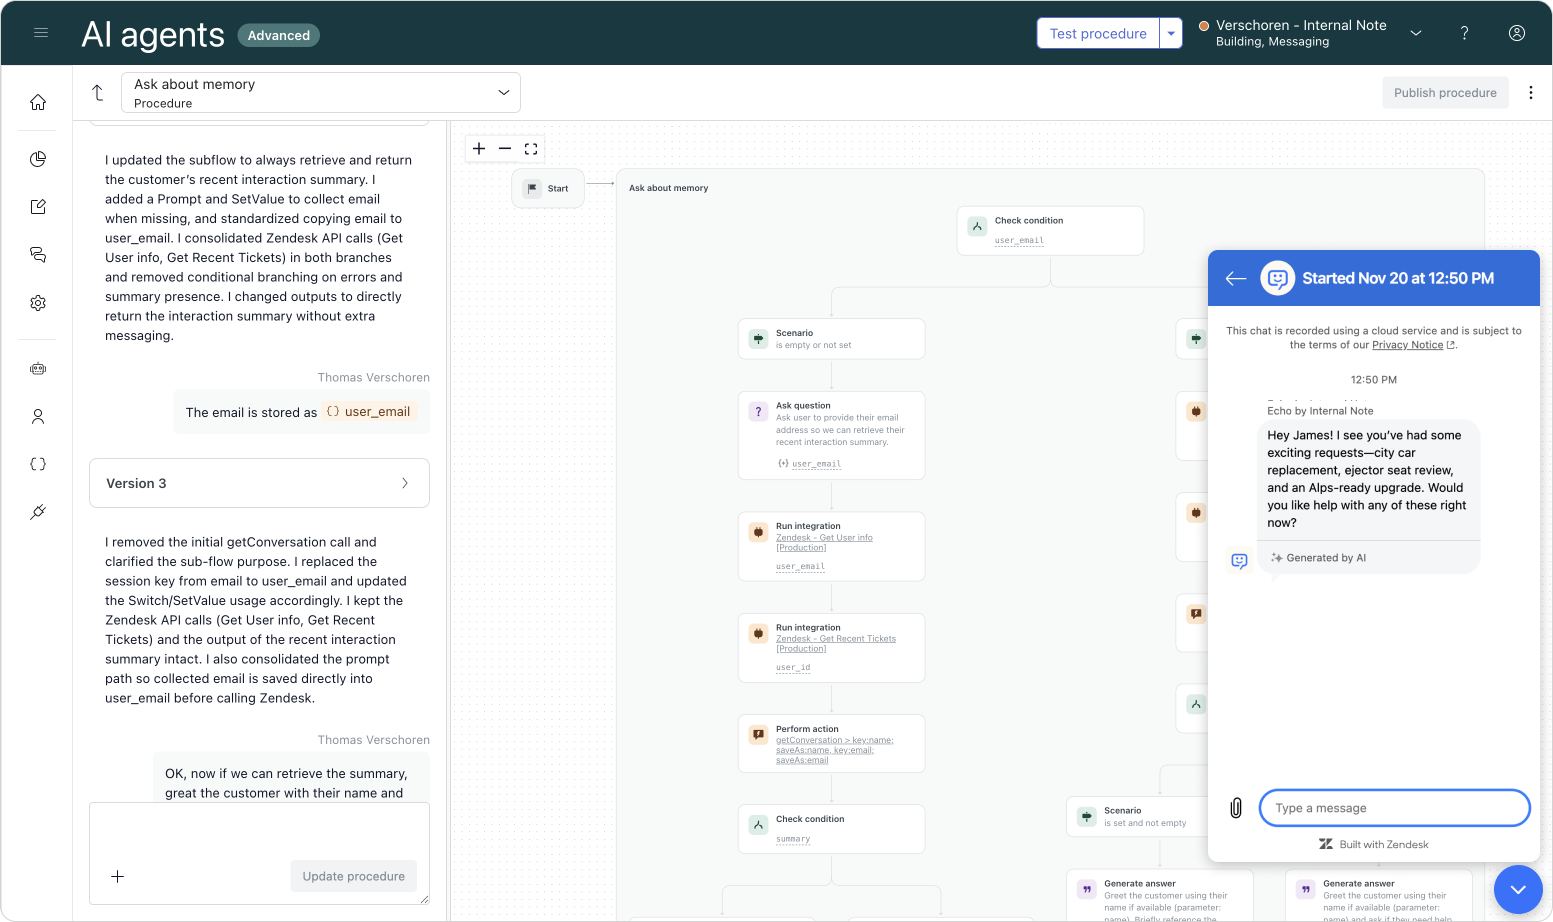
A final example refers back to our intro. Since we can now be 100% sure a user is authenticated, we can make flows that rely on verified user information much shorter.
In the example below, we instruct our AI Agent to check the authenticated status immediately.
- Authentication is true: We use the provided info to instantly fetch an order status.
- Authentication is false: We ask the customer for their email and postcode manually, perform a verification check, and then retrieve the order.
This allows verified users to skip the busywork, creating a seamless experience.
Conclusion
The way Zendesk links its Messaging platform (and users) to its Support platform (and tickets) is complicated. If you just use the standard features, these elements interconnect nicely and things "just work."
But once you want to do advanced things, like authentication, retrieving metadata, or passing data upon escalation, you quickly discover that under the hood, the platform is a complex combination of multiple acquired products (Smooch, Ultimate, and Zendesk). They interact nicely, but they don't always speak the same language.
However, efforts like AI Agent tickets in Agent Workspace, Help Center authentication, and now these improvements to Authentication Metadata are gradually pulling these three platform elements together into a cohesive, singular solution. And I'm all for it!