
What's new in Zendesk Security
Zendesk strengthened its platform across governance, identity, and data protection. We introduced the Security overview dashboard, improved auth, Department Spaces, and advanced redaction. Read the article for practical steps to modernise APIs and secure your environment at scale.

On this page
At Zendesk we talk about our Resolution Platform. It's the overall platform architecture that helps our customers achieve successful resolutions for their end-users, customers or employees alike.
The platform generally consists of five layers, all powered by Zendesk AI. Most of the articles on this blog focus on the middle three layers: the agent layer with AI Agents, Agent Workspace and Agent Copilot; the actions and integrations layer, connecting your CX teams to the broader company; and the knowledge layer, which provides answers with articles, indexed sources and procedures. Together they form the engine that turns questions into answers.
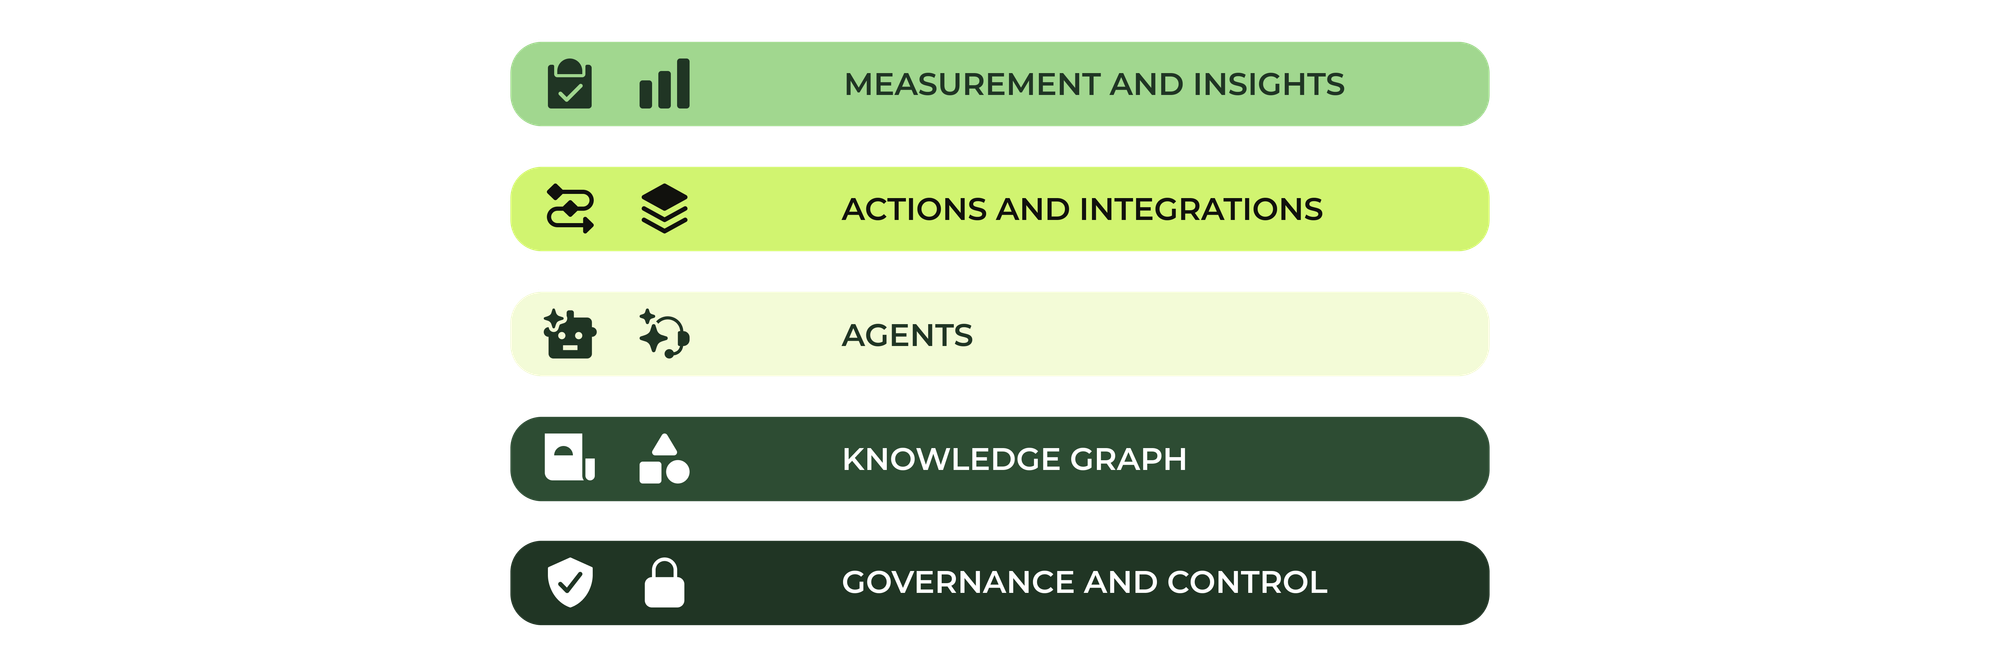
But there are two more layers to the platform. One side holds measurement and insights, which provides analytics dashboards, quality assurance and proactive insights into how Zendesk and its components are performing. And at the very bottom is governance and security. It’s the foundation on which the entire platform rests. It provides secure access to the platform, defines who can do what, manages AI agents with instructions and guard rails, and protects privacy. This essential technical layer, our silent guardian and watchful protector, ensures every other part of the platform can operate safely.
Security may not always be the layer we like to engage with, but it is the one that ensures every other part of the platform can operate safely, responsibly and at scale. And as AI capabilities deepen, integrations become richer, and the marketplace expands, this foundation becomes even more critical.
This Security Checklist article contains useful tips and tricks to keep your support environment secure. And while that list is still relevant, plenty has changed in Zendesk over the past year, with significant new capabilities added to the platform.
In this article, we’ll dive into the world of Zendesk Security and discover what’s new—and why now is the moment to give that silent guardian the attention it deserves.
Security Overview
One of the bigger initiatives Zendesk took this past year is the release of the new Security Overview dashboard in the Admin Center. This new dashboard gives you a health score and overview on how you're handling security in your instance.
It's similar to the AI Insights dashboard that highlights AI enablement, and the new Launchpad that shows you what platform elements you haven't used yet.
At the top it shows an overall health score based on the amount of critical, recommended and healthy recommendations you have, followed by a detailed list of features you should or could enable.
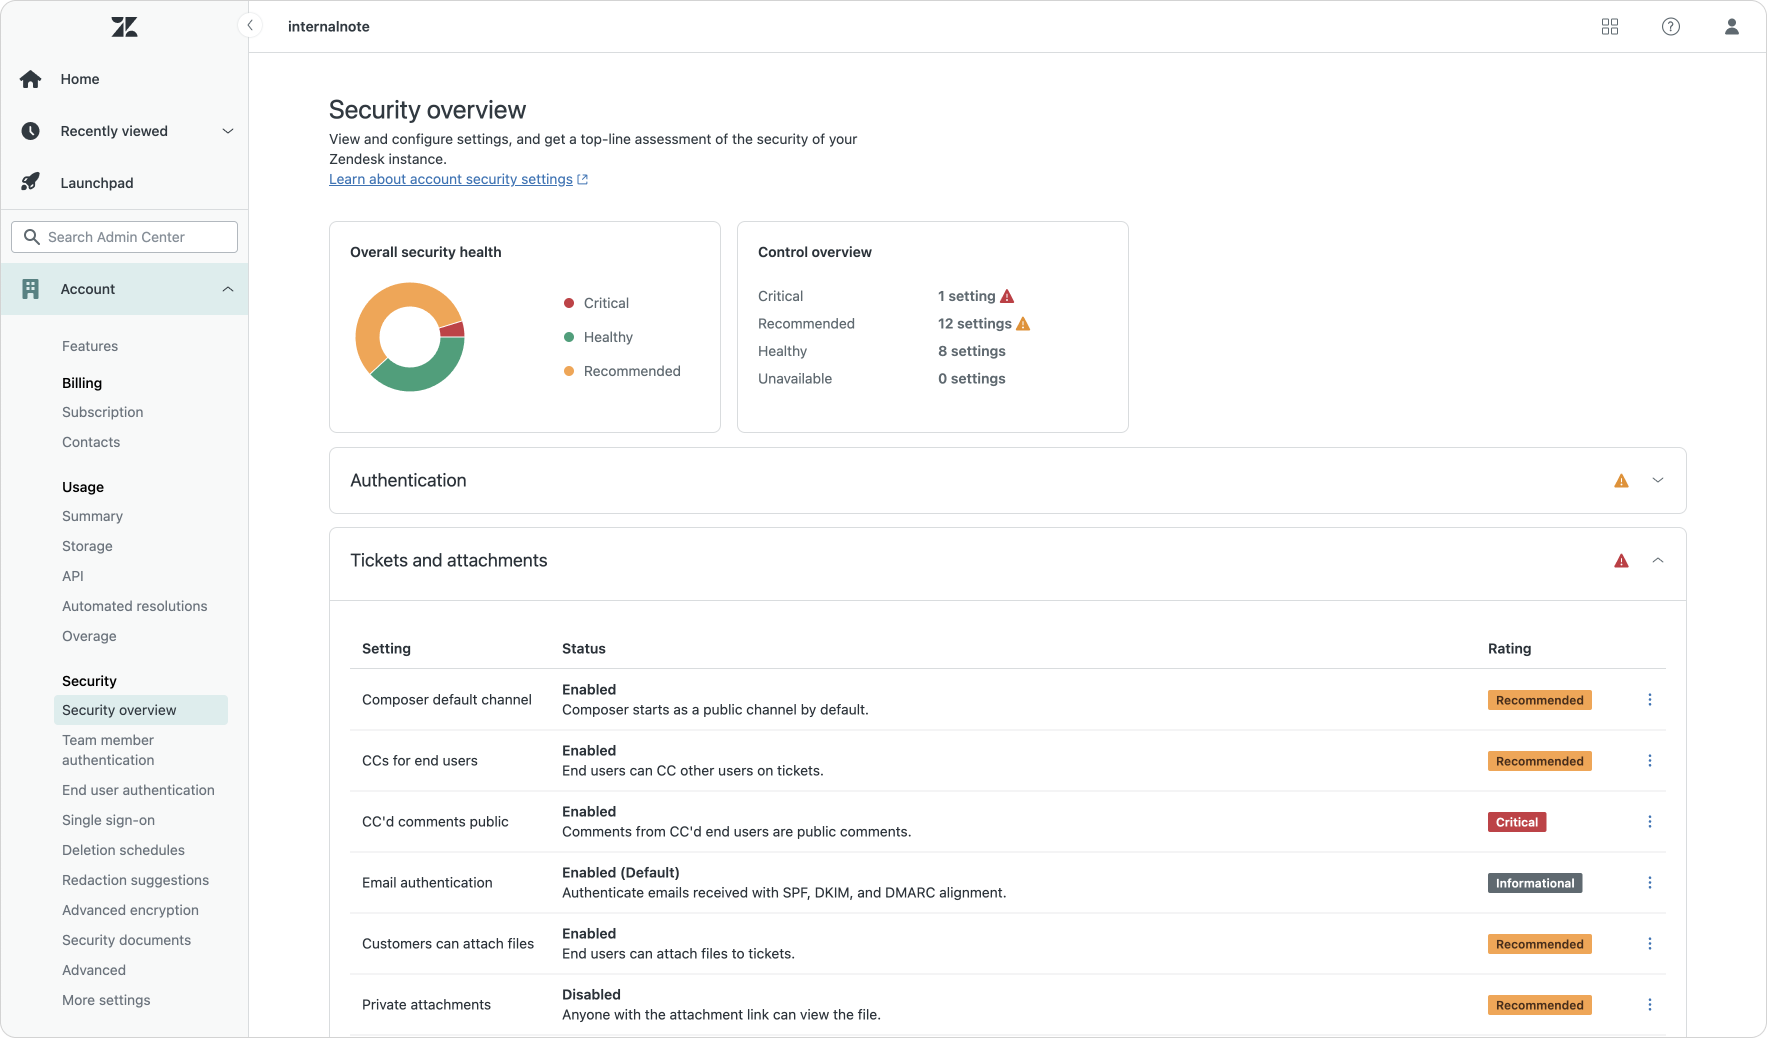
While all of these elements were already visible in the Admin Center as features are spread across the security, channels and API settings, having them combined in one actionable page makes it way easier to adopt all the (new) security and privacy capabilities of the platform. I highly recommend diving into this page and following its recommendations. But be aware that some of these security measures do have a tangible impact on how your Zendesk instance functions. Luckily, every recommendation has a details option that clearly states what it is and why you should, or should not, enable it.
ADPP: encryption & data protection
No article about Zendesk Security would be complete without spending some time on Zendesk's Advanced Data Protection and Privacy (ADPP). This ADPP add-on adds additional security capabilities to the platform on top of the existing feature set. It's not a requirement to have since Zendesk comes out-of-the-box with most security measures you'd need, but if your company has very specific requirements, it's worth looking into since it basically turns your Zendesk security setup up to 11.
As you can see in the table below, ADPP takes each included Zendesk feature, like deletion schedules, and adds more powerful capabilities like multiple schedules or more granular filter conditions.
| ADPP Feature | Included in Zendesk Suite | What ADPP Adds |
|---|---|---|
| Access Log | Event logging showing agent and admin actions on settings and users/tickets | Detailed access logs capturing who viewed, exported, or edited data, including timestamp, user role, and affected records |
| Advanced Data Retention | Single deletion schedule, limited fields, no user-level cleanup | Multiple layered retention policies, granular conditions |
| Advanced Redaction | Manual or API-based redaction of ticket comments and attachments | Automated redaction options, bulk redaction rules, scheduled purges of sensitive fields, and audit-tracked redaction management |
| Data Masking | No masking; sensitive data remains visible unless redacted | Automatic on-screen masking of sensitive patterns (e.g. credit cards, national IDs), preserving agent context without exposing full values (EAP) |
| Advanced Encryption | Standard encryption at rest and in transit | Customer-managed encryption keys, enhanced data isolation, and region-specific encryption controls for compliance requirements |
Authentication & account access
User identity and authentication are central if you want to offer a personalised experience to your customers. When you know who the customer is, it unlocks automated AI Agent flows like changing bookings, handling returns or providing shipping updates.
While Zendesk has always offered robust authentication methods with its built-in user directory, social logins and enterprise SSO solutions like SAML or JWT, there was still room for further improvement.
One such improvement is the concept of two-factor or two-step verification. To make sure a leaked password does not result in a breached account you can now enforce two-factor authentication for both end-users and agents. This means that if they want to log in they need to provide a 6-digit verification code that's generated by tools like Apple's Password app, Google Authenticator or platforms like 1Password or LastPass (although I assume these latter two will primarily be used in business use cases). You can manage 2FA for end-users in the Admin Center, while 2FA for agents is only recommended for scenarios where you're not using your own SSO solution.
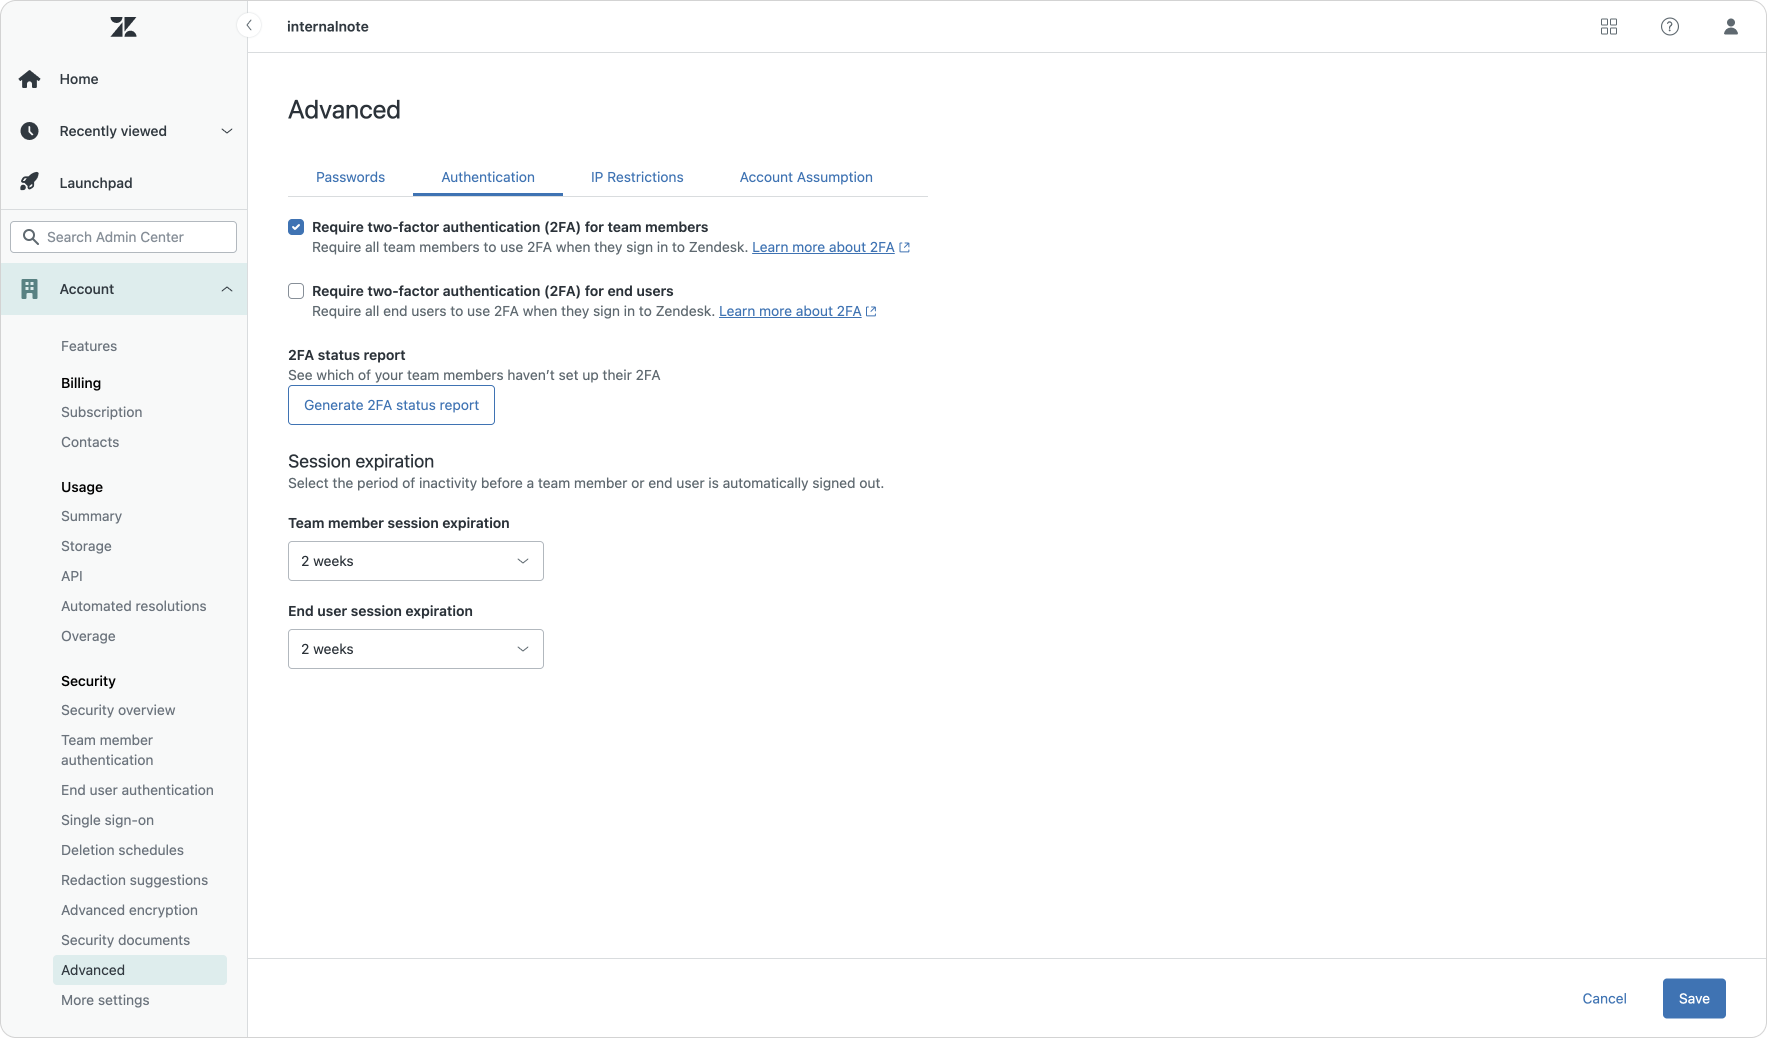
Additionally, for agents Zendesk has rolled out an additional mandatory two-step verification that requires agents who login to a new device to provide a one-time unique code that's send to their email address. A small inconvenience that prevents account hijacking and makes your environment more secure.
Messaging authentication
There's a couple of elements in the Zendesk platform I really really like. Custom Objects and Agent Home are two of those, but weirdly enough, Messaging authentication and the way users, identities and Sunshine Conversations interact with the core Zendesk platform is one of my favourite niche elements of the platform. It allows you to really dive into the nitty-gritty details.
Enabling Messaging authentication is key to providing that personalised experience I mentioned earlier. And while enabling it on your own website or webshop still requires custom JWT endpoints and development, within the Help Center it's now possible to add Messaging Authentication with a single checkbox.
Once you've got it enabled you can start using that authentication in AI Agent procedures.
Email connectors
Zendesk's email configuration is one it's oldest capabilities. Forwarding emails to your Zendesk instance and configuring your DNS to add the required SPF, DKIM and DMARC records has been a motion many a Zendesk admin has gone through to get started with Zendesk.
And while that traditional forwarding setup still works, some CIOs or IT policies at companies required a bit more control over email for auditing, security or policy reasons. The new email connectors for SMTP and Exchange offer an upgrade over the existing Zendesk email setup and allow you to send both incoming and/or outgoing email traffic over your own email servers. If your existing setup works for you, there's no need to really change, but it's a worth a look at the documentation to see if the benefits might make a move towards these new connectors useful for your environment.
Documentation for the new email connectors
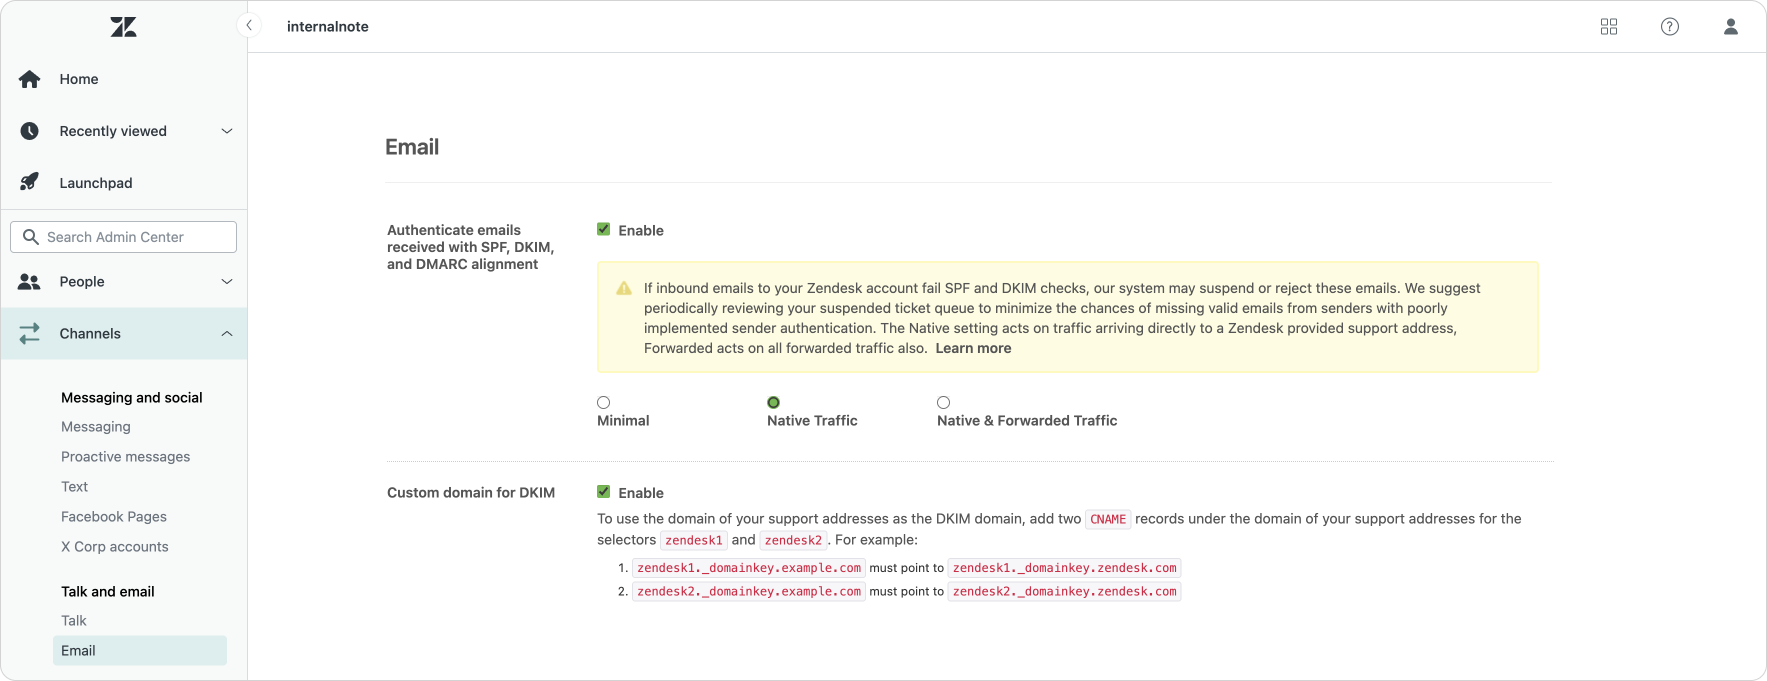
One additional change to email security is a more nuanced approach to handling DKIM/DMARC sender authentication. As a reminder, DKIM/DMARC allows you to define a list of services you trust sending email on your behalf, and tells email servers that receive email from your domain how to handle email that arrives from services not in that list. Untrusted services can be allowed, quarantined (suspended) or blocked (rejected). Where previously you could tell Zendesk to respect or ignore DMARC records, the new setting allows you to filter based on DMARC for all incoming email, or only that email that is directly send to an @domain.zendesk.com email address. This is useful in scenarios where email is first delivered to your own email server and where you already take care of filtering. You can now tell Zendesk to trust those forwarded emails and don't filter them.
Roles and permissions
Every Zendesk Suite environment comes with end-users, light agents, agents and admins as default user roles. End-users can only interact with tickets they requested or are cc'd on. Agents and light agents can only interact with tickets within their groups, or those they're followers on, with the limitation that light agents can never be an assignee and can only comment internally. And admins can access and edit everything.
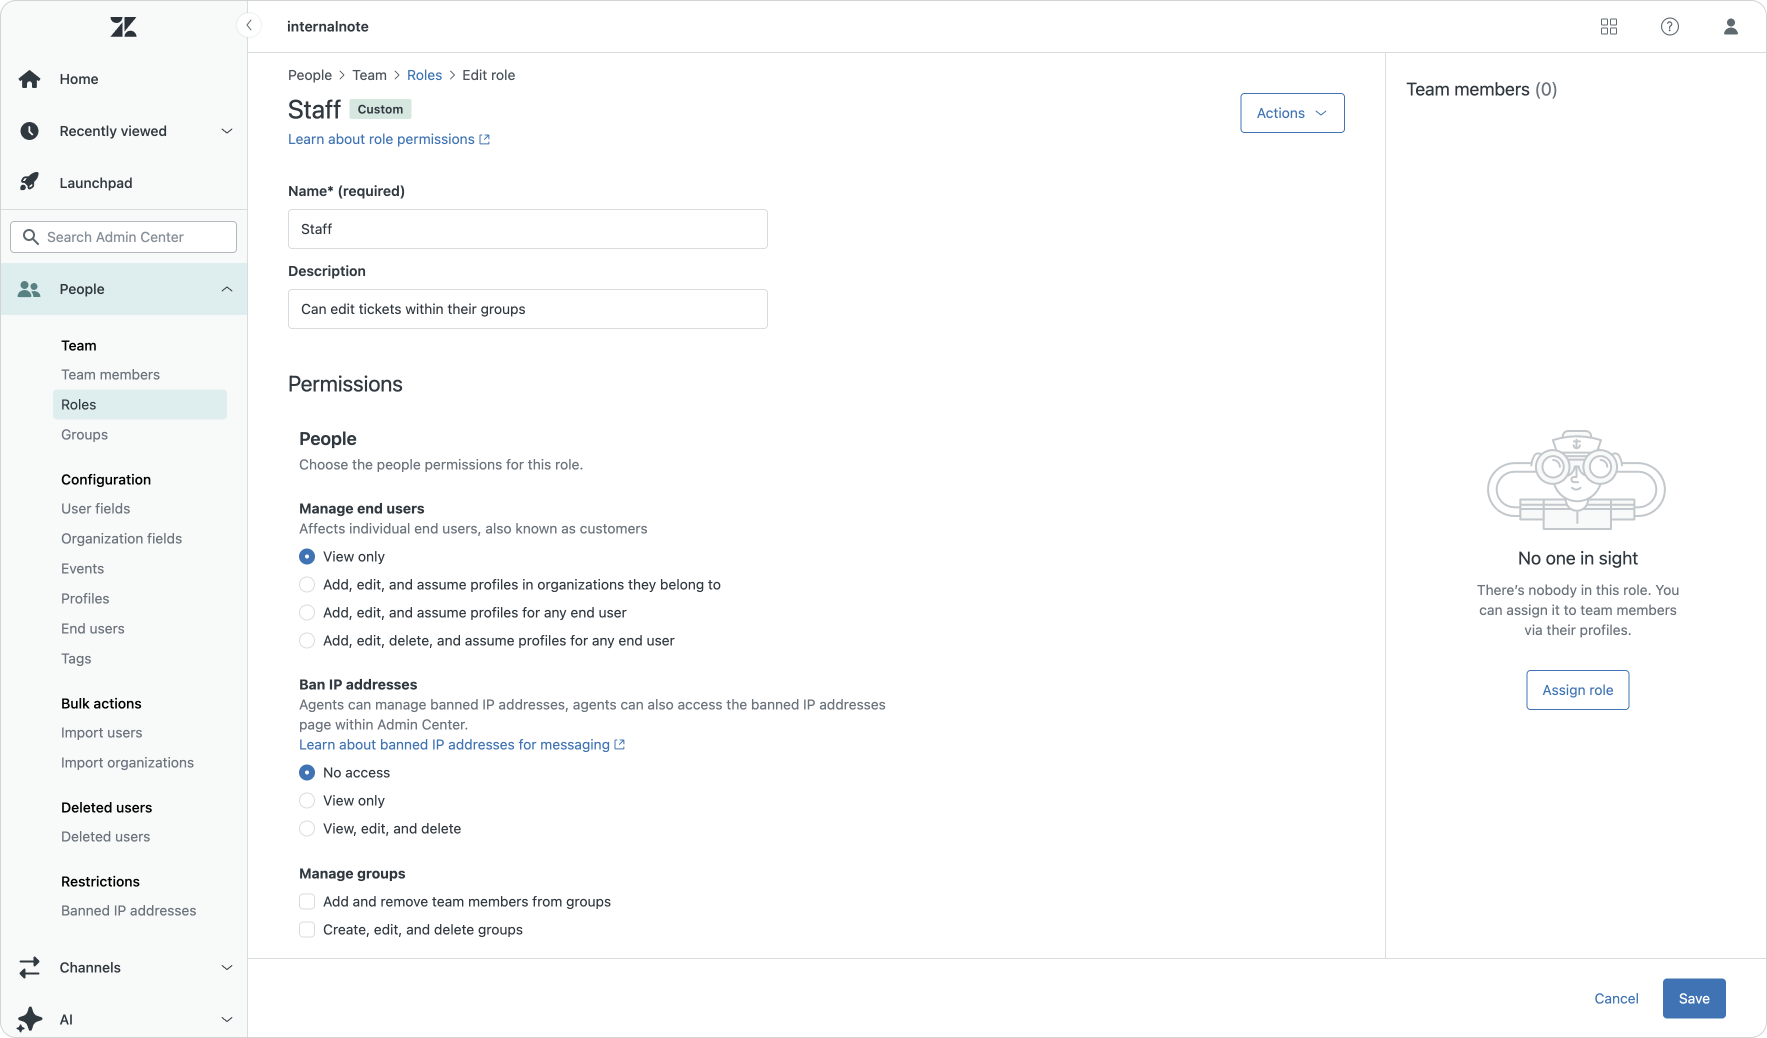
The above description obviously cuts some corners, but as a general one-paragraph description it does its job. But with Zendesk roles and permissions there's a whole slew of custom permissions you can add to roles once you get access to Suite Enterprise and dive into custom roles. And over the past year Zendesk has added even more granularity to those settings.
The list is too long to go into detail here, but examples are the ability to create/edit end-users while not being able to delete them, manage deletion schedules, or make use of the new data masking EAP that hides PII for specific agents (see below).
There's two additional major capabilities that should be highlighted here. Custom Objects and Department Spaces.
Custom Objects permission can now be managed on both the object and record level. An IT team split across locations can be configured that they can only see and manage devices assigned to their office. Or an account manager can only inspect service contract for their assigned customers. Or a customer can only select the devices they own.
Second is the release of Department spaces. I've written an entire article on the topic but in essence this marks a major shift in the way ticket access and permissions are managed. Previously ticket access was defined by groups and roles and being part of a specific group gave you access to tickets. In this new model tickets are linked to a brand and if an agent is assigned to that brand they can see those tickets. Groups can still be used to further define access, but this new approach simplifies setups by removing redundant groups per brand and reduces the need for private groups or more restricted custom roles.
Another scenario this can be used is in an Employee Service setup. Your IT team has access to IT tickets, while HR has access to HR tickets, while a shared backoffice service like Marketing might need access for tickets across both brands but solely those assigned to their own Marketing group.
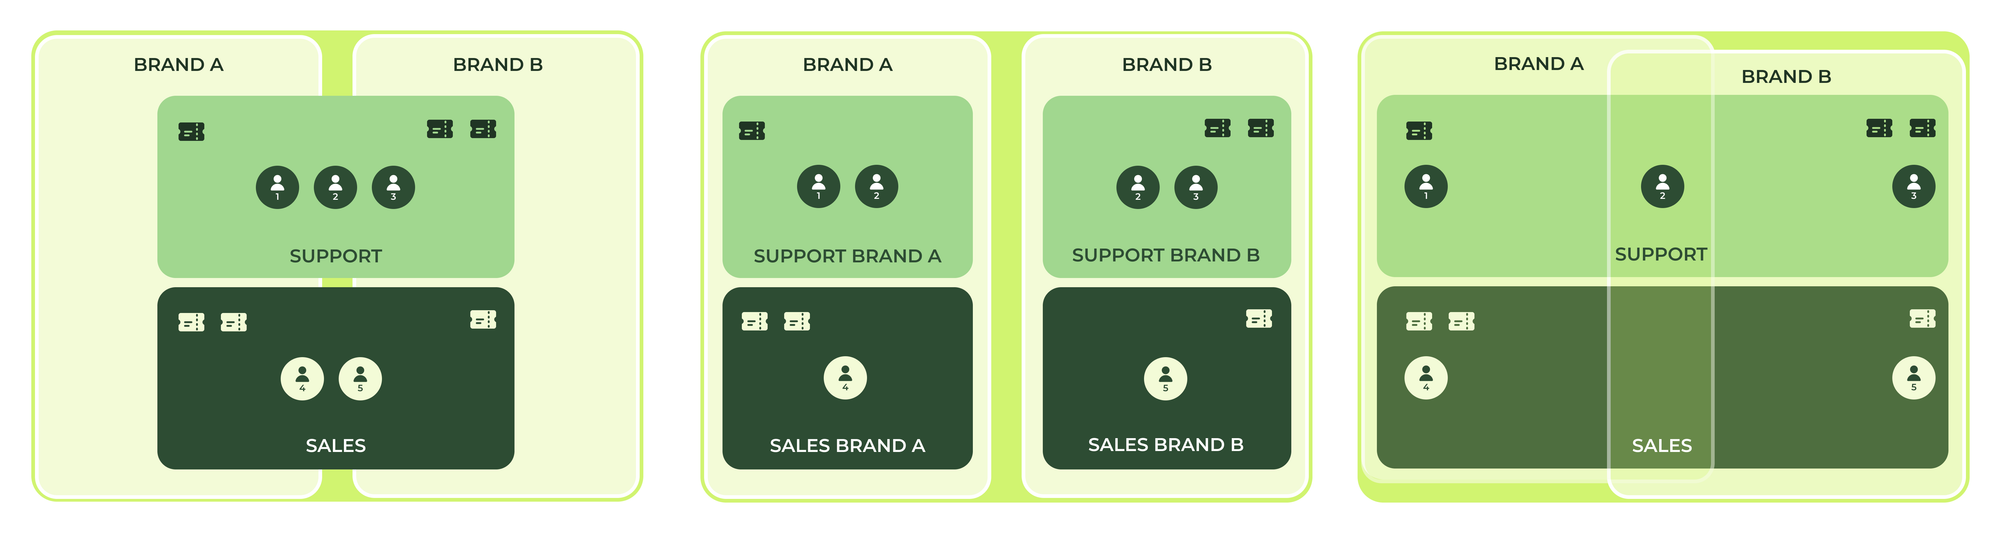
The above diagrams show this new approach. On the left we see a traditional setup with two brands and a Support and Sales group that handles tickets for both brands. A support agent can access tickets of all brands assigned to their group. Typically team leads would use views per brand to split works for each brand, but the potential risk of agents having access to too many tickets remains.
The middle image shows a more nuanced approach were each brand has their own support and sales group. This makes sure the support agents that handle brand A can never see tickets for brand B. While this setup works, agents can only access their own brand's tickets, it's a more complex setup. Agents live in multiple groups, and setting up queues, assignment triggers or SLA's all need to be done double, once for each brand.
The rightmost image shows a setup that makes use of department spaces. We assign our agents to their respective brands, with some agents in both brands. Tickets can be assigned to a single support group again, and it's the brand that defines which agent can see those tickets. It allows for the same granular permissions, but management is a lot more simplified.
Redaction & masking
While interacting with customers to resolve their questions your team needs to collect a lot of context and data. When a customer wants to change a delivery you need their address. You might need to ask for a copy of their passport or SSN in order to validate you're talking to a real person. Or a customer might accidentally send you their entire credit card number instead of just the last four digits.
Whether shared intentionally or by mistake, large amounts of personal data often end up stored in tickets. While some of that data may be essential during the resolution phase, such as confirming an address or verifying an identity, once its purpose has been fulfilled, it no longer adds value. Instead, it becomes a liability and is typically best removed.

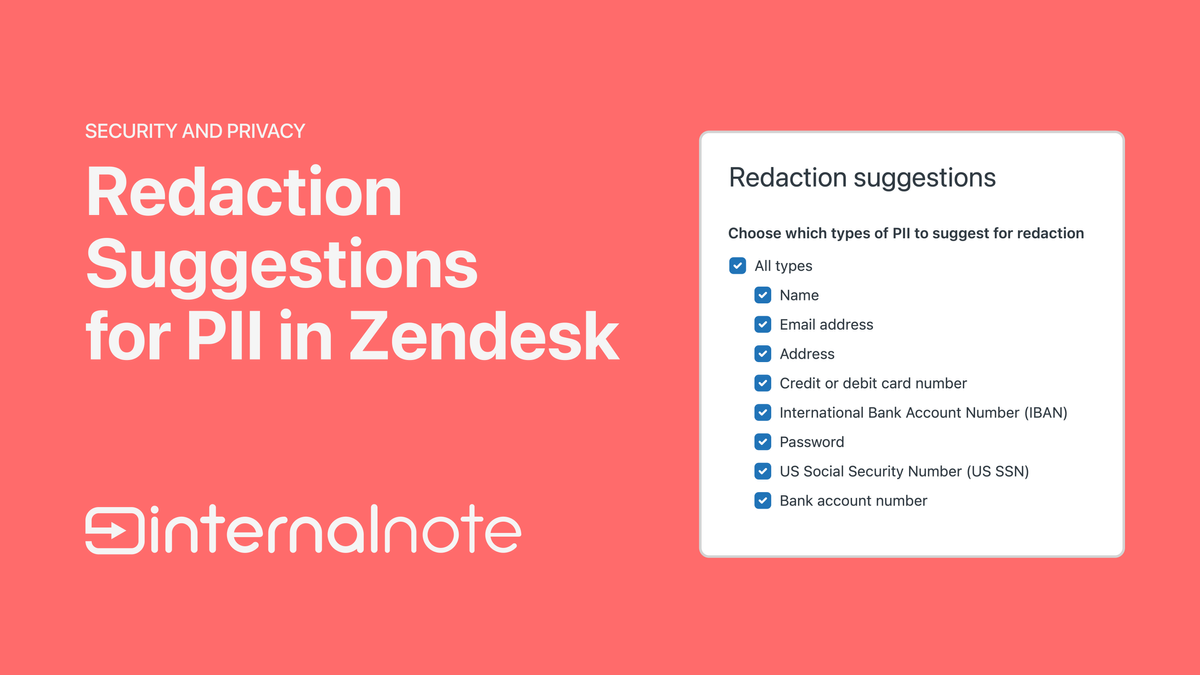
This is where Zendesk's redaction suggestions come into play. Similar to how entity detection in Intelligent Triage can identify products, Zendesk can also identify and highlight PII in your conversations. Within settings you can choose which types of information the system should look for, and these can then be highlighted in the conversation.
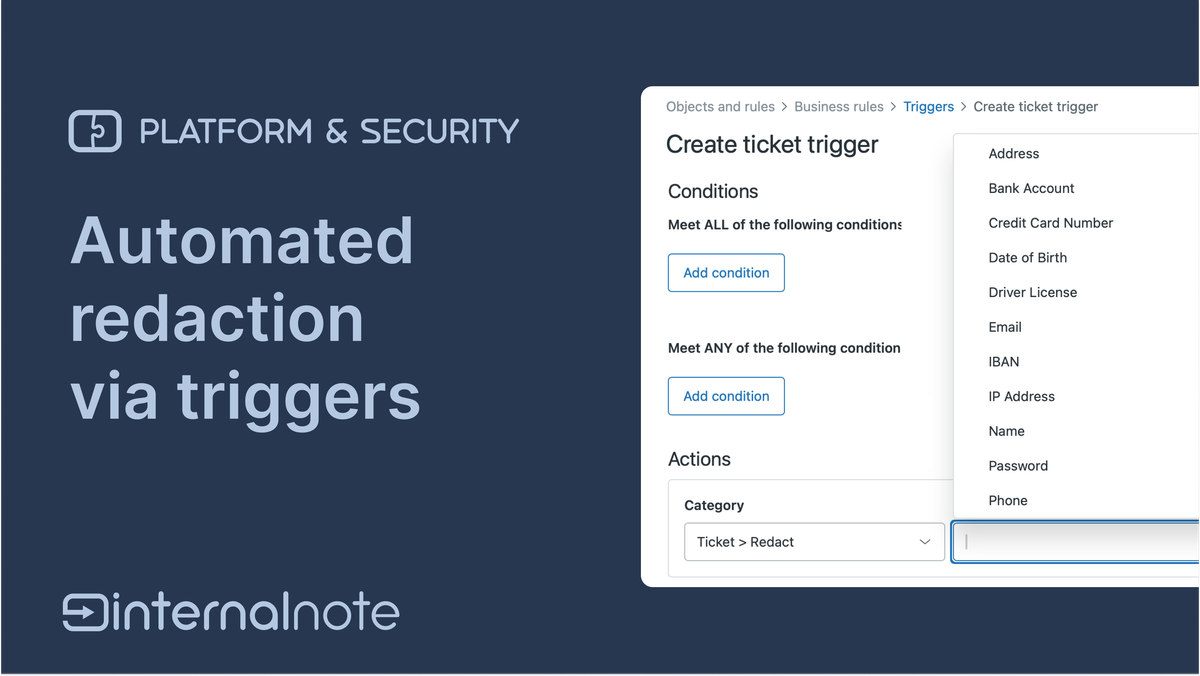
Agents can then choose to manually redact these elements or we can automate this process via triggers. Triggers are especially useful here since they both allow for an automatic cleanup as well as prevent data being visible to agents.
You can create triggers that automatically redact specific information either at a ticket's resolution, or when specific conditions are met like "user verified checkbox is checked". Or in the case of SSN and credit card numbers, we could redact these elements upon ticket creation, making sure that data is removed before a ticket gets assigned to an agent.
For now, these features are limited to users having purchased the ADPP add-on.
Data retention & deletion schedules
Security goes beyond access controls and authentication. It also relies on managing data correctly and ensuring unnecessary information is removed in time. A well-maintained environment is built on both strong access governance and disciplined data hygiene.
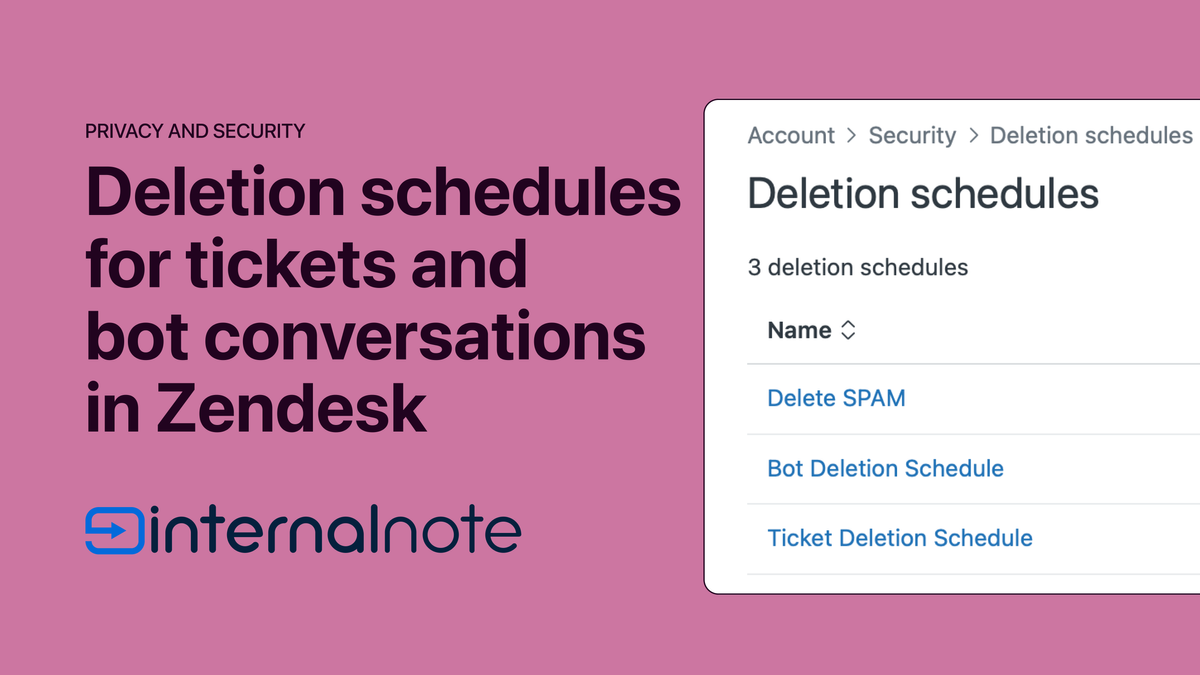
This is where Zendesk's deletion schedules come into play. These allow you to periodically delete data from your Zendesk instance based on conditions you set. It's useful to keep your storage usage in check, or to comply with local privacy laws like GDPR.
You can currently setup schedules for four types of data: users, tickets, attachments and bot conversations (AI Tickets in Agent Workspace are not yet part of this but it's on the roadmap). If you've got the ADPP add-on you can setup multiple and more complex schedules, but even with the basic capabilities, it's a good idea to setup a schedule for each of these.
One of the most useful updates to schedules is the introduction of attachment-only schedules. Attachments typically consume the bulk of your storage, yet they are rarely needed once a ticket is resolved. Until now, your only options for reclaiming that space were deleting entire tickets — which also removed their attachments — or manually redacting them via the Zendesk API. With attachment-only schedules, you can target and remove attachments directly while retaining the full conversation history for much longer.
Deletion schedules allow you to automatically remove tickets, users, and bot conversations on a recurring basis based on conditions you set. A key detail: ticket schedules delete both regular and AI Agent tickets, but the original conversations stored in Sunshine Conversations are only removed when the associated end user is deleted via a user-deletion schedule.
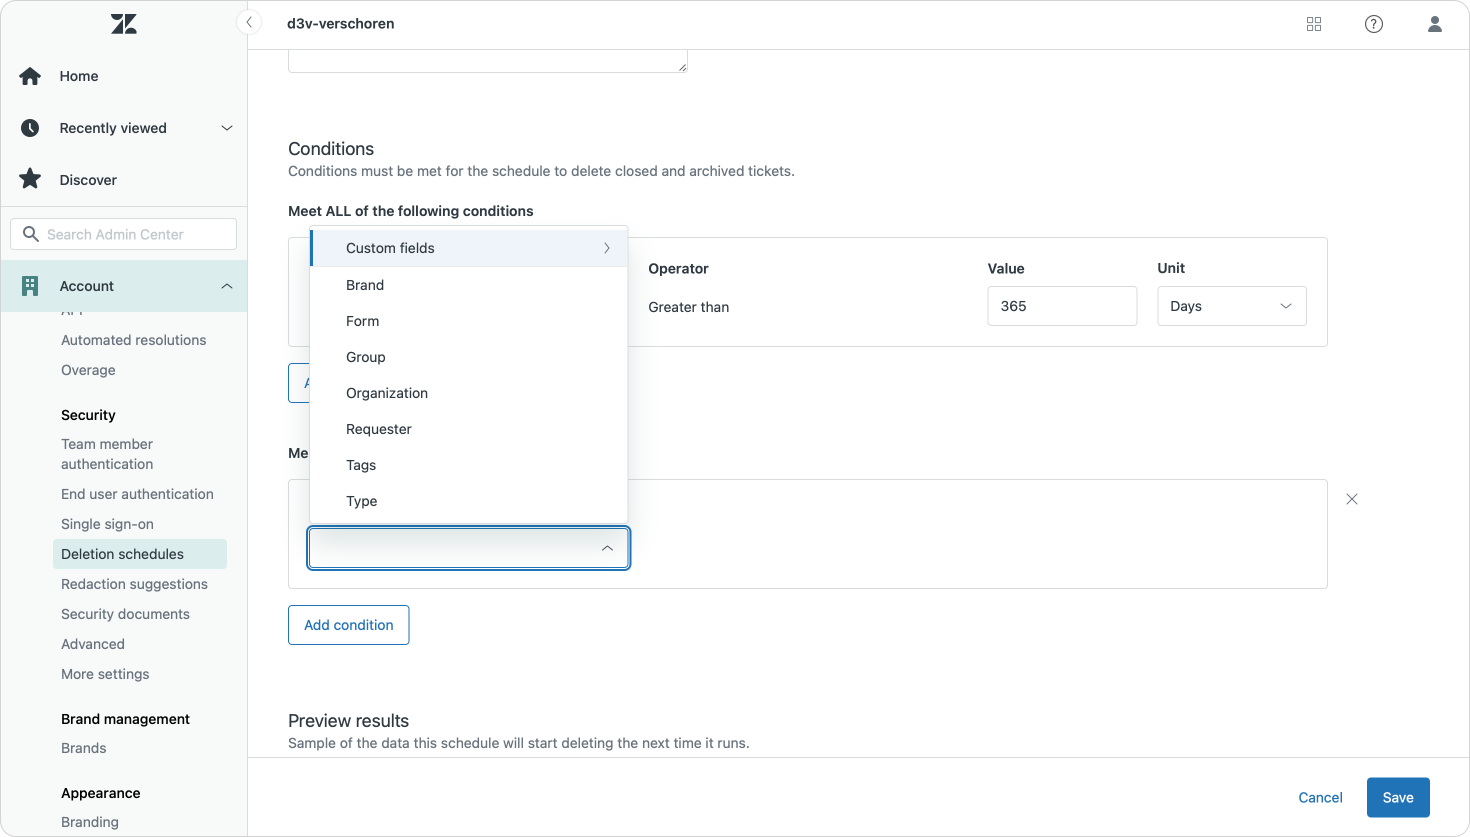
If you previously dismissed deletion schedules under ADPP because available conditions were too limited, it is worth revisiting them. They now support a much wider range of system and ticket fields, making them far more precise and practical to implement.
Attachments & file security
So far we've discussed redaction of specific pieces of data in conversations, as well as automatically removing entire tickets and conversations based on schedules.
But there's a third kind of data that not only takes up lots of space in your instance, but can potentially contain a lot of personal information and that's attachments. Customers submit photos or PDF documents as part of their inquiries.
Typically, attachments in Zendesk are only visible to users who have the direct link to the attachment. These links, similar to how a Google Drive document is shared, are unique and complex in nature, making sure that no one can accidentally find a working link to an attachment. There might be scenarios where you want to protect them even more, and that's where Private attachments come into play. Both email and messaging conversations can require users to authenticate in order to be able to download the attachments linked to their conversations. While a bit annoying for the end-user, this will make sure forwarded conversations aren't accidentally exposing attachments linked to the conversation.

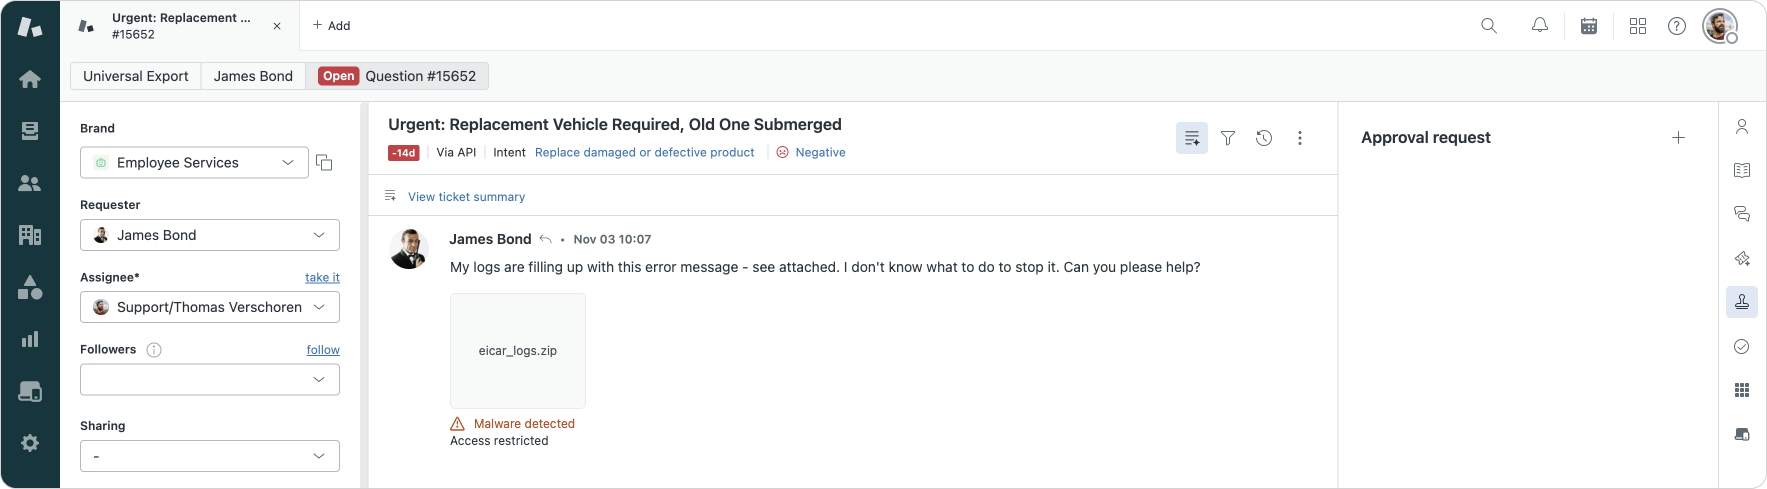
Since attachments come from unknown sources, Zendesk has scanning in place that looks for malicious attachments with known malware. For now that scanning excludes attachments upload by customers via Messaging, but all other channels are included. By default these attachments can not be accessed by agents, but you could expand their role to allow them to download these attachments.
API authentication
Zendesk has a very extensive API that gives you access to all data in your instance. With the right credentials you can access object data like users, tickets or custom objects, as well as configuration data like triggers or views.
Traditionally these API endpoints have been accessible over both password based and token based authentication. But as password breaches and reused password across services happen more and more, relying solely on a username and password to access the API is not ideal. If an agent or customer uses the same password for Zendesk as they'd use for another platform, you might run the risk that if that other platform gets breached, a bad actor could reuse those credentials to access your Zendesk instance.
To address this risk, Zendesk has been shifting away from password based authentication in favor of their existing API token based approach, as well as a renewed focus on oAuth.
If you're still using password based authentication for API access for your agents and admins, now is the time to change [email protected]:<password> into [email protected]/token:<api_token> or shift towards Auth based sessions. Starting December 2025, the API will no longer accept password authentication for those users.
For end-users, you've got a choice. If you've build tools that leverage end-user authentication to pull data from Zendesk, you can choose to either allow passwords, or disable password access and move to solutions like oAuth. If you decide to disable password access for end-users, any future attempt to authenticate will be considered anonymous. So if you're using end-user authentication to pull segment specific Help Center data, update tickets or submit CSAT surveys, you can retain your authentication as is, shift towards oAuth or leverage a global oAuth token in combination with your own SSO solution to identify end-users.
One element Zendesk has not yet fully addressed is adding a more granular approach to API access. For now, an API token's scope is still defined by the user that uses the token, instead of the token itself being limited to e.g. only users or views. This means that if an agent decides to use their token against an other user's email, they'll get access to that user's scope. API tokens should be handled with care and not shared at will.
Admin experience
The shift from password based authentication towards API tokens and oAuth also means you want to be able to easily manage both solutions within the Admin Center. As part of their authentication "refresh" Zendesk also revamped the Admin Center pages for API tokens and oAuth.
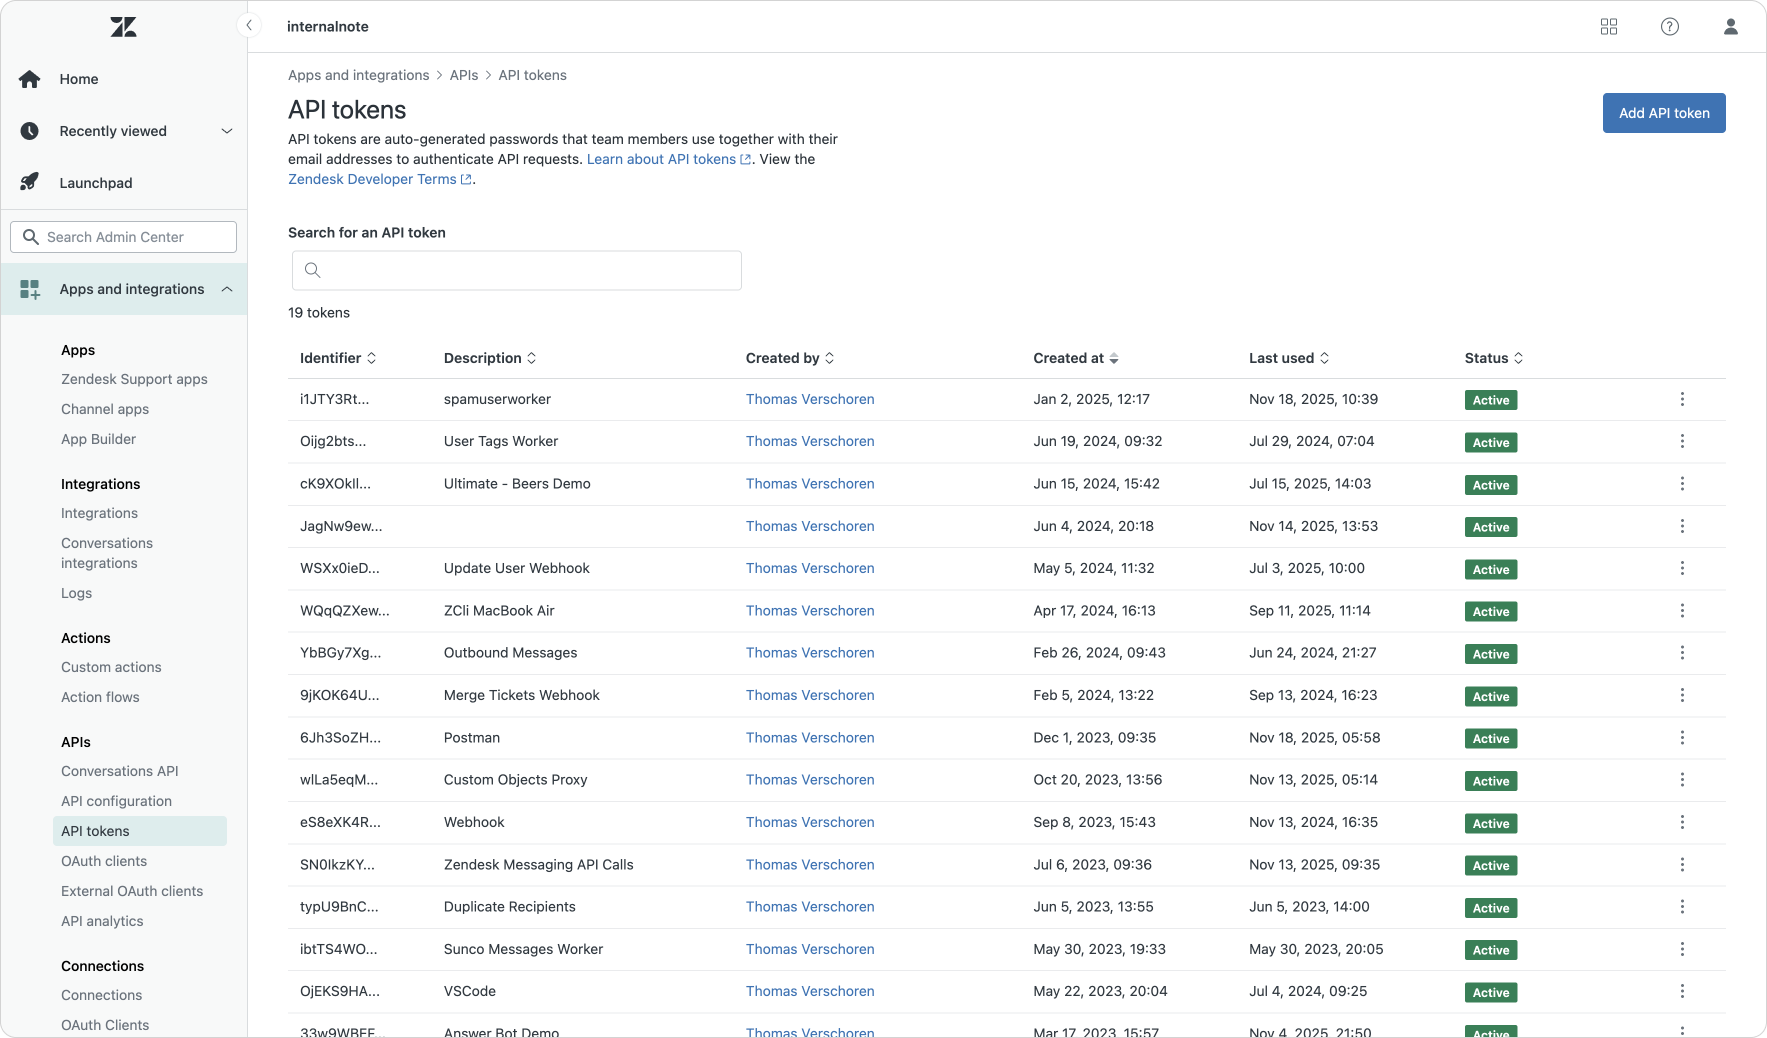

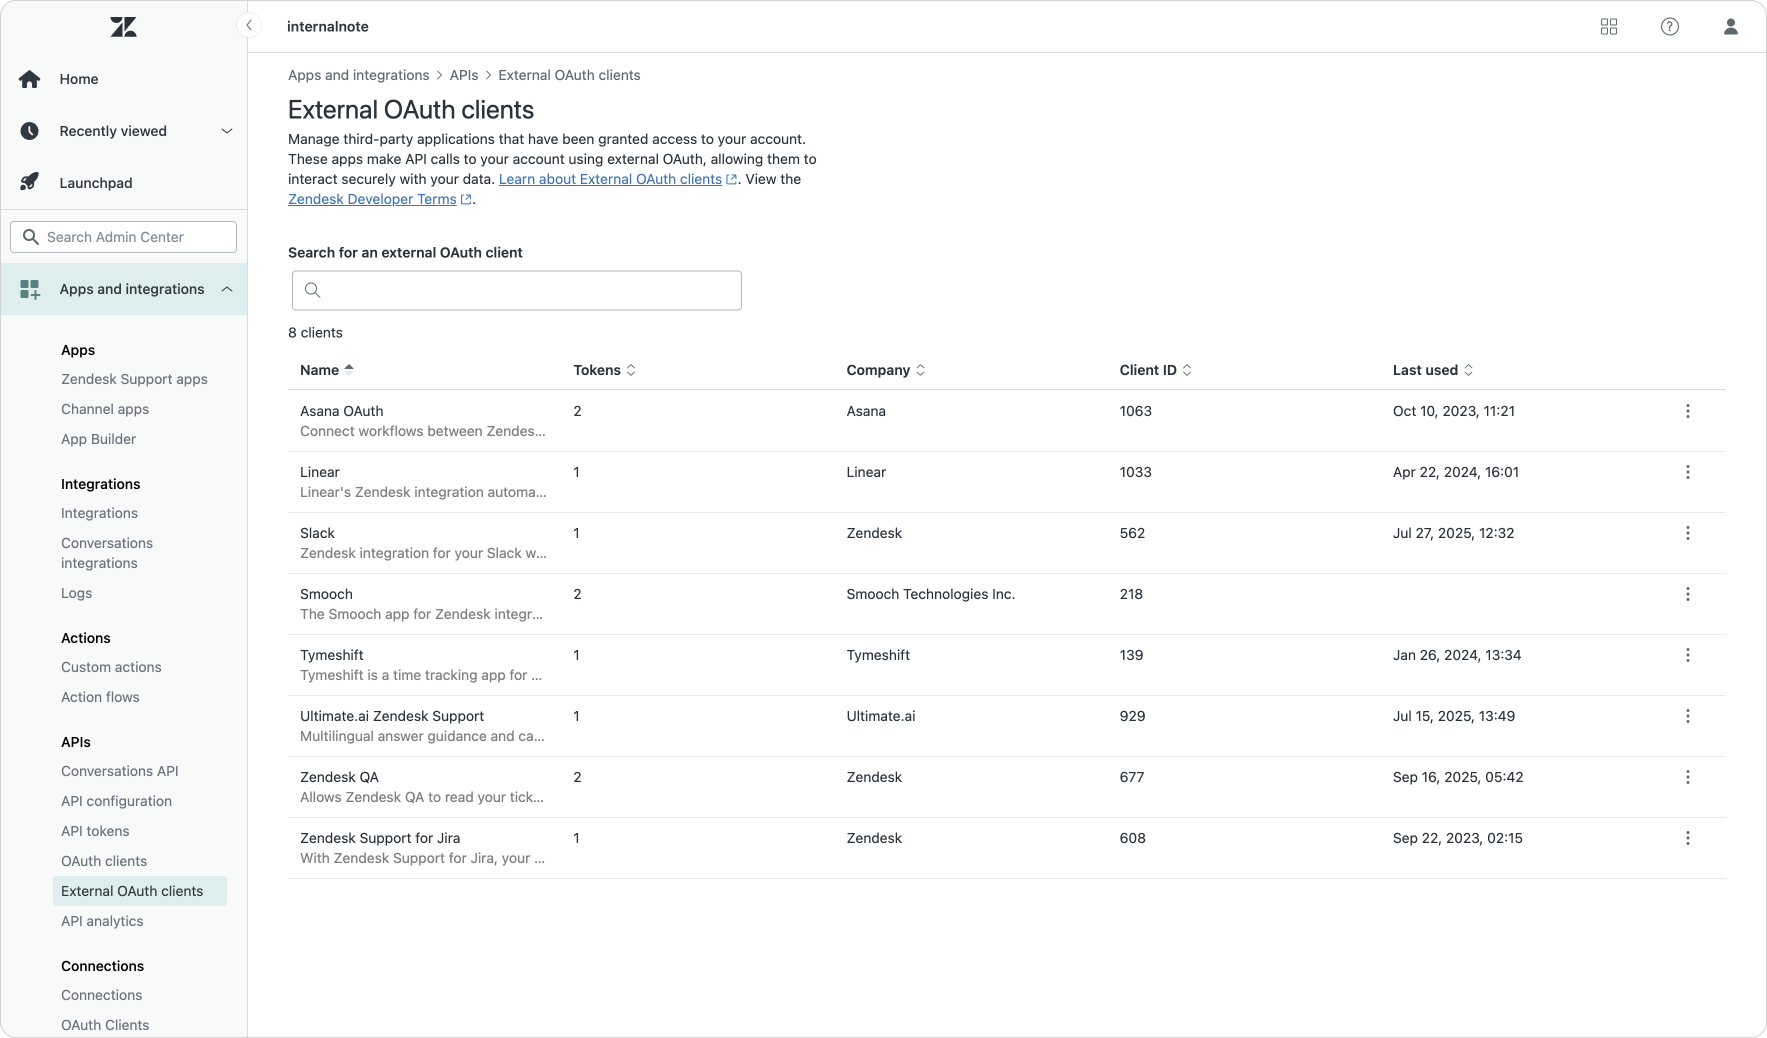
The API Token page allows you to temporarily disable unused tokens, and features a direct link to the Audit Log which shows its historic usage. The new oAuth and external oAuth pages on the other hand make it possible to manage connections made. You can view, delete or disable both internal and external oAuth sessions, as well as inspect usage or reset tokens.
It's worthwhile opening these new pages and removing any unused tokens from your instance.
Enhanced security guidelines for apps, integrations & bots
While direct API integrations are one way to interact with Zendesk data, there's another segment of developers that need to get access to your Zendesk instance, and that's marketplace apps.
Readers of this blog know that I'm a big proponent of our Marketplace ecosystems. These partners expand the platforms to cater to industry specific use cases or fill gaps in the product.
But as the marketplace grows, security must advance alongside it. Thats why Zendesk recently Zendesk launched a new initiative to move the way third-party interact with Zendesk data forward.
Marketplace apps can no longer leverage API tokens or store customer credentials and moving forward they must use global oAuth clients. Additionally, any API call they make has to include identifying custom HTTP headers and adhere to stricter review policies
X-Zendesk-Marketplace-Name:"App Name for Zendesk"
X-Zendesk-Marketplace-Organization-Id:12345
X-Zendesk-Marketplace-App-Id: 99999As a user of Marketplace apps, this should all happen transparently. Marketplace partners will update their apps to match these new requirements, and if they leverage legacy authentication methods, you'll be prompted to re-authenticate once their apps are updated.
Securing the foundation of your Resolution Platform
Security in Zendesk is no longer a background dependency, it is the structural foundation of the Resolution Platform. It governs access, protects identities, guides data hygiene, and ensures that AI and automation operate safely, ethically, and within the right boundaries. As Zendesk’s capabilities evolve from agent automation to authenticated messaging, from granular permissions to protected attachments, security is no longer a gatekeeper. It becomes an enabler.
Much of what we covered already exists in your Admin Center today. Some features are quietly active, others waiting for adoption. Whether it's enforcing 2FA, using attachment-only deletion schedules, implementing data masking, or adopting ADPP for advanced protection, these are not just compliance measures. They are essential building blocks for delivering trusted, high-quality experiences at scale.
If you’re looking for practical starting points, focus on two foundational shifts: modernise your API authentication by moving away from password-based access, and explore Department Spaces to redefine how access, visibility, and governance are applied across your organisation. Together, they lay the groundwork for cleaner boundaries, stronger identity control, and a platform that is secure by design, and not by afterthought.
Now is the moment to revisit your Security Overview dashboard, activate what applies to your organisation, and turn governance from a silent guardian into an active driver of intelligent, secure resolution.