Crisis Management via Zendesk
Imagine a major part of your service breaking down, users can't login and tickets are being created in volume. Agents get overwhelmed by the amount of backlog and customers get frustrated. Zendesk can remedy this by leveraging Pro-Active support and Self Service and Problem/Incidents. Learn how.
Crisis Management via Zendesk

On this page
Imagine a major part of your service breaking down, users can't login and tickets are being created in volume. Or due to external factors shipments of orders are delayed and a lot of customers get angry.
In most of these scenario's a few things happen at once:
- Customers create a lot of tickets for the same issue.
- Agents get overwhelmed by the amount of backlog being created.
- You can't get info out fast enough to customers.
- Unrelated tickets from other customers get late replies due to the above backlog, resulting in even more bad customer feedback.
Luckily Zendesk can remedy most of these issues by leveraging Pro-Active support and Self Service via the Help Center, Answer Bot and Incident/Problems.
There's a couple of steps to take
1. Deflection
The most important step to handle such an influx of tickets is deflection. Make sure the problem is front and center on your FAQ. Have Answer Bot enabled to reply withlinks to the article when customers email.
This way, customers see that you are aware of the issue and are working on it, hopefully encouraging at least part of your customer base to not contact you.
2. Bundling
If tickets about the question do come in, make sure to categorise them and link them together, so instead of updating thousands of incident reports, you only need to update one problem ticket.
It's important here to note that in crisis scenarios a one to many communication is much more effective than a one to one. Sending out updates every hour to all customers with a generic status update is more effective then deep-diving into each ticket individually. There's time to handle unique cases once the crisis is averted.
3. Smart Routing
It's important to still have a good overview of your support inbox. Since the tickets related to the crisis are all categorised and bundled together, it's trivial to separate them from other tickets in your queue.
Assign some agents to handle the crisis tickets, and keep other agents available to handle your regular support queue. This way you help both affected customers, and other users with different issues like bugs, usage questions,...
4. Keep your FAQ and macros up to date
Deflection and automation are the way to go for large influx of tickets.
Make sure you keep the support article(s) related to the incident up to date with the latest info so new inquiries get the latest info via Answer Bot or search.
Similar, make sure your agents have a macro available for both acknowledging the issue and sending out the latest status update. This way, any ticket that's created and hasn't been deflected, gets the latest info without the agent needing to write a custom reply each time.
How to set this up
Now that we have the basics defined, let's dive into how we can actually build this in Zendesk.
For this example we'll be handling the following crisis:
1. Deflection
Help Center
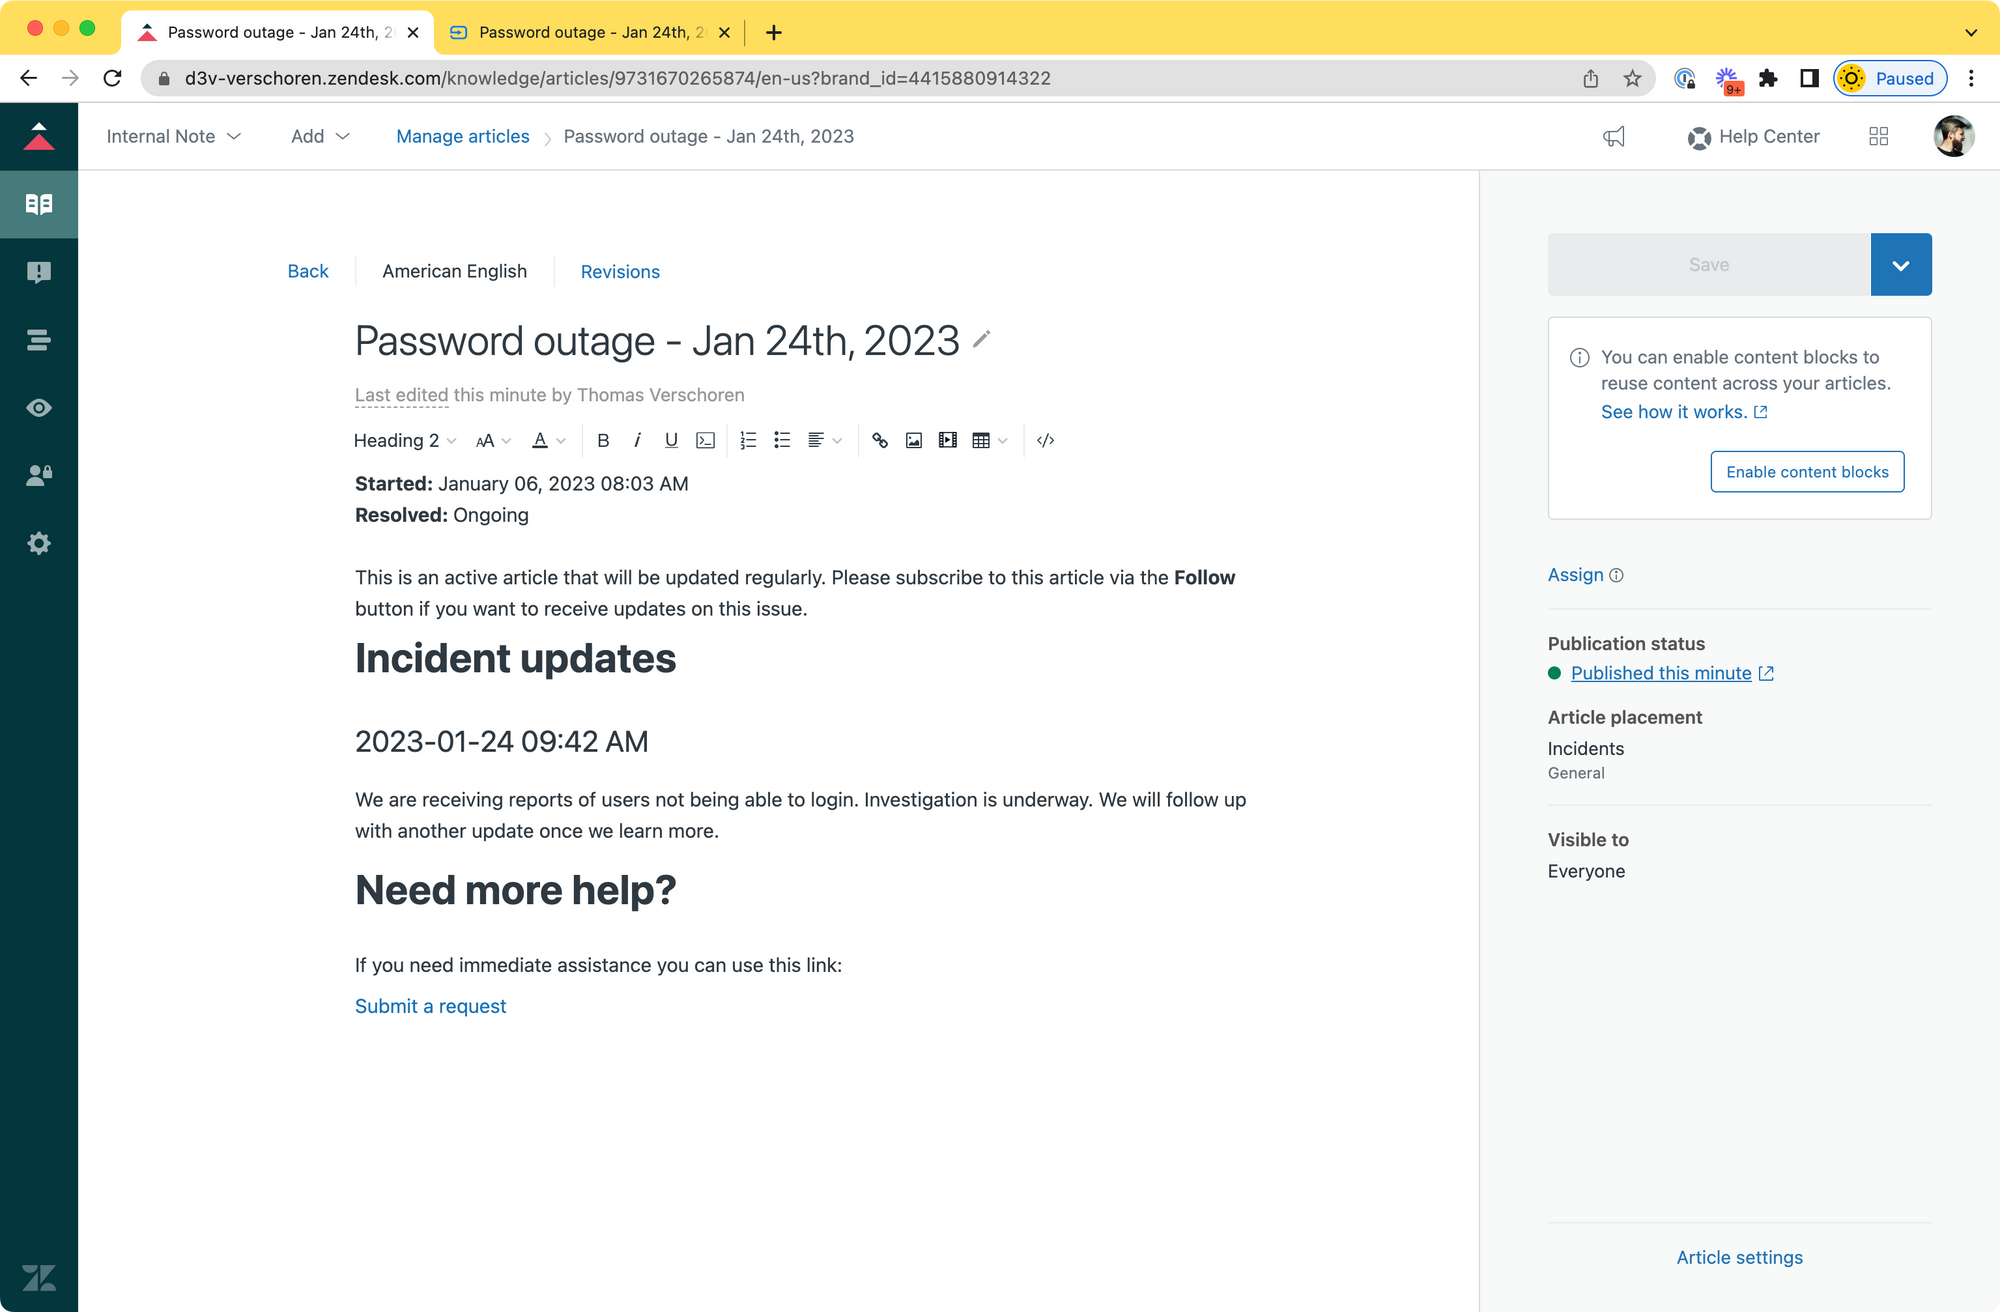
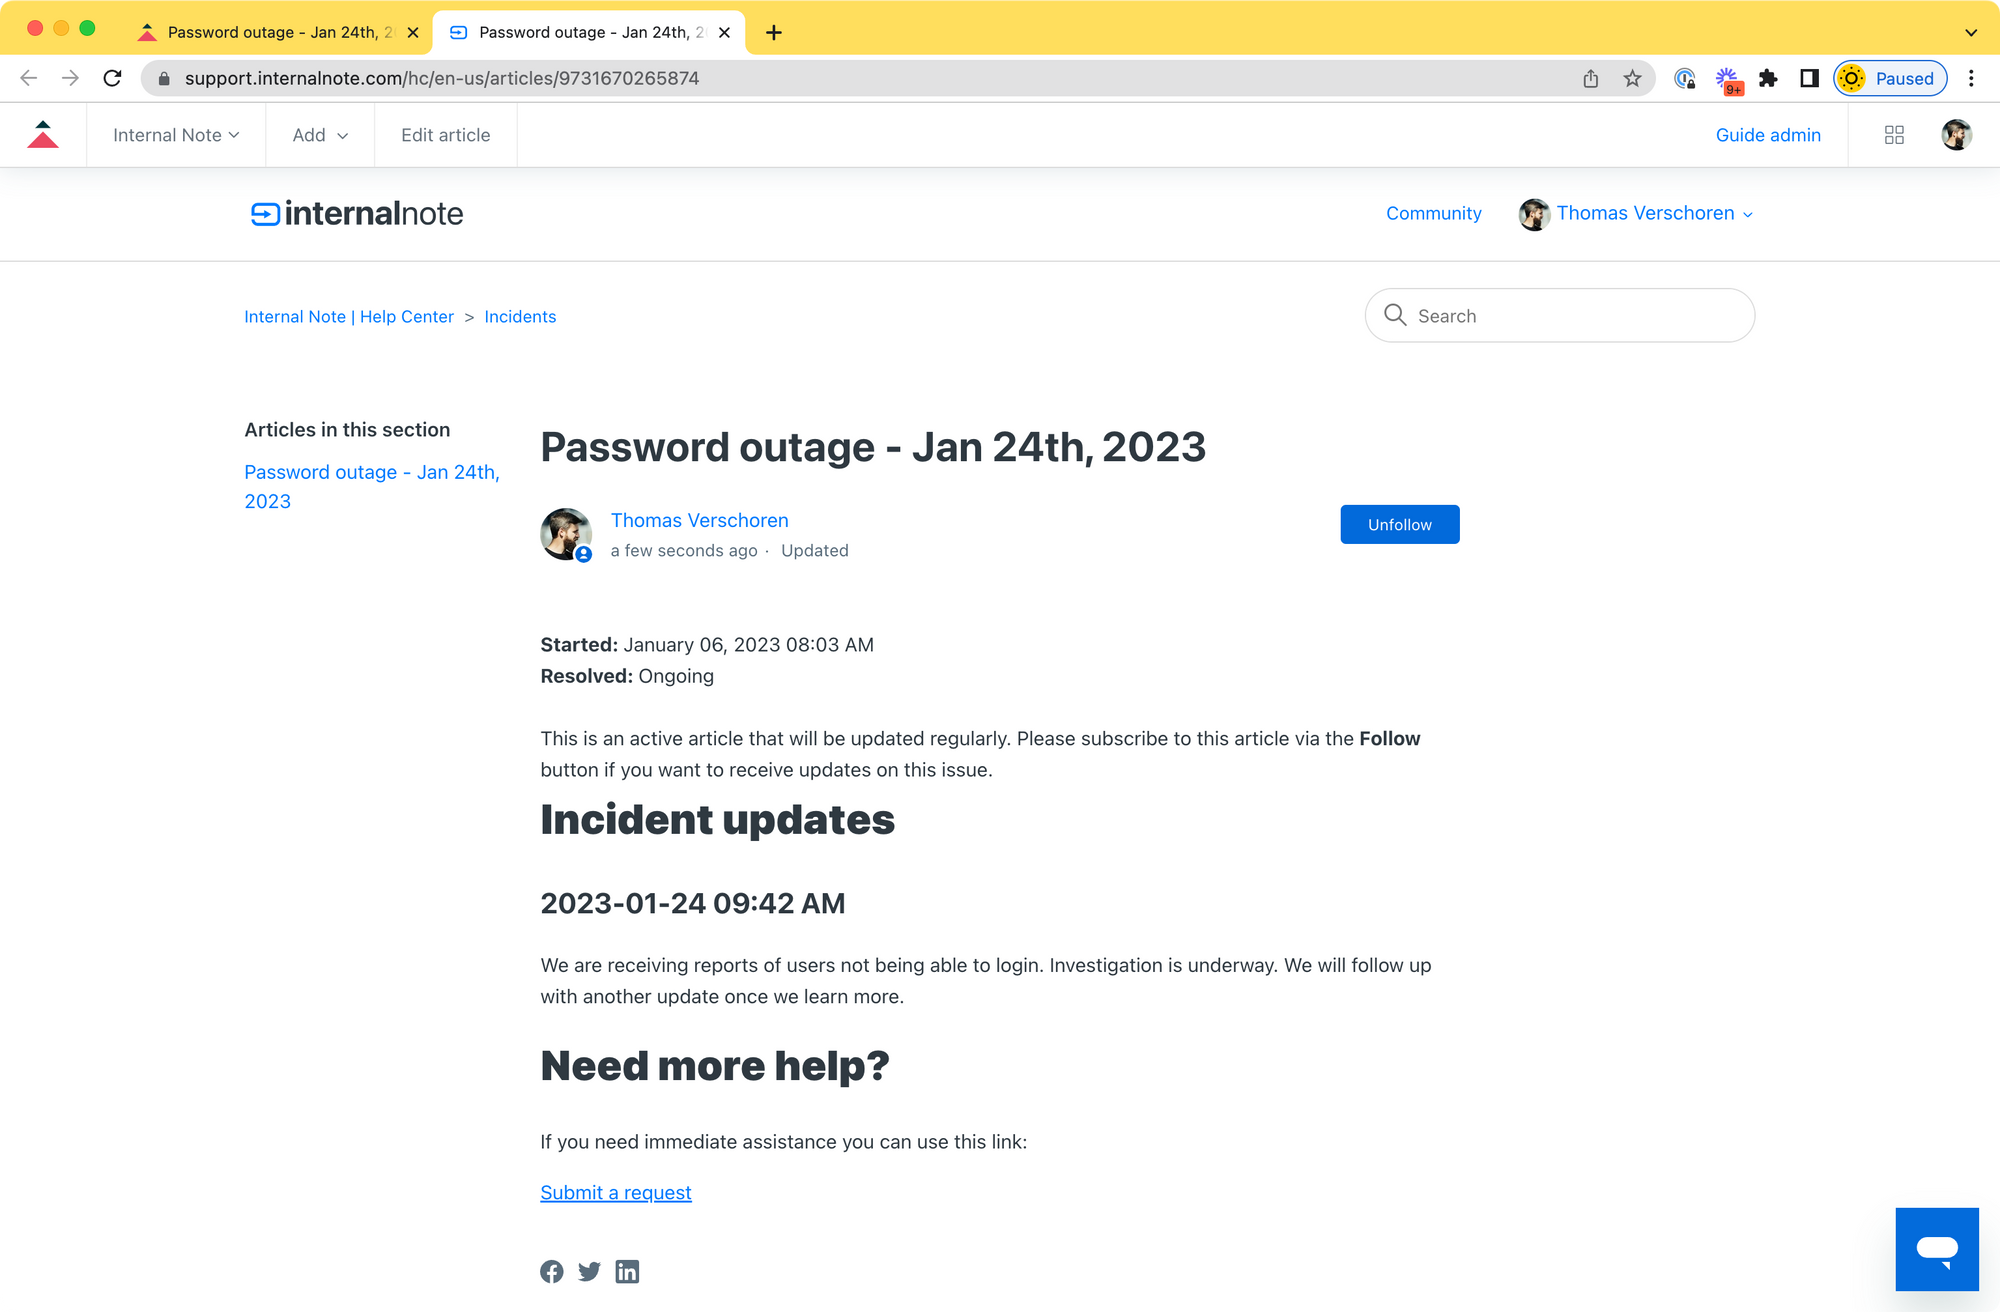
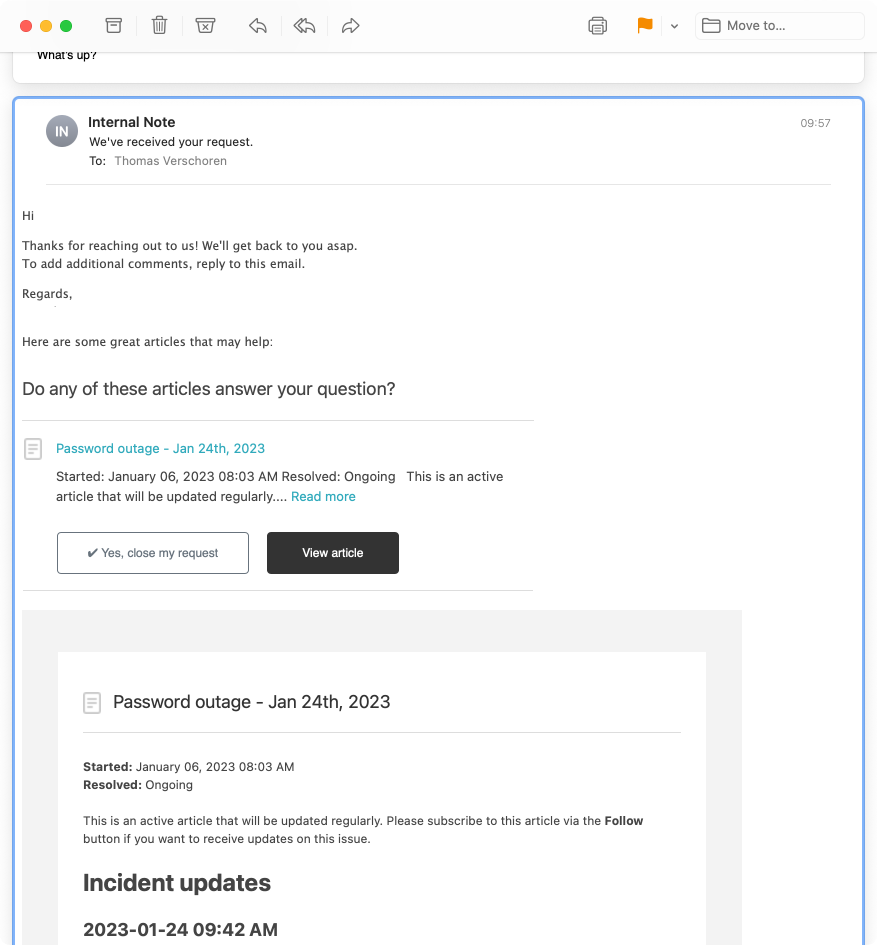
Deflecting incoming inquiries involves using Zendesk Guide. The first step is to create an article that explains the issue.
Make sure it's public to everyone and promoted so it's highlighted on your Help Centers' homepage.
It's always useful to clearly note when an update has been made so the customer gets a nice chronological timeline of the actions taken.
And end the article with a clean CTA to point customers to a place to ask for help that you control.
Email: Use answer Bot
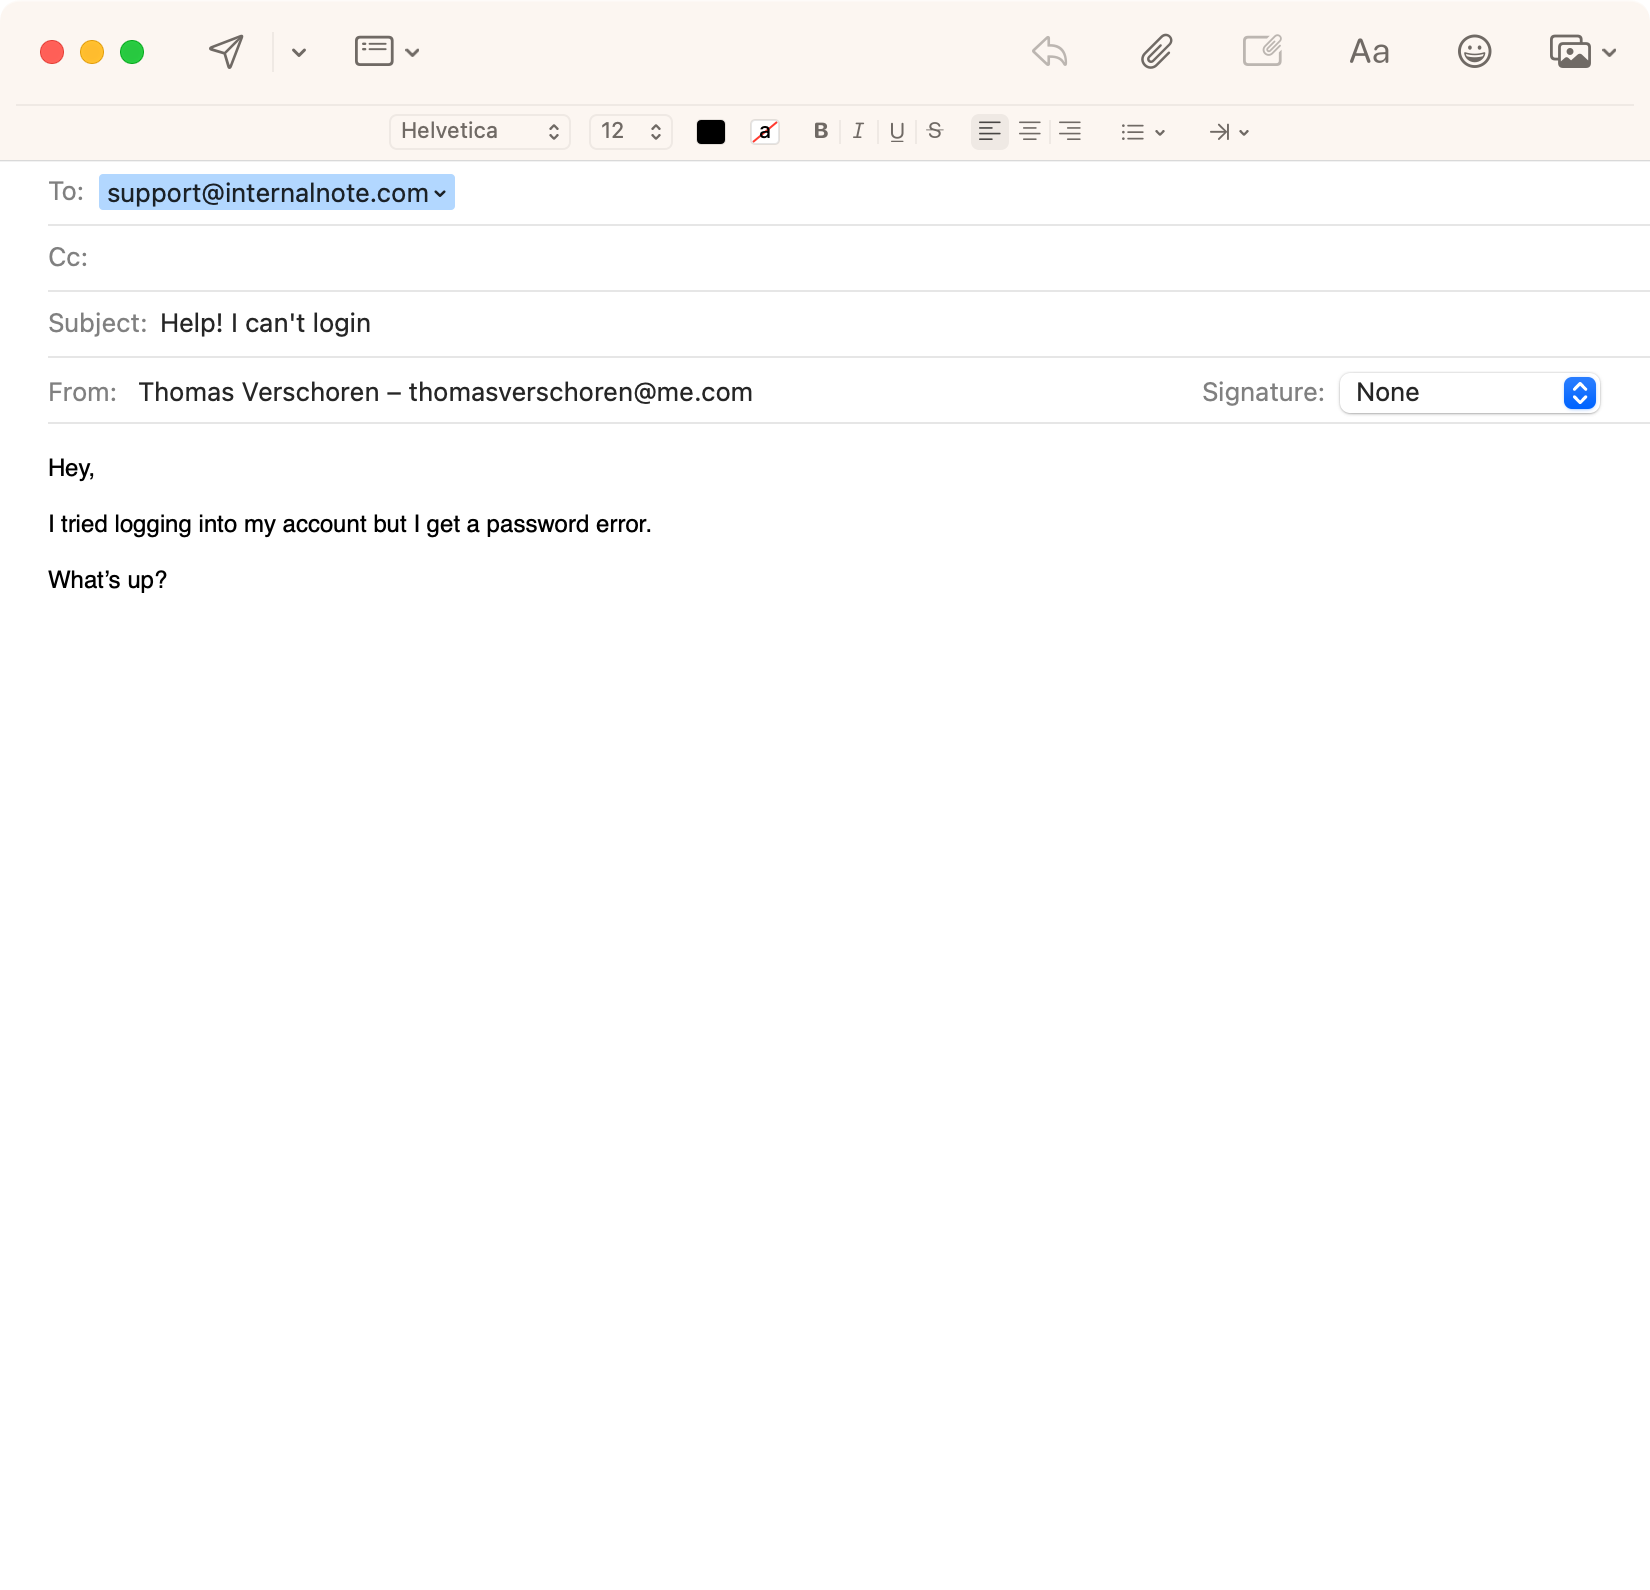
If you've got Answer Bot enabled on your instance, a customer that emails you will get suggested articles and can auto resolve their issue.
In our example here, a customer that emails you about not being able to login, will get a reply back with the Outage Report article.
Request forms
Aside from email your webform is another powerful tool to deflect incoming requests.
A customer that goes to your contact form and submits a request for e.g. can't login will get a suggested article list that also contains your support article.
But we can do one better. Zendesk Webforms support pre-filled fields. So instead of having your Support Article link to your request form, we can create a specific CTA in the article that links to your form but also sets a predefined subject. This way you can more easily triage those inquiries and show the customer you know what their issue is, providing more trust.
Creating a pre-filled link is easy:
- Copy the URL of your request form
https://your.helpcenter.domain/hc/en-us/requests/new - Append the following parameter
?tf_subject=textwheretextis whatever you decide the subject to be, in our caseLogin Outage 2023-01-24 - Use this as a link in your article. For example: https://support.internalnote.com/hc/en-us/requests/new?tf_subject=Login+Outage+2023-01-24
If you've got trouble creating pre-filled links, take a look at the article below or use the Pre-filled Ticket forms app from the Zendesk Marketplace.
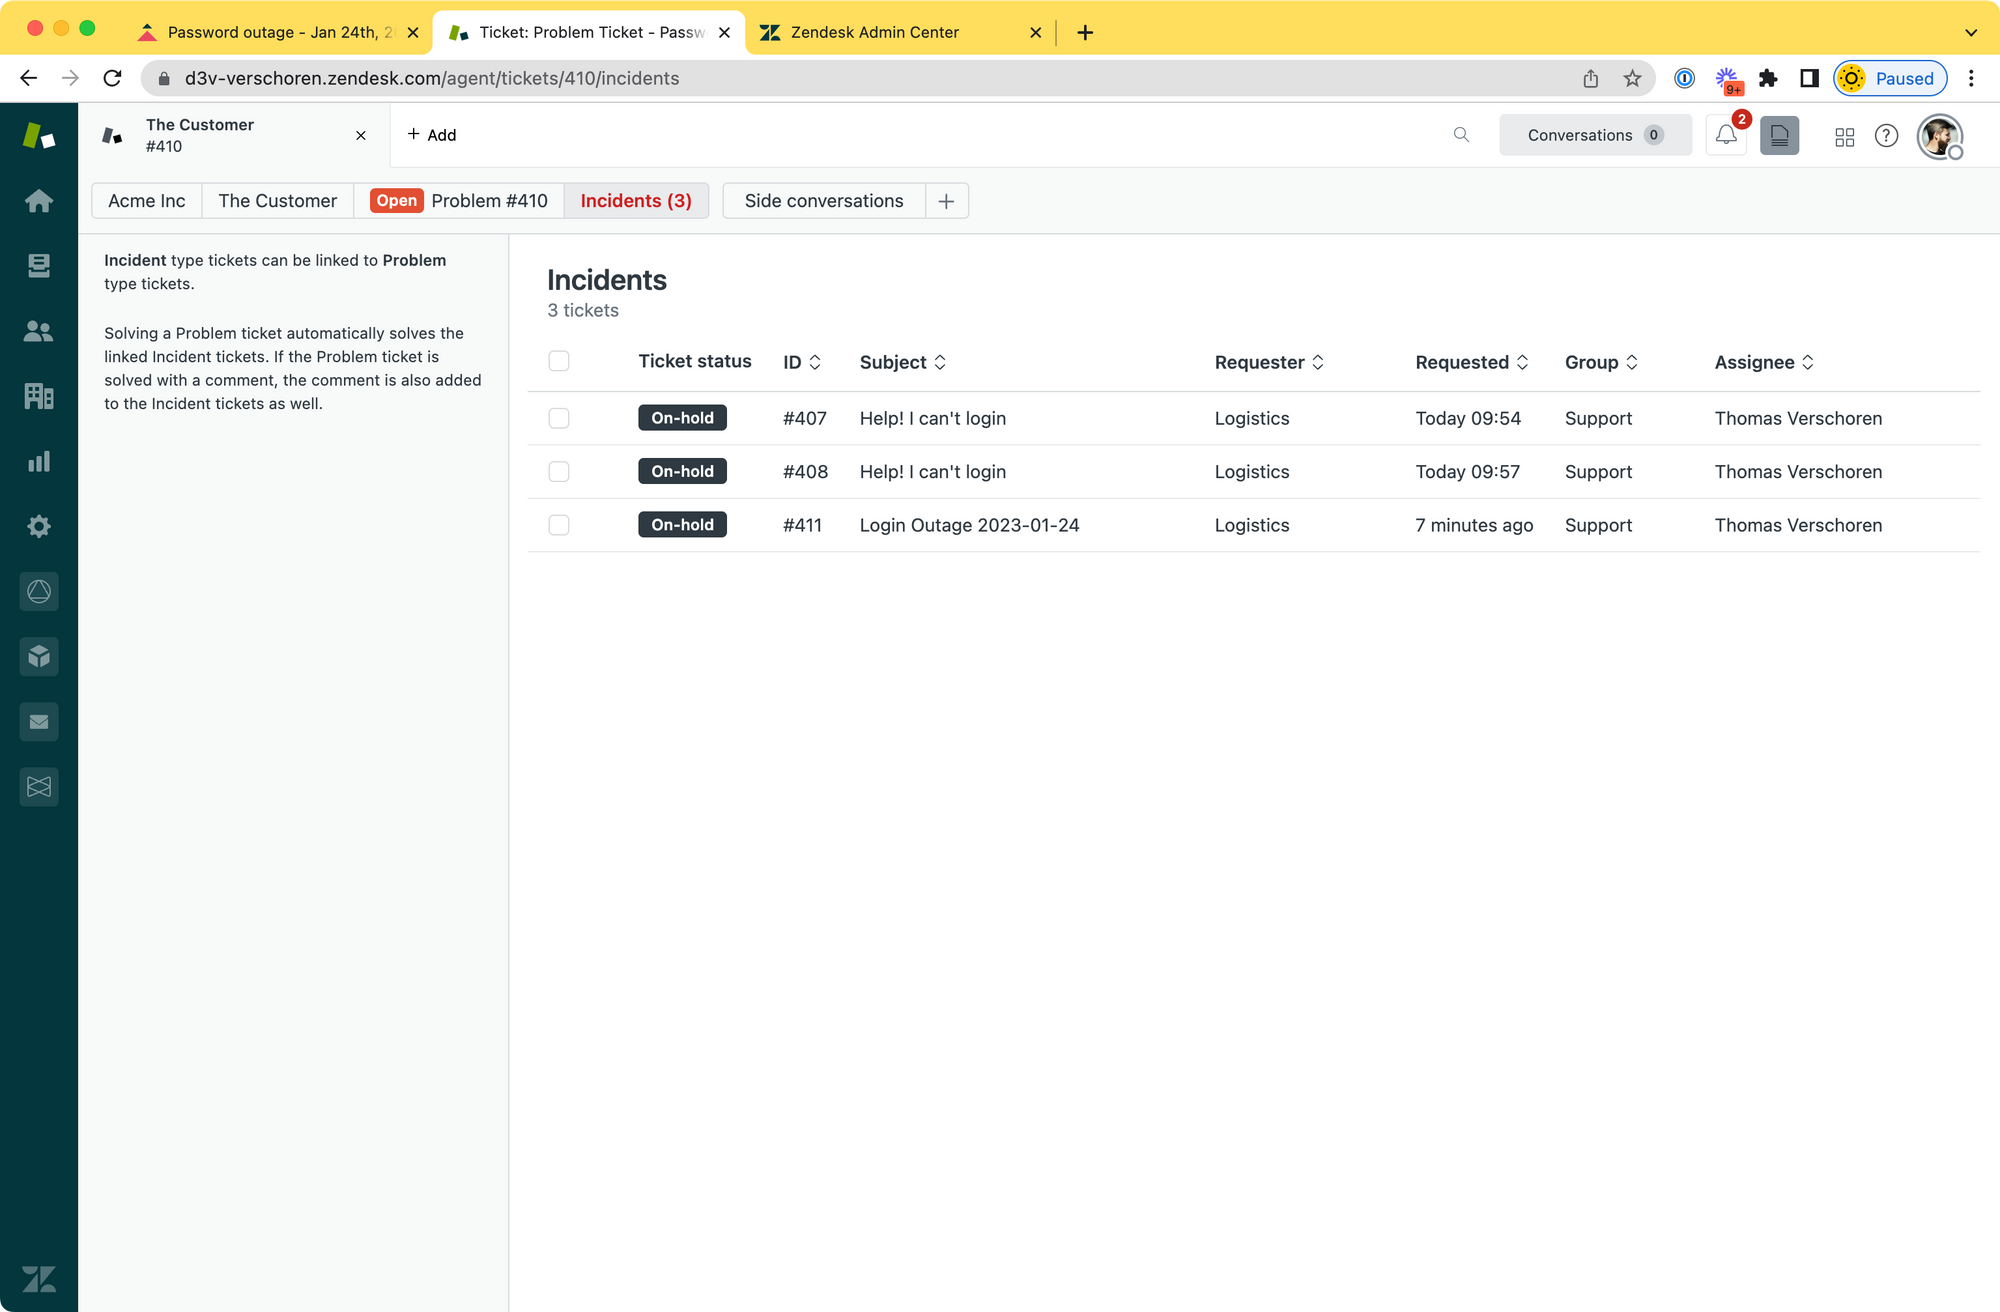
2. Bundling
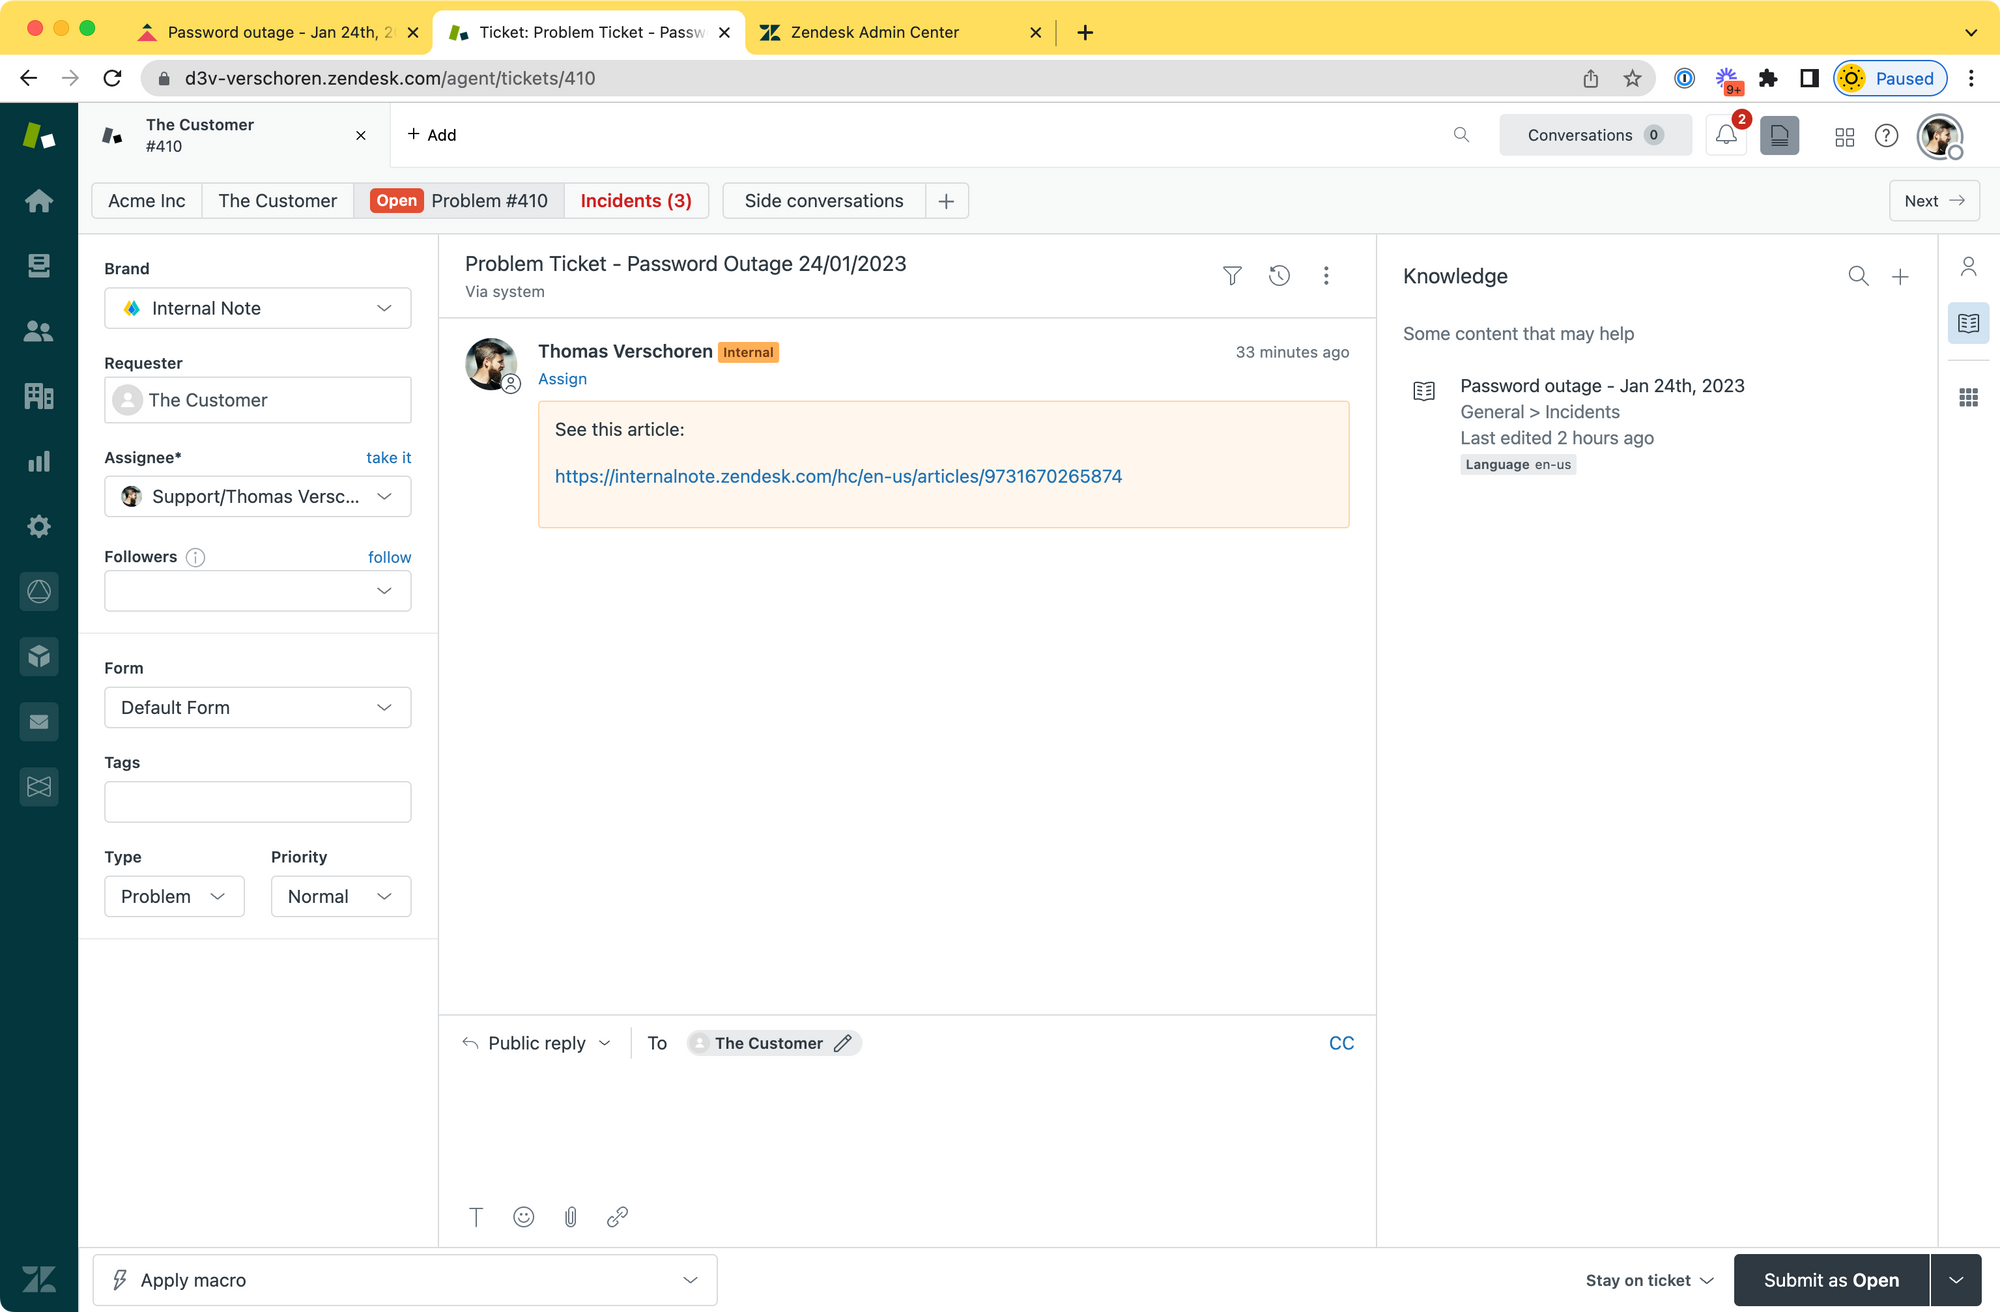
Zendesk has an old feature that allows you to link multiple incidents into one problem ticket. This gives agents the benefit of having one ticket to look at and have all related tickets linked. And solving the Problem ticket will send the comment to all Incidents als close them too.

We're going to take this concept and automate if further for your agents.
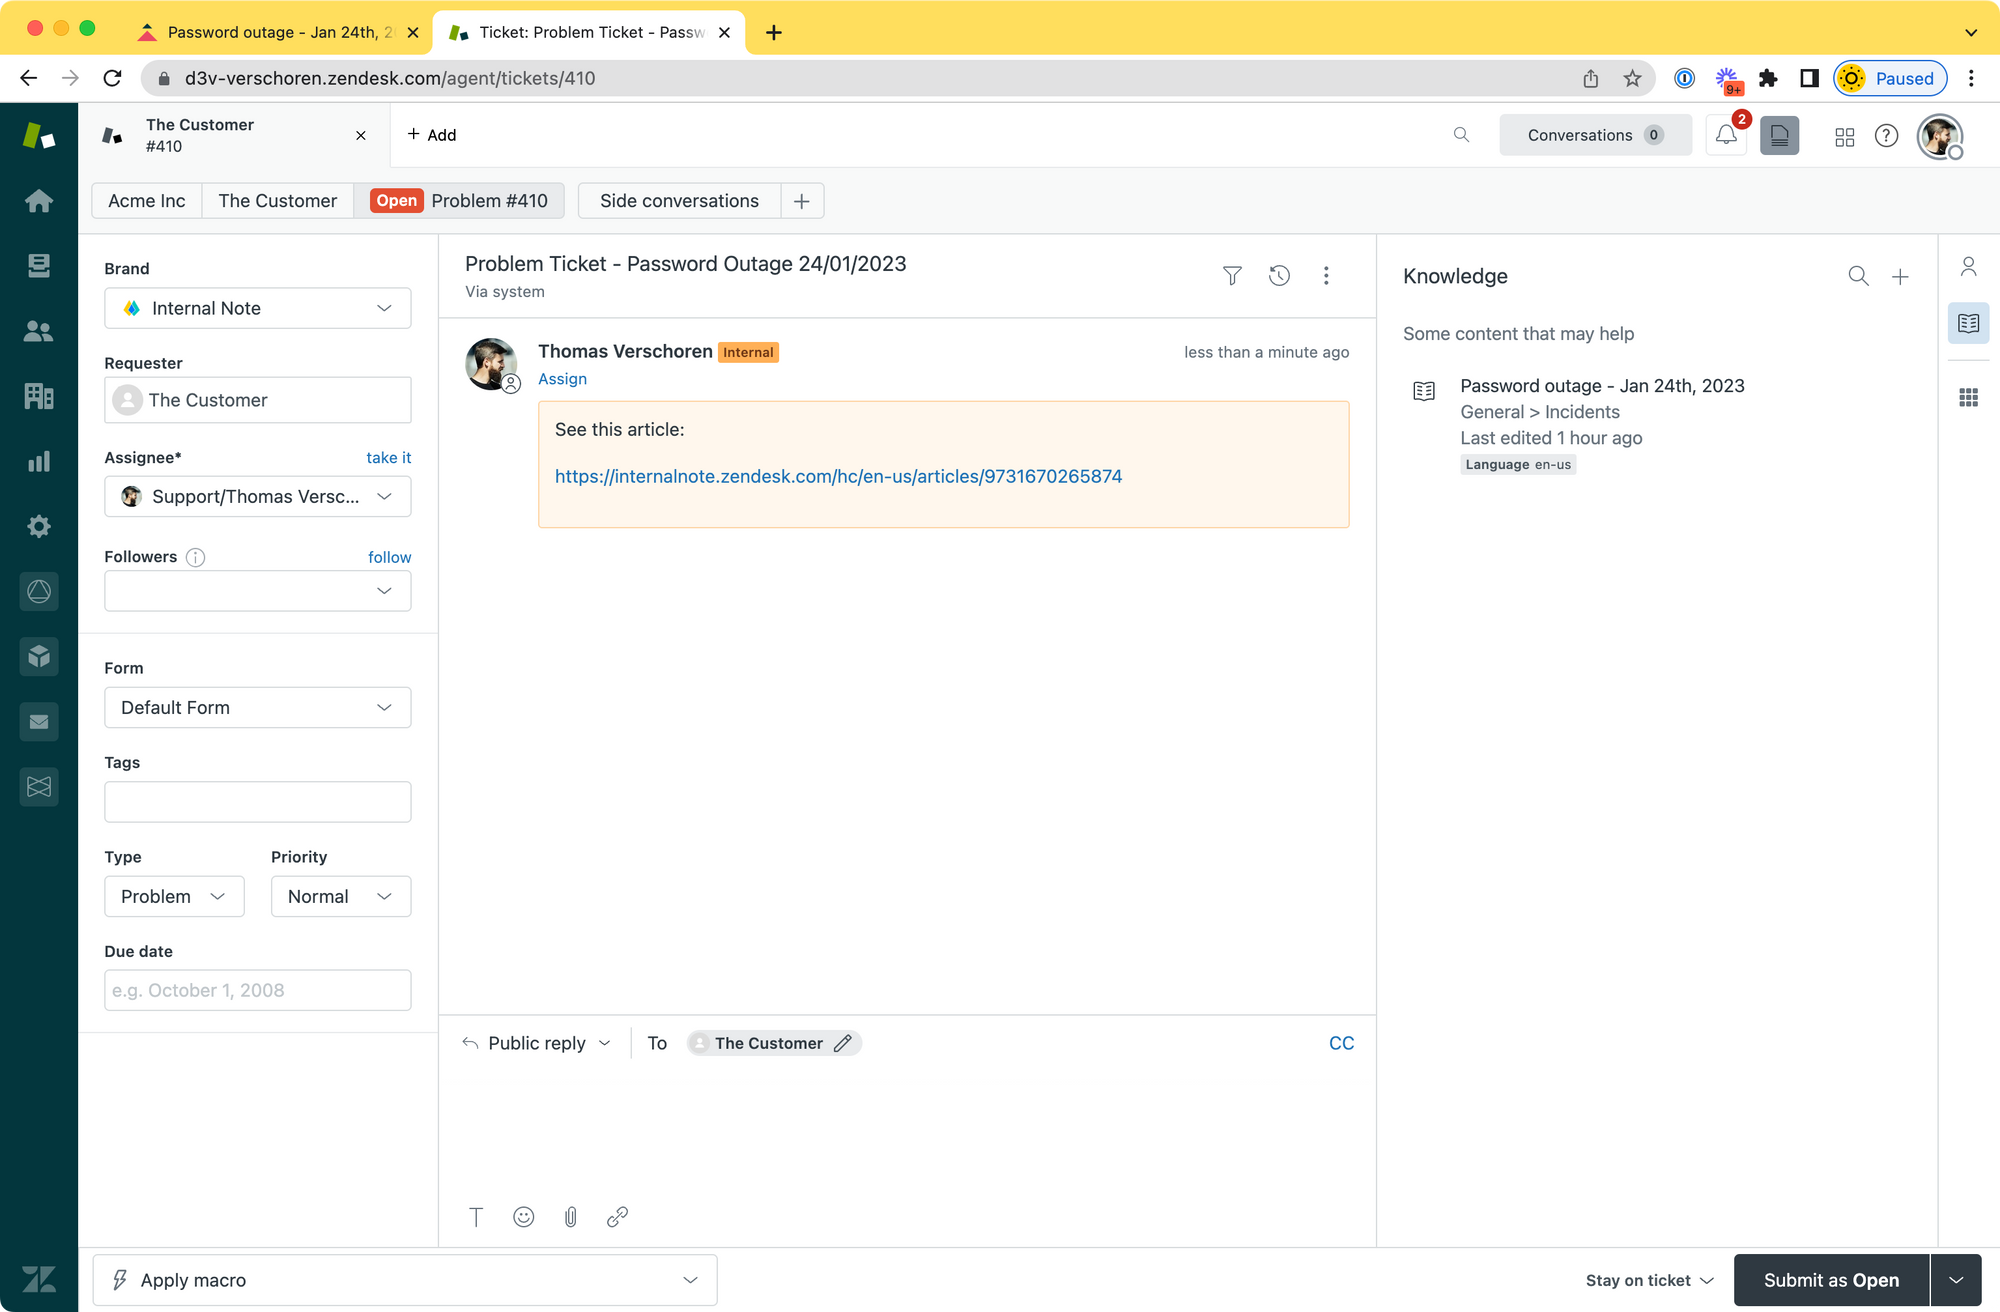
Create a problem ticket
The first step for any crisis is to create a new problem ticket. This ticket will be the cornerstone of your crisis management:
- Ticket Type:
problem - Give it a clear title
- Link to the Support Article so agents can quickly find it
- The requester can be anyone, I prefer to use an
@example.comdomain so no emails get send out.
Copy the Problem Ticket ID somewhere, you'll need it later. In our demo #410.
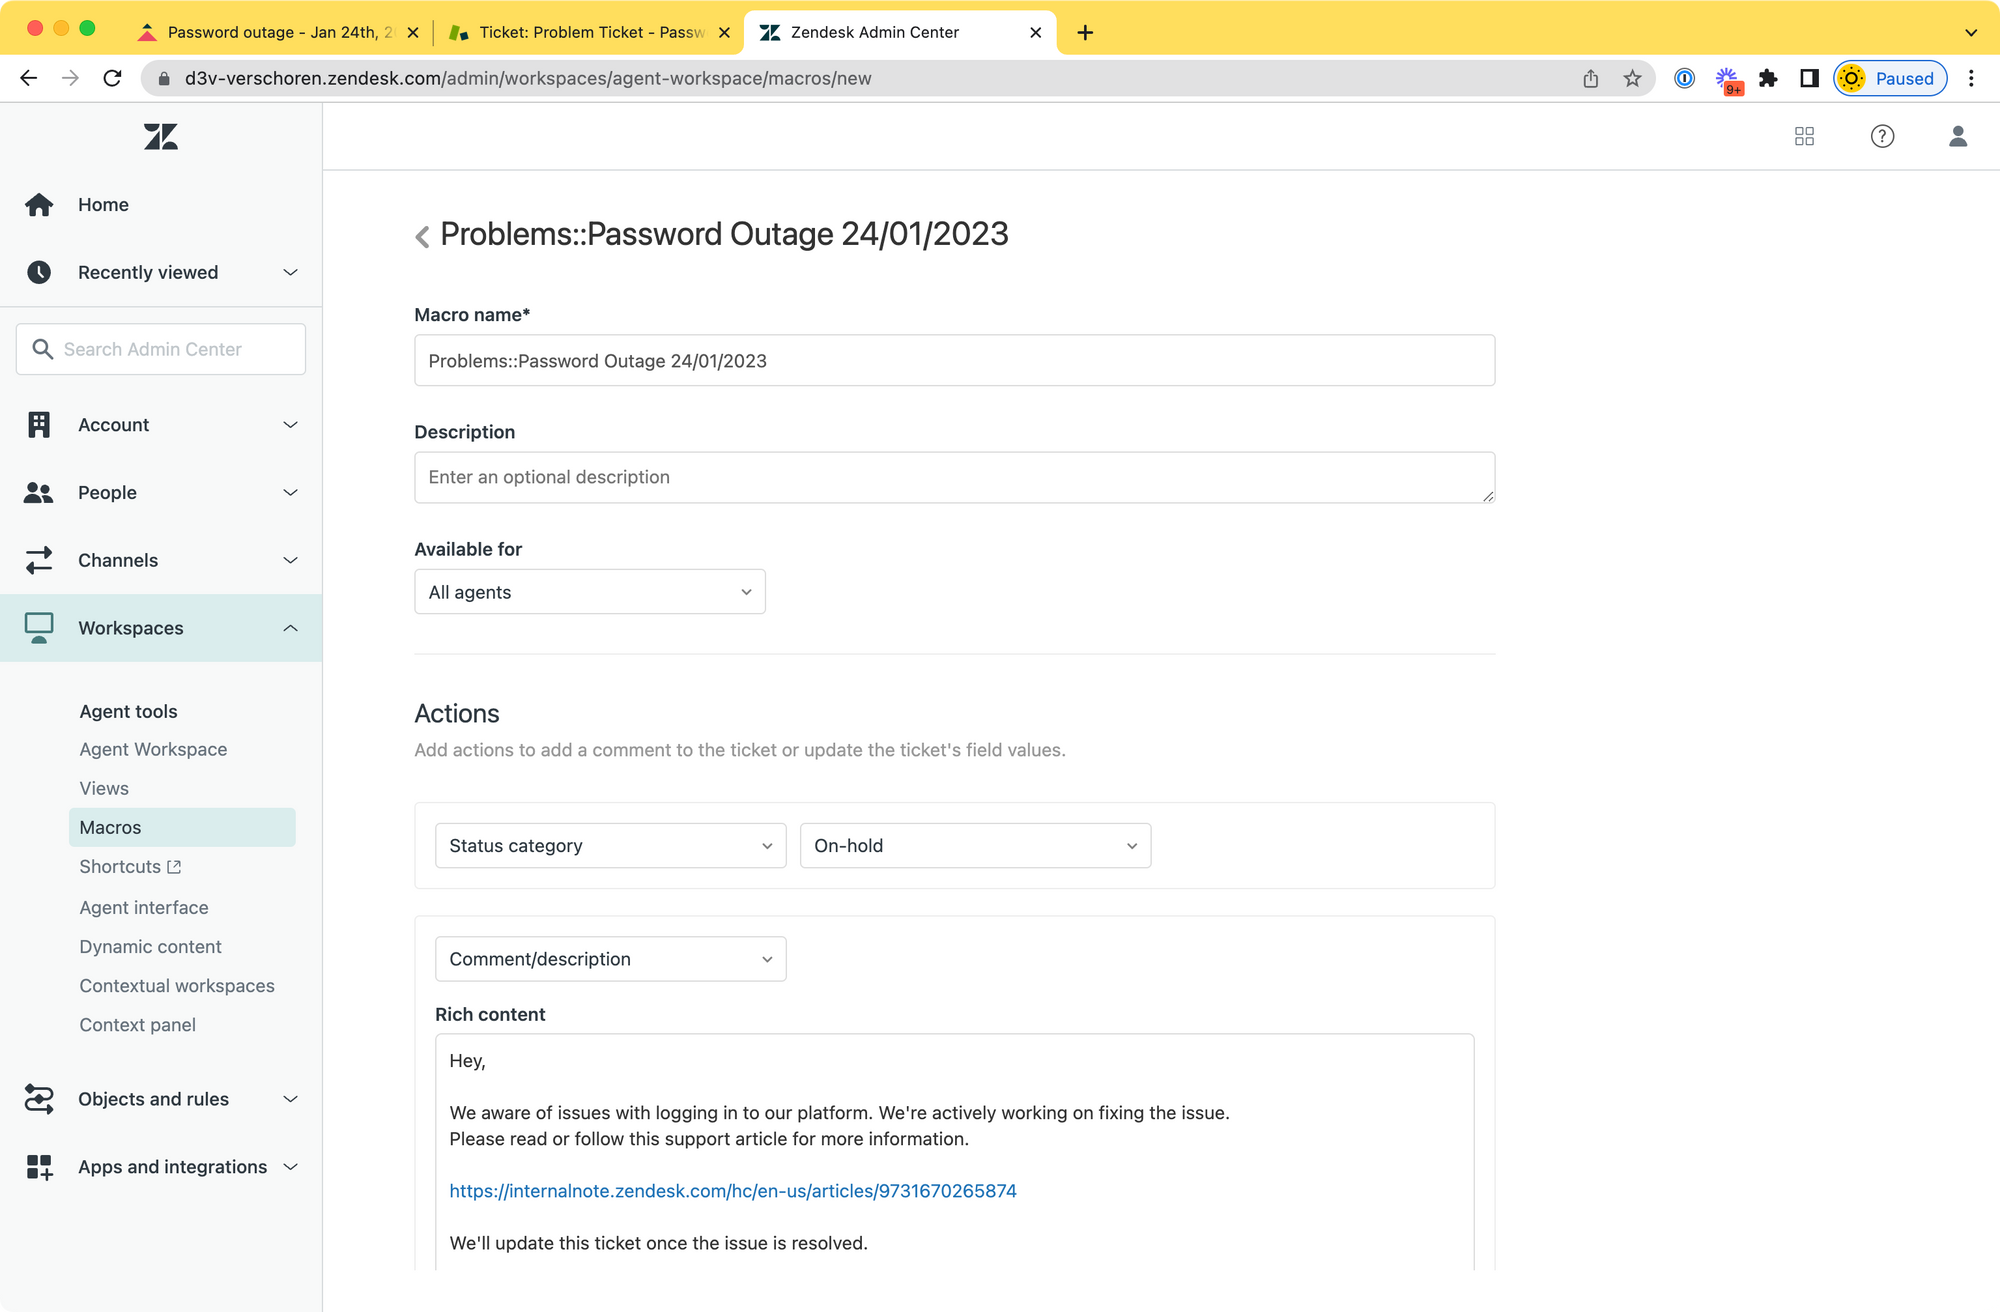
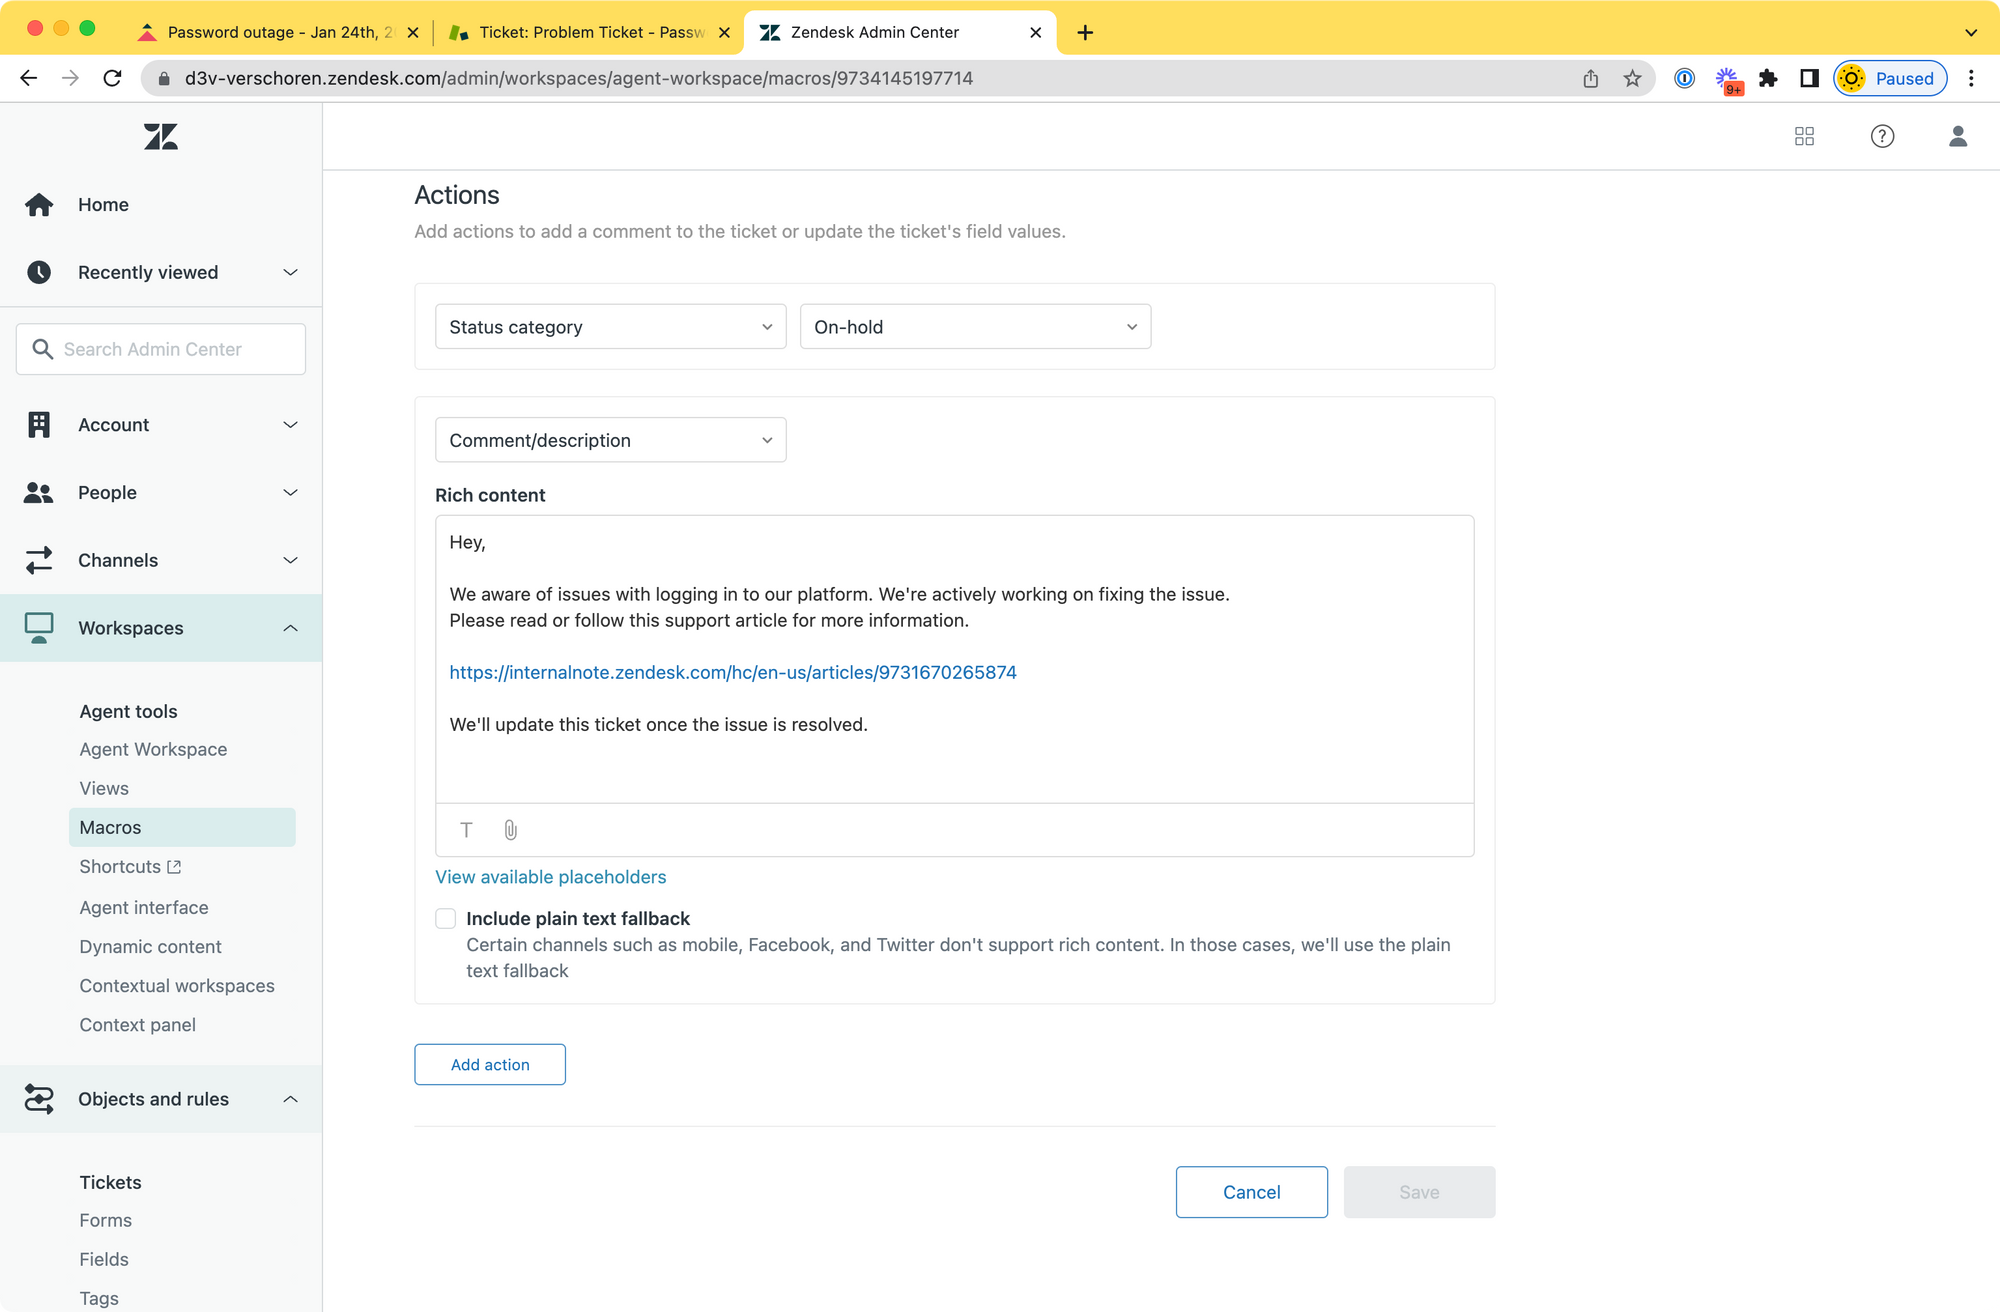
Create a Macro
Step two is creating a macro for your agents via the admin panel. This allows agents to bulk select all incoming tickets about the issue and send out an update.
- Add tag
incident_20230124for categorisation - Set status to
on holdsince we need to wait for an internal resolution. - Add a description that clearly links to the Support article and sets expectations.
You can update this macro throughout the day.
Linking to the problem ticket
We now have tickets created via email, web form and either assisted via Answer Bot or replied to via the macro about this incident. Ideally we want them all linked to the problem ticket automatically.
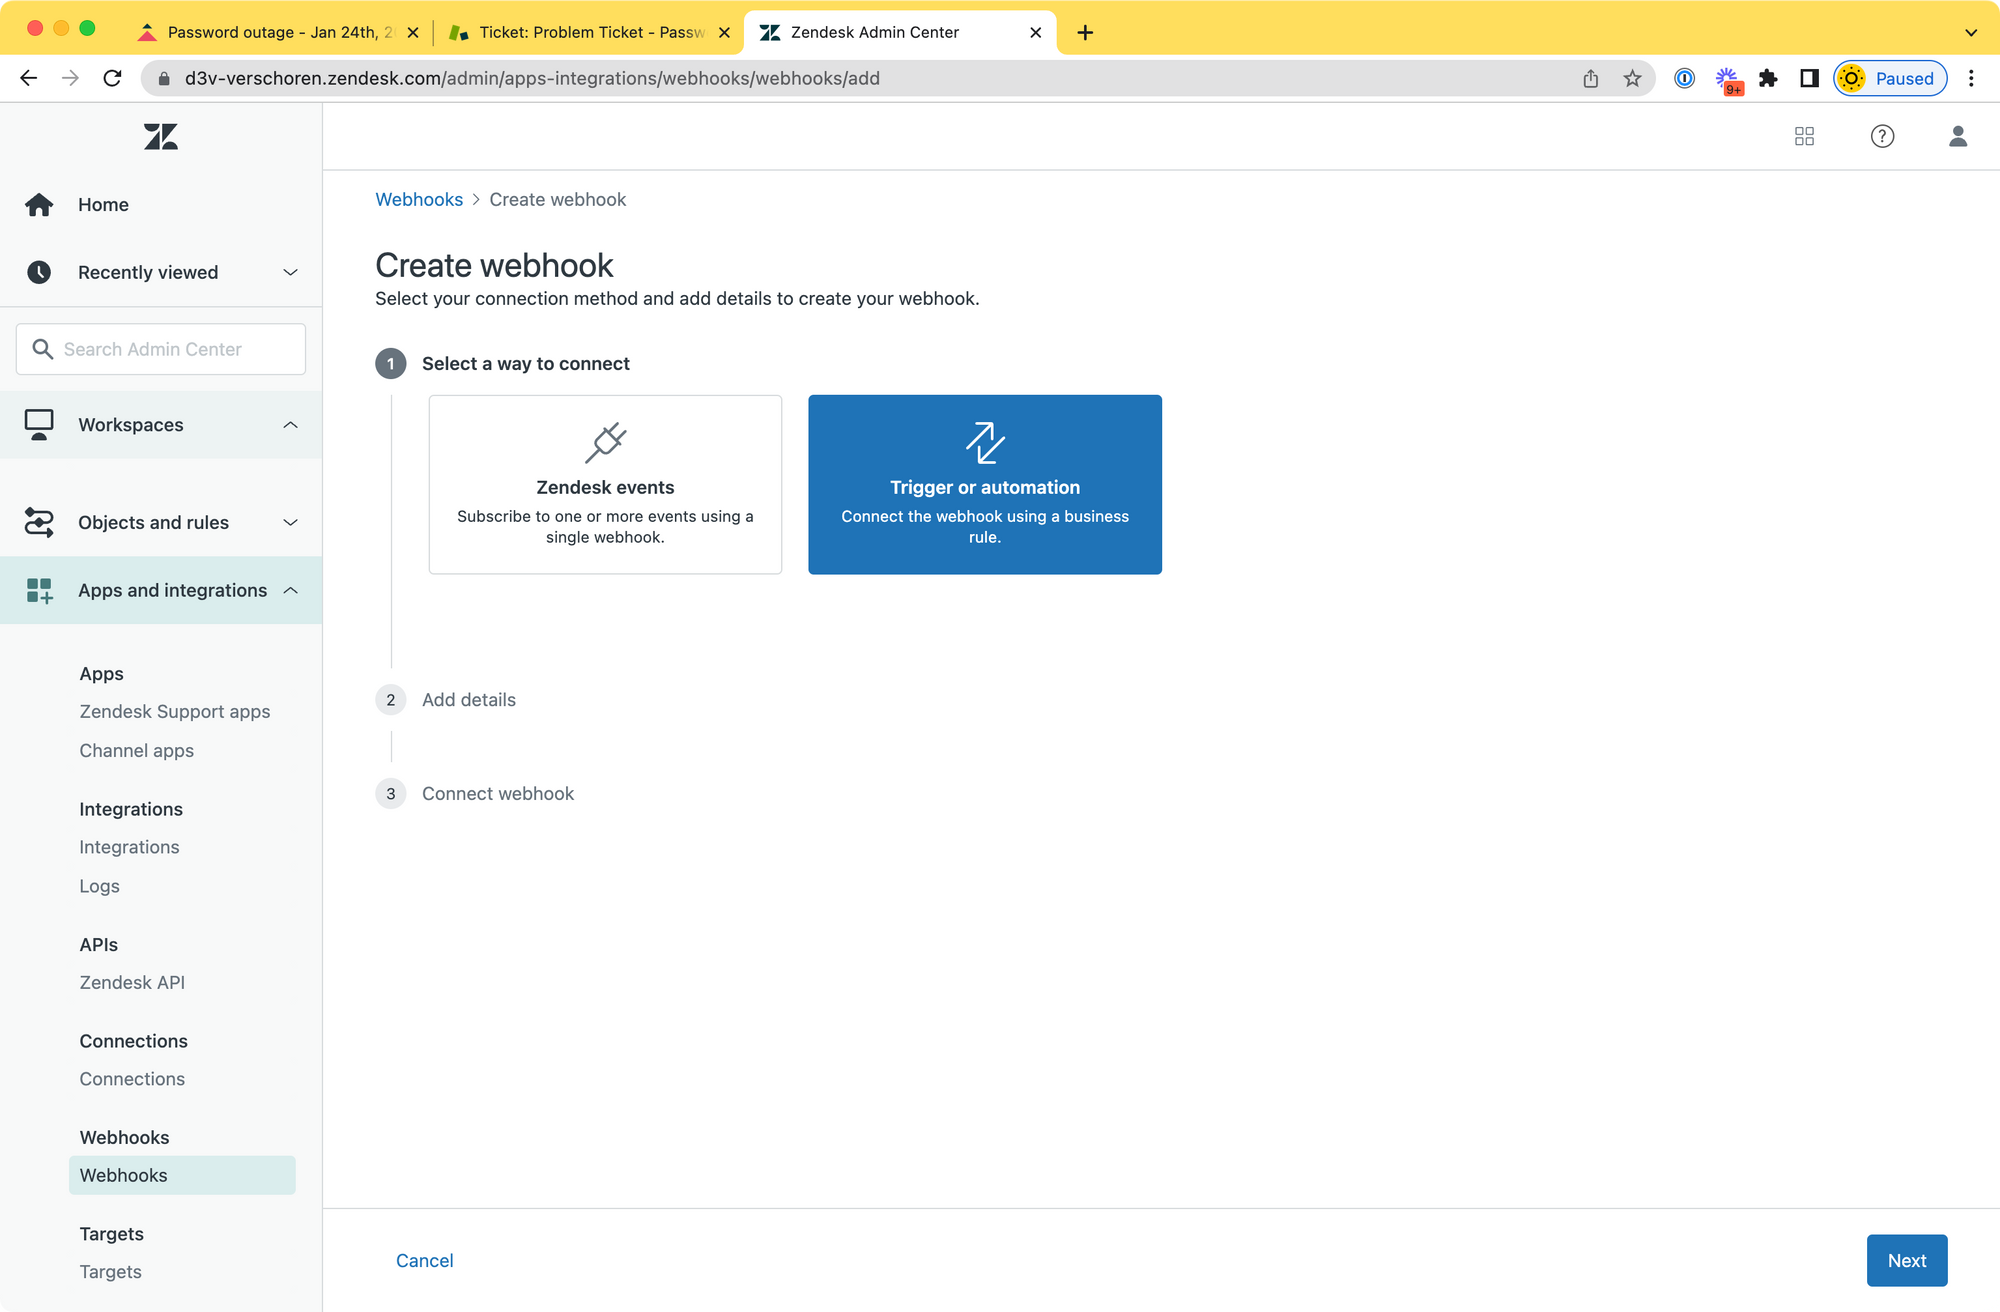
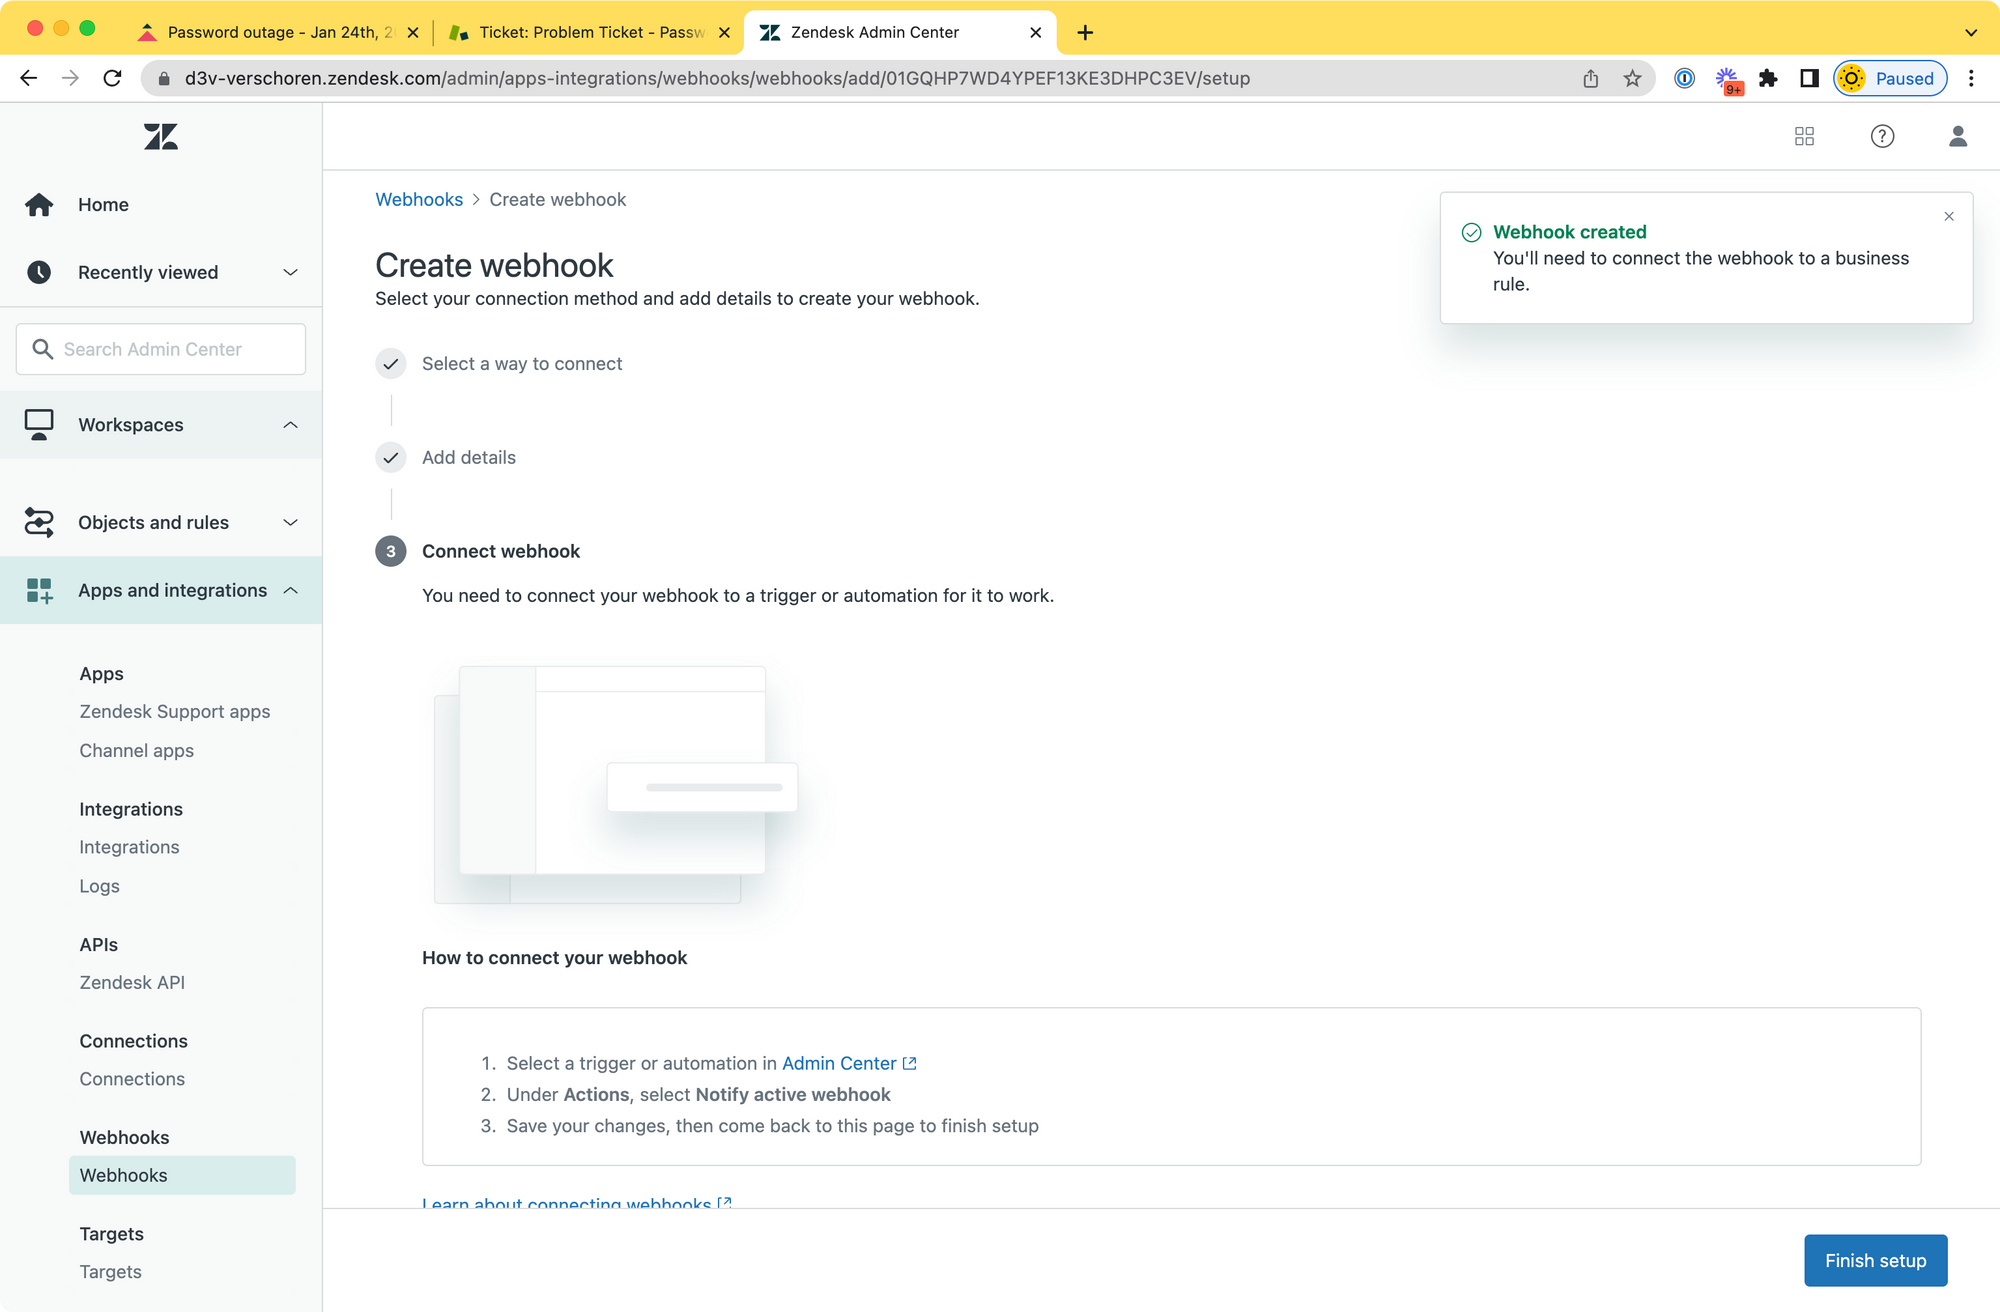
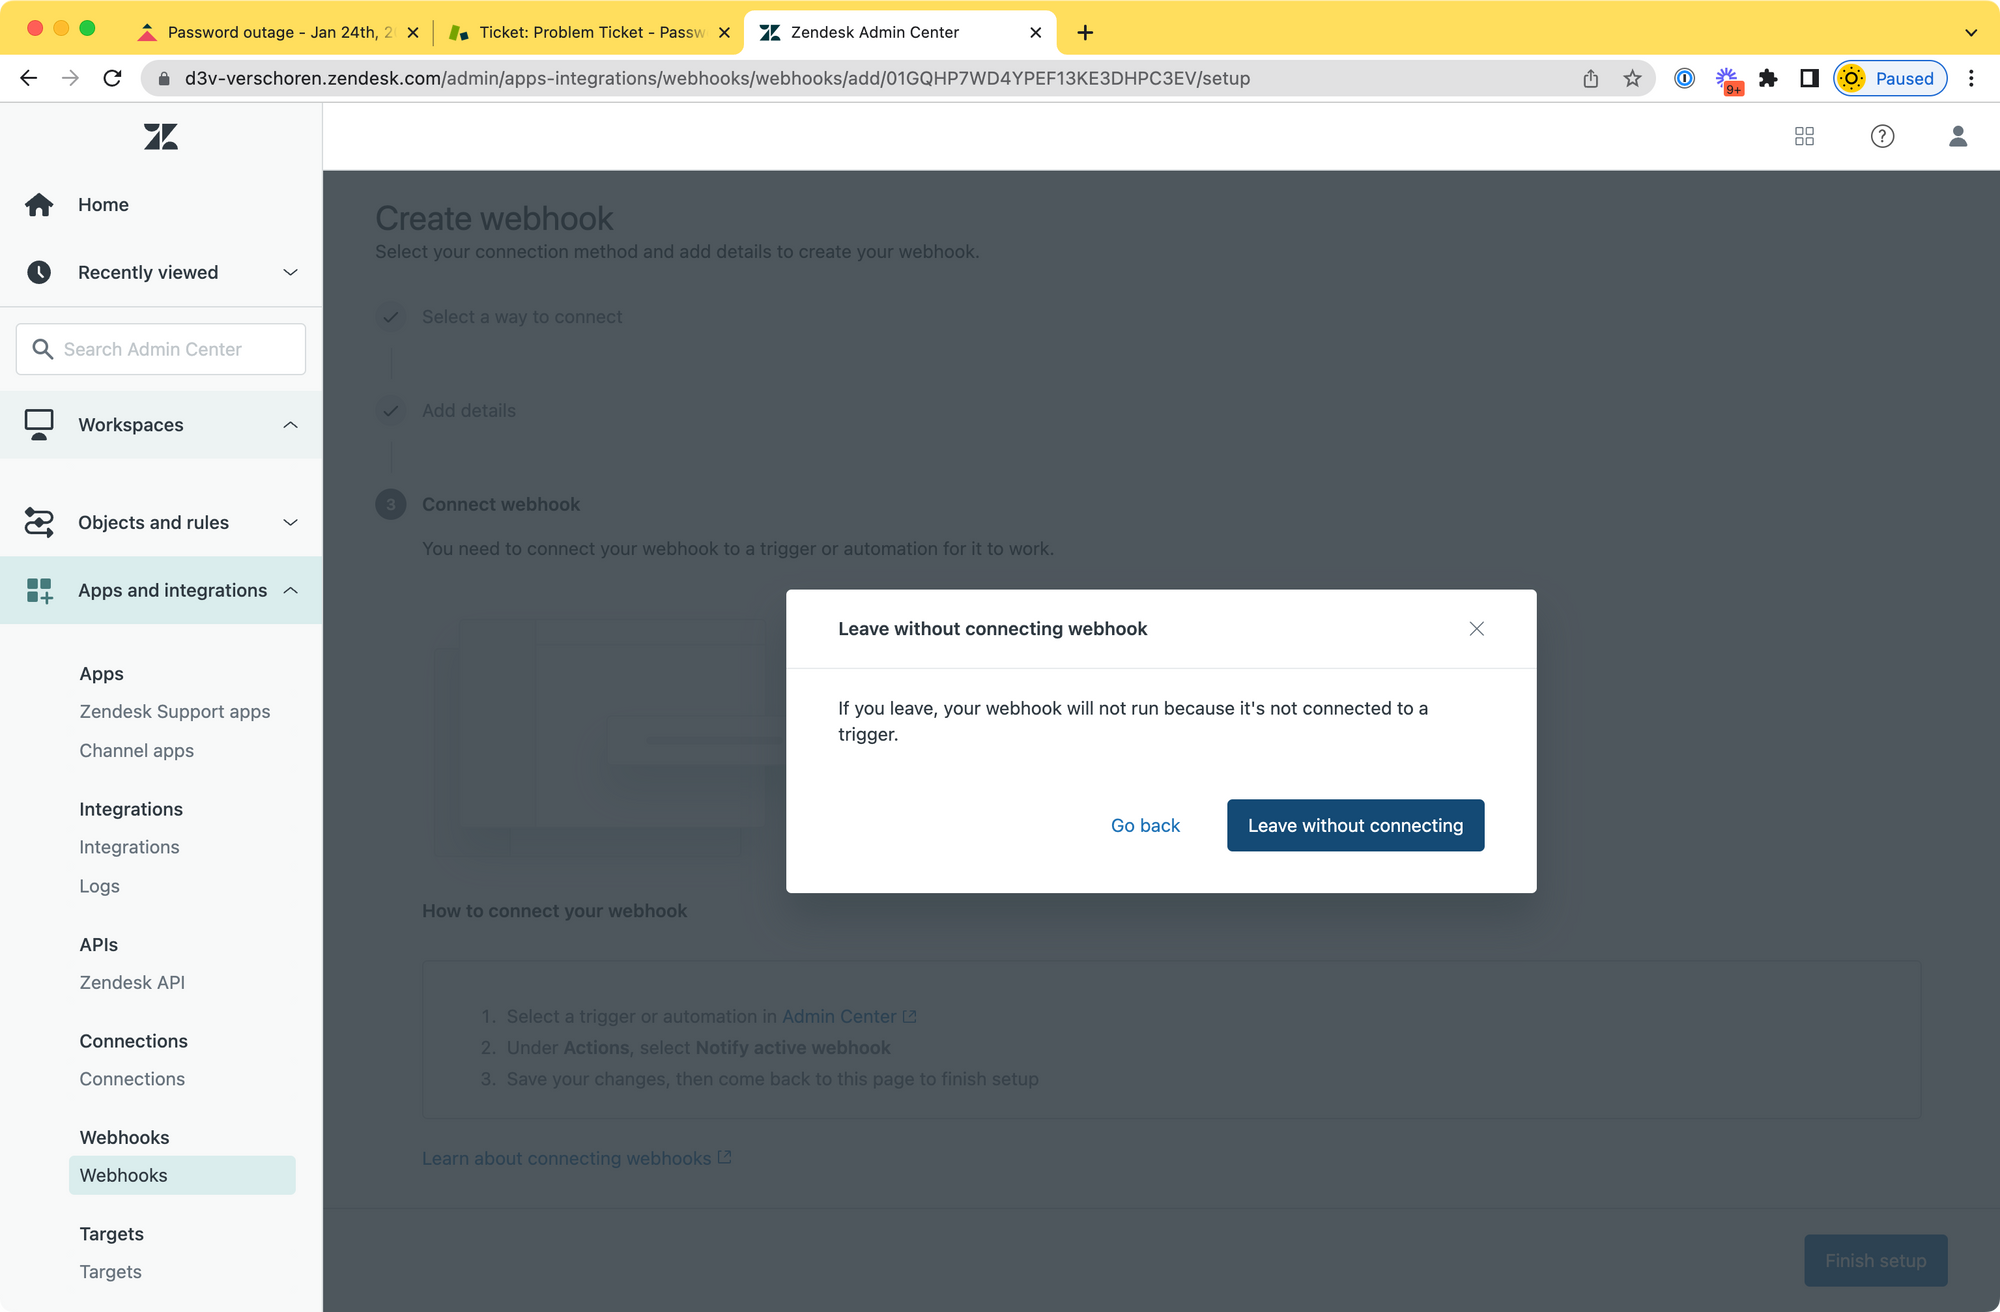
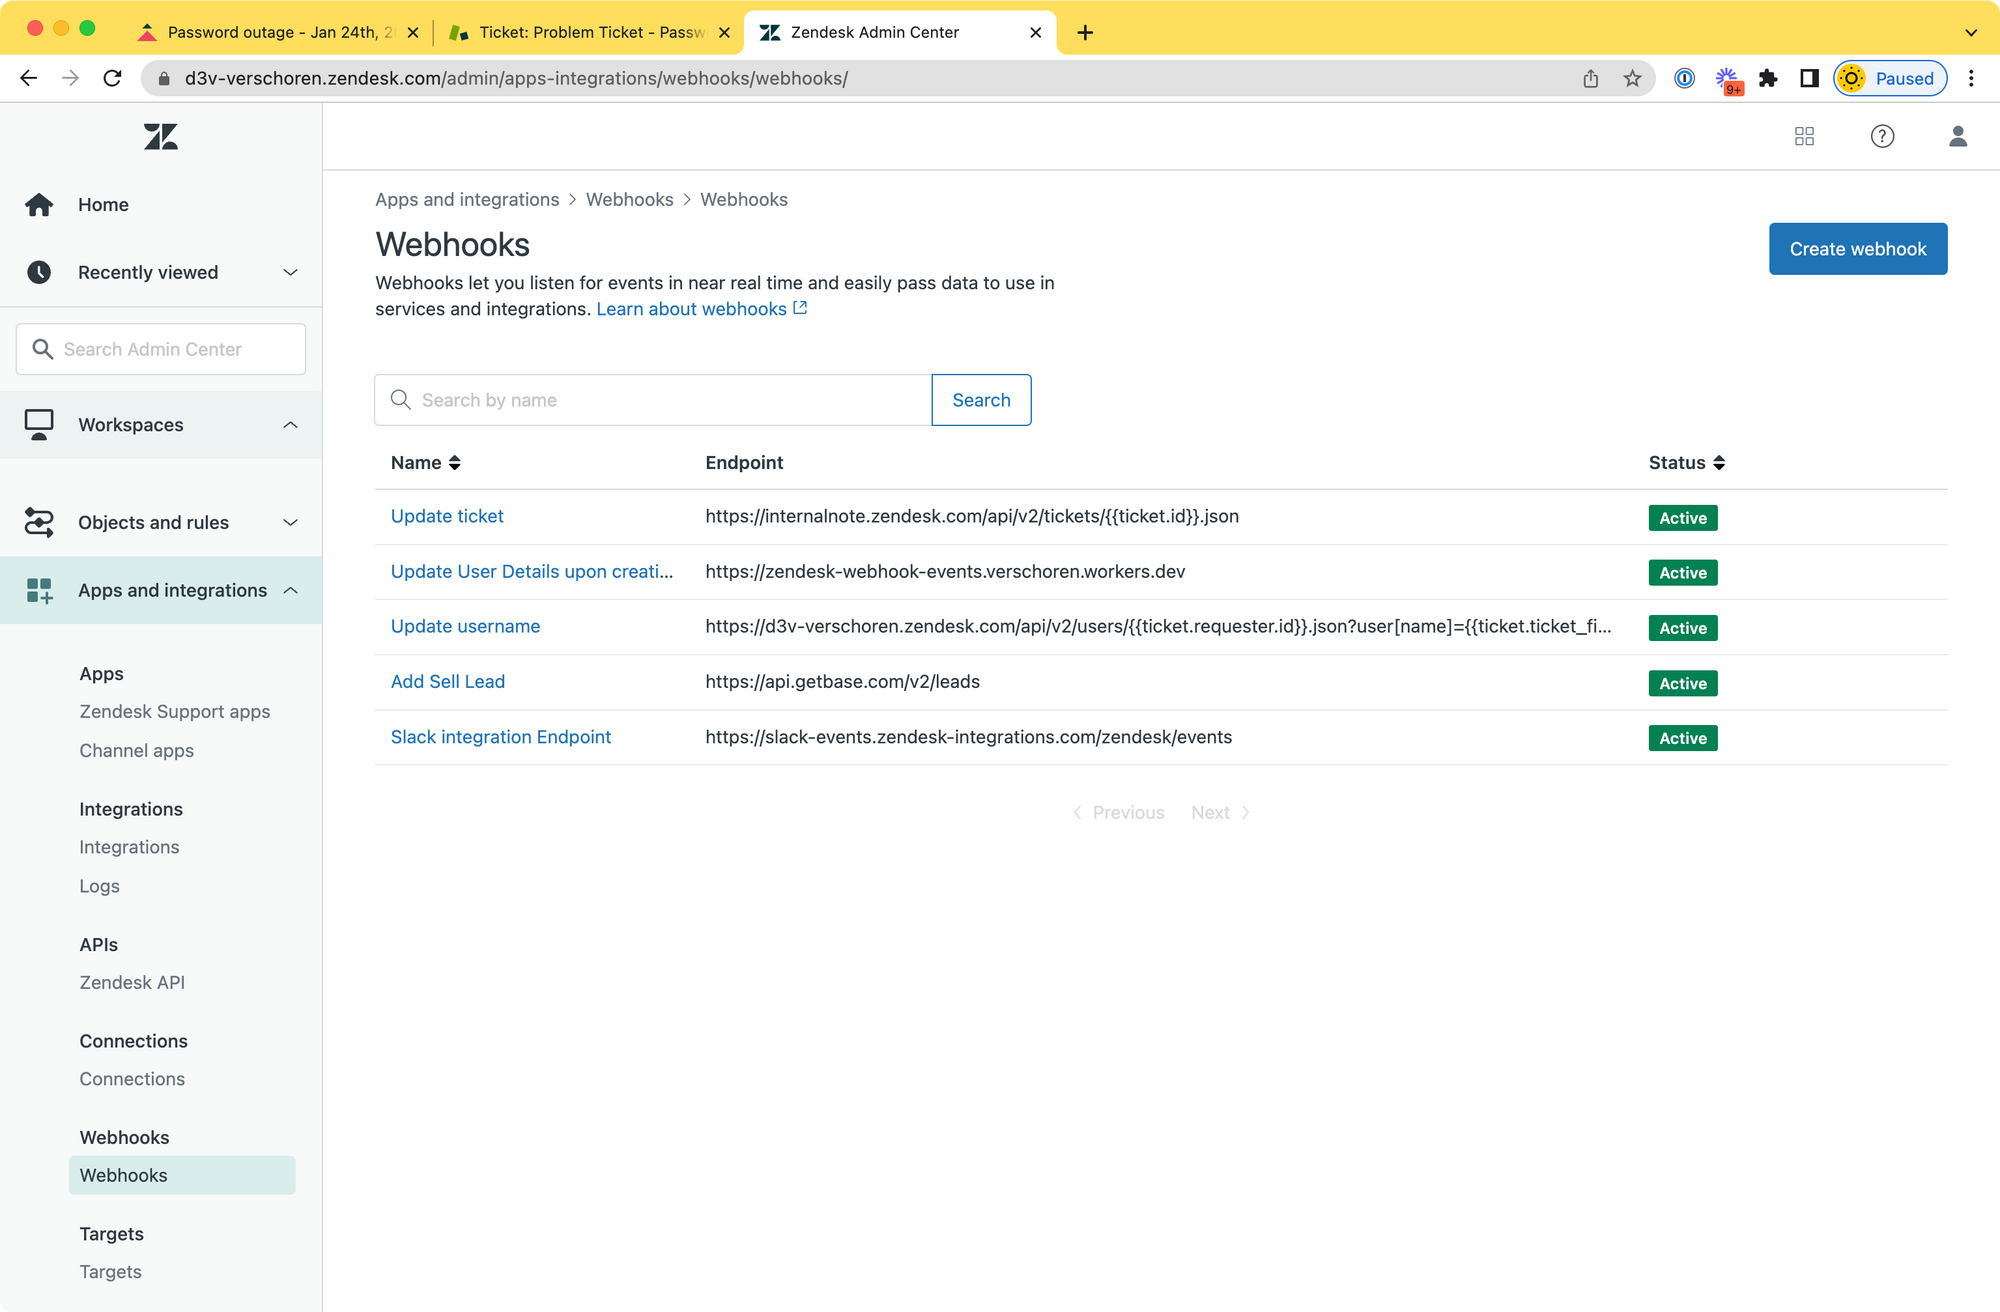
For this we can leverage webhooks. We'll create a webhook and trigger that takes any incoming ticket about the incident and links it to the problem ticket.
Webhook
Create a new Trigger or Automation based webhook via the admin panel with the following setup. You only need to create this trigger once, it can be reused across all incidents and problems in the future.
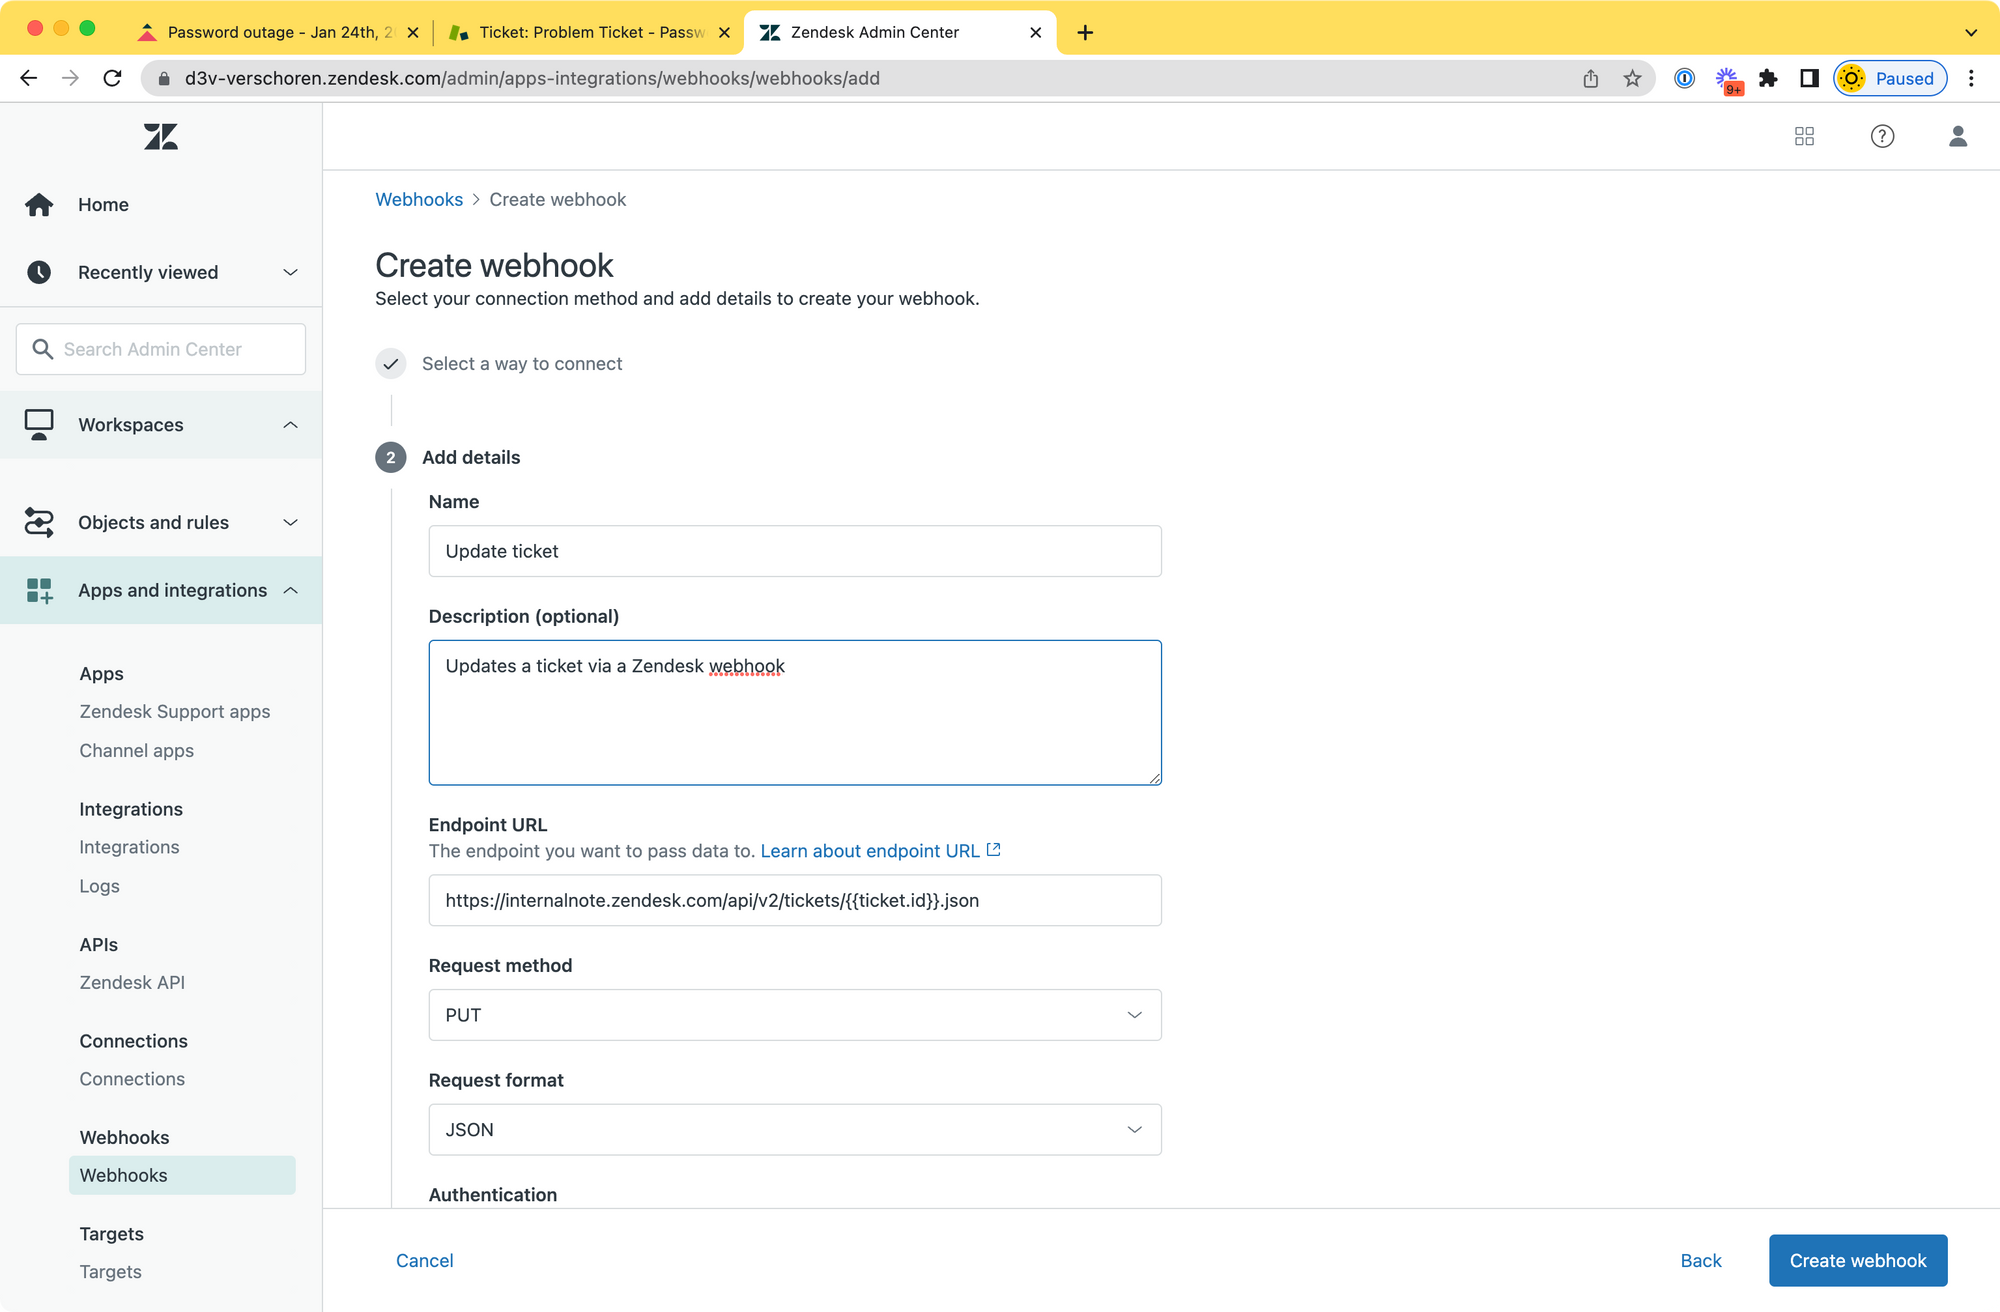
- Name:
Update Ticket - URL:
https://yourdomain.zendesk.com/api/v2/tickets/{{ticket.id}}.json - Type:
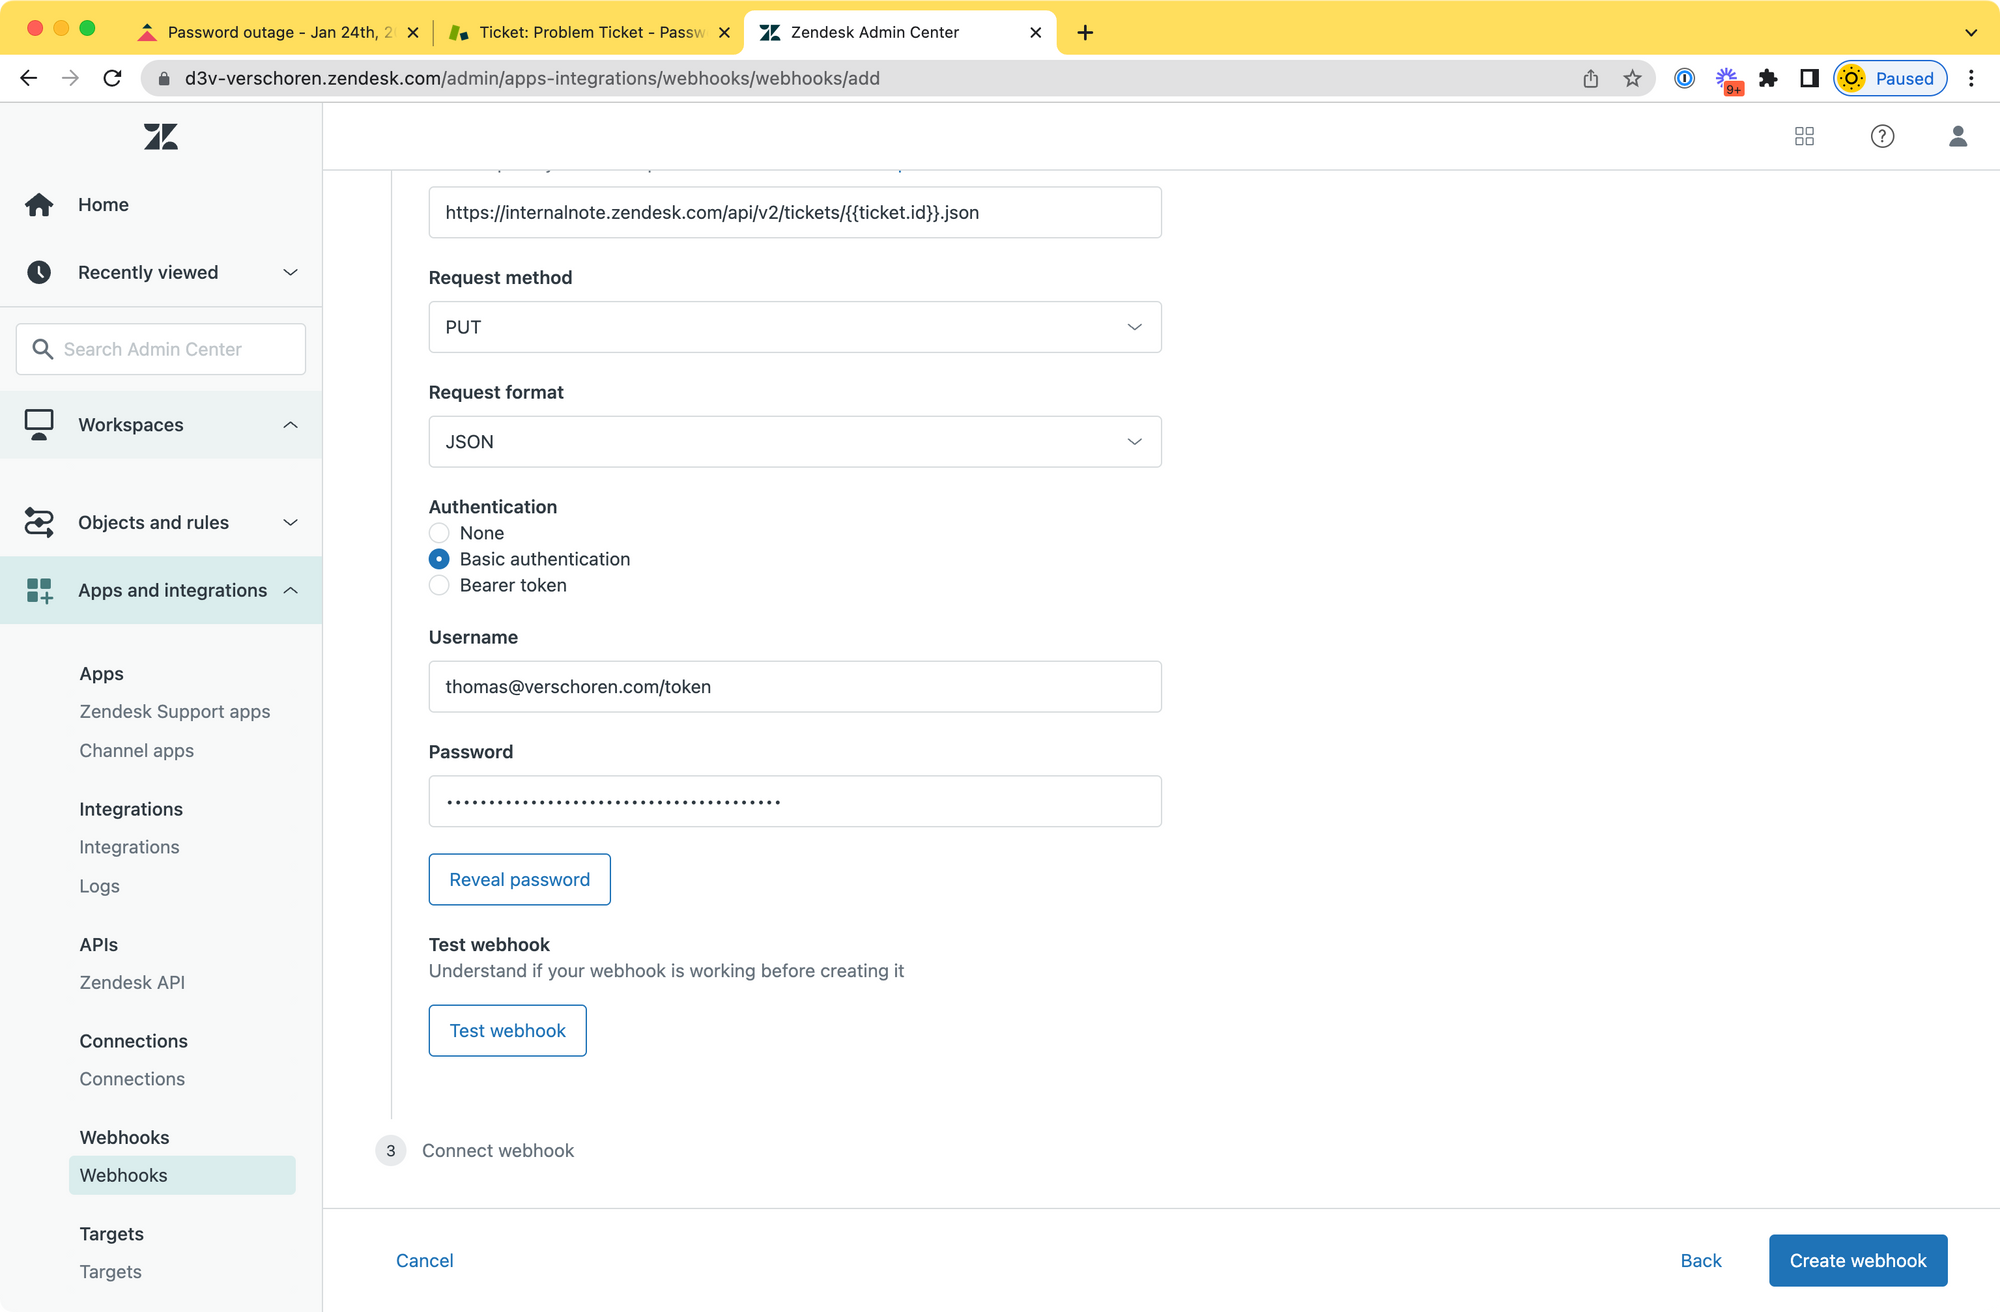
PUT - Authentication:
Basic Authentication - Username:
[email protected]/token - Password:
API Token, see Creating an API Token.
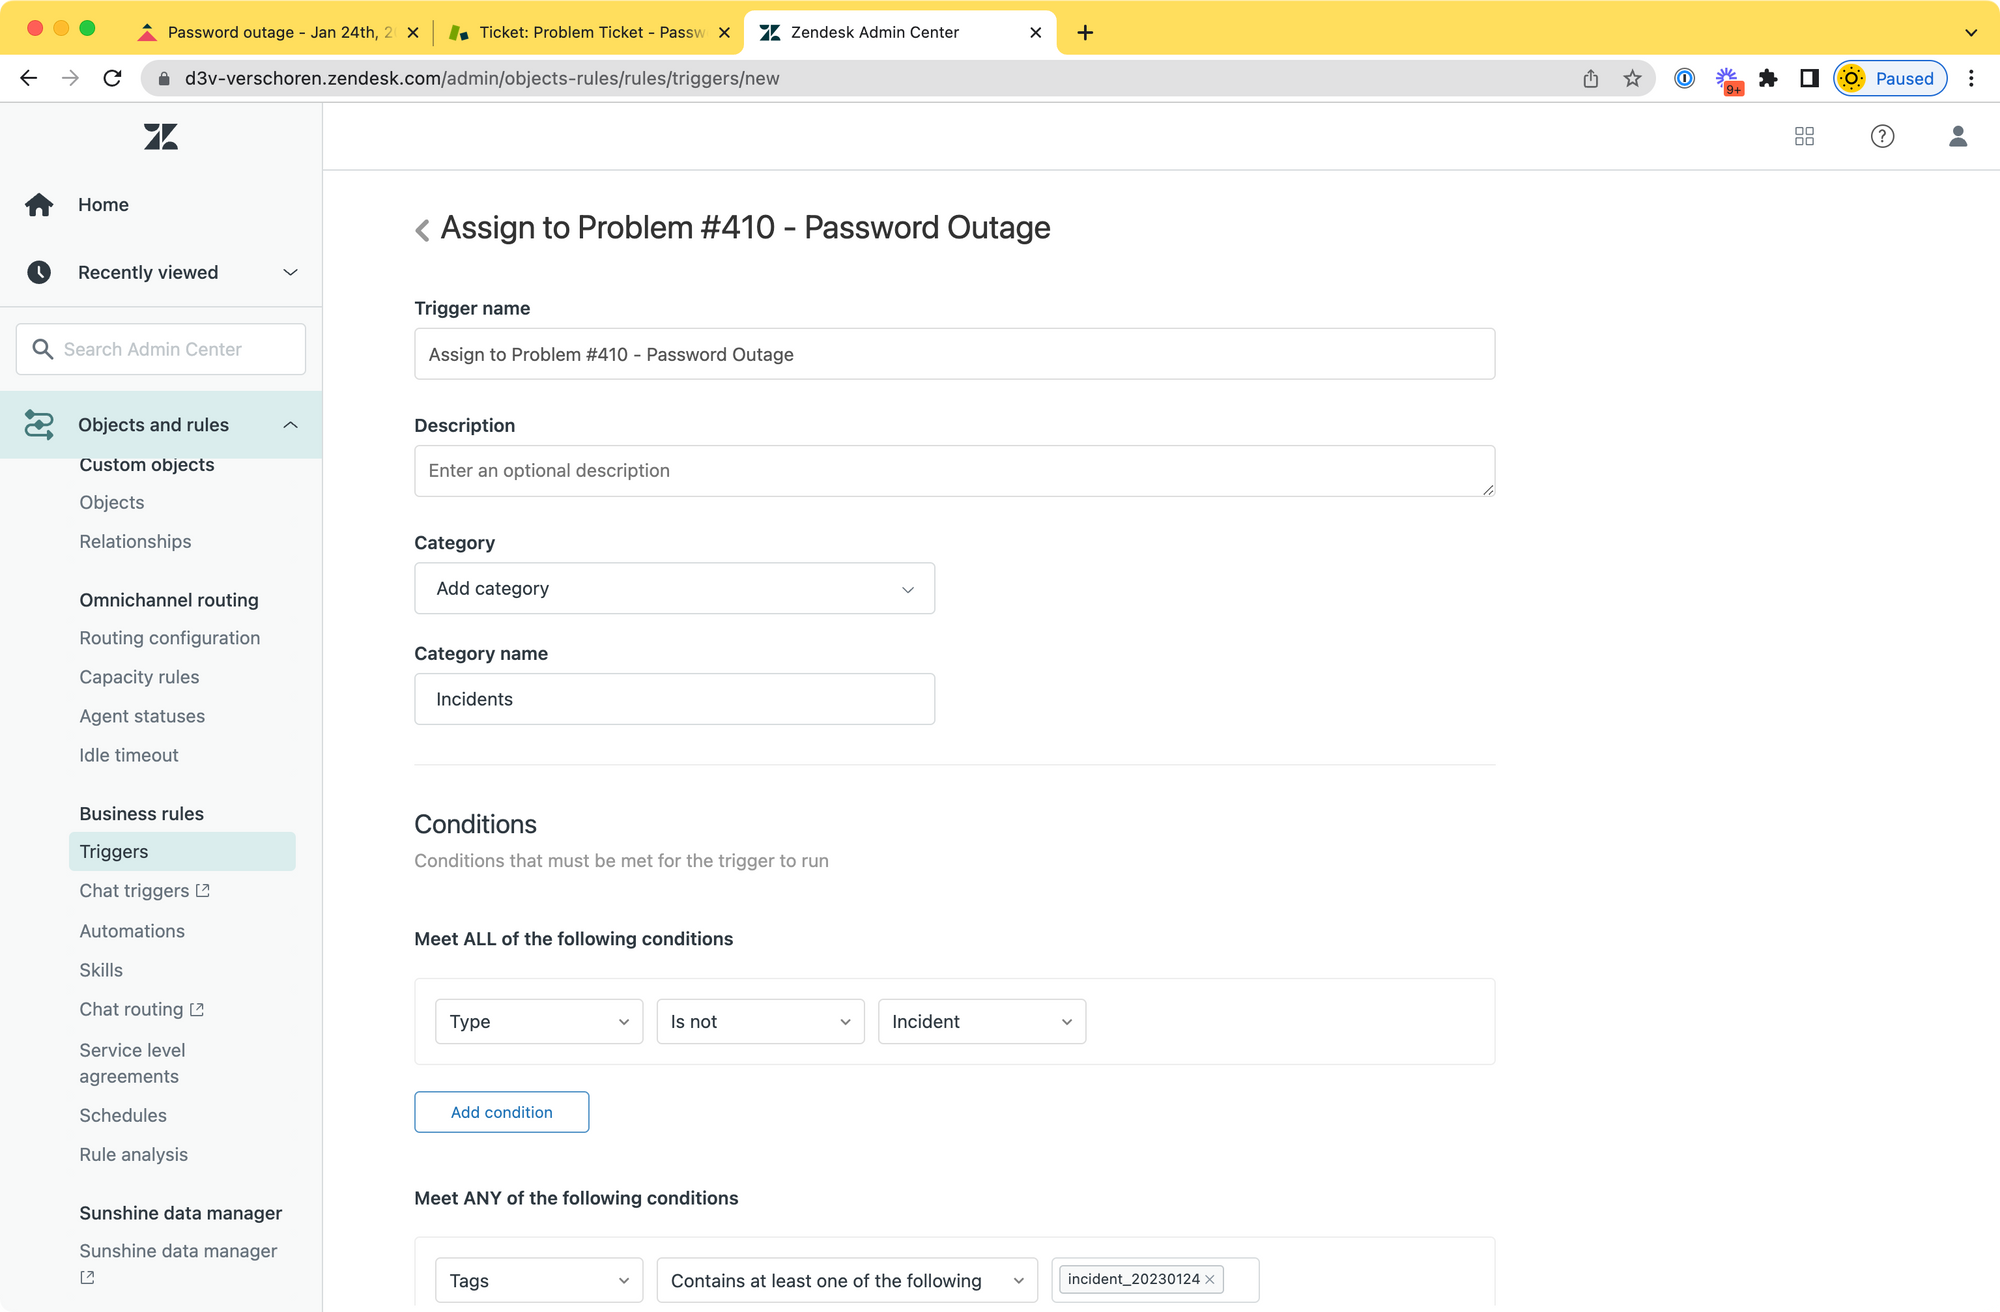
Trigger
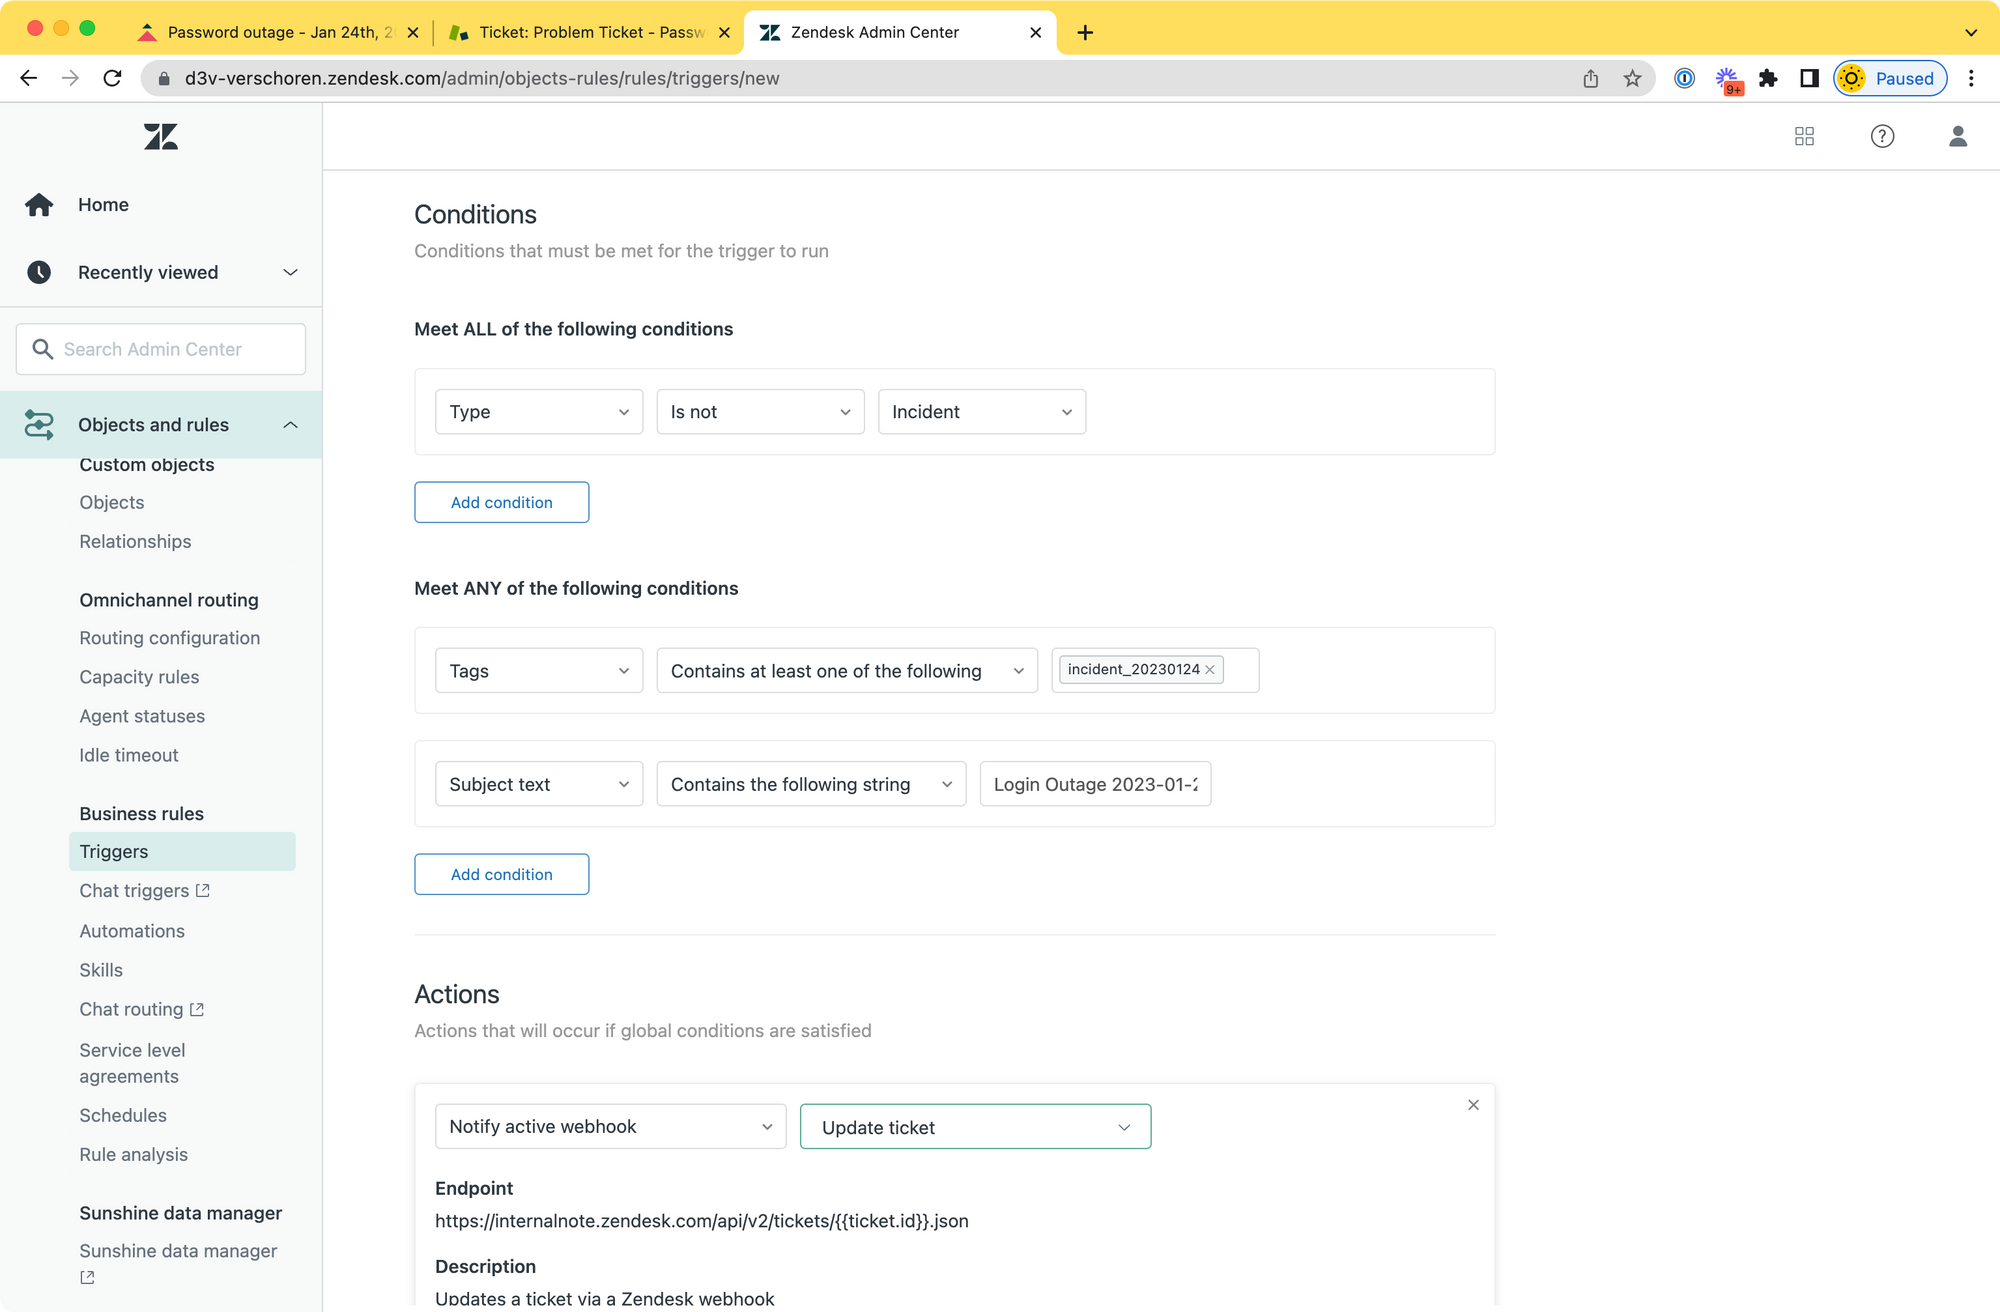
Next we need to create a trigger. Give it a clear name referencing your current Crisis. E.g. Assign to Problem #410 - Password Outage
Conditions:
- ALL - Type is not
Incident
This will make sure the trigger runs once - ANY - Tags contains at least
incident_20230124
The tag added by the macro to capture those tickets - ANY - Subject text contains the following string
Login Outage 2023-01-24
The subject set in the webform to capture those tickets
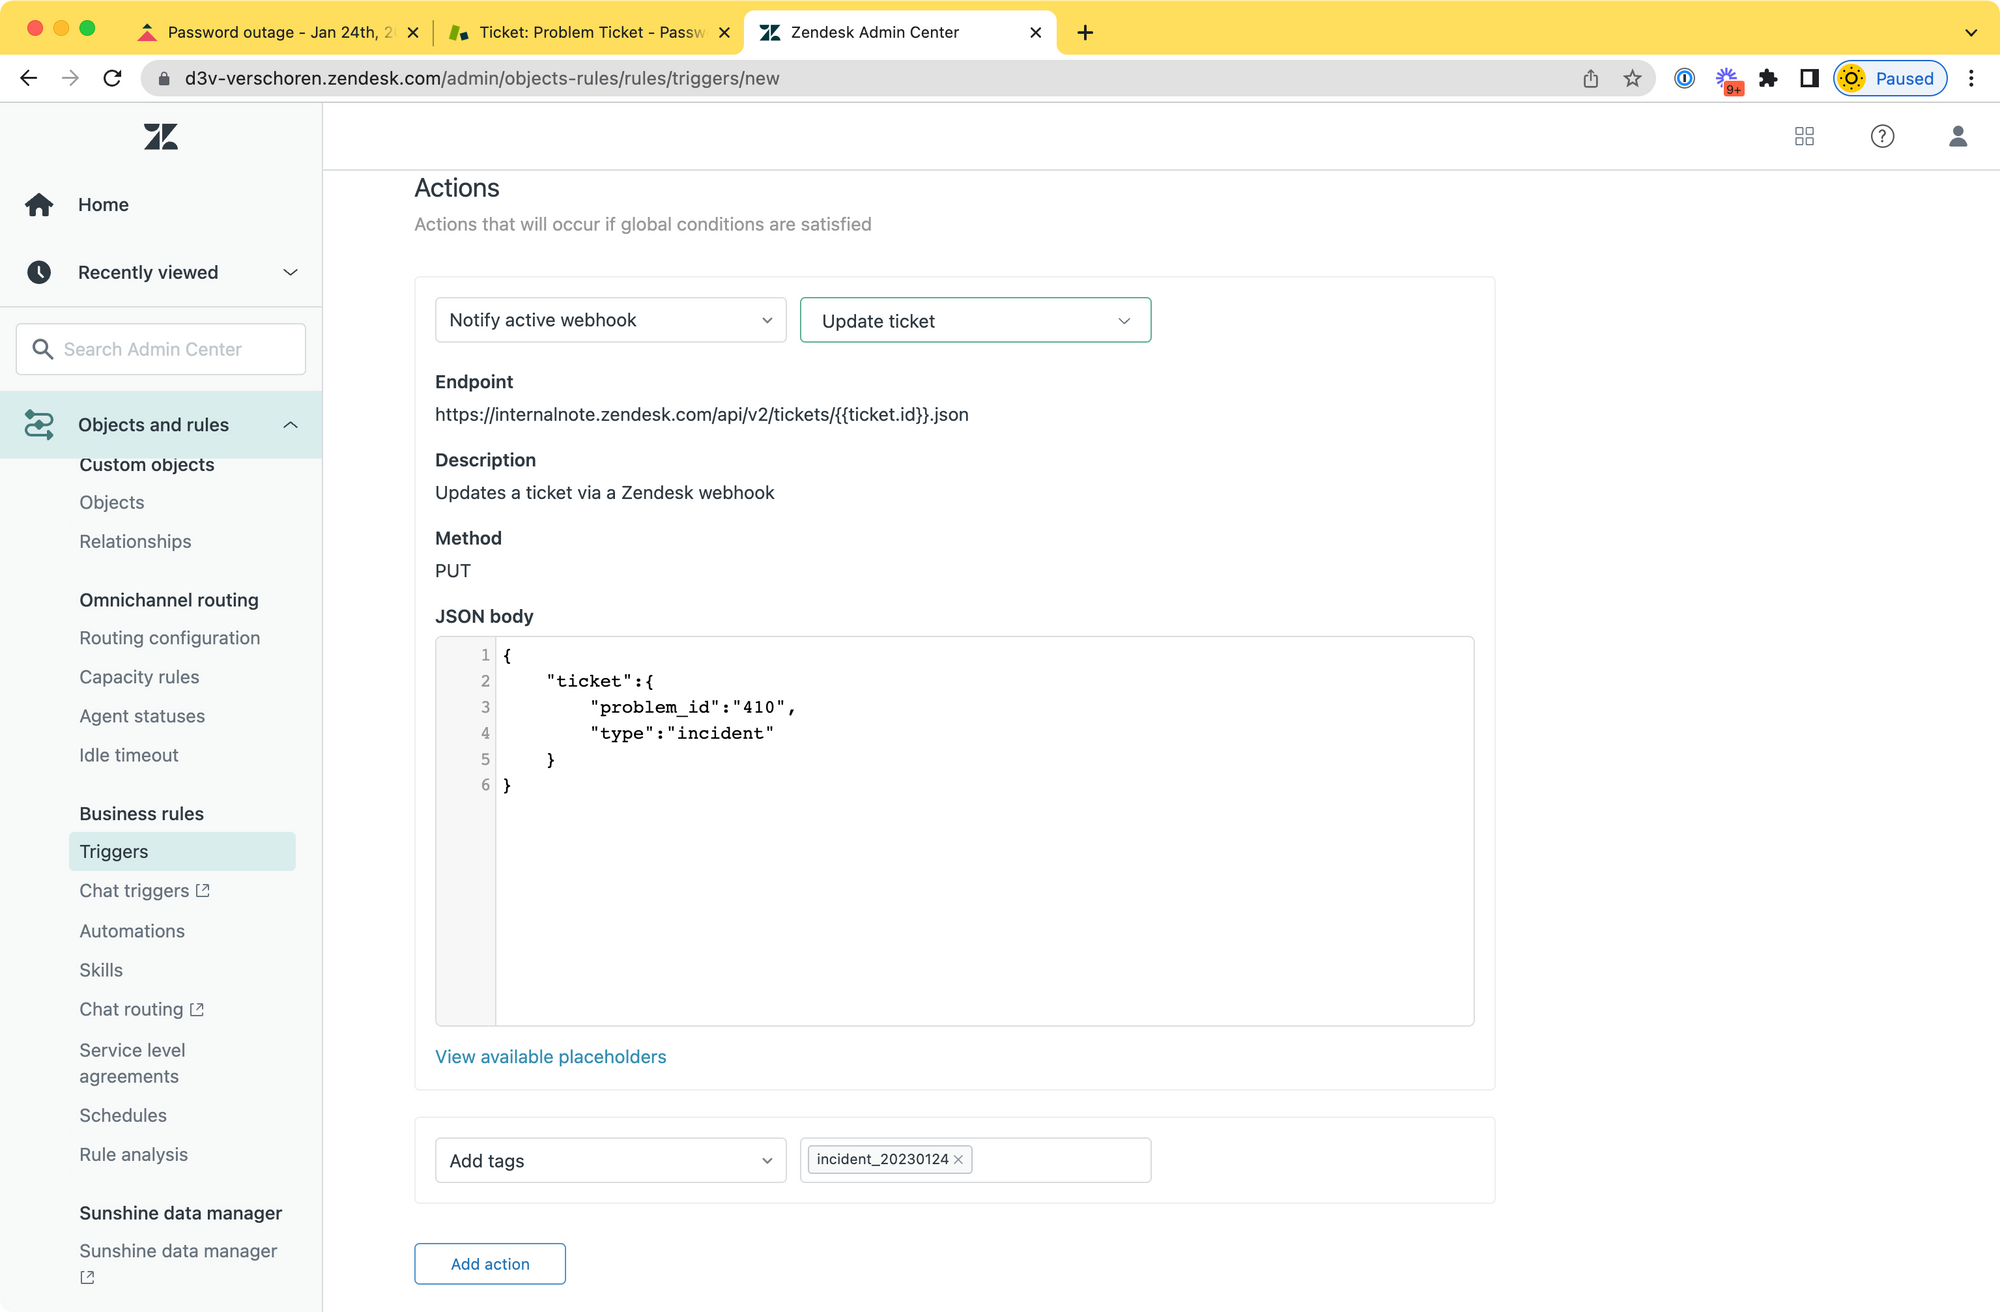
Actions:
- Add tag
incident_20230124
So we also categorise the webform tickets. - Set the Status to
On Hold.
All incoming requests either got a reply form an agent or Answer Bot so there's no need to keep them in the inbox. - Notify action webhook
Update Ticket - Set the JSON body to the following, where
410is the ID of the problem ticket we created earlier.
{
  "ticket":{
    "problem_id":"410",
    "type":"incident"
  }
}
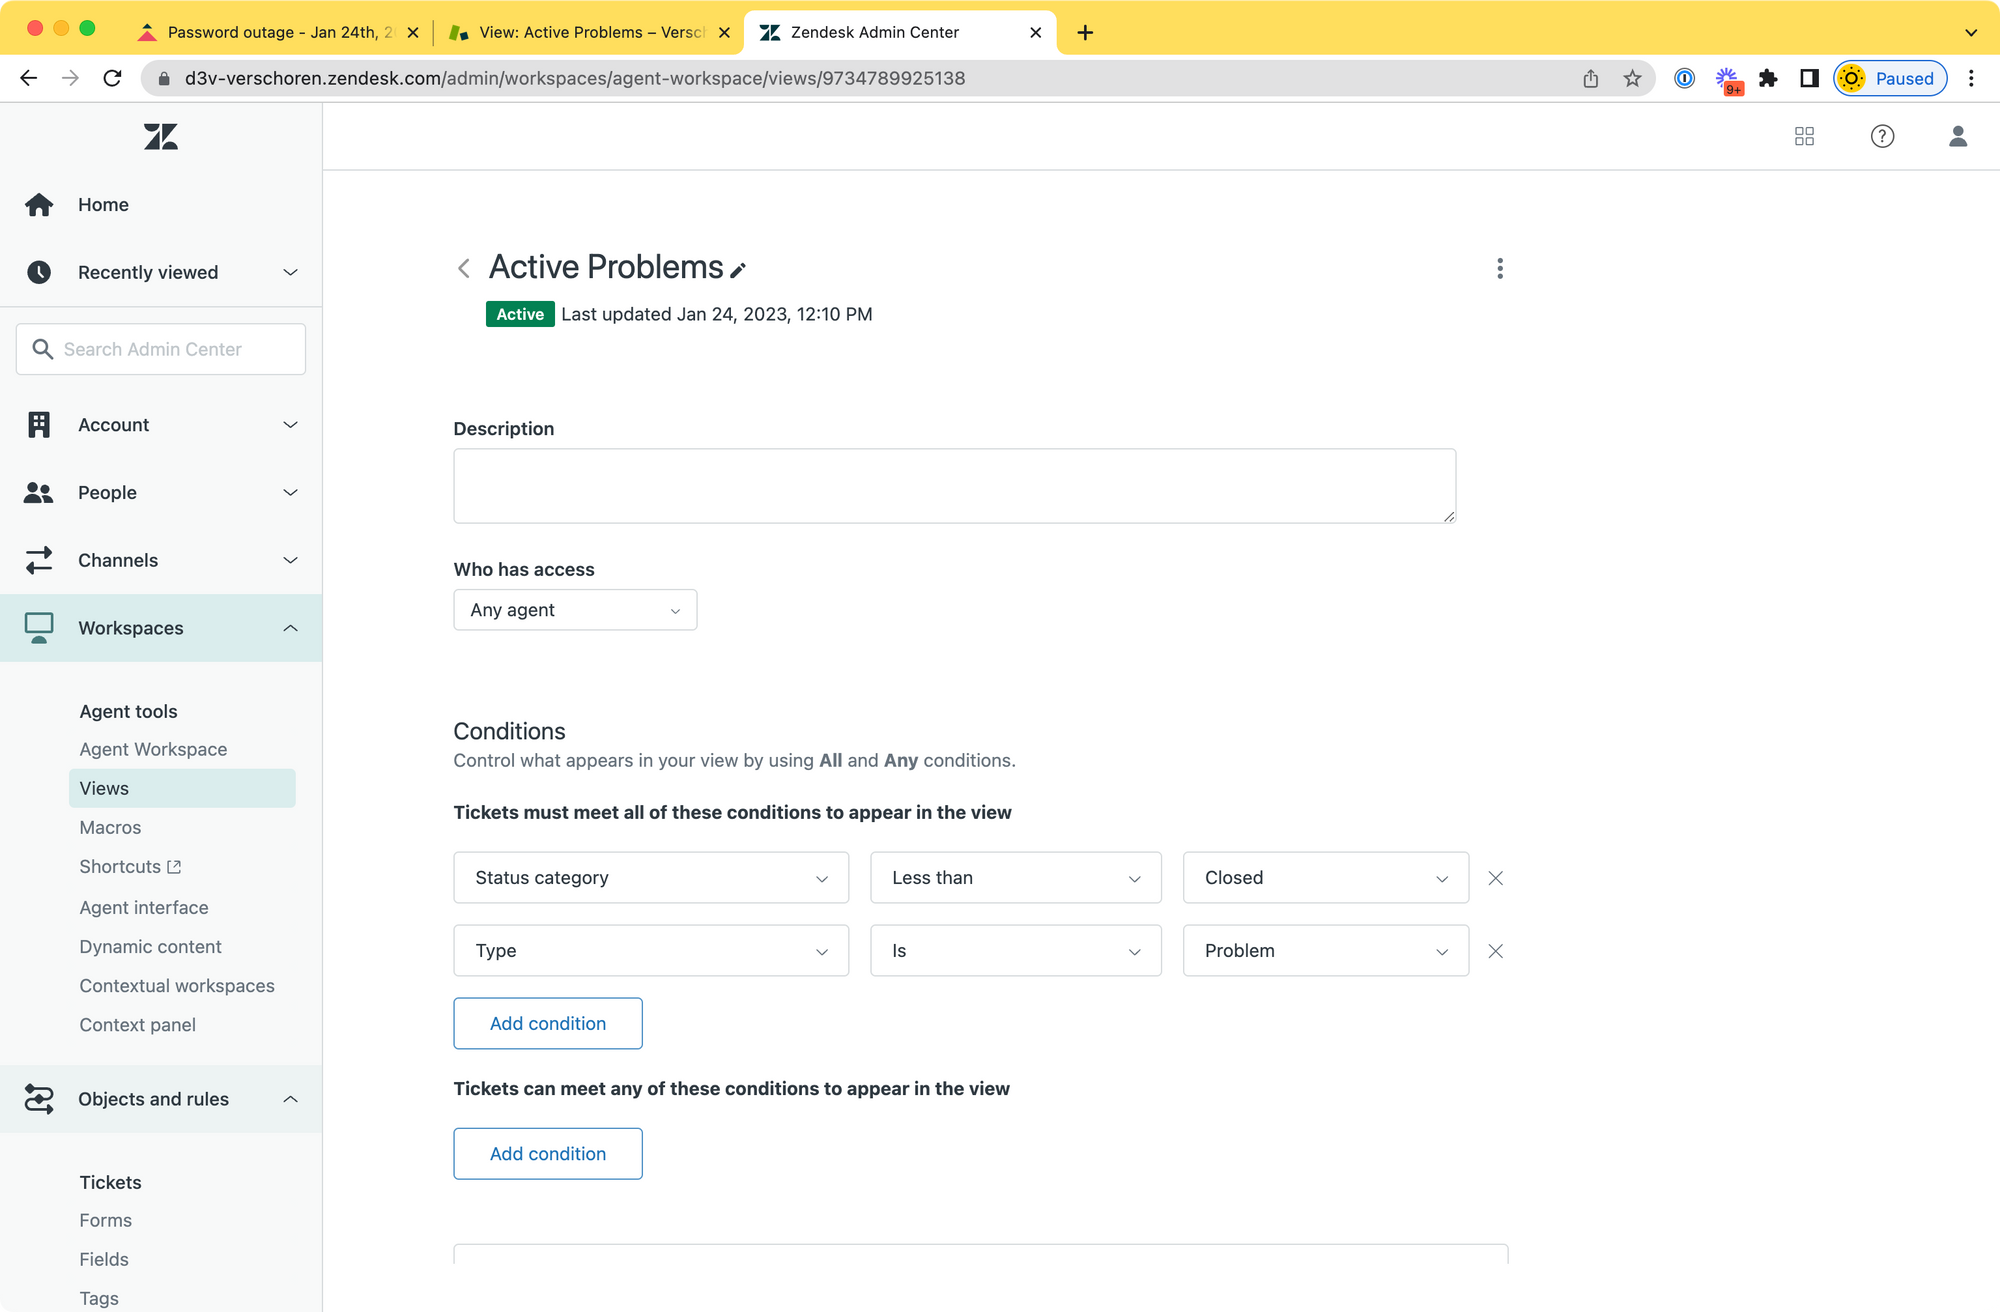
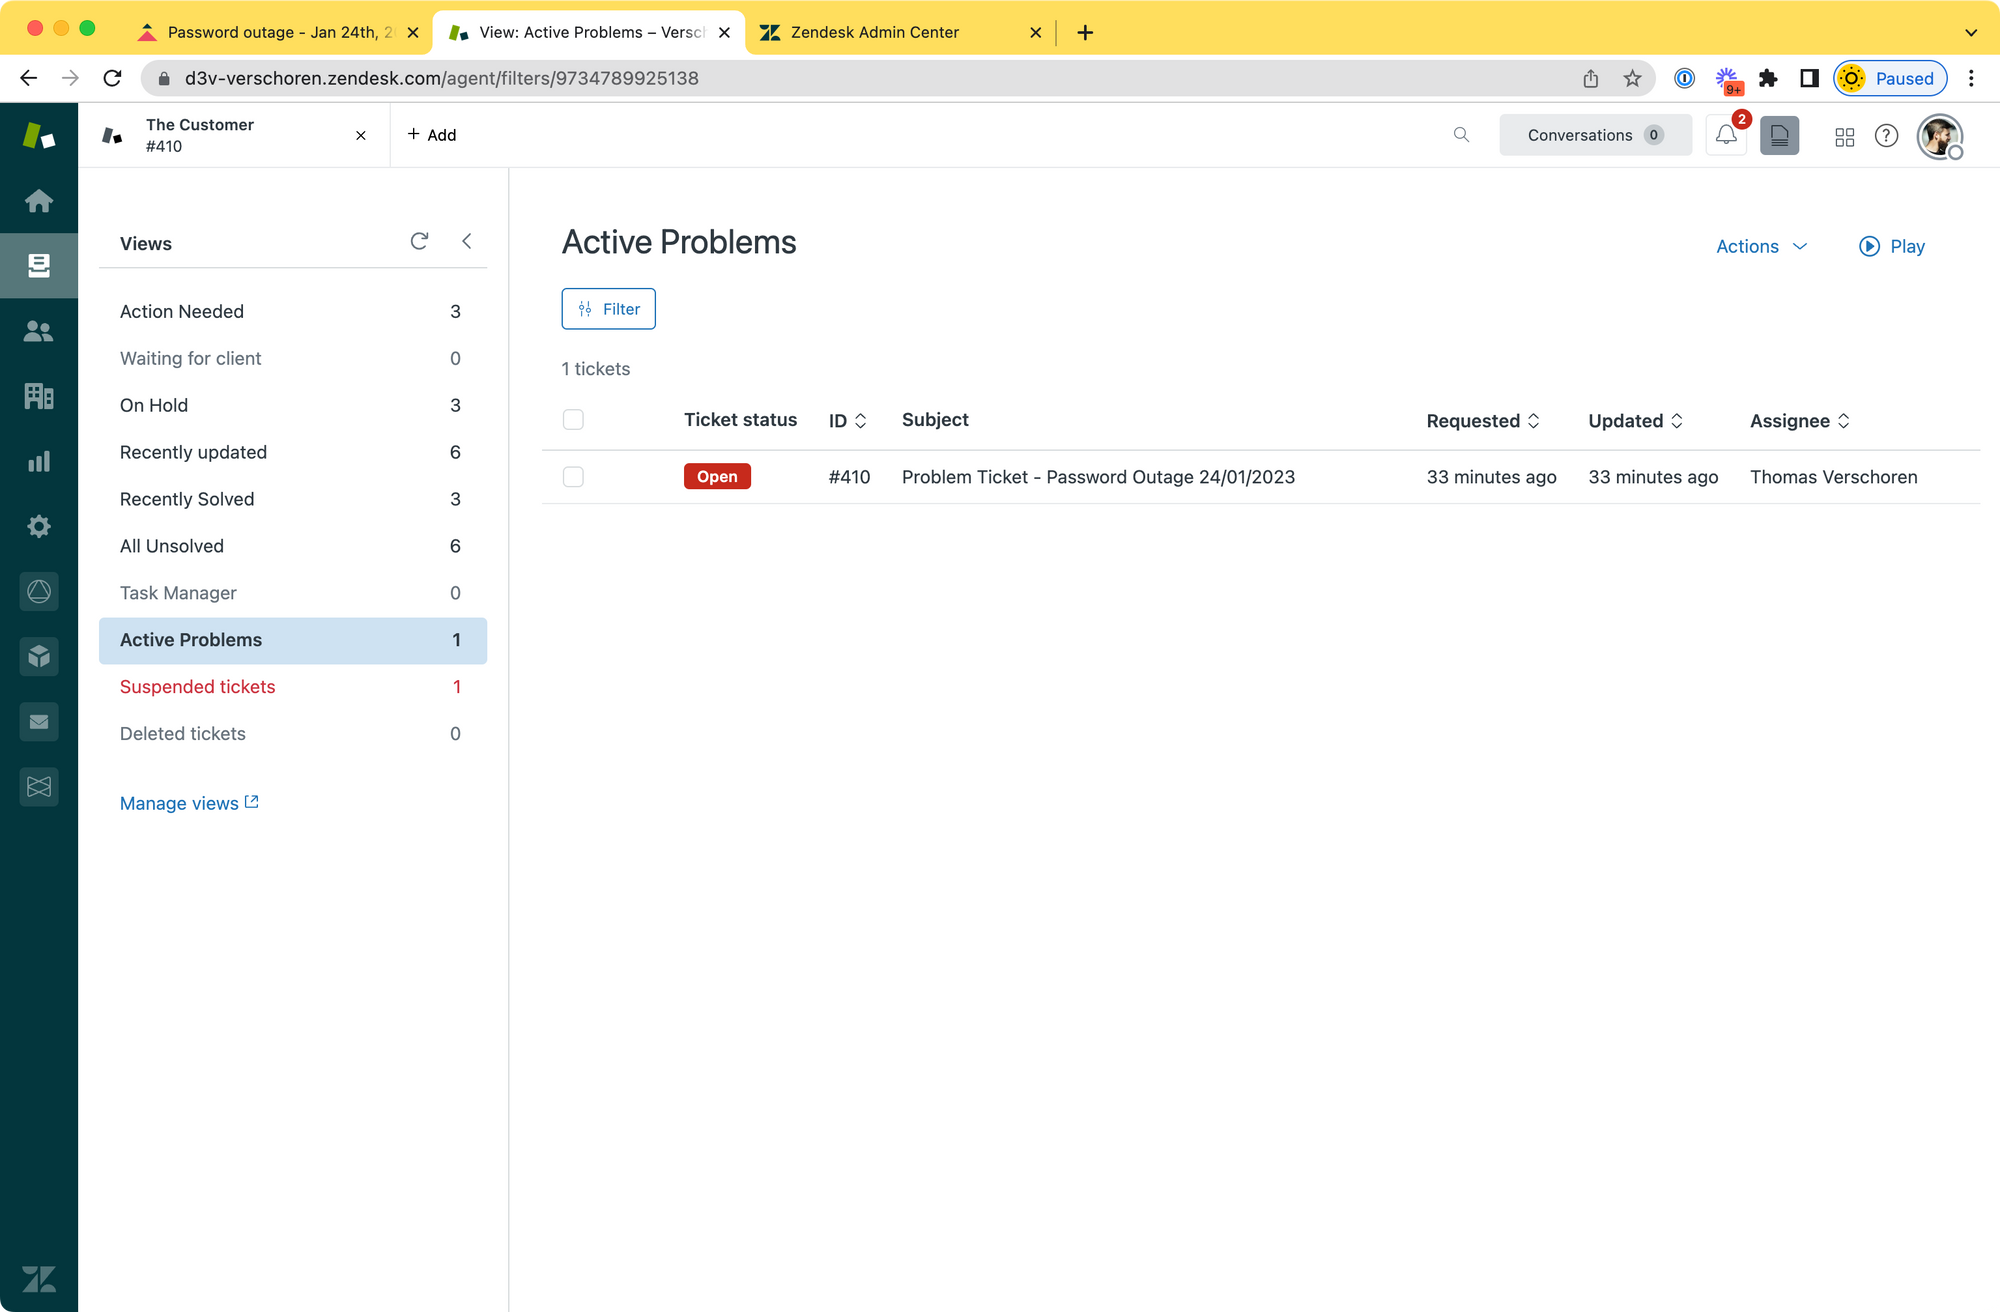
3. Smart Routing
If you followed the steps above you now have one problem ticket with multiple incident tickets linked to it all in On Hold status.
To keep a good overview I recommend updating your views to the following:
- Update your Action Needed view to contain all open tickets and exclude problem and incident tickets. They are linked to each other so should be kept out of the regular questions queue so other inquiries can get attention.
- Create a new view that contains only problem tickets.
Putting it all together
The video below shows an overview of this flow from a Customer and Agent View.
- Customers email or fill in the form
- They get presented with the article about the outage
- Their ticket gets automatically linked to the problem upon submit or via the macro
- Agents can work on the problem ticket to bulk push updates or update the Help Center article
- Upon resolution of the outage the agent closes the problem ticket and all linked incidents
- If after the outage an issue does persist and a few customers reply, their ticket will re-open but all others will close.