Expanded support for variables in the Zendesk Bot
Zendesk recently added variables, dynamic options and carousels to their Bot Builder. No better way to showcase these new capabilities than building a bot powered by the Avengers!

Expanded support for variables in the Zendesk Bot
Zendesk recently added variables, dynamic options and carousels to their Bot Builder. No better way to showcase these new capabilities than building a bot powered by the Avengers!

On this page
These last few months we've seen the Zendesk Bot evolve from a basic flow builder towards a fully capable conversational bot that can integrate with external APIs, show complex flows and dynamically generate carousels and buttons for customers.
When I wrote my tutorial on a, then, full-featured Zendesk Bot, and consequently wrote about the new Dynamic Conversation experiences and Answers Linking one of the things that popped up was a lack of variable support in the Zendesk Bot.
To give an example: image you're setting up a support bot for a company that has both laptops and mobile phones. When you have answer flows for reinstalling the device, warranty policy and feature tutorials, you need to start each flow with "What device are you using" to make sure you can give the right response.
In an ideal world when a customer talks to your AI Agent, if they tell them "I use a mobile phone" once, that information should be context for every subsequent interaction in that conversation.
Long story short: Zendesk just introduced that capability in Zendesk with their new Set Variable step, while also introducing session variables that live across answers for the duration of a conversation with your bot.
What's New
These last few weeks Zendesk introduced three major capabilities to the Zendesk Bot:
Set Variables
A new step type was introduced 'Set Variable' which allows you to store a piece of data and reuse it across steps and answers.
Additionally, all variables in your answers flows, both those created in Set Variable as those gotten from API calls,Carousels or Option Lists are now accessible in all other subsequent answers used in the conversation.


Dynamic values in Present Options
When Zendesk introduced their Dynamic Conversation experience late last year, one of the nice additions was the ability to generate carousels based on API data. I used it to generate a carousel of movies in my demo for example.
One weird omission, now fixed, was the ability to generate a list of options (buttons) based on API data. That is now possible with the addition of Dynamic values for both the carousel and now options too.
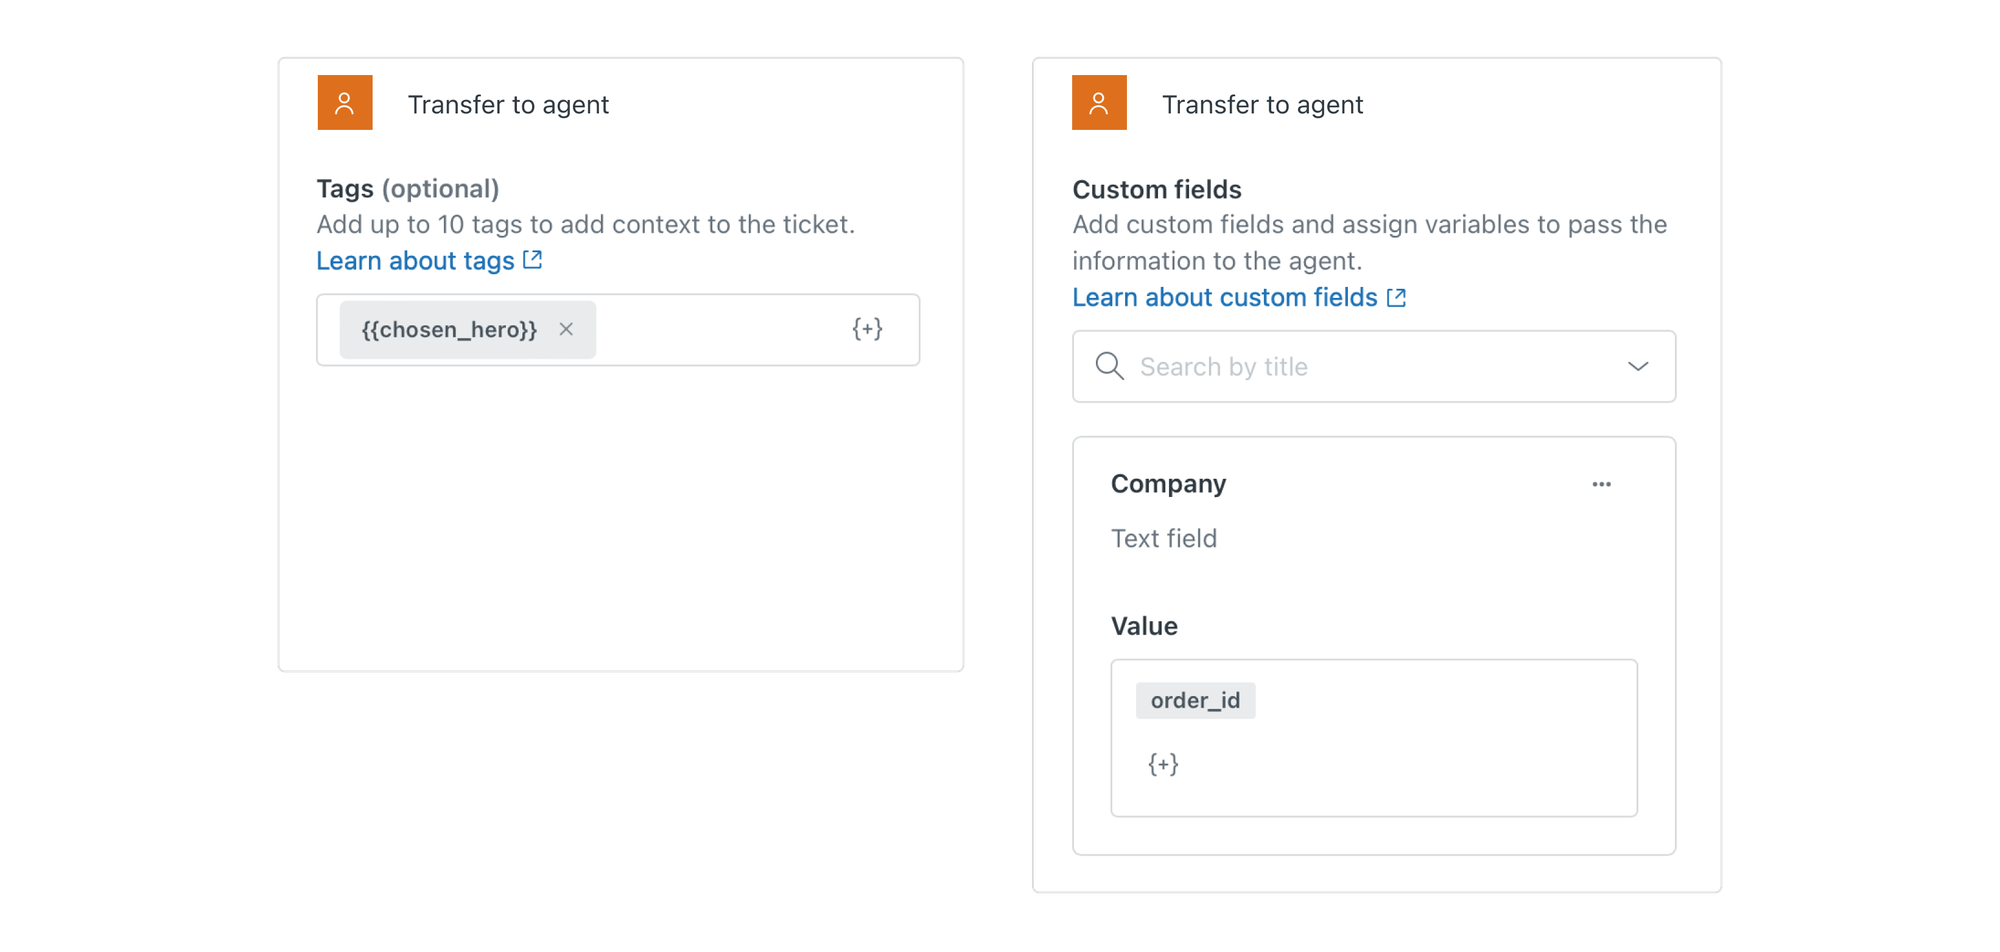
Transfer values
And the values of variables can now be passed as tags or custom field values when a conversation is transferred to an agent.
Let's make this real
So, how better to test out these new features then by creating a fun new Bot flow!
In this new Answer we'll do the following:
- Get a list of Marvel superhero's from an API
- Show a dynamic list of options based on the API data with super heroes.
- If a customer picks a hero we'll store their
chosen_heroand show more data about the character.
- We'll then offer the option to show movies that feature that character, and if the answer is yes, we'll link to a new answer flow.
- Leveraging the
chosen_herovariable we can conditionally show only those movies featuring that character. - And finally we show an option to show all superhero movies. This will reset the variable and reuse the same movies answer to show all hero movies.

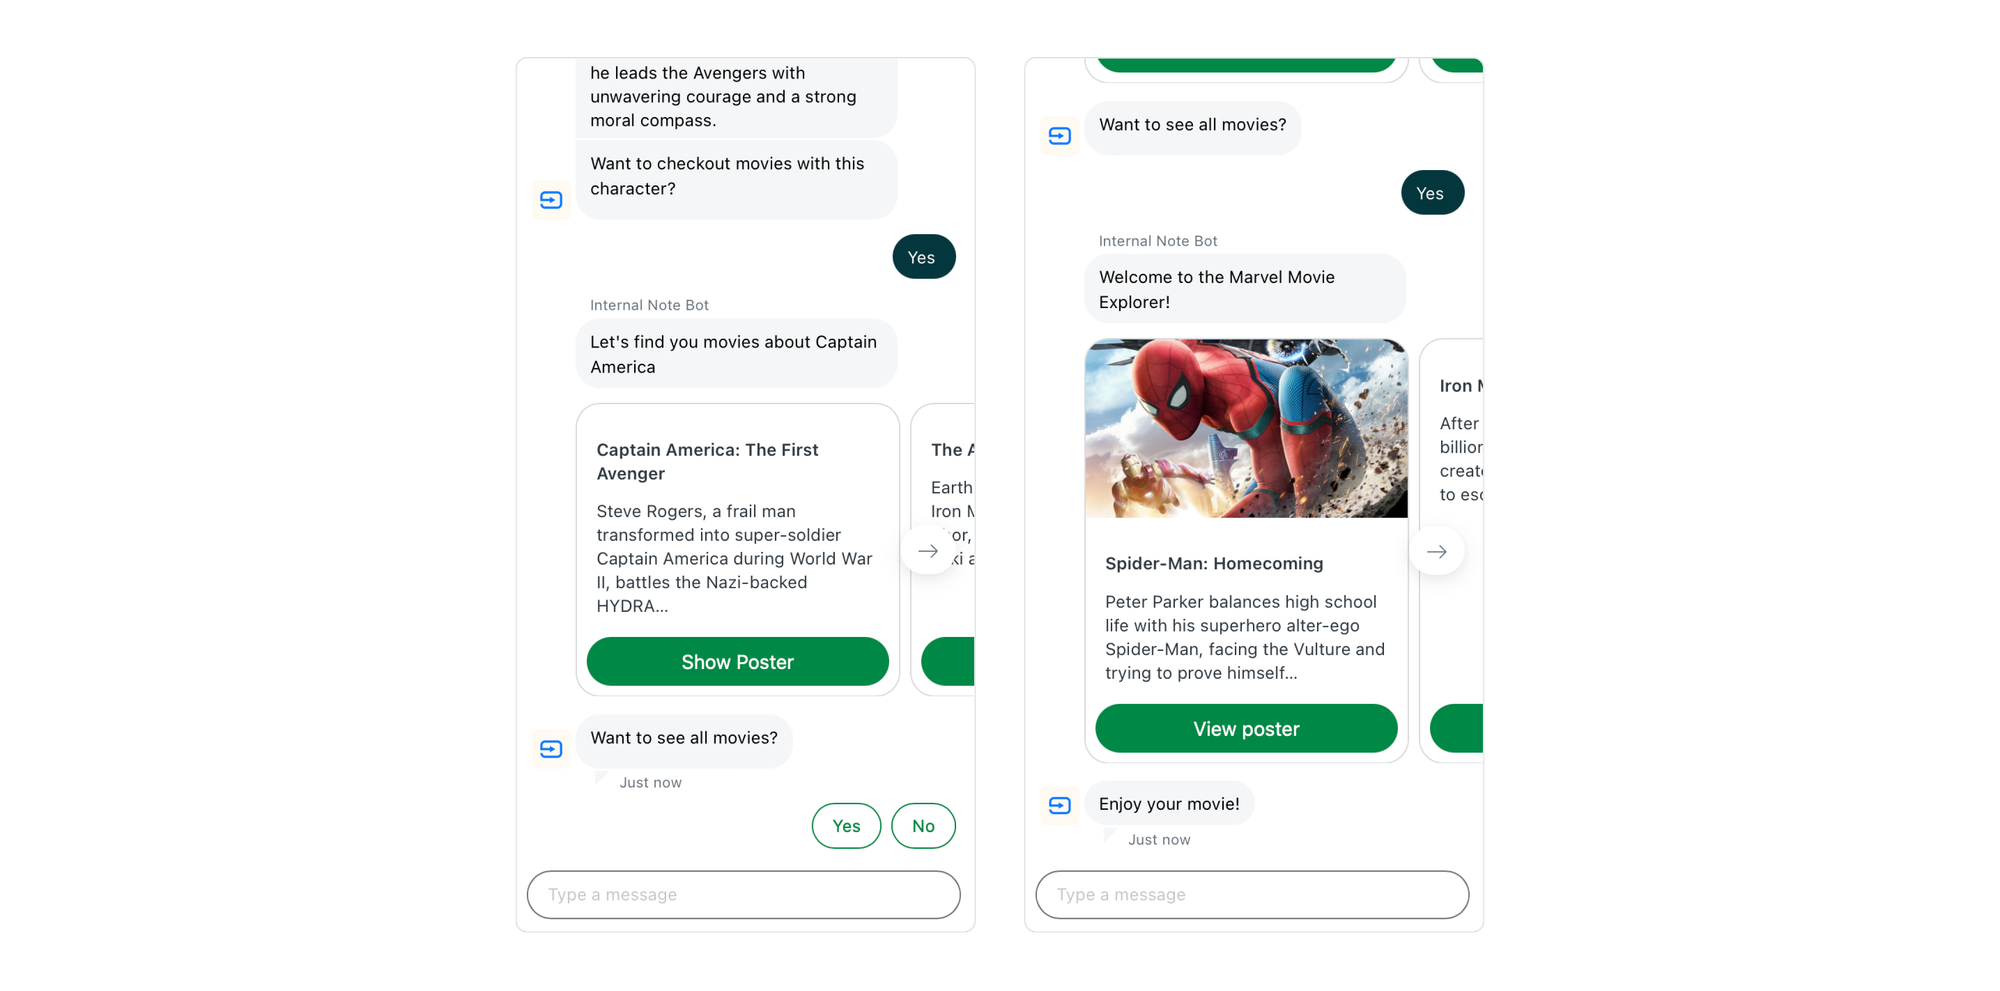
You can test the flow via the Messaging button bottom right!
How did I build this?
Characters
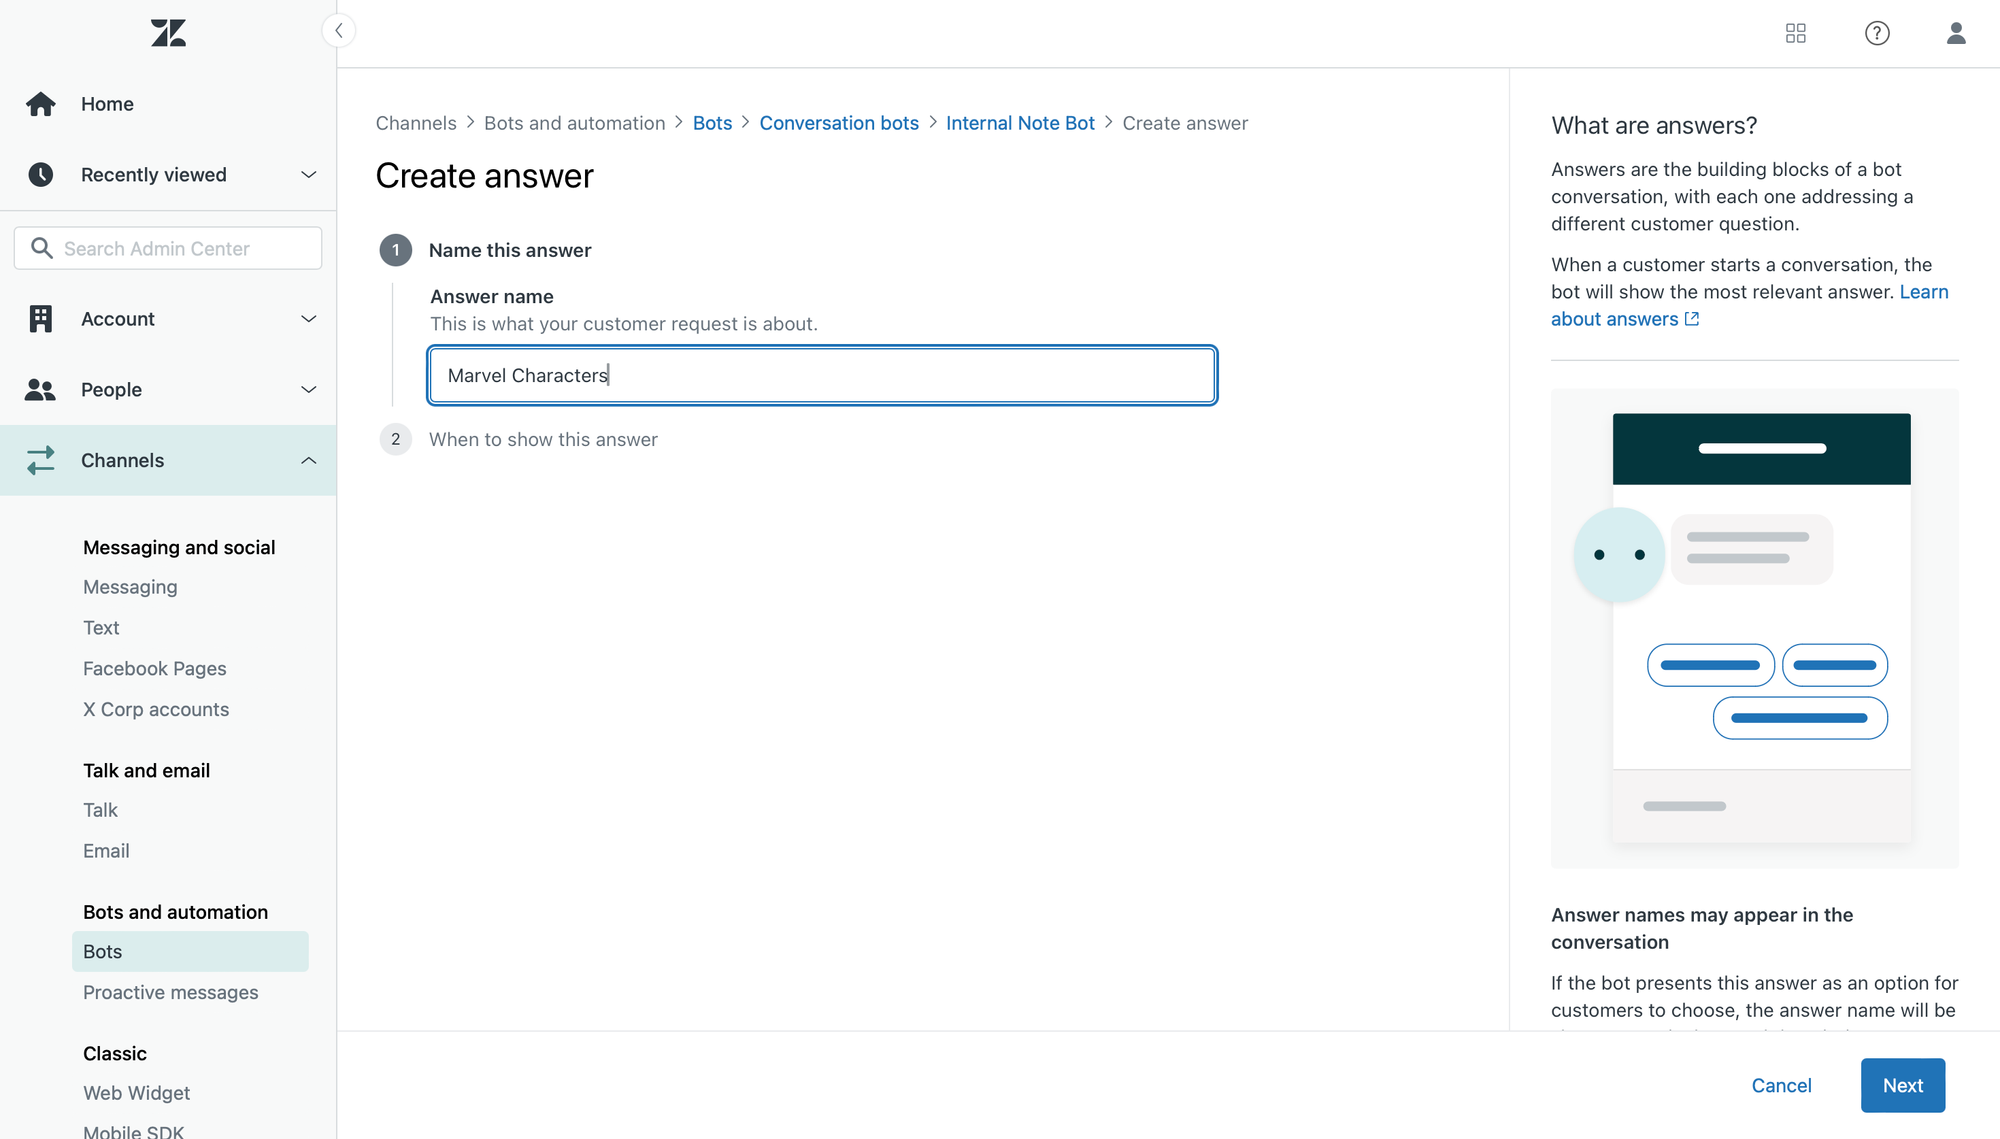
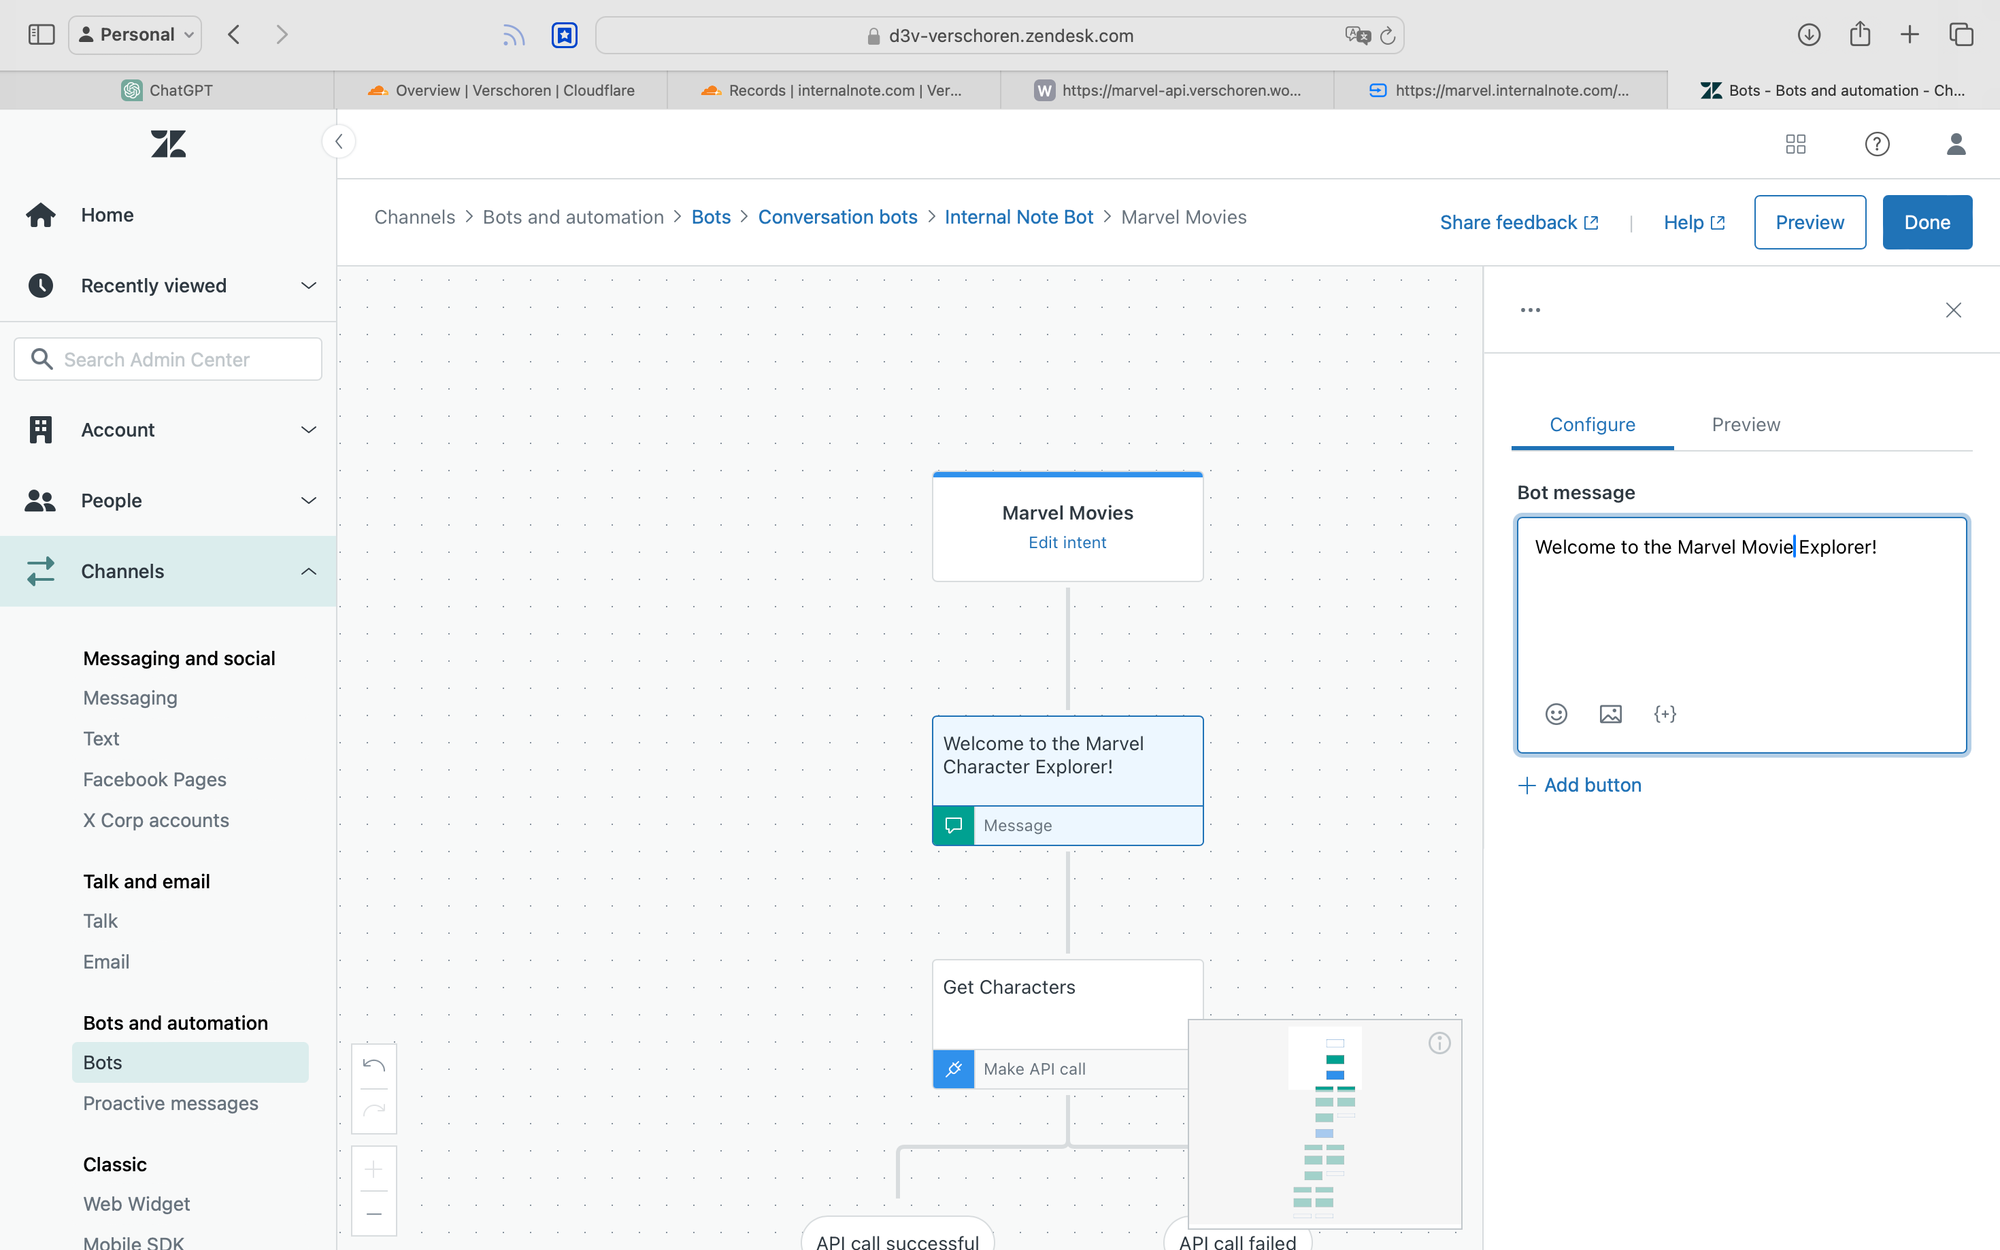
Create a new bot answer
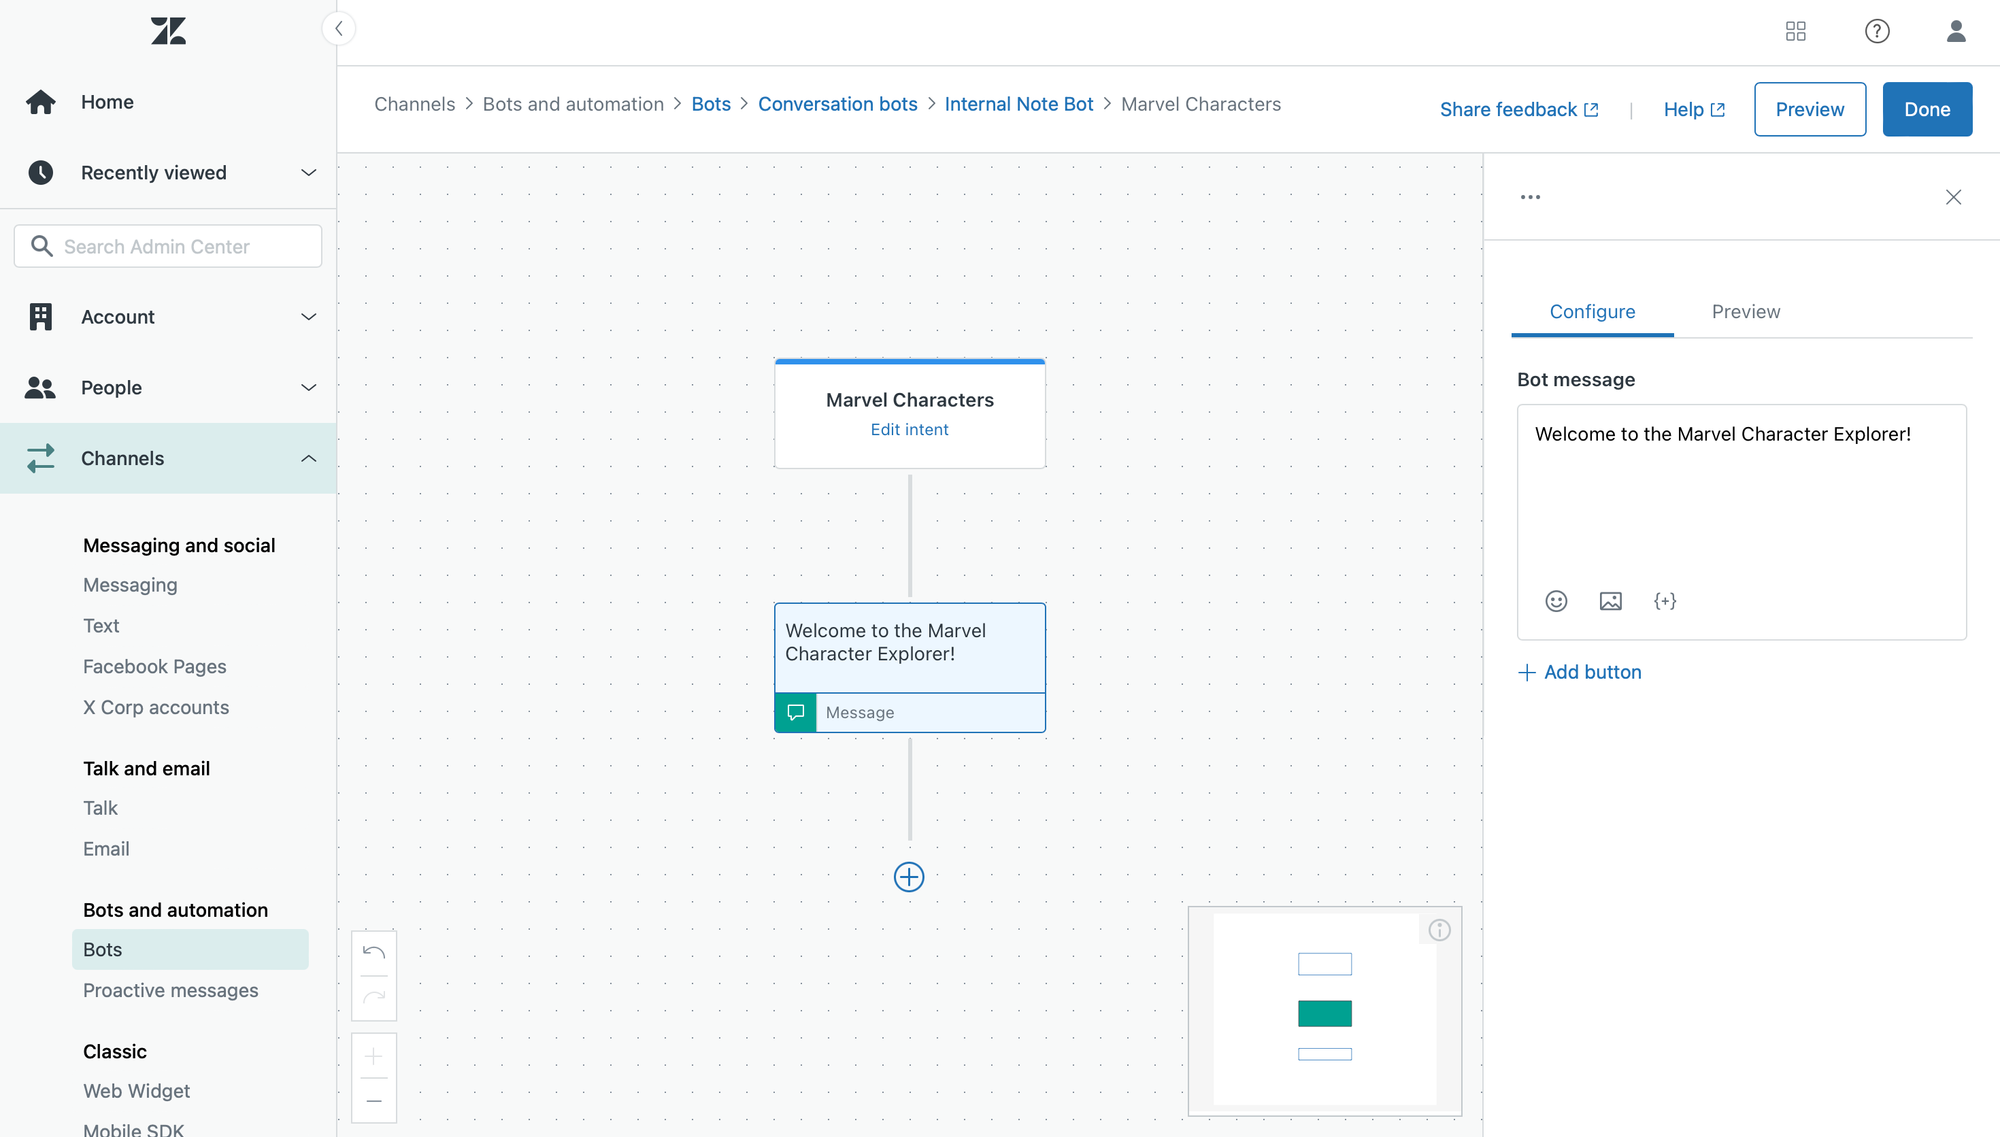
All new flows start with the creation of a new answer for your bot. I decided to call this one Marvel characters and started with a short intro via a Bot Message.
Get all characters
In order to present options to the user we need to gather a list of Marvel characters from our API.
The API is hosted at https://marvel.internalnote.com/characters and returns an array of characters when a GET request is made.
{
    "characters": [
      {
        "name": "Spider-Man",
        "realName": "Peter Parker",
        "weapon": "Web-shooters",
        "description": "Bitten by a radioactive spider, Peter Parker gained superhuman strength, agility, and the ability to cling to walls. As Spider-Man, he uses his powers to protect New York City and uphold his mantra: 'With great power comes great responsibility.'",
        "image": "https://marvel.internalnote.com/avatar_spiderman.jpeg"
      },
      ...
    ]
  }
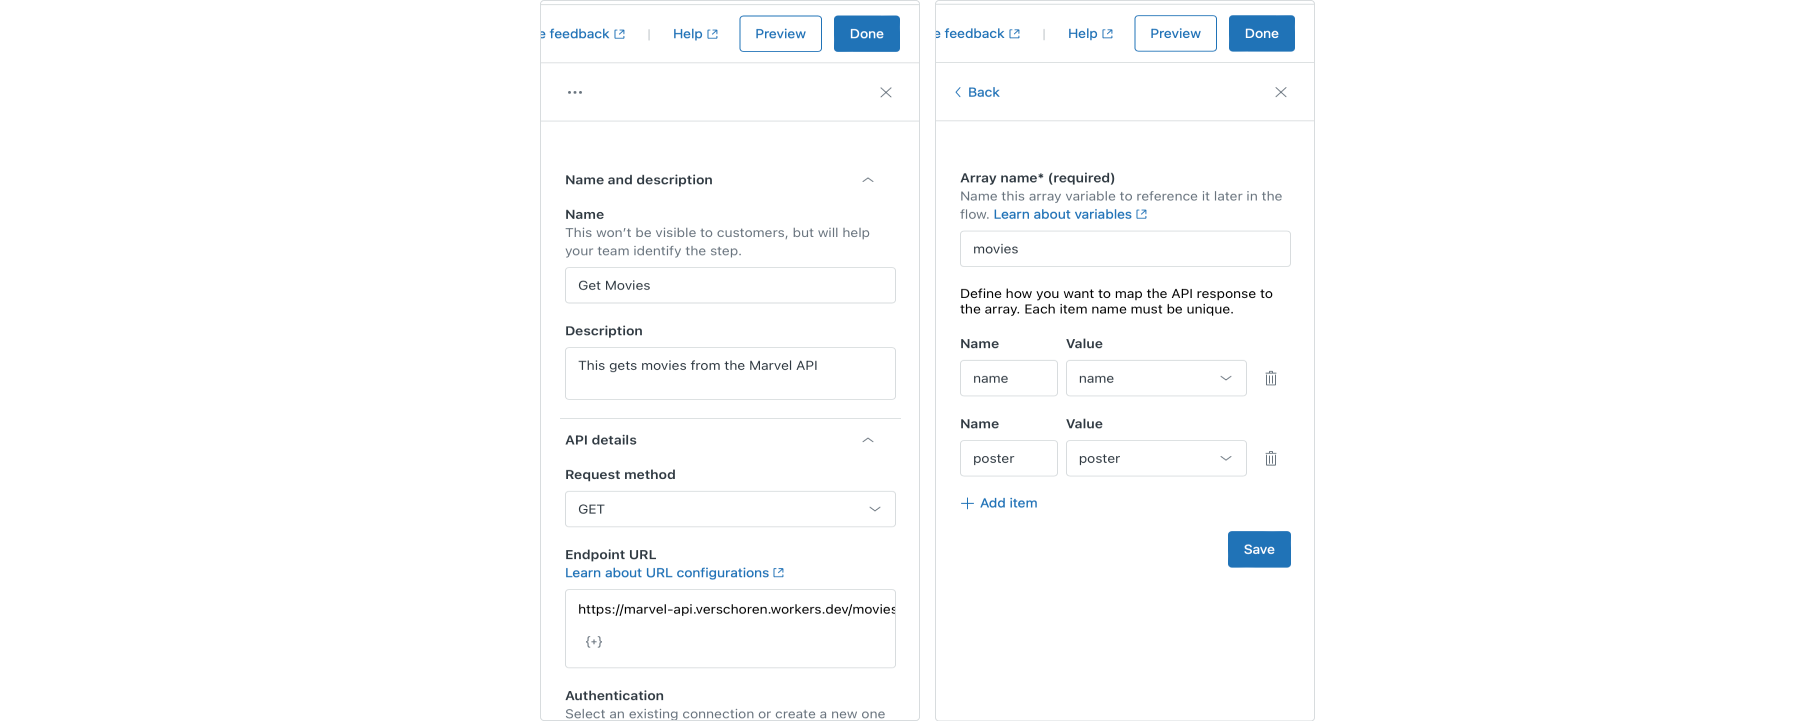
First thing to add to our flow is a Make API call step with the following configuration:
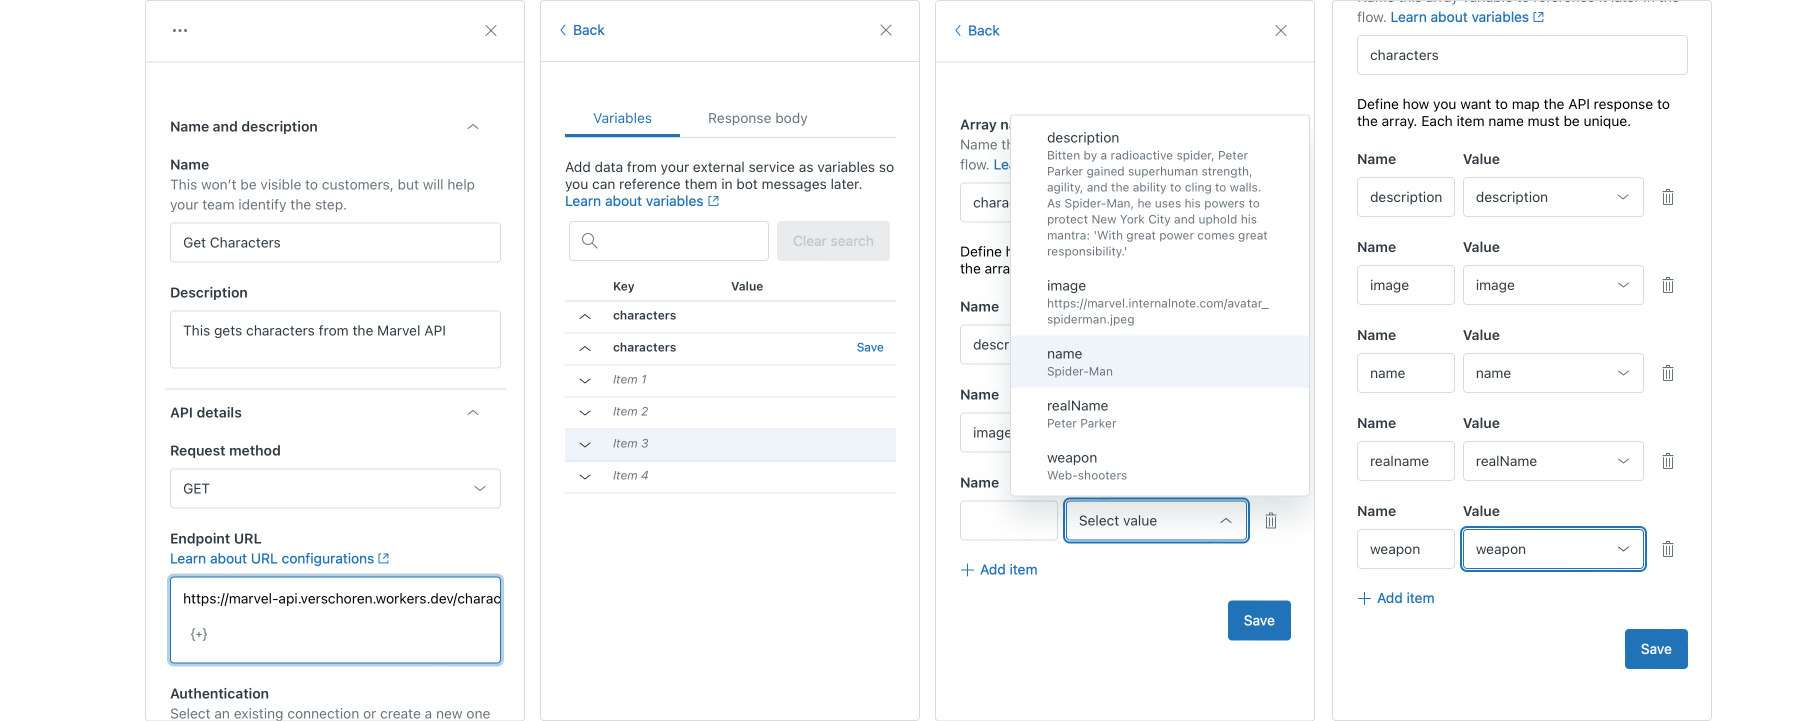
- Name: Set Characters
- Request Method: GET
- Endpoint URL:
https://marvel.internalnote.com/characters
Once added, you can do a test run and it will return an array of characters. Click save next to the object, and store the different values as variables.
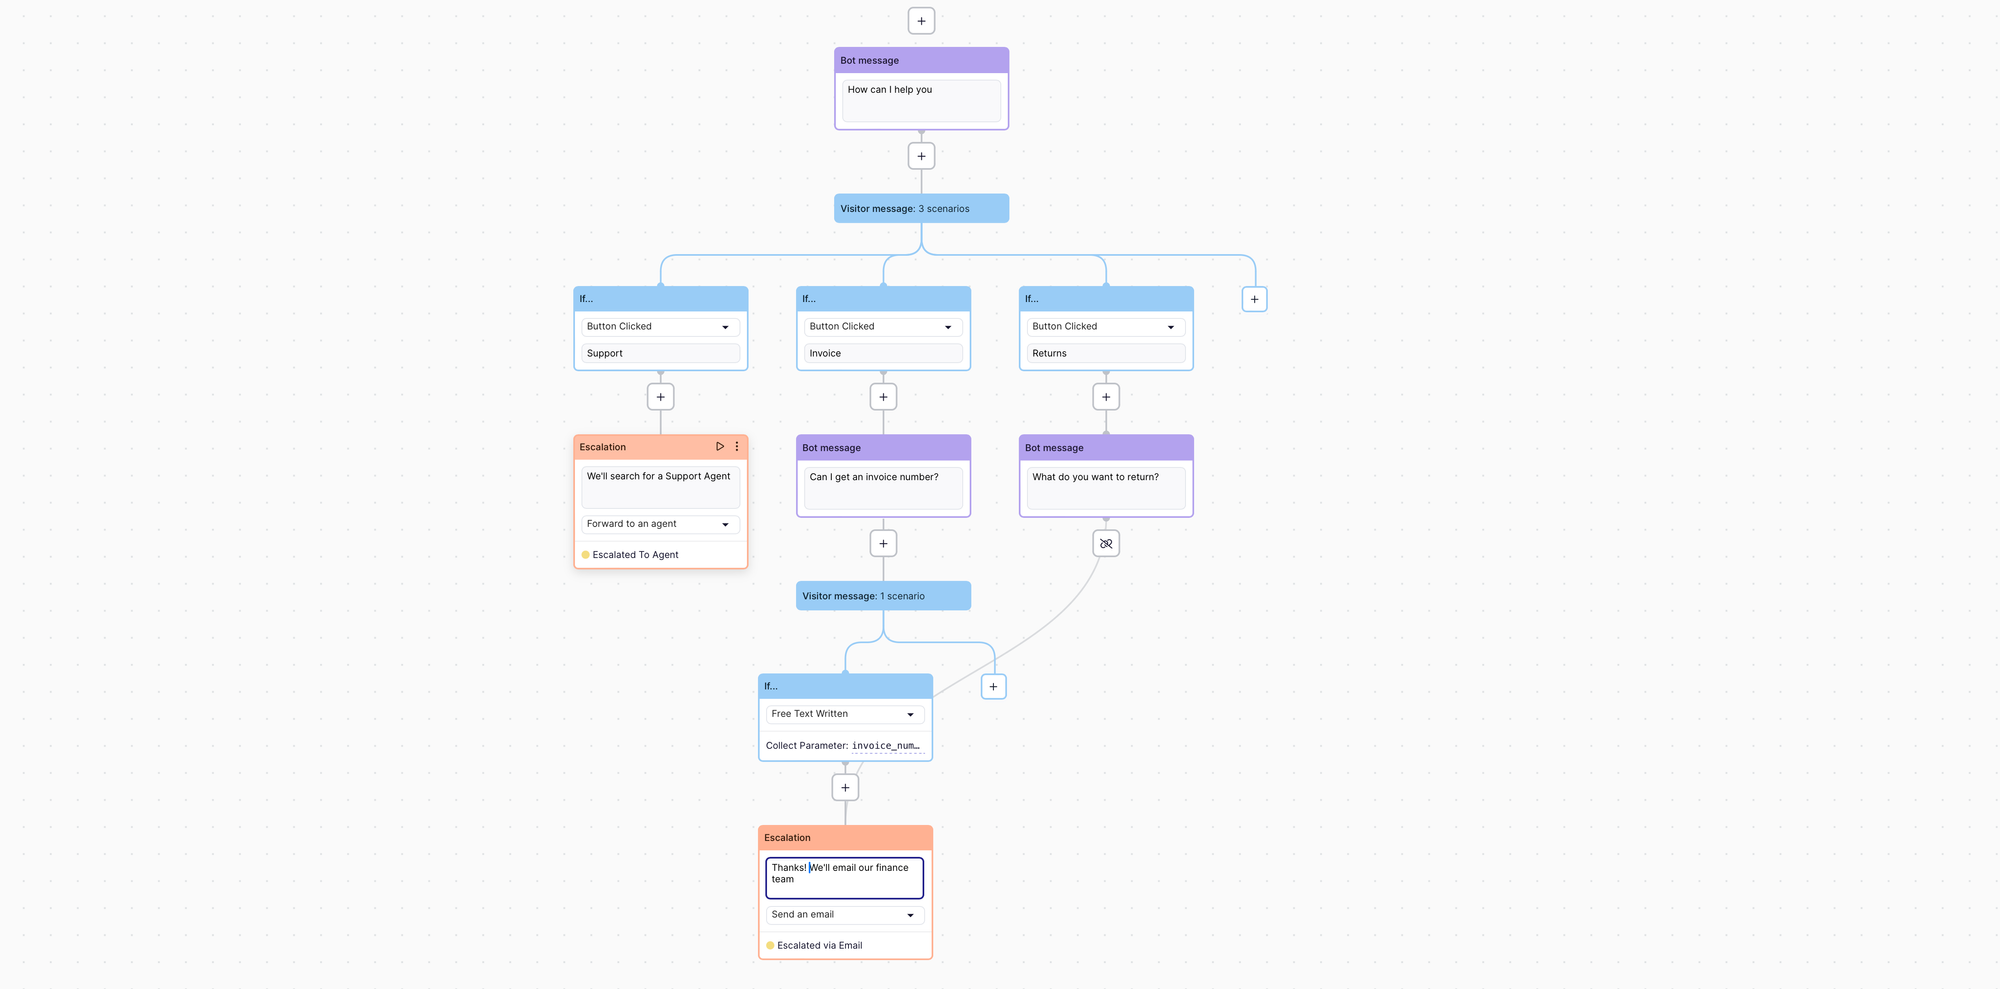
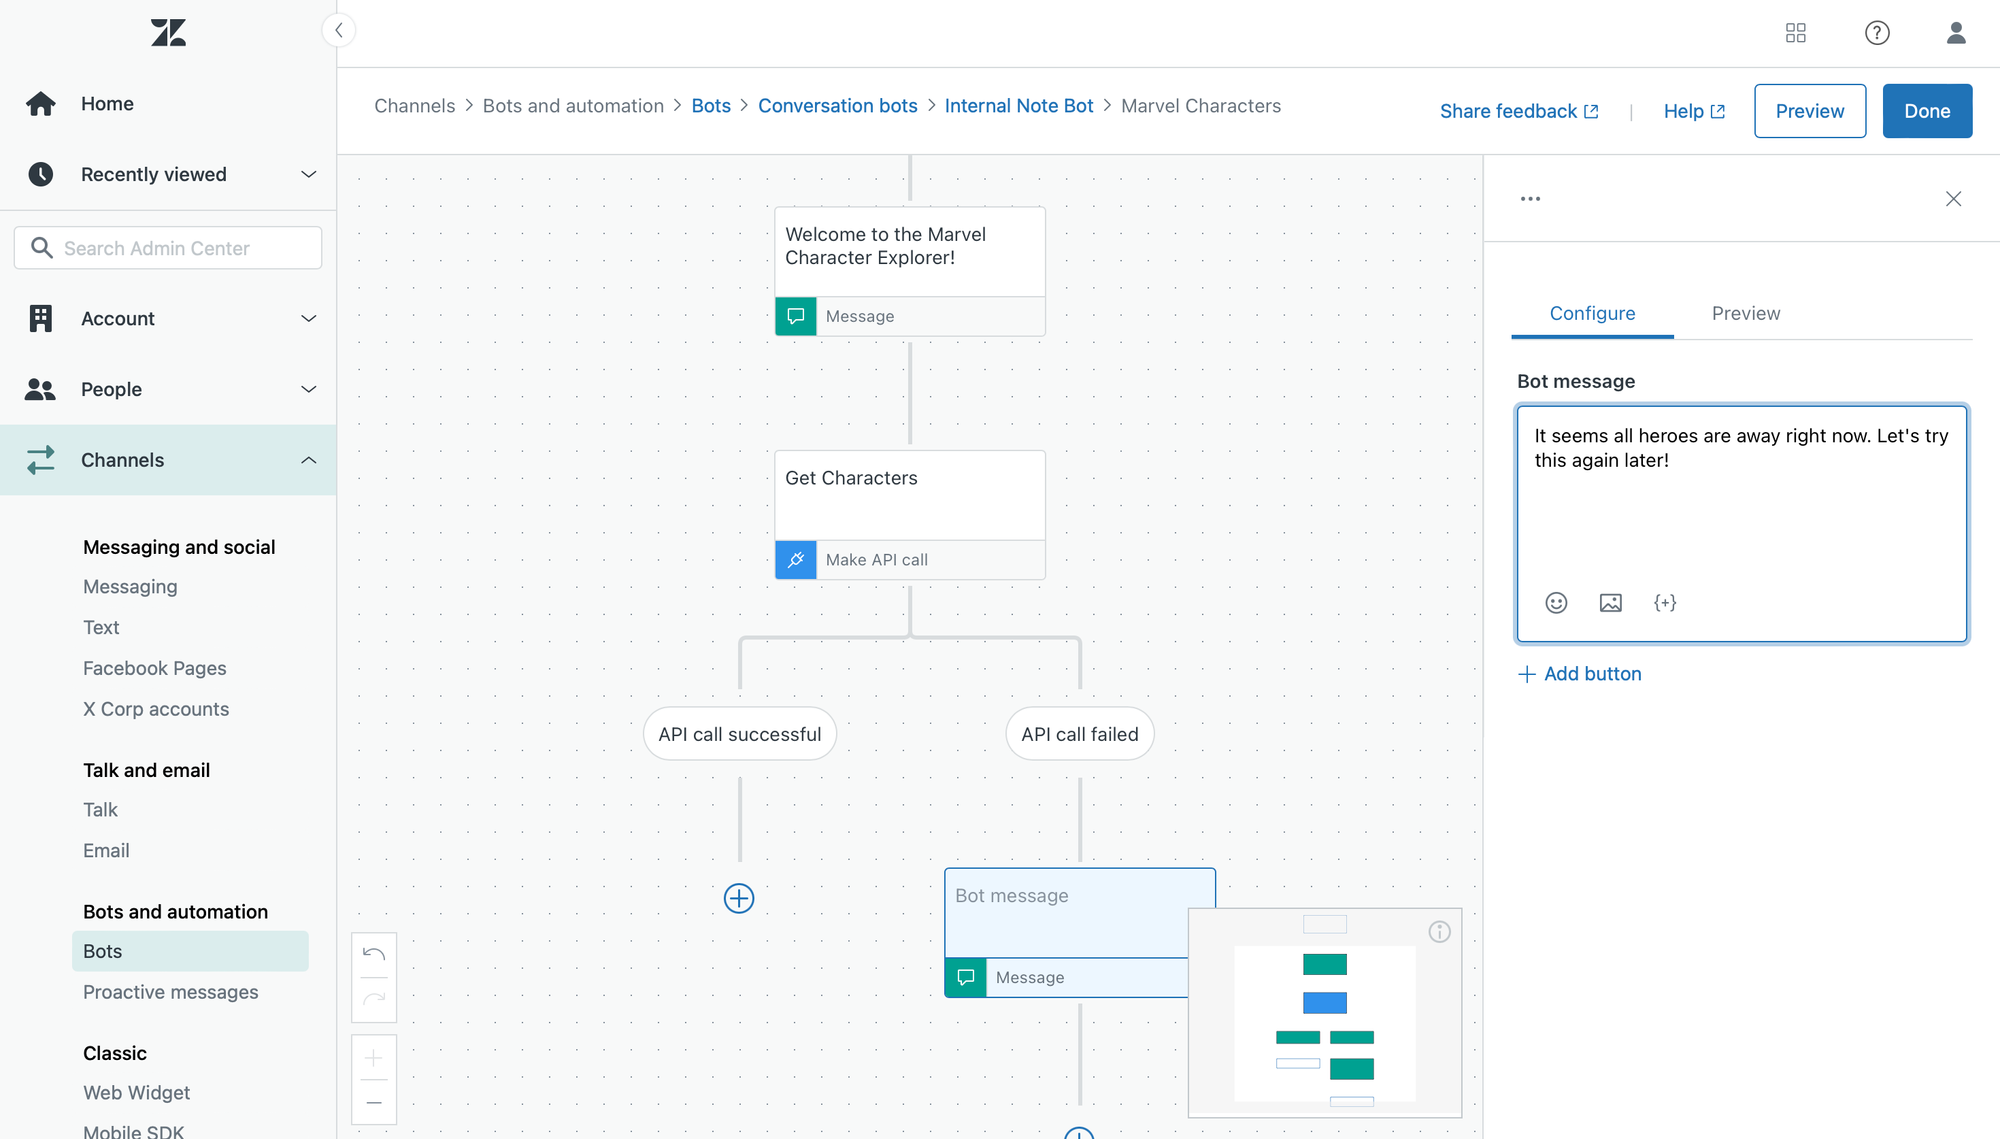
When you have configured your flow, it will look like the screenshot below. Be sure to handle the API call failed scenario by adding some kind of error message.
Show dynamic Options and store variable
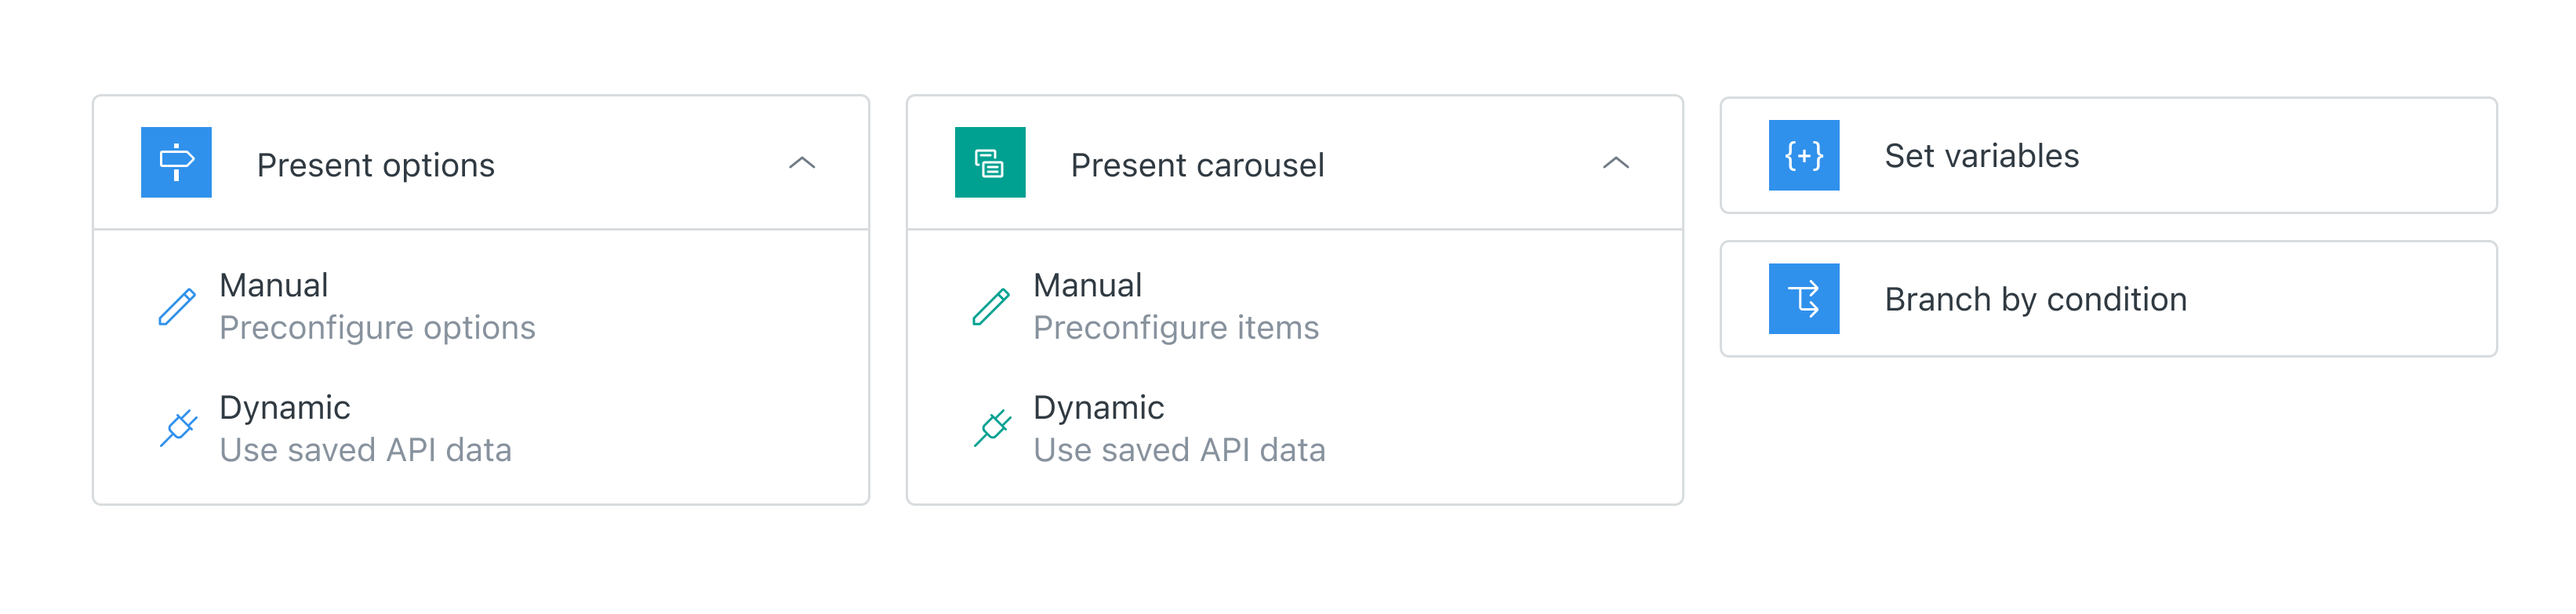
Now that we have our array of characters from the Make API Call step, it's time to use the new dynamic Present options step to show a list of buttons to our users.
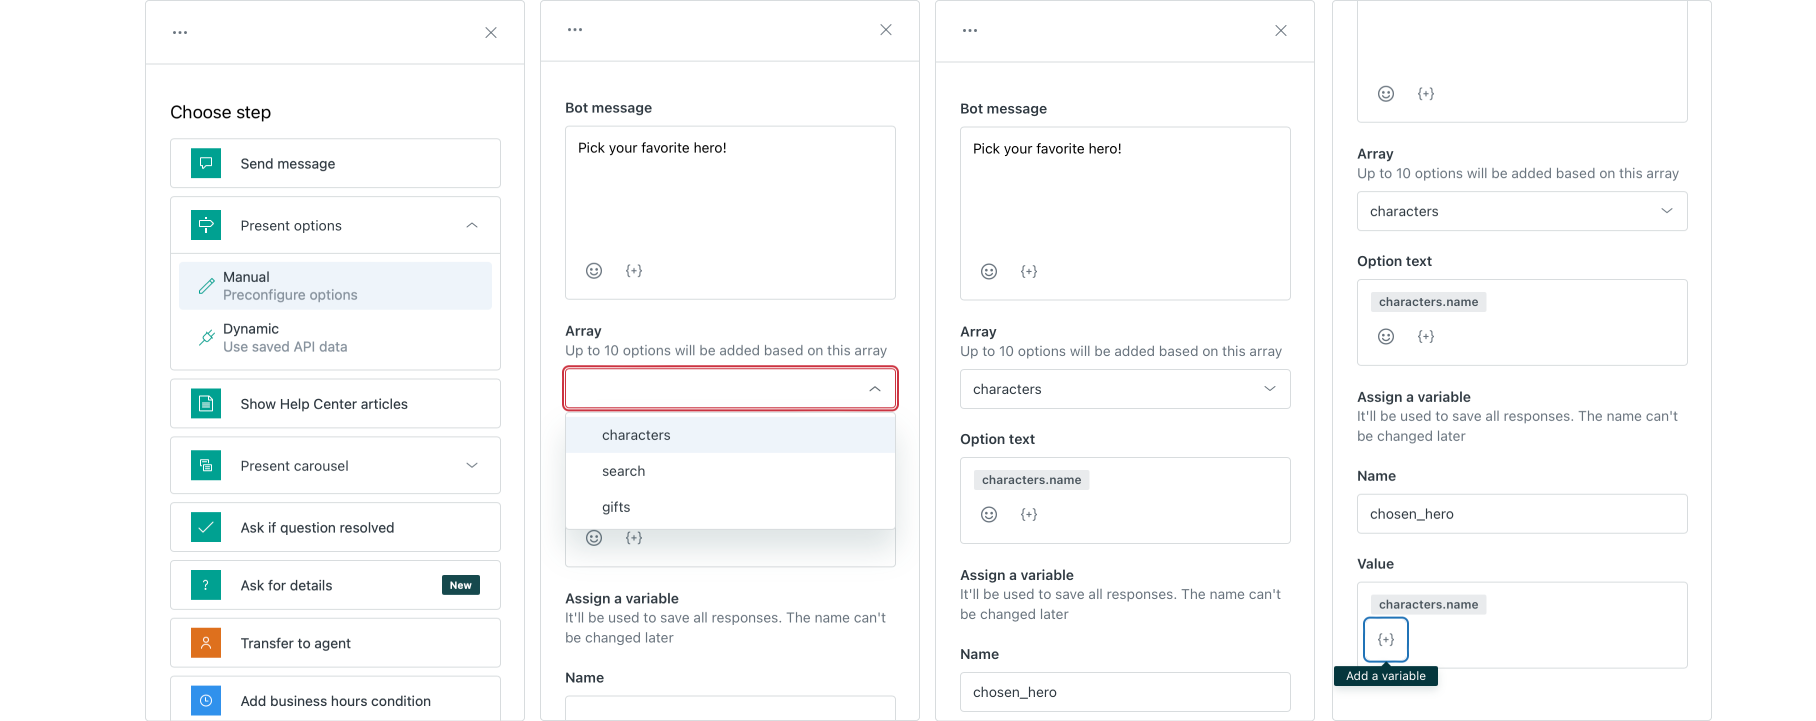
- Add a Present options step and choose the Dynamic configuration
- Select our
charactersarray and add a Bot Message. - For the Option text choose the
characters.namevalue. This is what will be shown in the button. - For the variable we will create a new variable
chosen_heroand assign it the samecharacters.namevalue.
To wrap up this step, we should add a confirmation message via the Send Message step and let the user know they correctly selected our chosen_hero. You can do this via the {+} button in the text field.

Get Character Details
So far we've gathered a list of super heroes from our API, shown them to the user as a list of options, and stored the chosen character in a chosen_hero variable.
In this step we're going to make a second API call to our API to gather more details about our hero and shown them to the user.
The API is hosted at https://marvel.internalnote.com/characters and returns character details when a POST request is made.
The payload
{"name":"Thor"}The returned data
{
  "name": "Thor",
  "realName": "Thor Odinson",
  "weapon": "Mjolnir (hammer)",
  "description": "Thor, the Norse God of Thunder, wields the enchanted hammer Mjolnir, which grants him the power to control lightning and fly. As a founding member of the Avengers, he defends both Asgard and Earth from cosmic threats.",
  "image": "https://marvel.internalnote.com/avatar_thor.png"
}
To set this up, add a Make API call step below our message step.
- Name: Get details
- Request Method: POST
- Endpoint URL:
https://marvel.internalnote.com/characters - Body: {"name":"
chosen_hero"} (add the variable via the {+} button)

Next, enter a hero's name to run the test (e.g. Captain America) and save all the returned variables by clicking the Save button next to each.
Show Details
To wrap up this step, we're adding another Send Message step that will use the variables we saved in the last step to show a nice overview of our hero
- Click on the image icon in the bot message, and select the
imagevariable you just created - Set the text field of the message to the
descriptionvariable.
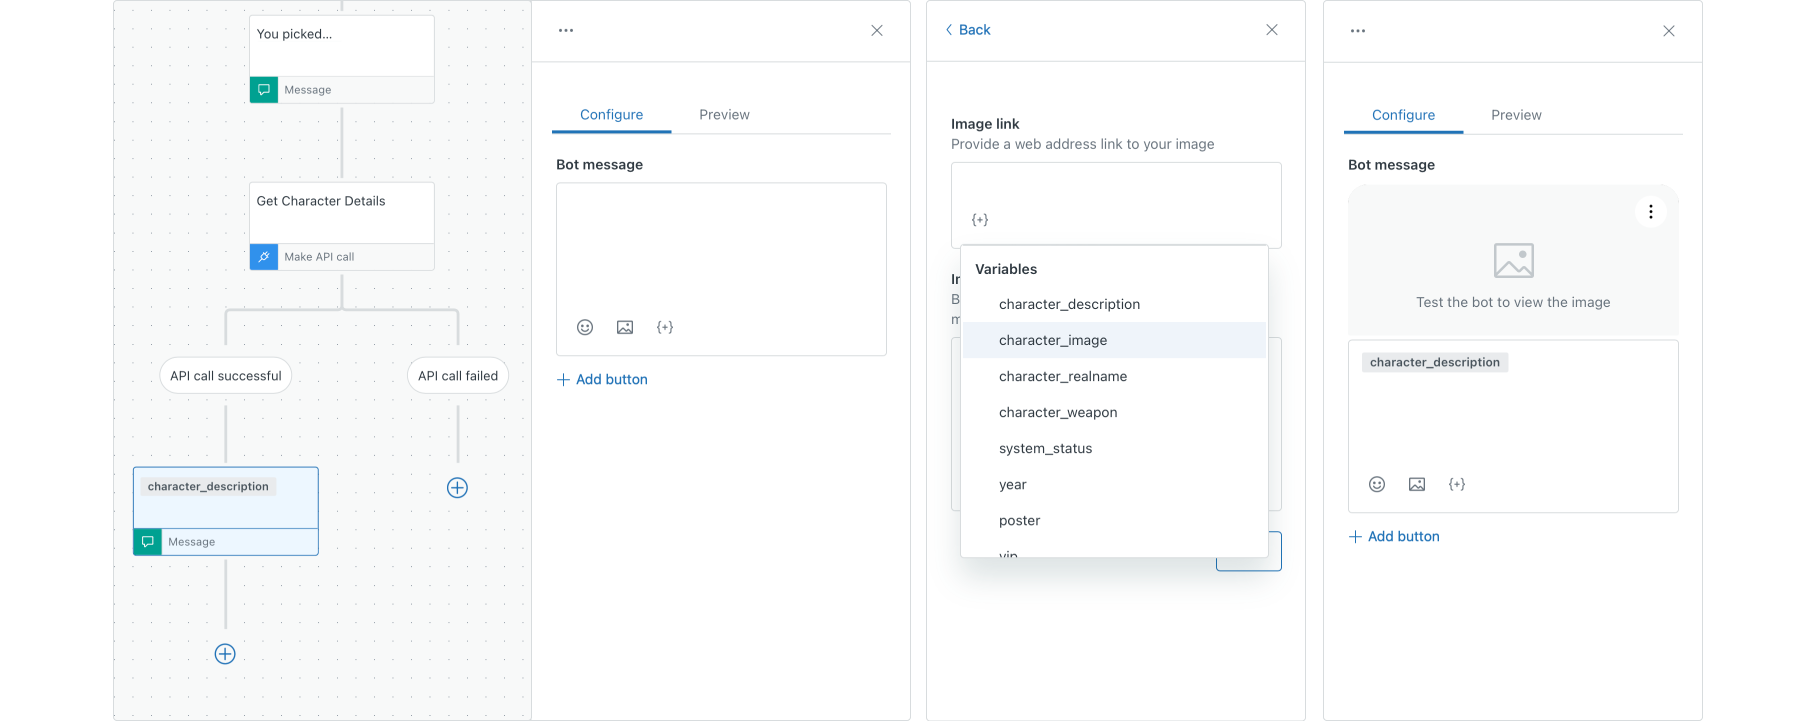
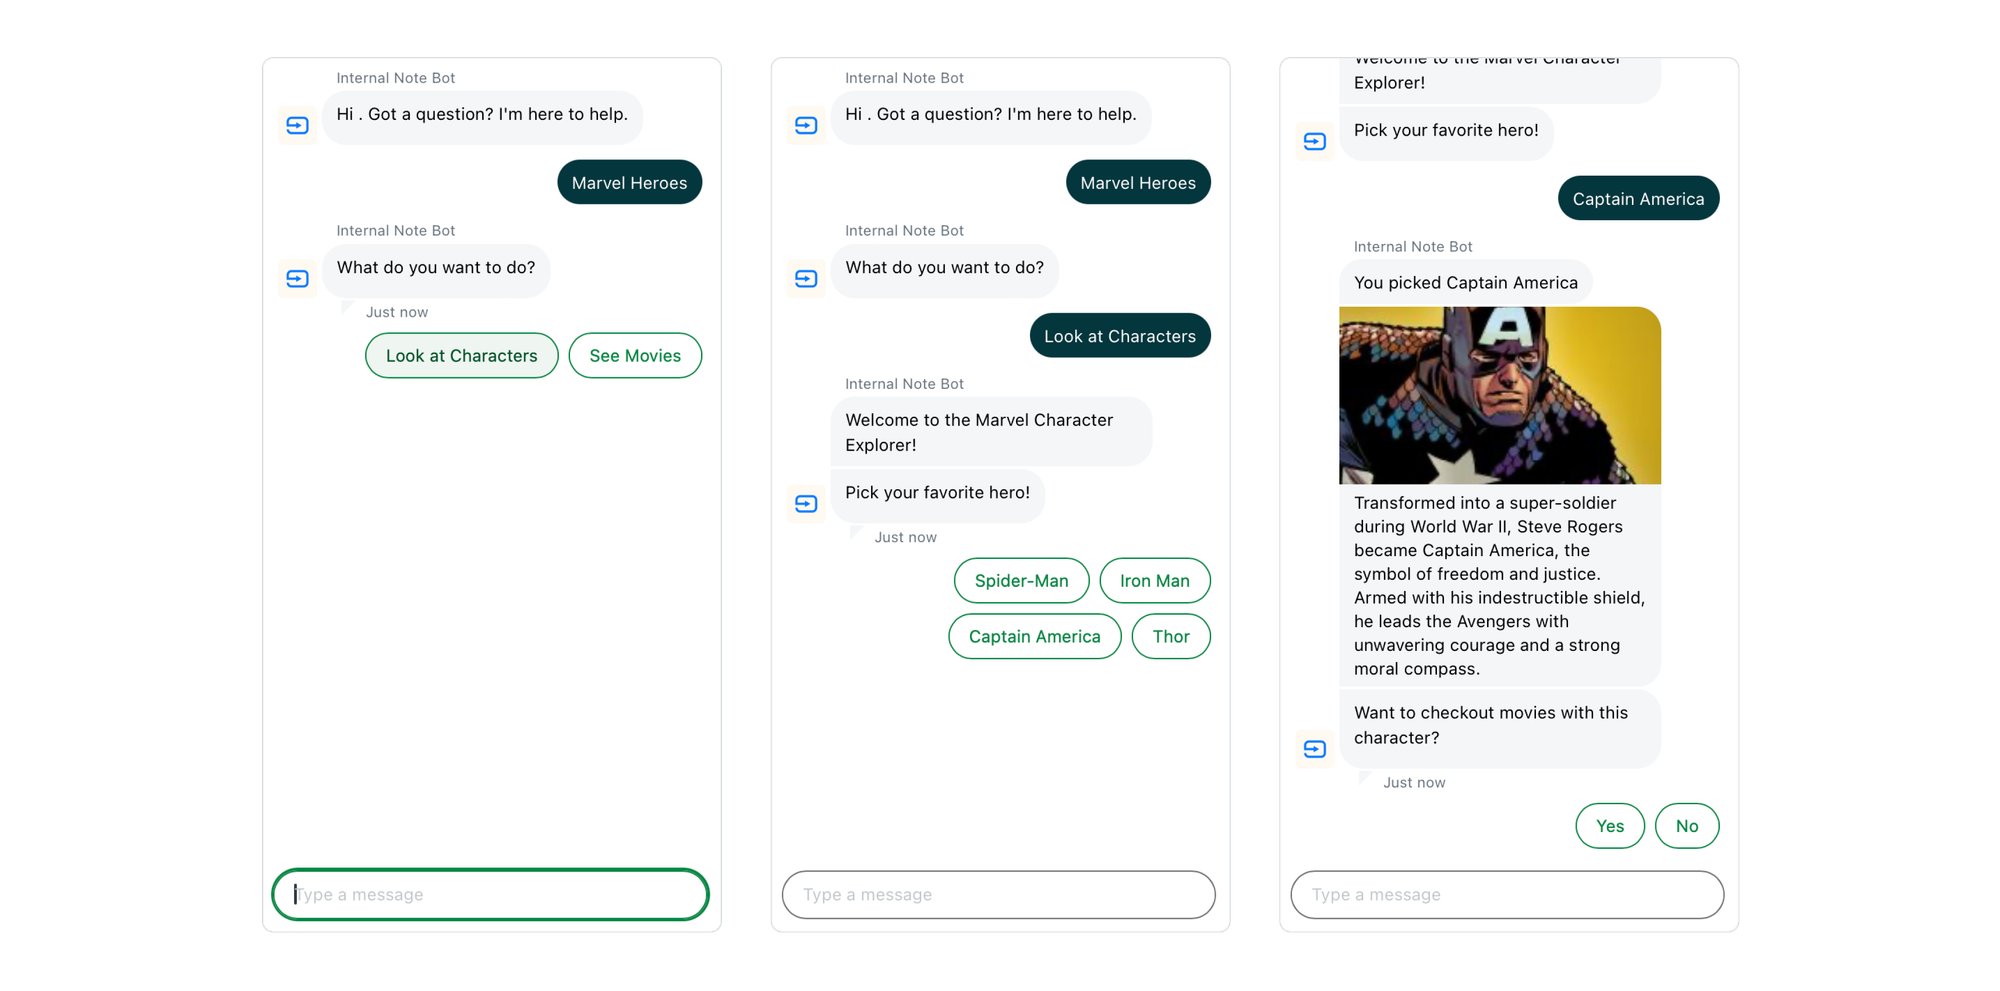
If all went well, when you test this flow it should show a list of heroes, allow you to select one, and show a detailed info card of your hero!

Movies
In the first part of this tutorial we gathered a list of super heroes and allowed user to pick a hero and show details of that hero.
In this next step we're going to do the same, but instead of gathering hero information, we're going to show a list of super hero movies.
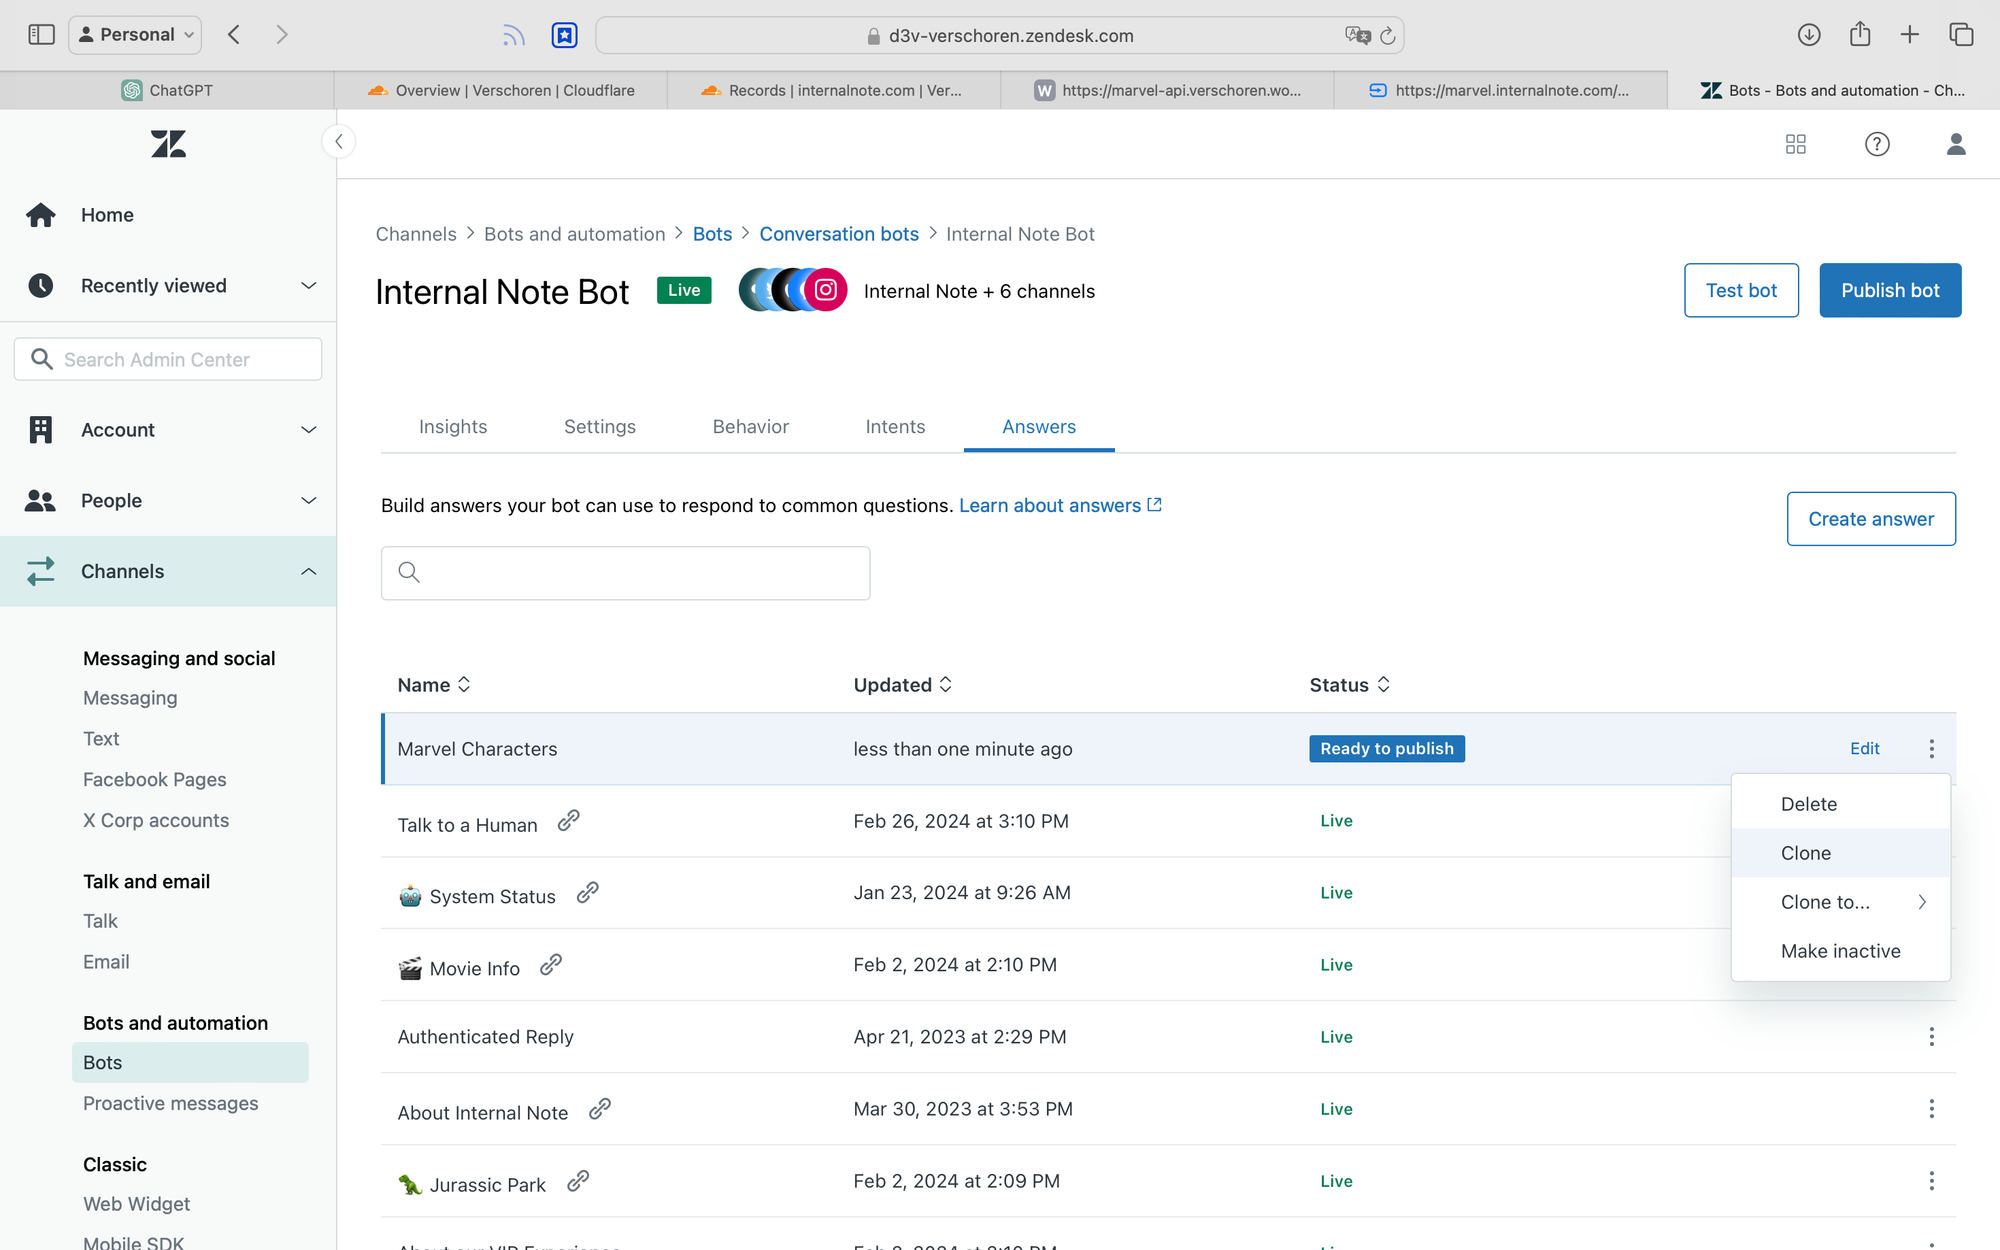
Clone Characters Answer
We can reuse almost all of the steps of the previous API flow so it's easiest to clone our Character answer flow and rename it.
This feature was enabled a while back in the bot builder and makes building similar flows that much faster!

Get all movies
To gather all movies we're modifying the Make API call step as follows:
- Update the API Endpoint URL to
https://marvel.internalnote.com/movies - Remove the variables at the bottom (we need to create new ones since the API changed)
- Run a new test and store the results in a
moviesvariable, and make sure to save thenameandpostervalues. (This is similar to the steps taken for the characters in part 1 of this tutorial.)
For reference, the API returns the following data
{
  "movies": [
    {
      "name": "Spider-Man: Homecoming",
      "year": 2017,
      "characters": ["Spider-Man"],
      "summary": "Peter Parker balances high school life with his superhero alter-ego Spider-Man, facing the Vulture and trying to prove himself to Tony Stark. This coming-of-age story marks Spider-Man's integration into the Marvel Cinematic Universe.",
      "poster": "https://marvel.internalnote.com/poster_spiderman.jpeg"
    },
    ...
  ]
}
Display all movies
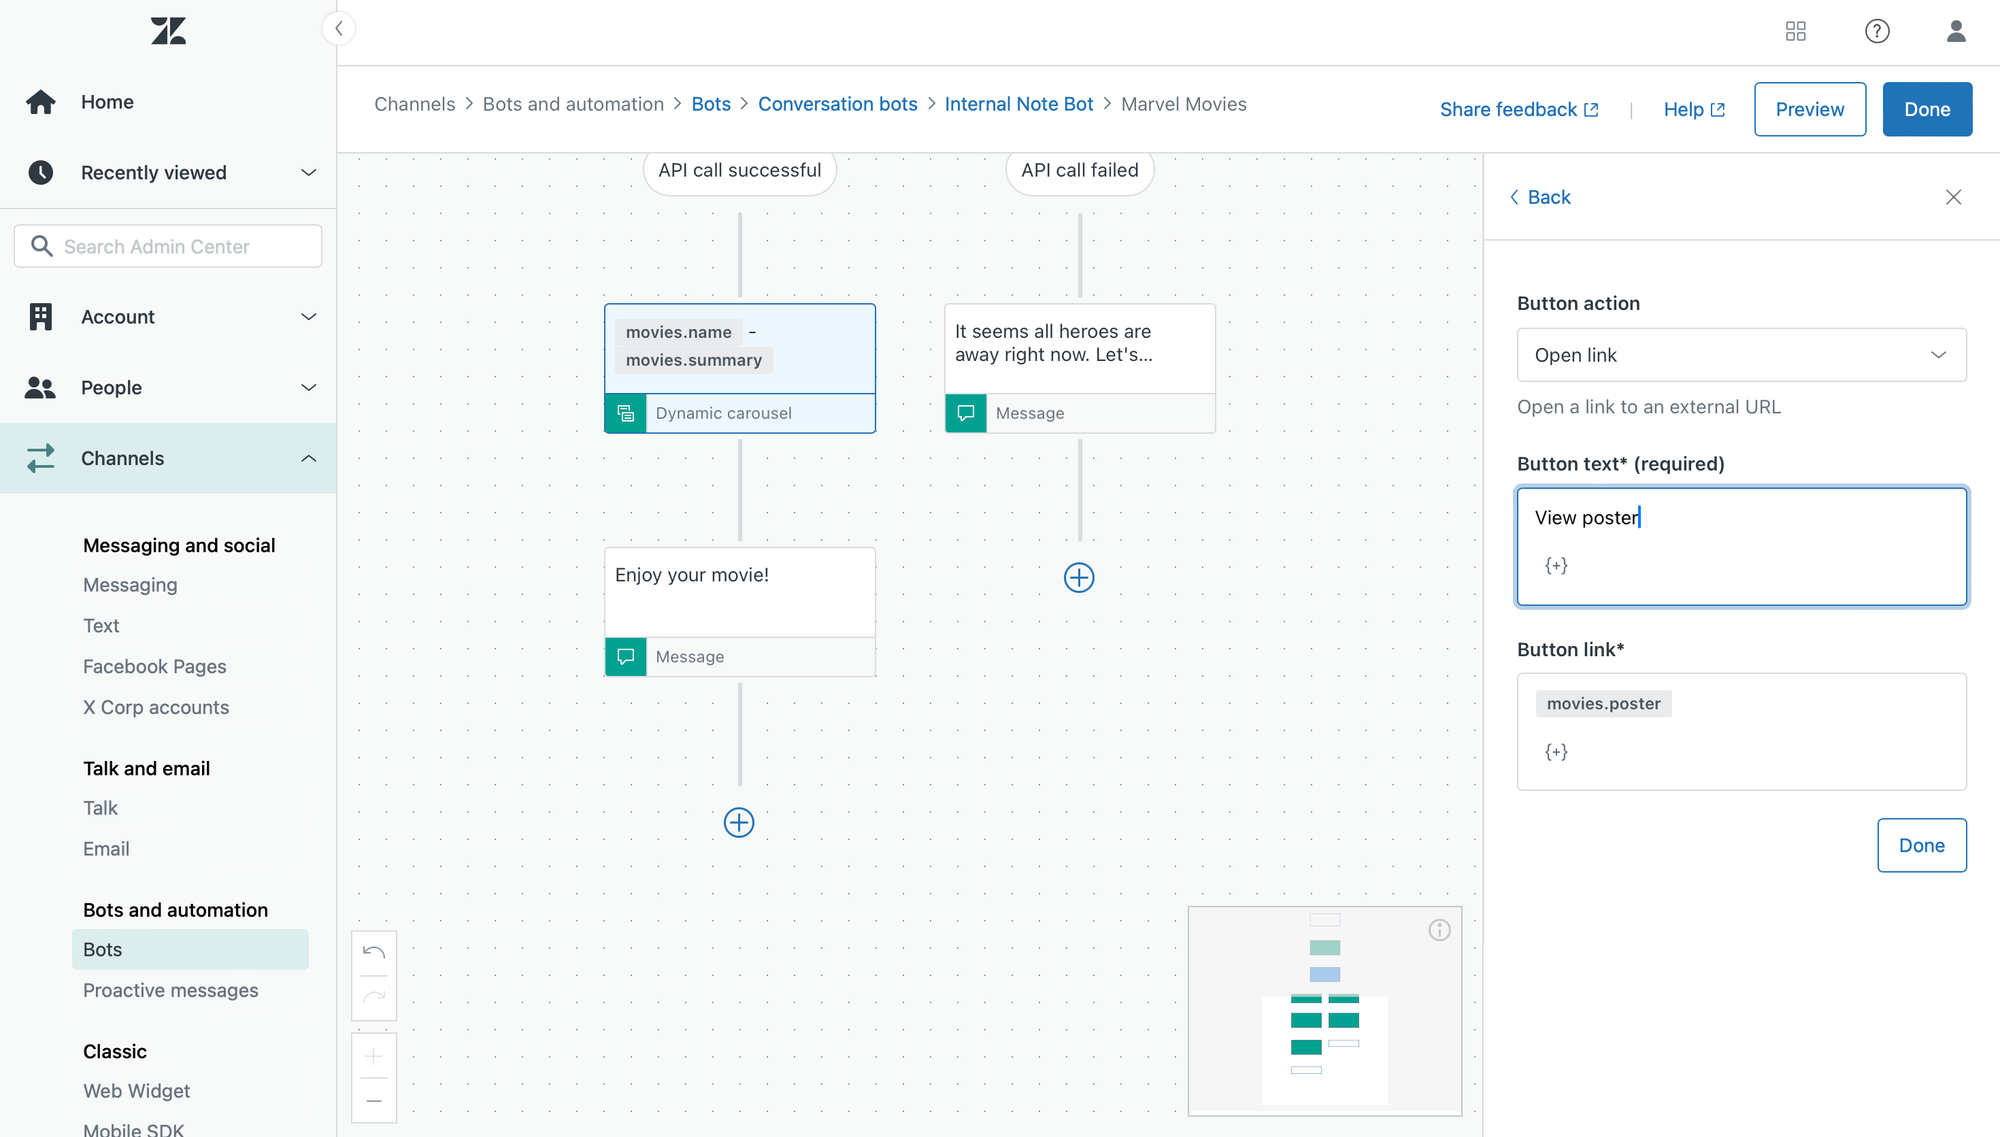
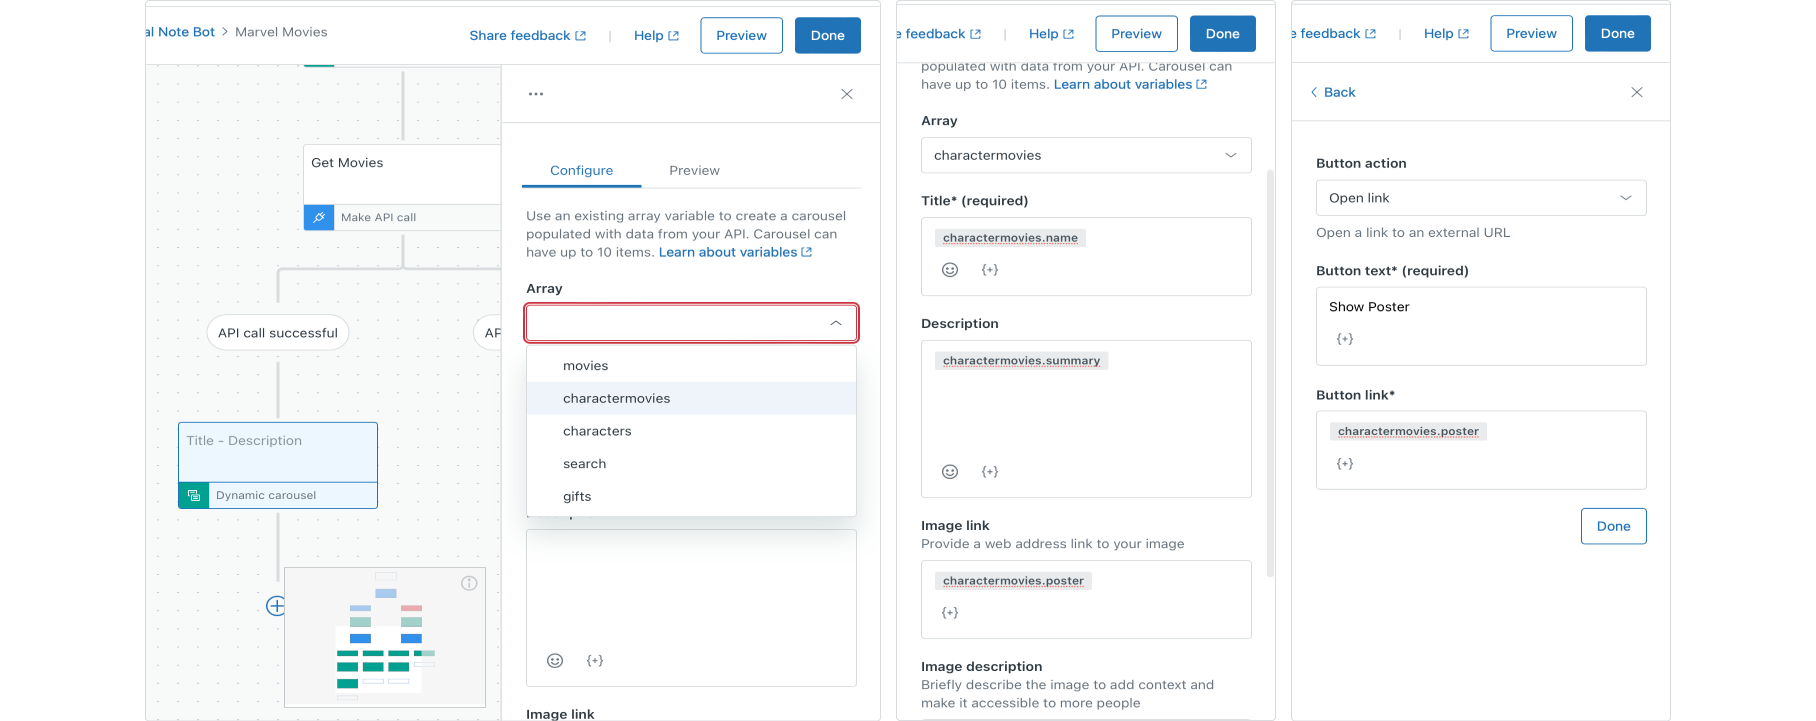
To display all the movies we're going to use a Carousel instead of a list of Options.
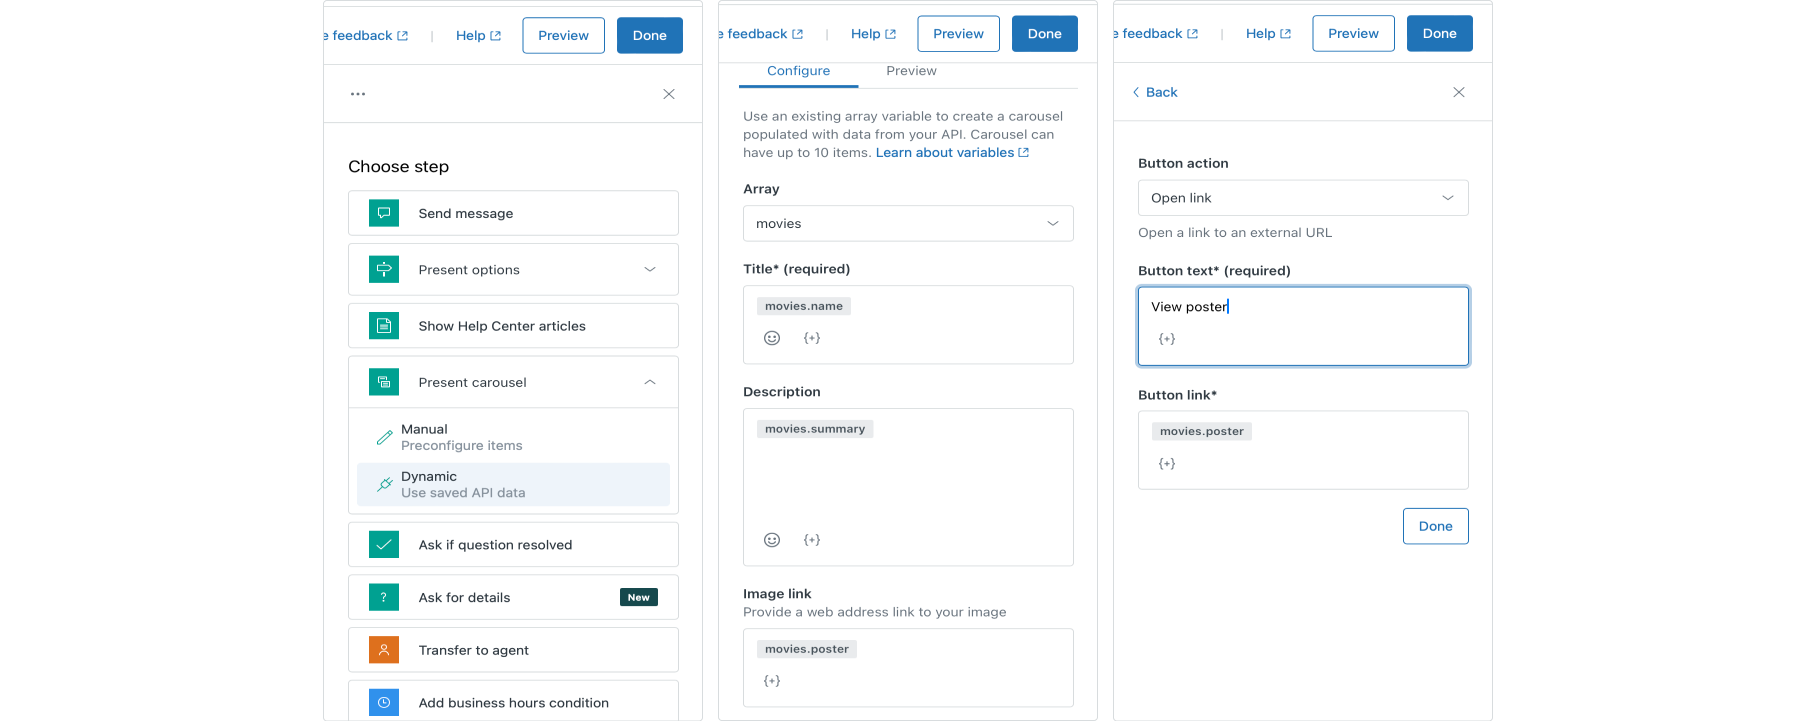
- Under the API call successful step, remove the existing Present Options step and all underlying steps.
- Add a Present Carousel step, and choose the Dynamic type
- Select our
moviesvariable and fill in our carousel variables- Title:
movie.namevariable (use the {+} button) - Description:
movie.summary - Image link:
movie.poster
- Title:
- Add a final Post Message step to wrap up the conversation.
Make use of the variables
Almost there!
Our new Movies answer correctly shows all available movies in our API. But in our Characters flow we ended with our user choosing a single super hero. It would be nice if we could show only movies starring our hero without the need to create multiple answers. This way we can trigger a single Movies answer in our bot, but have it dynamically show either all movies, or only a filtered set of movies.
Insert a conditional flow
To accomplish this we need to add a Branch by Condition step at the top of our Movies answer.
- Hover just below the first step of our Answer and click the + button
- Choose a Branch by Condition step
- In the If this brand we're going to add two conditions separated by an OR
- Variable
chosen_herois (leave blank) - Variable
chosen_herois all.
- Variable
- Give your brand a name 'No character chosen' and save this step.
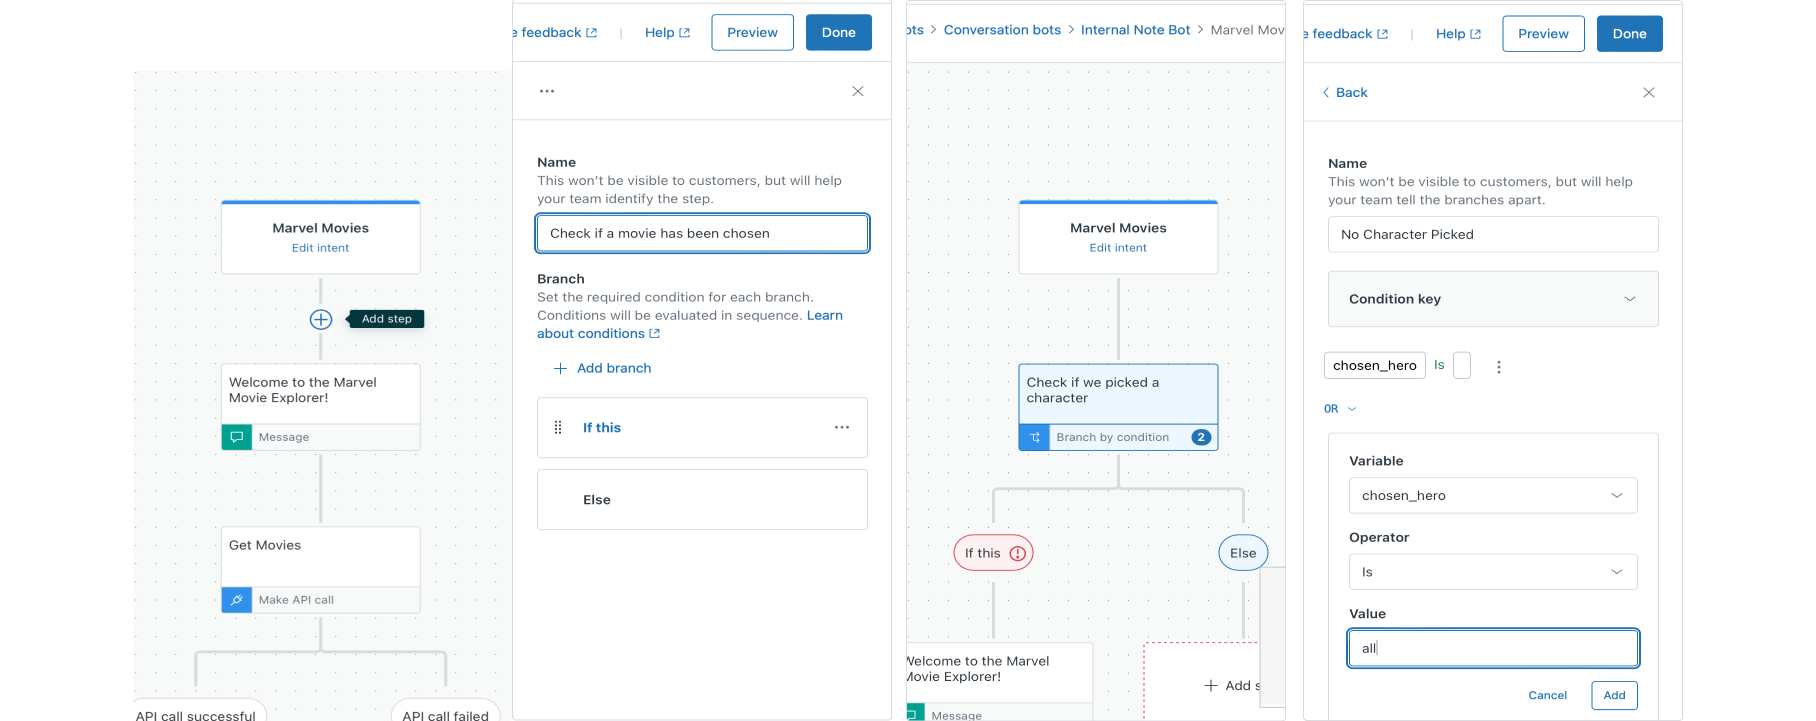
You'll notice that all the steps we did in the previous step are now under the No Character Picked branch, and we have a blank Else branch on the right.
Show a single movie
In the Else branch we want to create a similar flow as we did earlier, but instead of showing all movies in our API, we're going to call a different API endpoint that returns movies for a specific super hero.
The API is hosted at https://marvel.internalnote.com/character-movies and returns character details when a POST request is made with payload {"name":"Thor"}
The returned data is a similar array of movies as in the previous step, only filtered to only show these of our hero.
To set this up, add a Make API call step below our message step.
- Name: Get details
- Request Method: POST
- Endpoint URL:
https://marvel.internalnote.com/character-movies - Body: {"name":"
chosen_hero"} (add the variable via the {+} button)
chosen_hero value comes from since we haven't used it in the Movies flow at all. However, if a customer first hits the Character flow, and we then connect them to our Movies flow, this value is set with the name of their favorite hero, thus making the conditional branch choose the else flow.The steps here are almost identical to those of all previous API calls.
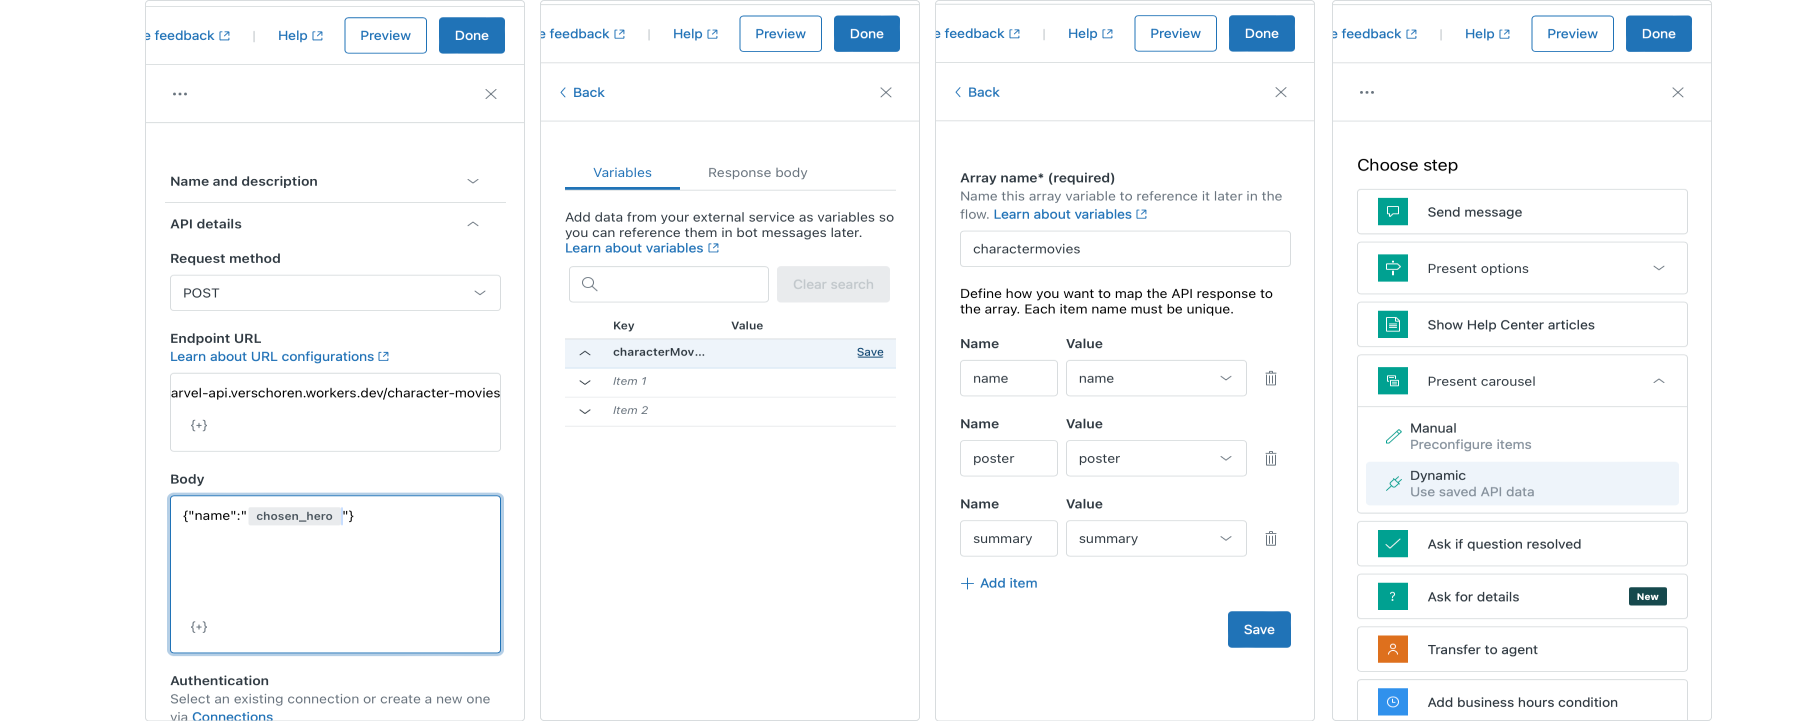
- We store the returned array in a new variable
charactermovies. - We give the values within that array logical names
- We create a new Carousel with dynamic data, taken from the
charactermoviesstep. - And we add a nice error Message in the API Call Failed branch.
Return all movies
To wrap up our Movies flow we want to give users the opportunity to discover all movies once they've seen the movies of their hero.
To accomplish this we're going to use the new Set Variable step.
- Add a Show Options step at the end of our Character Movie branch.
- Ask the customer if they 'want to watch more movies', and give them a Yes and No option.
- In the Yes branch, add a Set Variable step, and set the value of our
chosen_herotoall. - Next, add a Link Answer step, and choose the same Movies answer as we're currently working on.
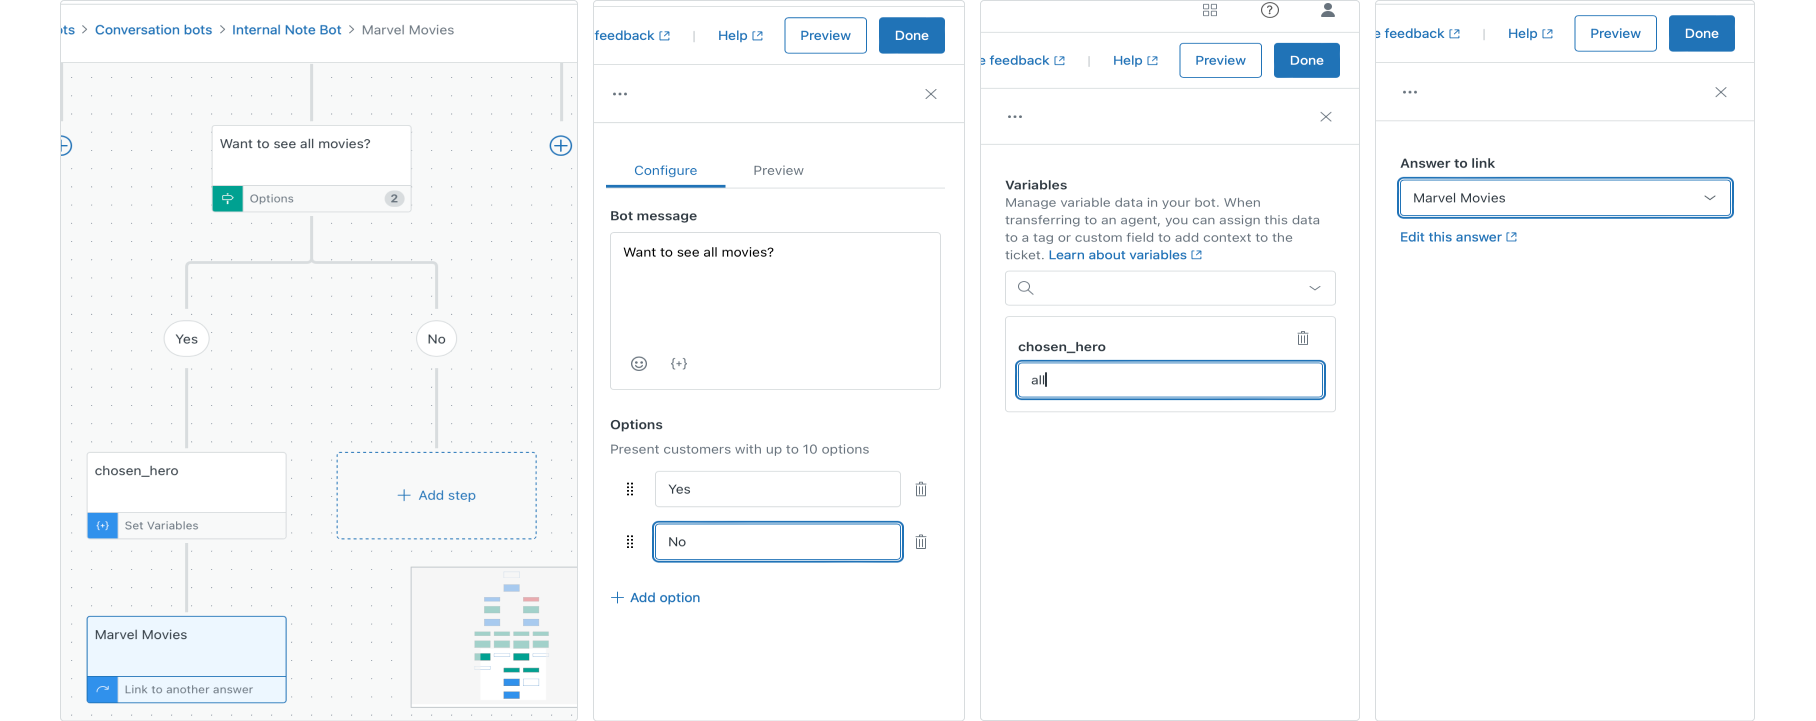
What happens now is that, when a customer says 'Yes I want to discover all movies', we set the variable chosen_hero to all and start our flow from the top via the linked answer. This time, instead of chasing the else branch, we've met the conditions for our primary branch due to the new value of chosen_hero .
Link character to movie
And now, finally, we can link our two answer flows for characters and movies together.
Ad the end of our Characters answer, after the message with the characters' description, add a Show Options step that asks the user if they want to checkout movies starring this character.
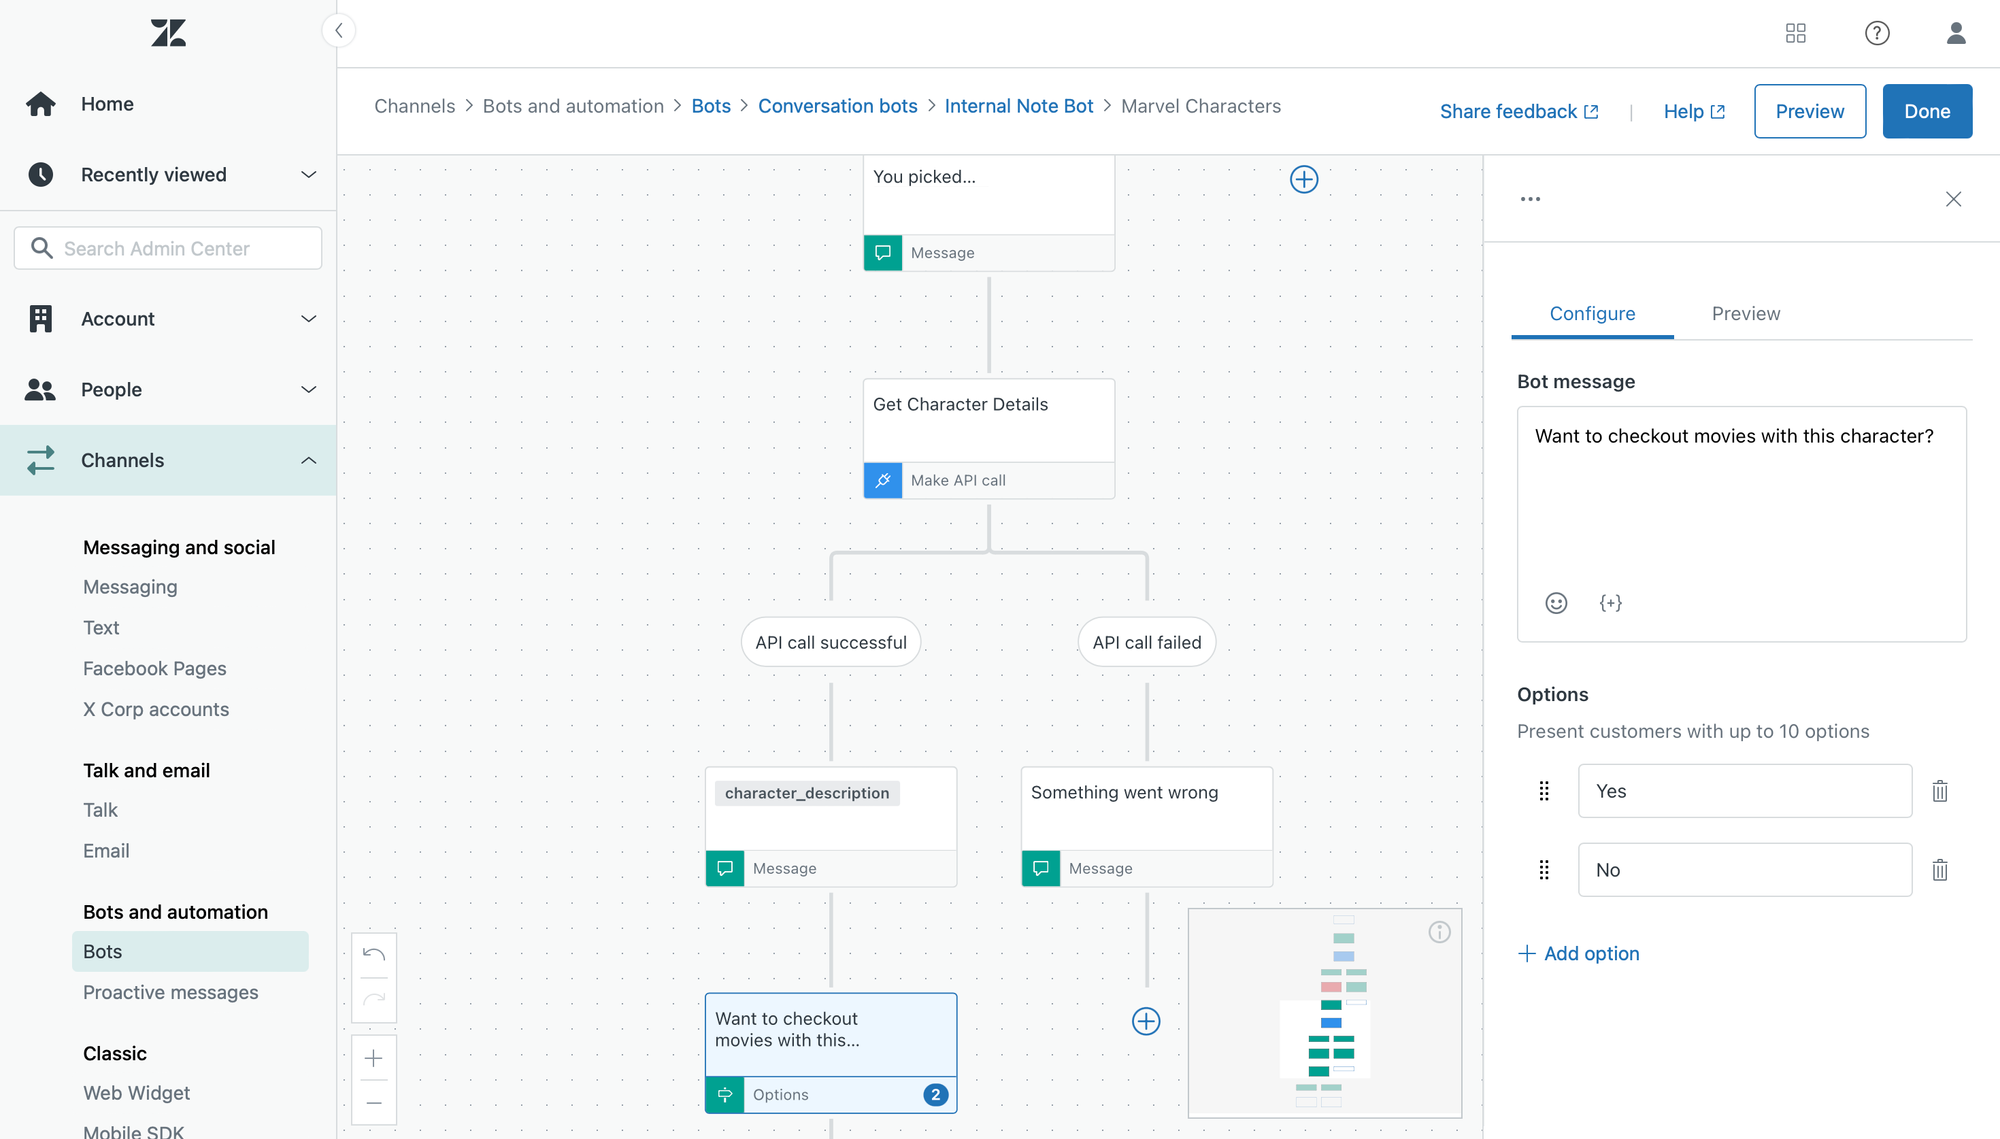
In the Yes branch, add a Link to another answer step, and select the Movies Answer.
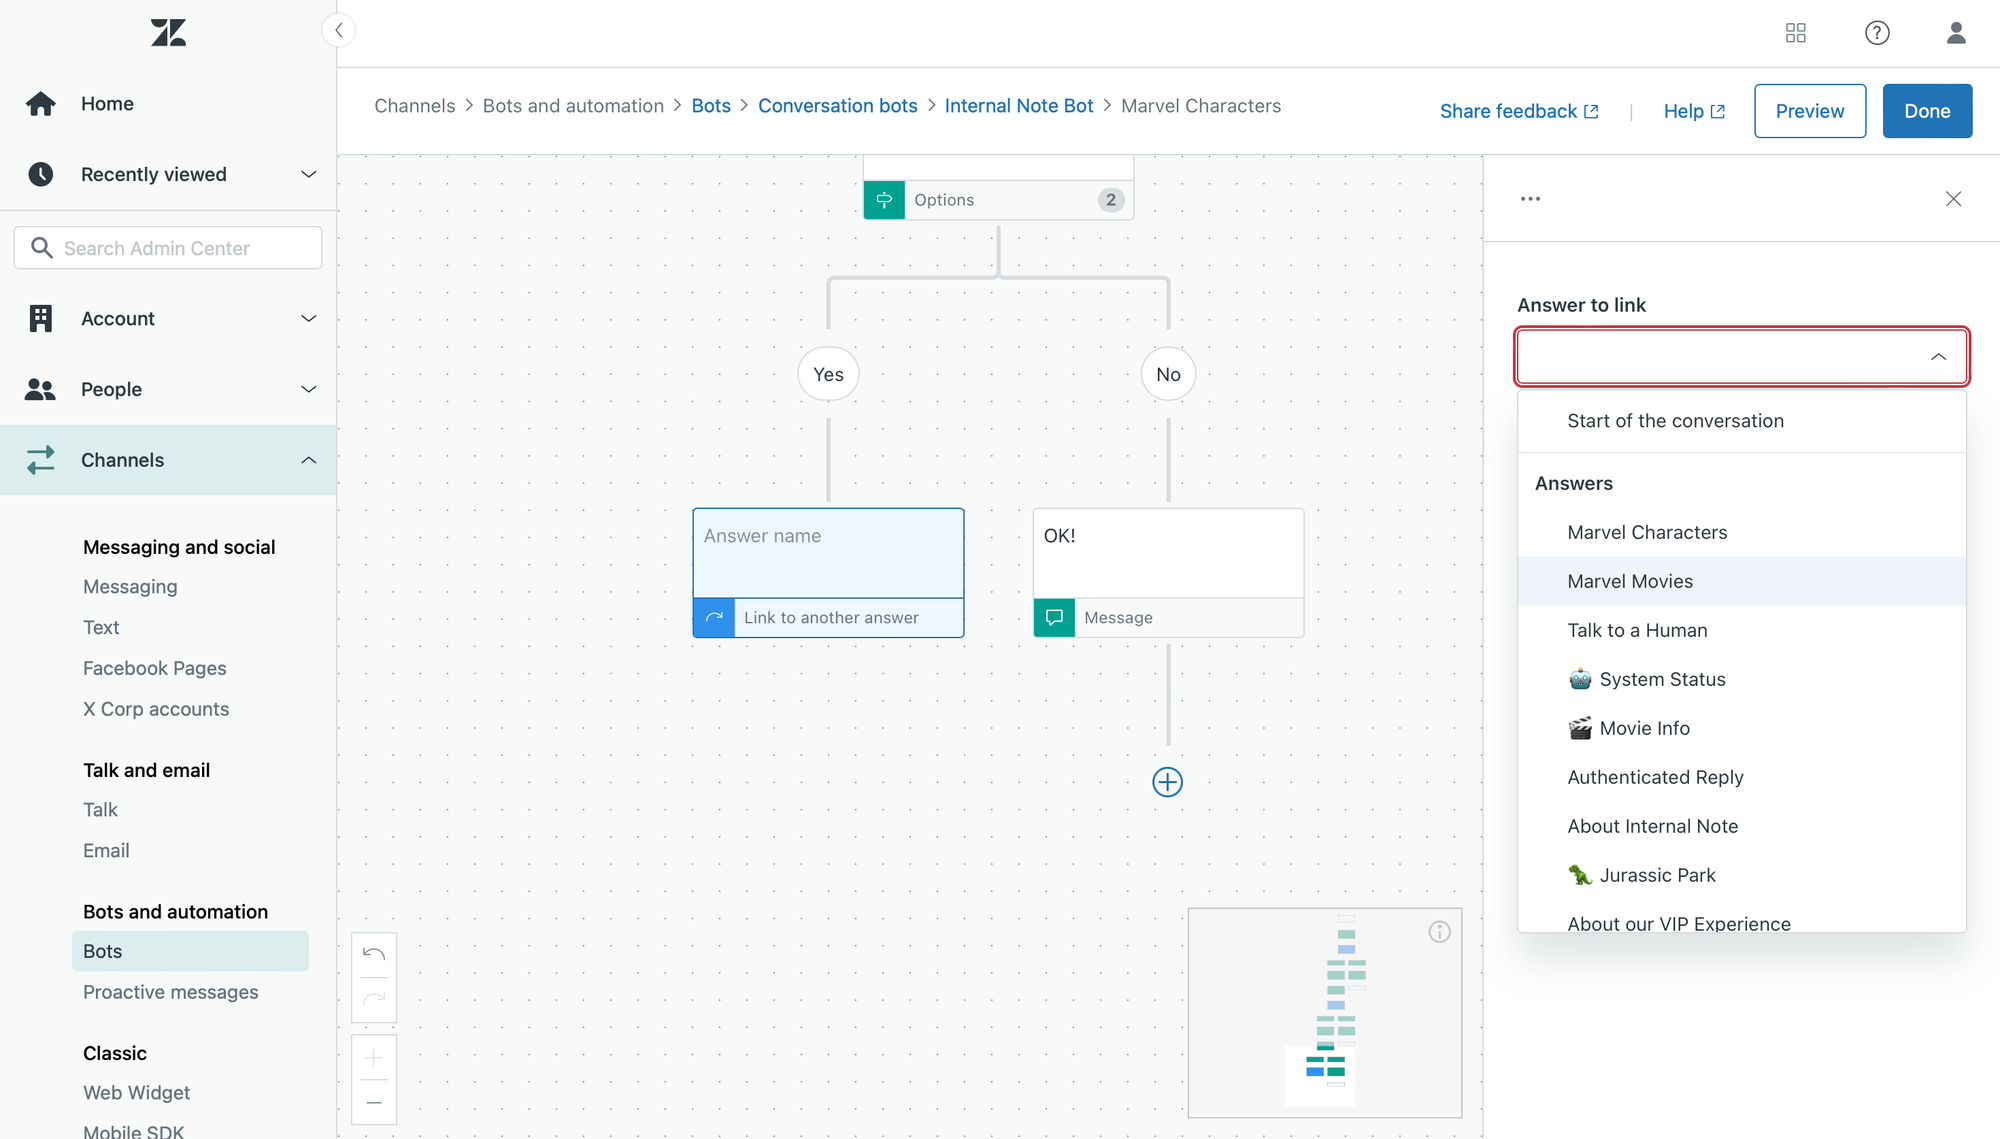
Et voila. You've got two interconnection flows with all the new Bot Builder goodies enabled!
Conclusion
The above flow is build a bit tongue in cheek by referencing Marvel Movies and super heroes, but in all seriousness, the ability to share a variable across your flows will make a lot of complex answer flows now possible.
If only for the ability to ask list orders for a customer, have customer pick one and store that value inside a ticket field. That alone is a major change that makes ticket escalation so much more powerful.
When building the above flows I was surprised to how close the Zendesk Answer editor comes to the one that Ultimate.ai offers. Having variables live within a conversation and shareable across answer flows brings Zendesk this much closer to their recently purchased bot solution.
The only major difference, putting custom AI models aside, I see for now is Ultimate's ability to link answer steps within the same flow. So here's hoping this feature gets migrated soon!