Leveraging Custom Ticket Fields in Action Builder
This article shows how to enhance Zendesk Action Builder flows by using custom API Actions to retrieve ticket and user data, including custom fields. It outlines how to connect, authenticate, and use this data to build smarter, more contextual flows—even before native support is available.
Leveraging Custom Ticket Fields in Action Builder

On this page
Zendesk’s new Action Builder brings modular, logic-based automation to support teams. This guide builds on last week’s introduction and shows how to enrich your flows with ticket field data via the API.
Action Builder is currently in EAP meaning that, although feature rich, it's still in development and some features and capabilities are still missing.
Zendesk has outlined a rough roadmap of planned improvements in the article below. One of the most important additions will be native access to custom ticket fields.

In my article I described an example flow that leveraged a value stored in a ticket field to retrieve data in an external API. I purposefully glanced over the details of that step since I thought that concept would be better positioned in a dedicated article.
So that's exactly what we're going to do here.
Available action types
Action flows have three kinds of steps.
- Native ticket actions (update status, add comments, etc.)
- Prebuilt integrations (Slack, Google Sheets, Jira)
- Custom actions (HTTP requests with parameters and output)
Custom Actions use the same engine that powers Agent Copilot. They can call any HTTP API, with input parameters and mapped outputs.
While native steps don’t expose custom fields yet, you can access them through custom actions that call the Zendesk API. This unlocks dynamic branching, ticket enrichment, and more contextual automation — all without code.
Creating a Custom API Action
Authentication
The first thing we need to set up is an API connection to store our credentials.

Start by creating a new API token under Admin Center | Apps and Integrations | Zendesk API. I always prefer a dedicated API Token per integration to keep a good oversight and to be able to revoke a token with minimal impact.
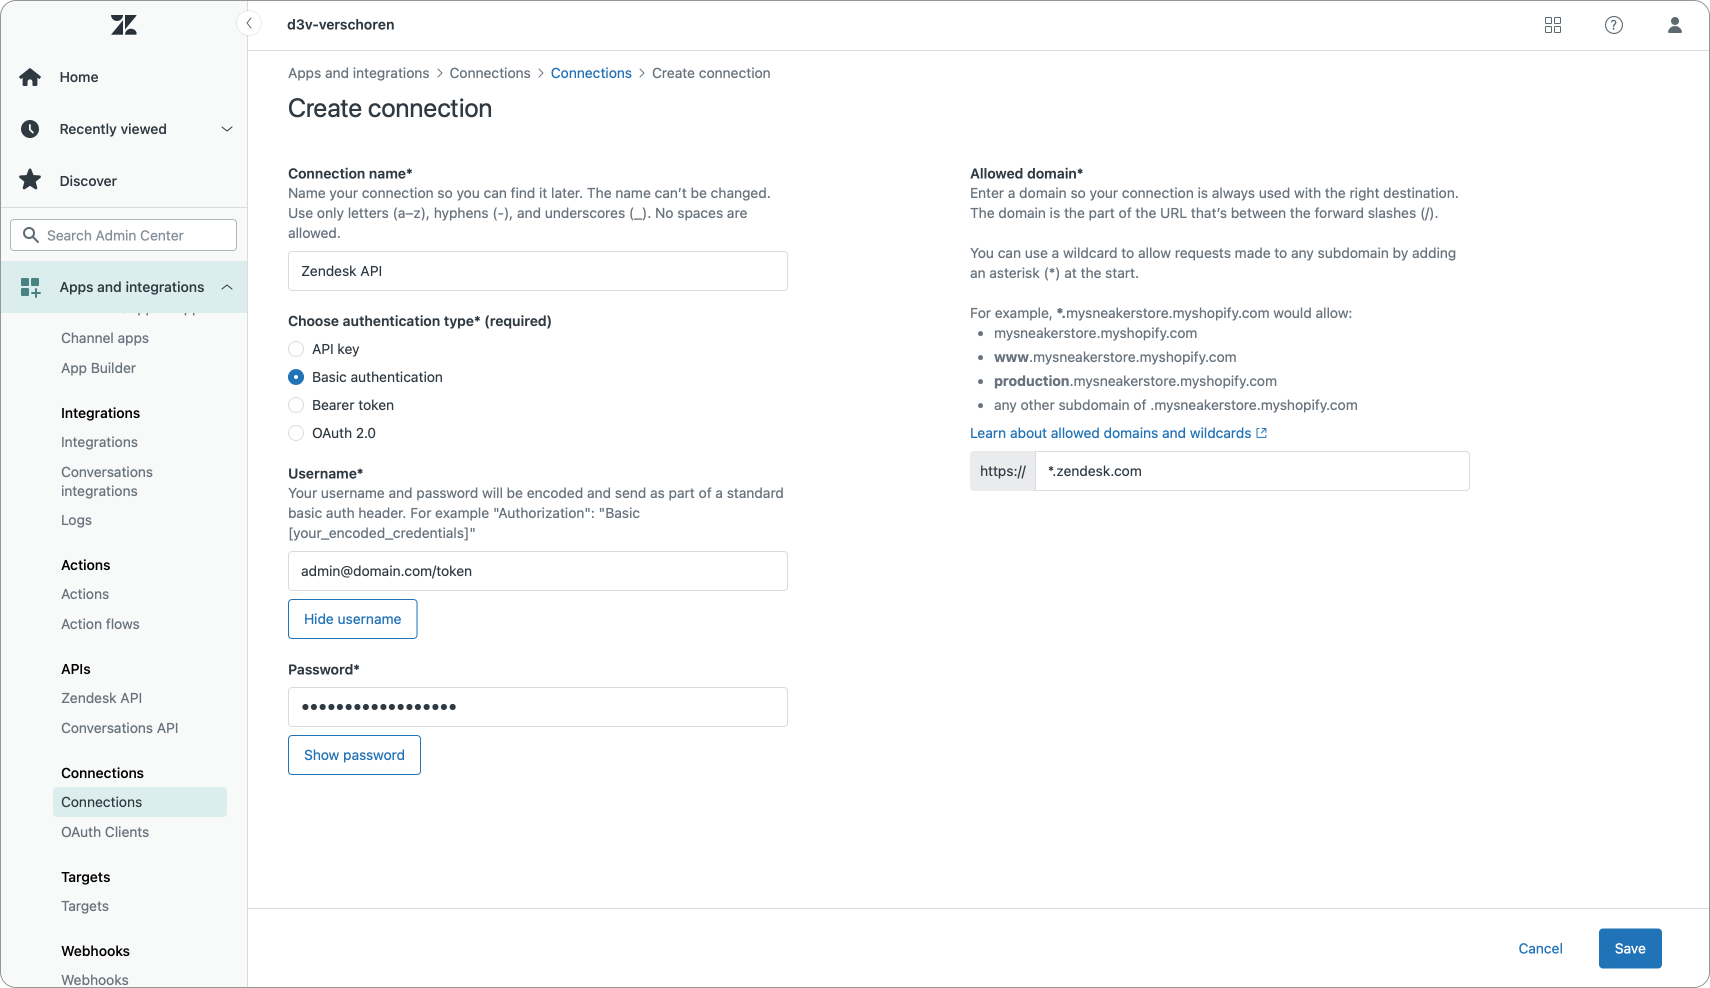
Next, we can add that token to an API Connection. To do this, go to Admin Center | Apps and Integrations | Connections.
We need to add a new connection of type Basic authentication.
The username is any admin account in your Zendesk instance, formatted as such: [email protected]/token and the password field is the API token you just copied.
As for the Allowed domain, enter *.zendesk.com or your domain.zendesk.com . I use a wildcard version so it works for all my brands.
Creating and testing a custom action
Creating the Custom Action
We'll create a new action under Admin Center | Apps and Integrations | Actions.
Under input we use a special variable called zendesk_ticket_id which retrieves the ID of our ticket.
The Request method is GET and the URL is formatted as https://yourdomain.zendesk.com/api/v2/tickets/zendesk_ticket_id with the latter part being the zendesk_ticket_id you add via the {+} variable button.
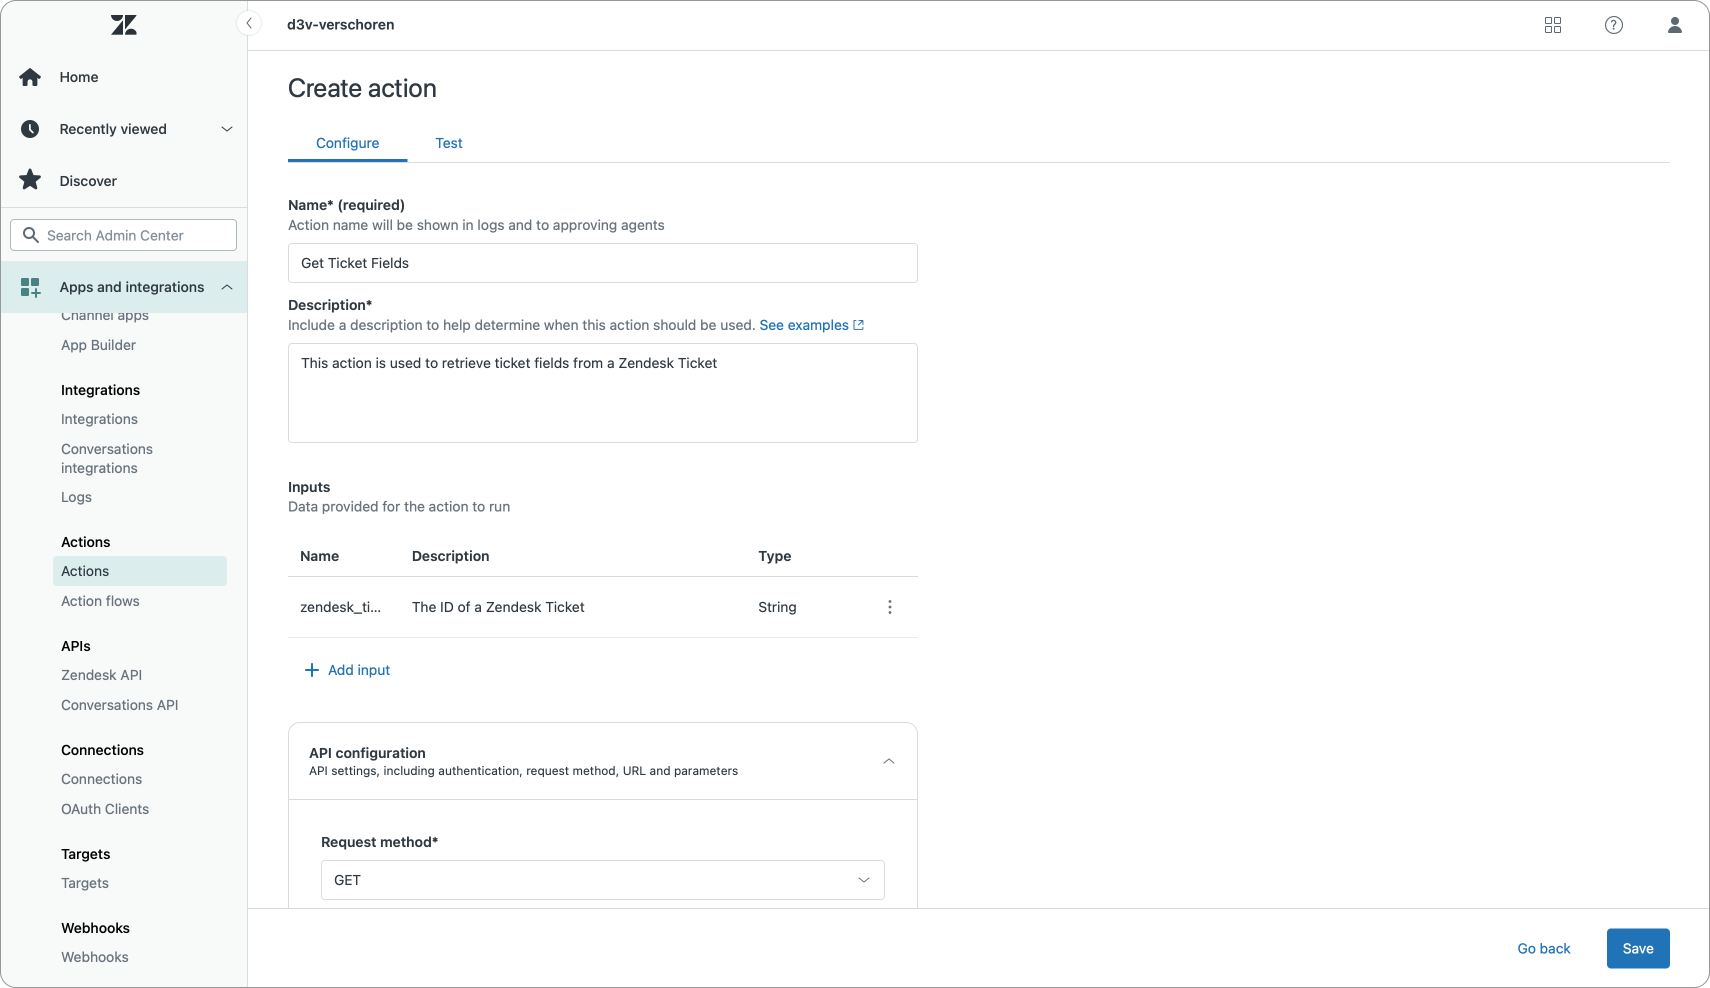
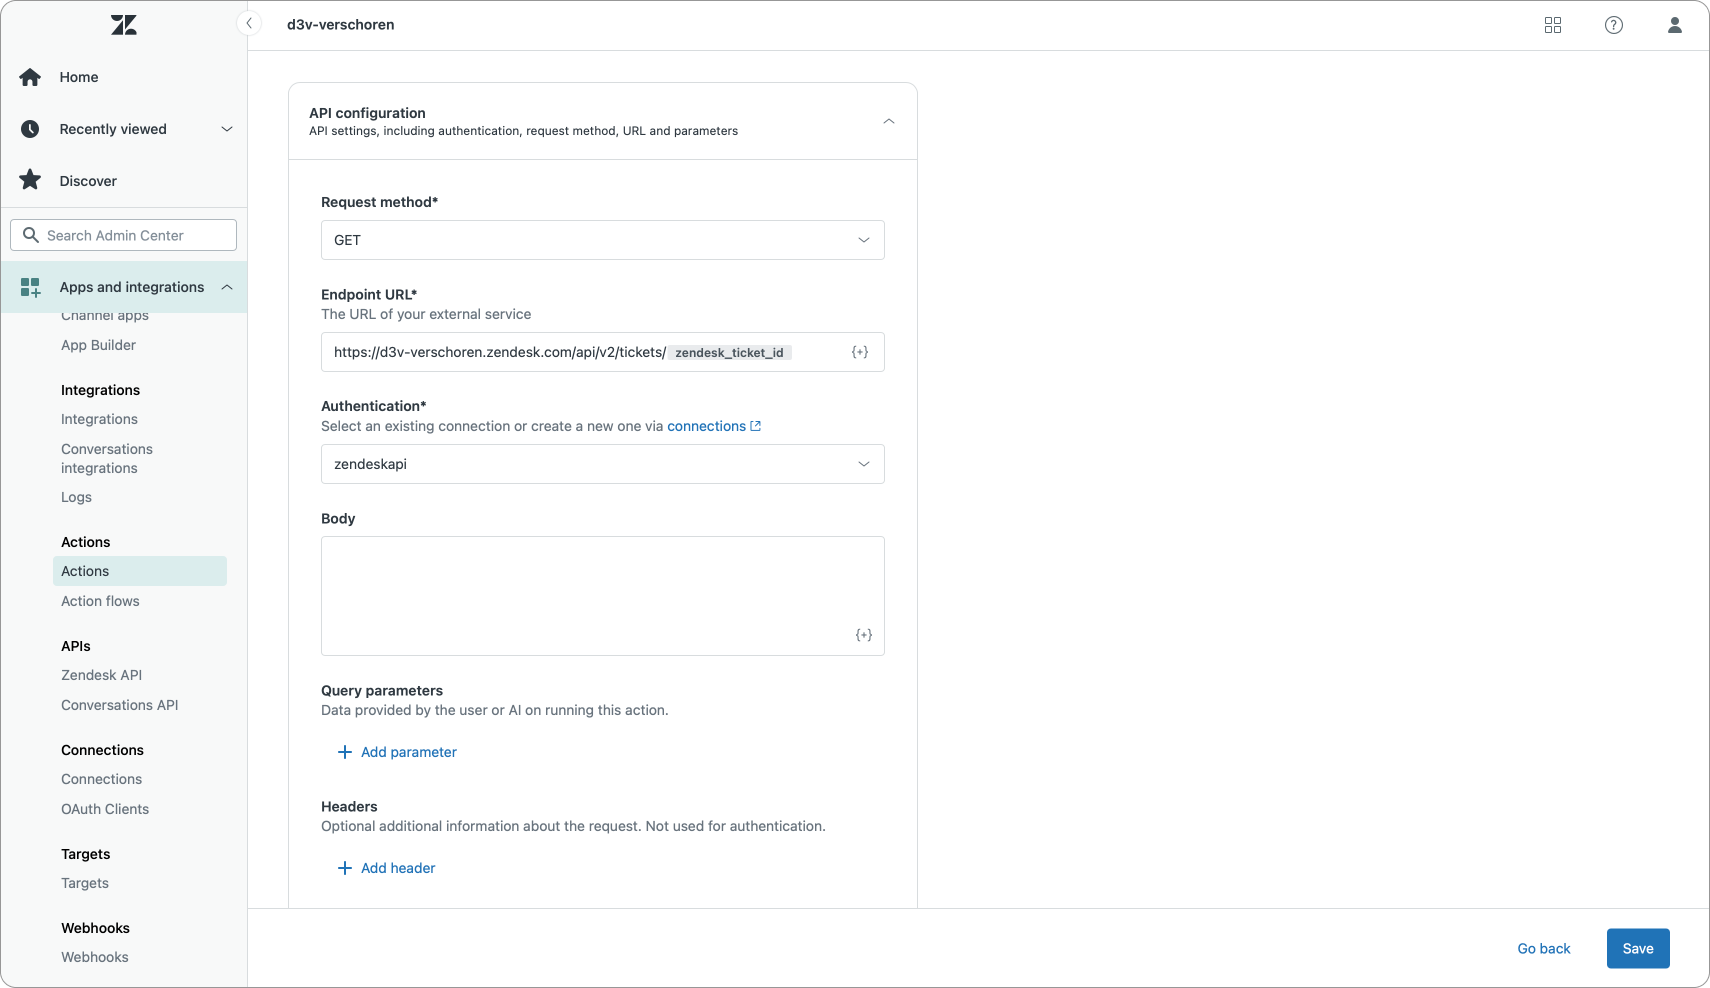
Remember to set the Authentication to the API connection you just added. You can leave the rest of the settings blank.
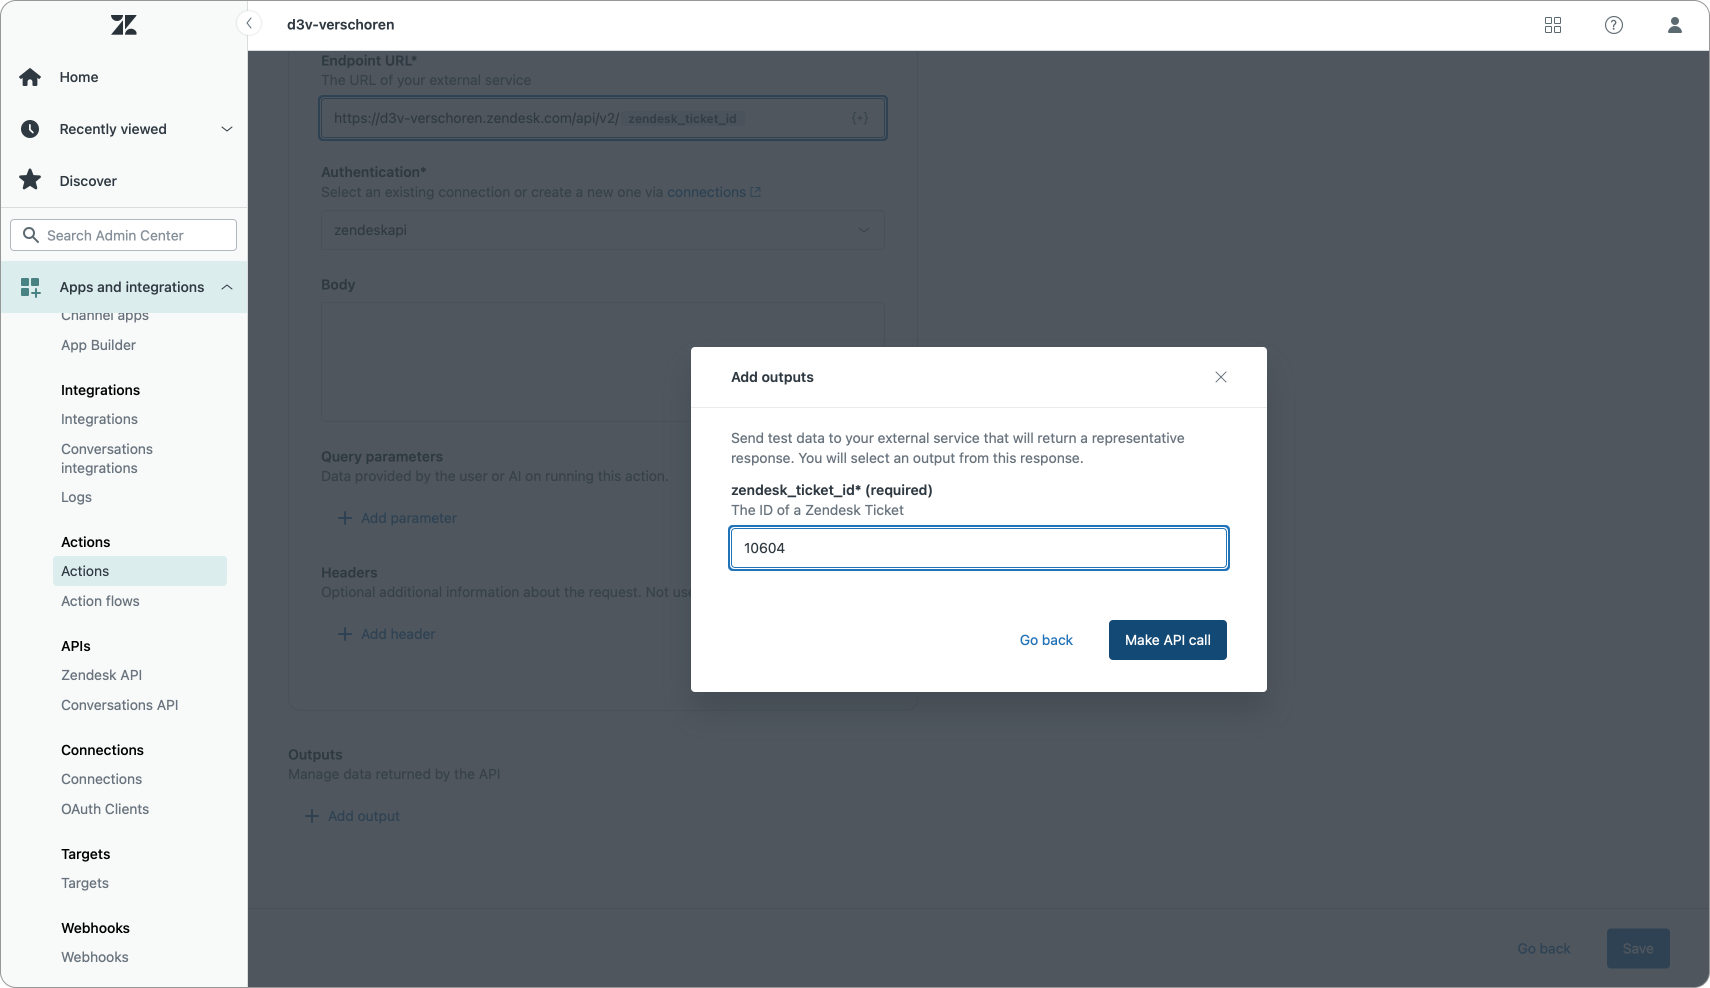
Testing our custom action
Once we've set up the API connection, we can test it out. Make sure to have a Ticket ID at hand that contains example data in the ticket fields you want to retrieve.
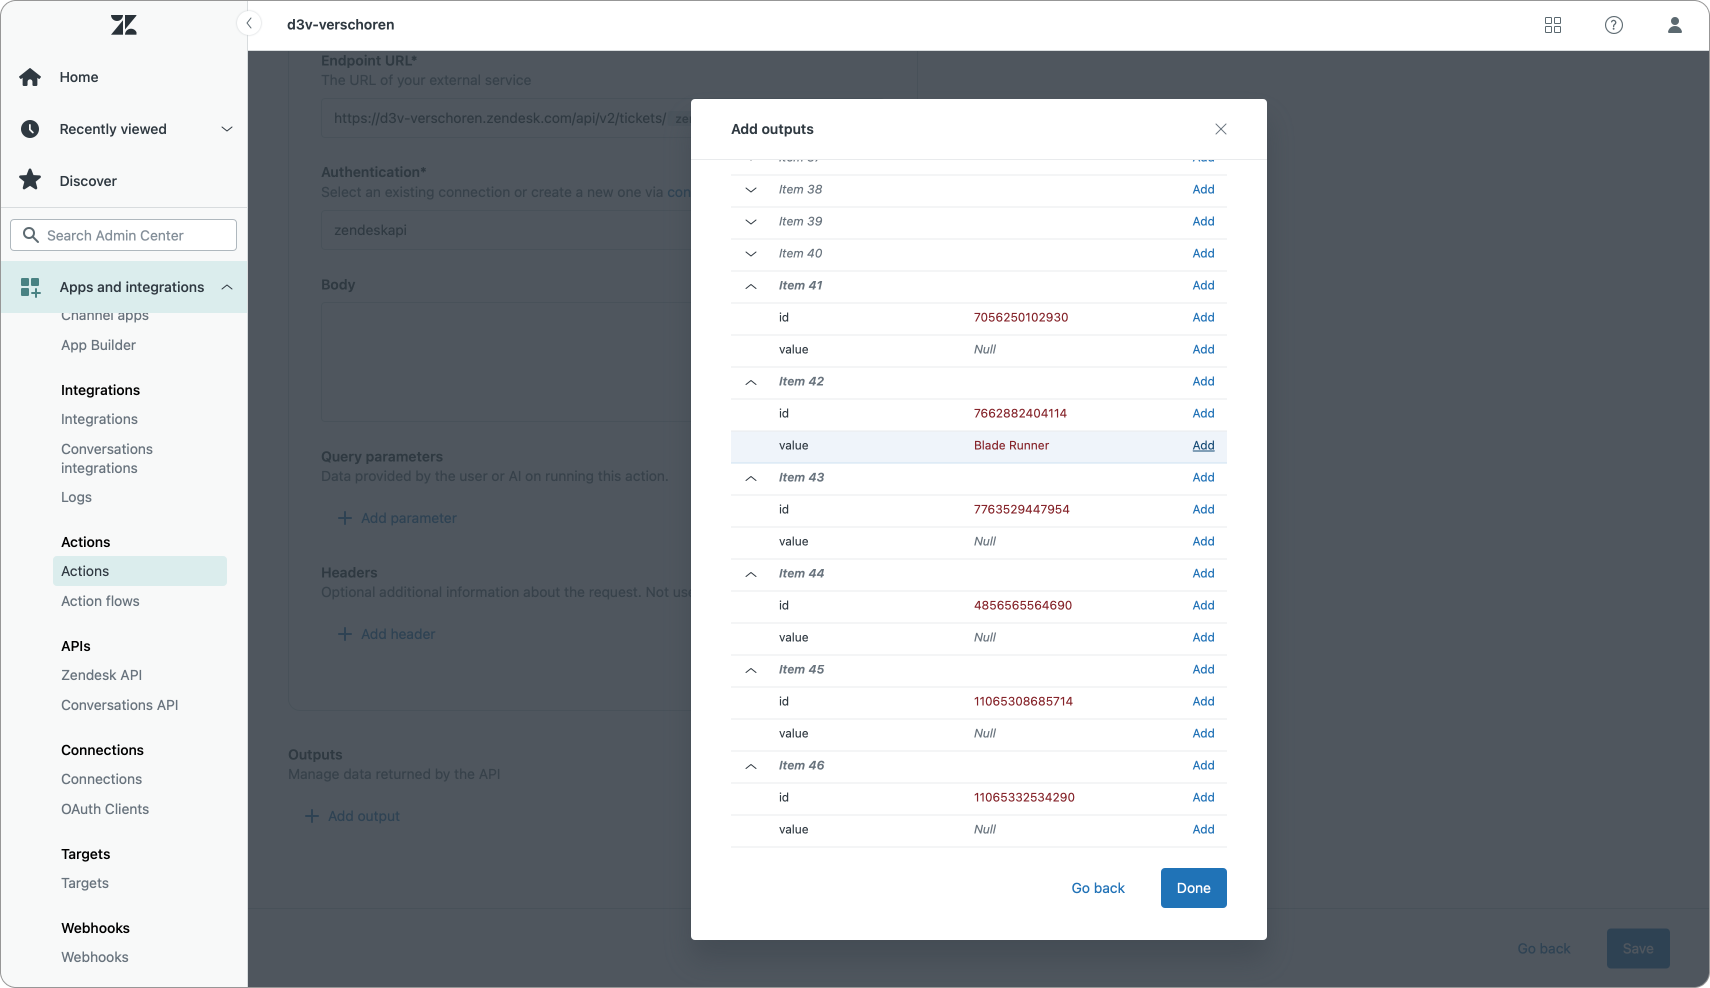
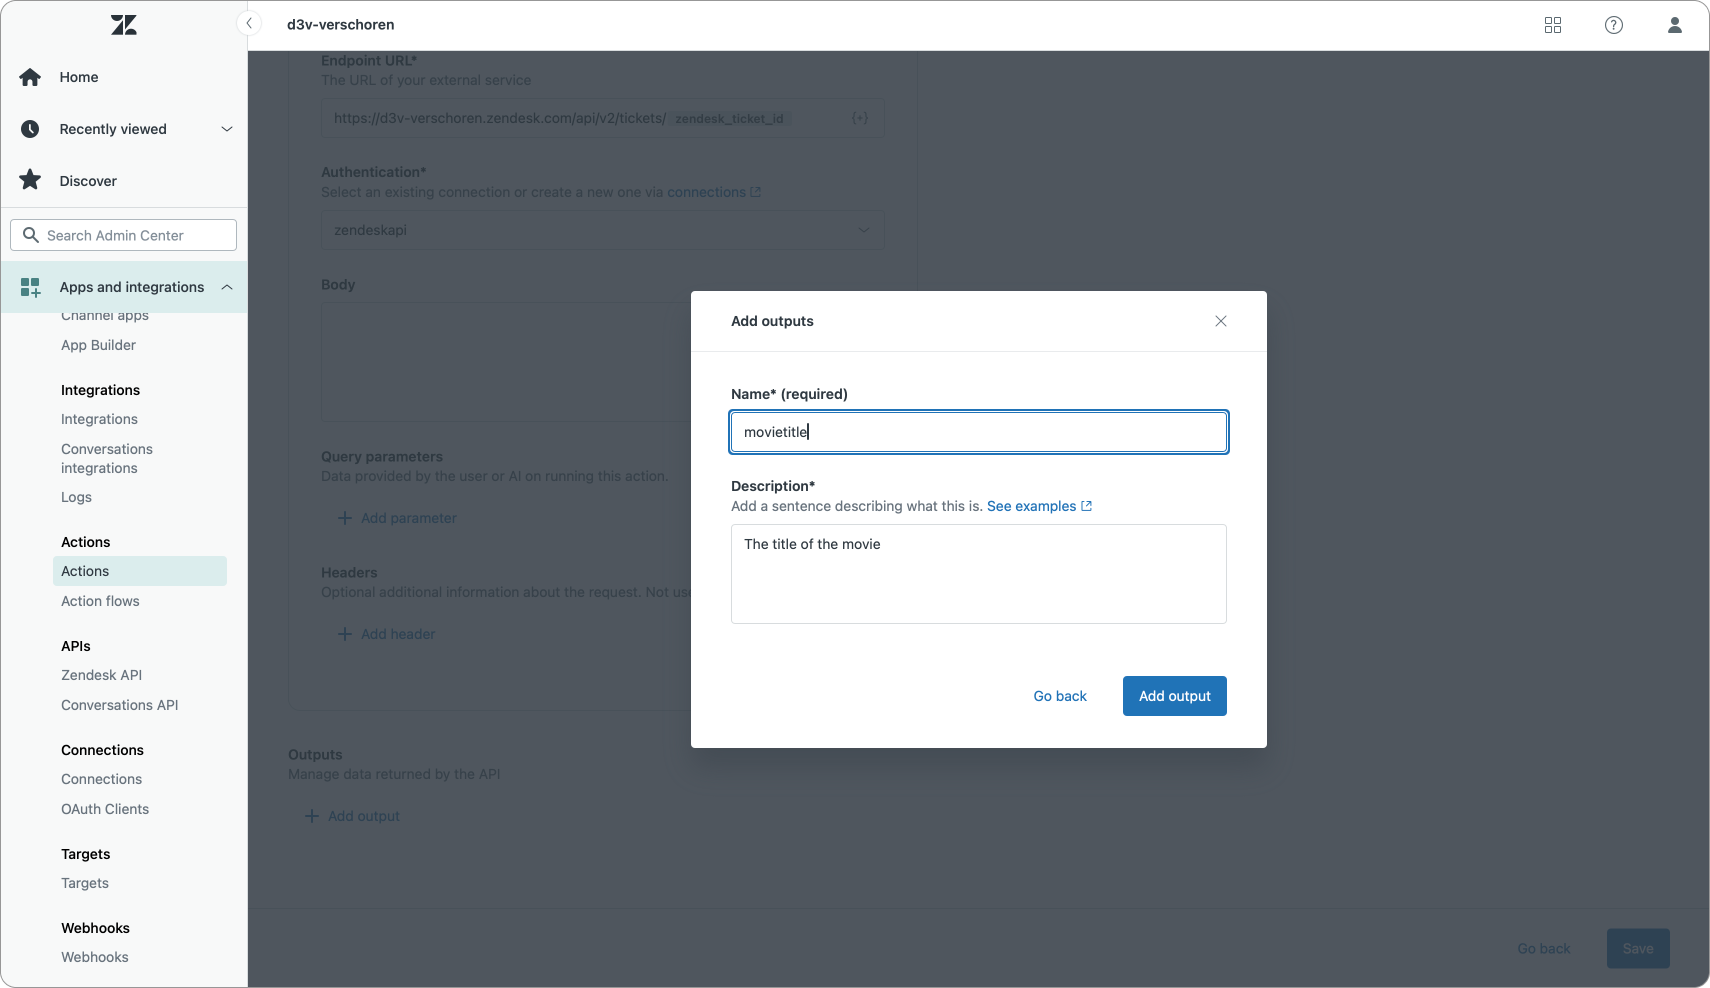
Enter a Ticket ID and you'll get a list of all the ticket metadata. Expand the available elements and look for the value of the custom field you want to store. Click ‘Add’ to save the field as a named variable.
In this example, I mapped my Movie Title field as movietitle . I'd recommend mapping as many custom fields as possible though so you can reuse this one action across all your Action Flows. This avoids having to build a separate action for each custom field.
Adding our action to an Action Flow
Once your action is working and the output is mapped, you can start putting it to work in a real flow.
Do this by selecting our custom action as the next step. You'll need to add a value for our zendesk_ticket_id input variable we created earlier. Click the add variable button and select the id variable. This will pass the Ticket ID of the current ticket to our Action

Once executed the output now feeds into subsequent steps. In this example, movietitle feeds into a step that fetches movie information.
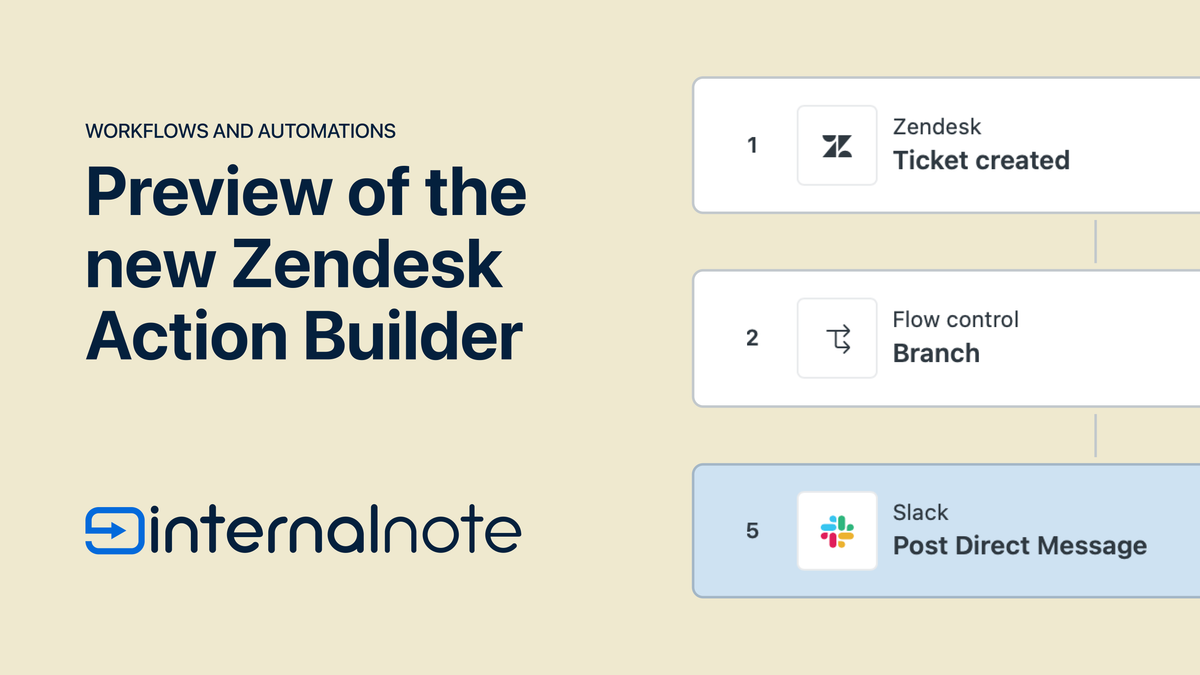
Or to recap: our Action flow is triggered by a ticket creation. When the flow is triggered, we pass the ticket ID to a custom API call. This retrieves the full ticket object and stores relevant custom fields as output variables, such as movietitle. You can now use that data in branching, external API calls, or comments.
Our next action uses that Movie Title to get info on the movie, which we can then use to add to a ticket comment, for example.
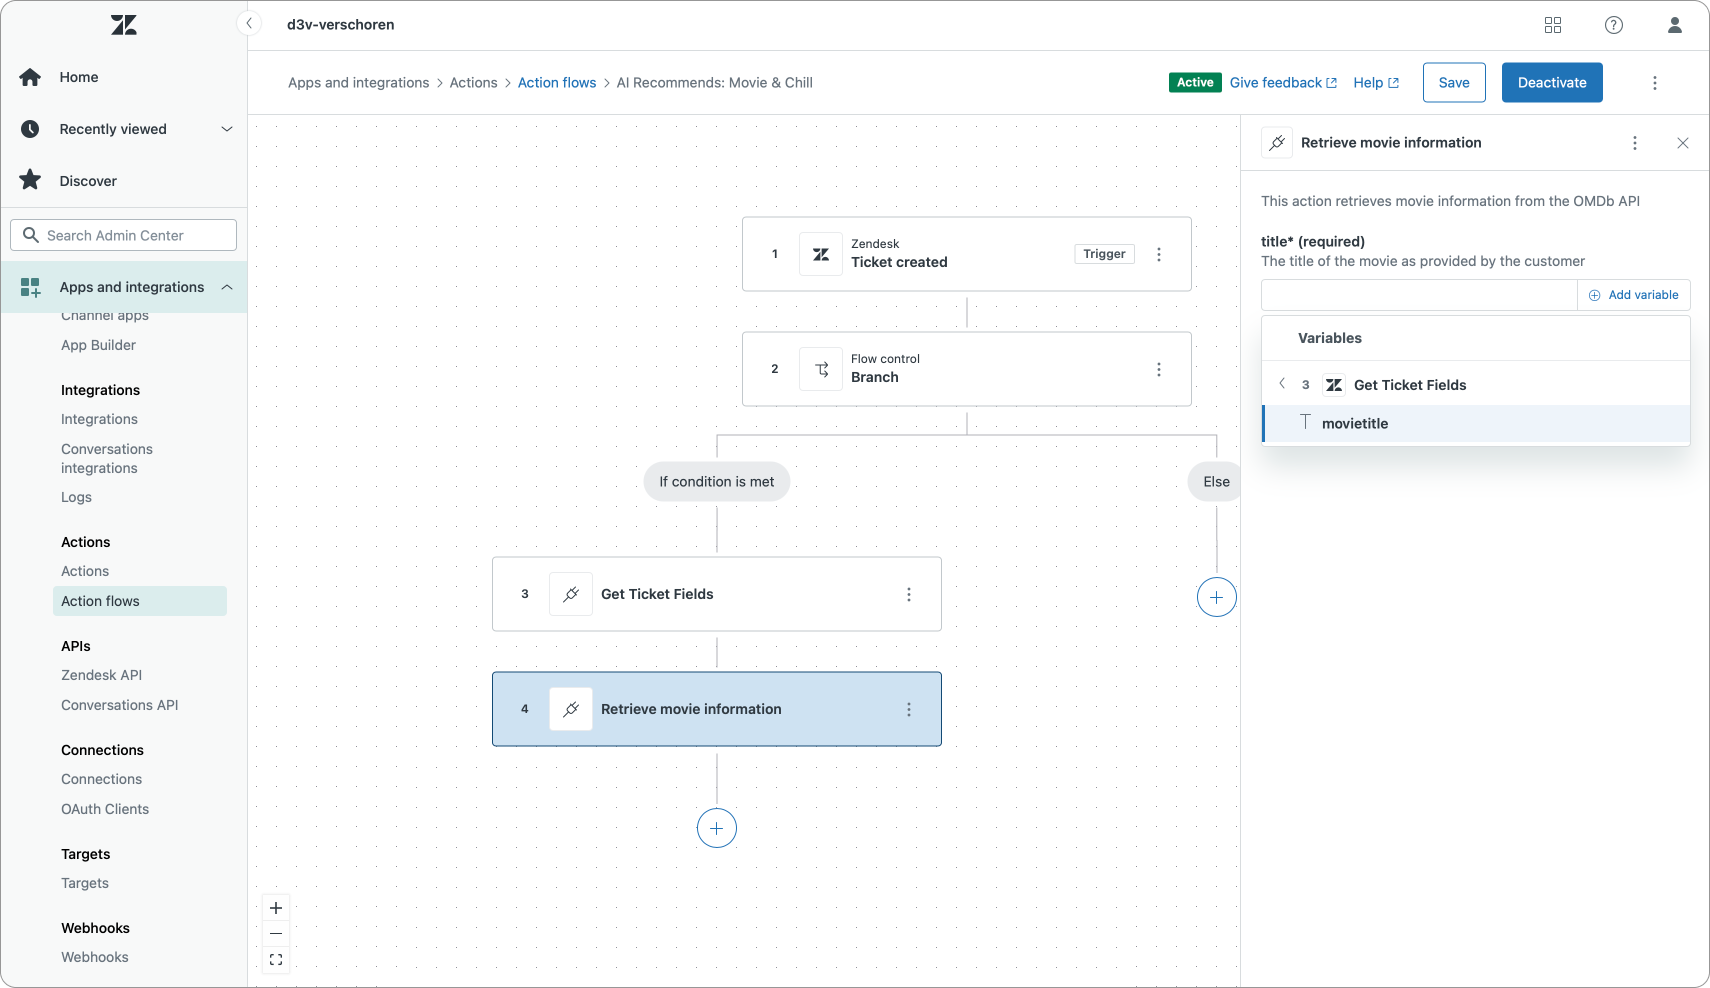
However, we can also use that Get Ticket Fields action in other places. If we use our action before we branch our flow, we can use the value of our ticket fields to decide if we should branch or not. In our flow we can only branch if there's a title present. Branches can also work with ticket intents an order number or any other custom ticket field.
Conclusion
Now that your flows can access full ticket context, you can build far more dynamic and personalized automations.
You can extend this technique to other use cases. Instead of creating an action that does a GET on the Zendesk API, we could also create a specific action that does a POST request that stores a previous step’s output in a ticket field, such as the requester’s email or order number..
You can also use these actions to enrich what’s available as variables. Currently the Lookup Ticket step retrieves the organization, assignee and requester but only returns the id of these users. We could create three Actions that call the Zendesk API to GET the full organization or assignee/requester object via their respective organizations/{{id}} and users/{{id}} endpoints. Once we have that object we can set their name, email or custom fields as output parameters and use them in our flows.
We could branch based on the VIP state of an organization. Or we can use the Assignee email in our "Send a message via Slack" step. Now that we have all that data available, Action Flows become significantly more capable.