Improve Your Content Discoverability with a Linked List in Zendesk Guide
Improve content discoverability in Zendesk Guide by creating a custom page that shows records indexed by federated search. This enables businesses to offer a better experience for customers, making it easier for them to find the information they need.
Improve Your Content Discoverability with a Linked List in Zendesk Guide

On this page
As mentioned in last weeks' article on Federated Search, as businesses grow, their knowledge base expands too. From FAQs to product or marketing pages, there's an abundance of information available to help customers find what they're looking for. By default, the content indexed via Federated Search is only searchable, and not easily discoverable for your users.
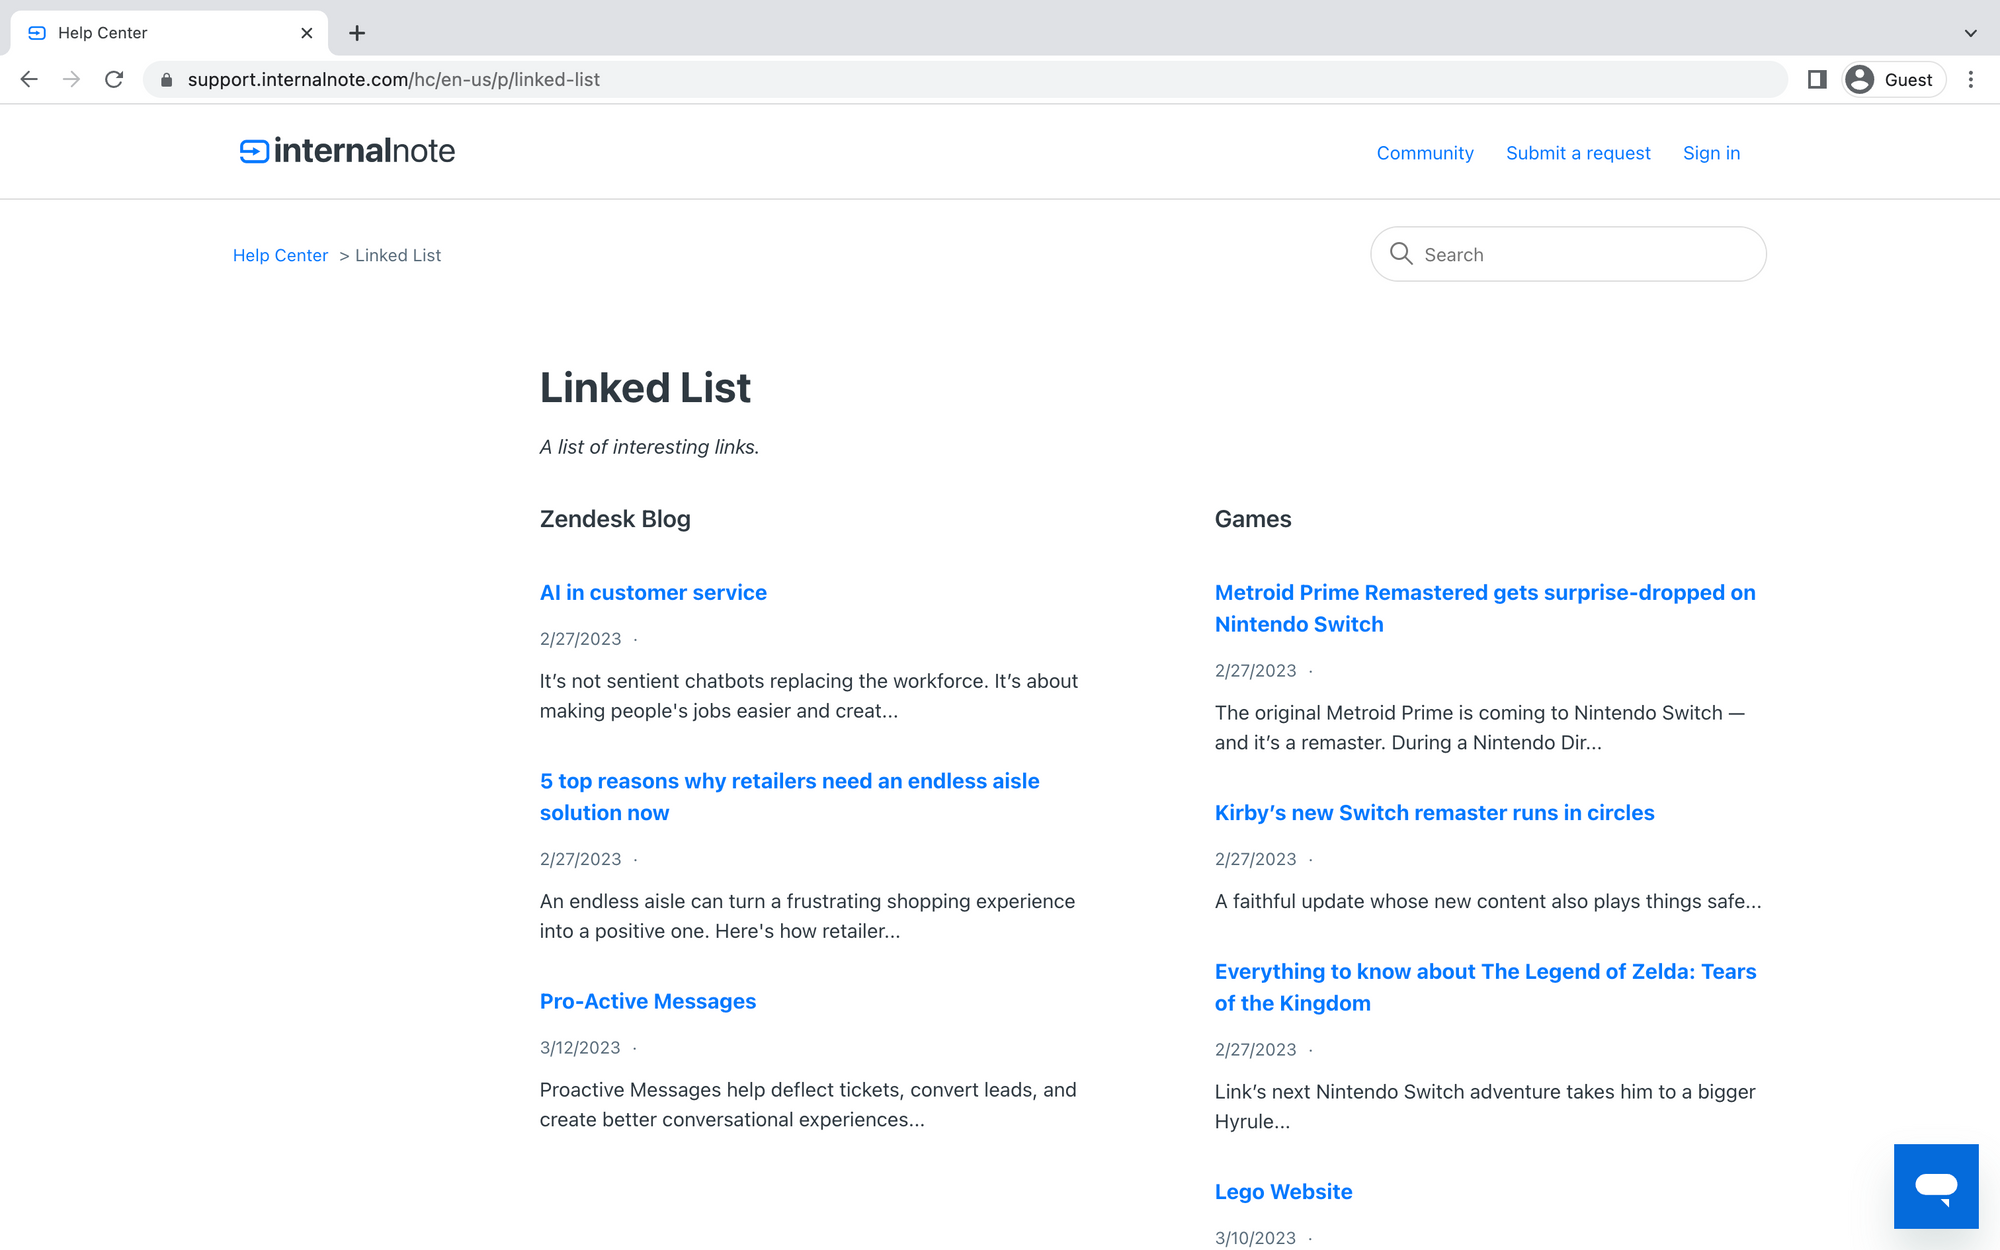
In this article, we'll explore how to use Zendesk Federated Search and Custom Guide Pages to create a custom page that provides a curated list of links for end-users. What sets this solution apart is that the added links are browsable just like regular Guide articles in the same UI as Article sections. This approach allows businesses to make even more content available to their customers, not just traditional FAQ articles.
With our custom page, end-users will, for example, have access to App Store install pages, marketing pages, and more. Moreover, we'll also build an admin interface that allows team leads to manage the links indexed on the Help Center and giving them the ability to add or delete links as needed. This new feature provides a more personalised experience for customers, making it easier for them to find the information they need.
In summary, by using Zendesk Federated Search to create a custom landing page, businesses can make more content available to their customers in the same UI as Article sections. This personalised experience enables customers to browse and search through a curated list of links, not limited to traditional FAQ articles. So, let's dive in and explore how to build this custom page and admin interface.
Tutorial
As always you can find the full code on GitHub:
 verschoren
Prerequisites
Use the Federated Search API or the Search Settings in Guide to:
- Add a source: "Linked List" and note down its ID
- Add a few types, eg: "Interesting Articles", "Product Pages".
- Add one record for each type via the Federated Search API. This makes sure once we retrieve records to show we can at least show one or two articles.
You can refer to my earlier article, or use the Zendesk Documentation
Worker
As usual on this website, we'll first build a Cloudflare Worker that handles the API site of our solution. This way we can remove any API keys and complexity from the client side code rendered on your Help Center, and make use of Cloudflare's build-in caching to speed up the page rendering.
Our worker has three end-points:
/getresponsible for returned all Federated Search records/addresponsible for adding a record/deleteresponsible for deleting a given record
You can copy the example in worker.js just make sure to change the top three variables:
//your Zendesk subdomain
const subdomain = 'yourdomain'

//Base 64 encoded [email protected]/token:{Zendesk API token}
const auth = '123457890qwerty='

//The Source you want to display, "Linked List" in my example
const source_id = '01GT1VEVYWJ10HMZKMR5YRXQHB';
You can find the Source ID via this API call.
The script is pretty straight forward. The only tricky part is filtering the returned records on the get call to only show those of the chosen Source and handling pagination correctly:
async function getRecords(url,federated_items){
    url = url != ''? url : 'https://'+subdomain+'.zendesk.com/api/v2/guide/external_content/records?page[size]=10';

    var init = {
        method: 'GET',
        headers: {
            'content-type': 'application/json;charset=UTF-8',
            'Authorization': 'Basic ' + auth,
        },
    };

    const response = await fetch(url, init);
    const results = await response.json();

    merge(federated_items,results.records);

    //Check if the results are paginated and if so, call the function again
    if (results.meta.has_more == true){
        return await getRecords(url + '&page[after]='+results.meta.after_cursor,federated_items);
    } else {
        //filter federated_items to remove all records with a different source.id
        federated_items = federated_items.filter(function(item){
            return item.source.id == source_id;
        });

        return federated_items;
    }
}Custom Page
Once we have a script that allows us to get, add or delete records, we can start working on the Help Center Page.
To start, create a new Custom Page on your Help Center and copy the code from the GitHub repository in linked-list.html. If you use the default Copenhagen theme, you'll end up with a page that looks exactly like your section pages.
For the page to work you'll need to replace worker_url with the URL of your worker.
Permissions
The script starts with a small section that checks what role current user has and hides the admin interface if they aren't an agent or admin.
var admin = false;
if (HelpCenter.user.role != "agent" && HelpCenter.user.role != "manager"){
	$('#addlink').remove();
    $('.linkform').remove();
} else {
	admin = true;
}
Rendering the layout
The page runs on a getLinks() function that
- gets all records from the Worker
- creates a section for each
typeit finds - adds
articlesto that section and adds a delete button if the user is an admin/agent for that article - adds each unique
typeto the Types dropdown in the form to create new links.
function getLinks(){
    var settings = {
        "url": worker_url + "/get",
        "method": "GET",
    };

    $.ajax(settings).done(function (links) {
        $('#main-content').html('');
        var sections = [];
        links.forEach(function(link) {
                if(sections.indexOf(link.type.name) === -1) {
                    sections.push(link.type.name);
                    $('#type').append(`${dropdown_option})
                    $('#main-content').append(`${section}`)
                }

                $('.article-list[data-articles="'+link.type.name+'"]').append(`${linkeditem});
        });
    });
};
Adding Records
The HTML page has a form that asks an agent/admin for a title, url, description and type. Based on that info we can ask the worker to create a new record.
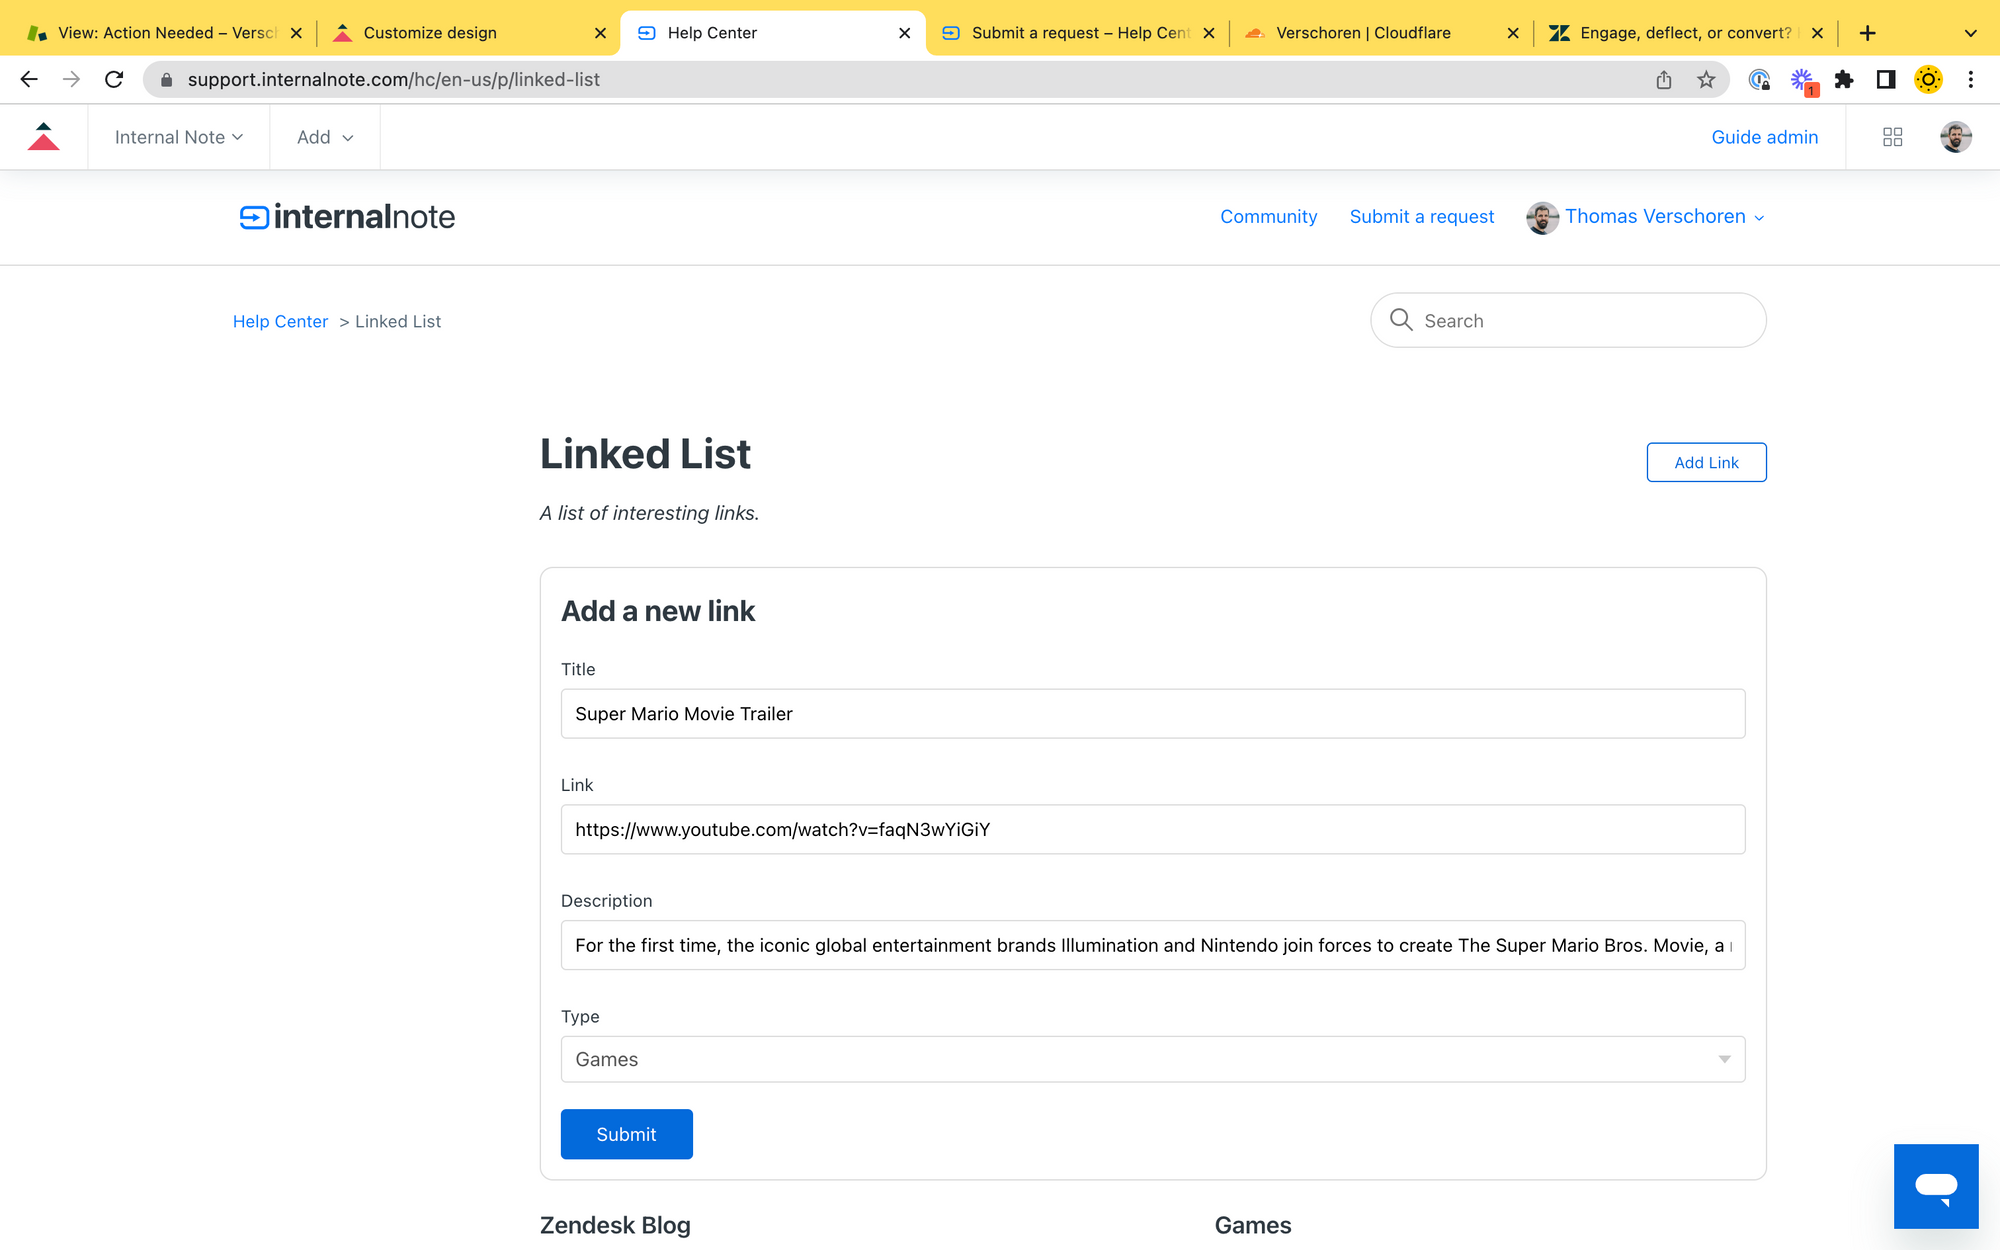
Note that records require a unique external_id. Since manually added records don't really have a good use for these, we just generate one based on the current timestamp.
We then call the /add endpoint of our worker via a POST.
$(document).on('click', '#submit', function(event){
    var json = {
        "record": {
            "body": $('#body').val(),
            "external_id": 'abc' + Date.now(),
            "locale": "en-us",
            "title": $('#title').val(),
            "type_id": $('#type').val(),
            "url": $('#url').val()
        }
    }

    var settings = {...};

    $.ajax(settings).done(function (response) {
        getLinks();
        /*empty form*/
    });
});
Deleting Records
To remove a record we have a data-target element on each link we display with the record id. Clicking the delete button for a respective element asks the worker to delete that element via /delete/id
$(document).on('click', '.delete', function(event){
    var id = $(this).attr('data-target');
    var settings = {
        "url": worker_url + "/delete/"+id,
        "method": "POST",
        "headers": {
            "Content-Type": "application/json",
        },
    };

    $.ajax(settings);
    getLinks();
});
Home Page
Since Custom Pages don't show up on Guide by default we can update the home_page.hbs on your Guide Theme and append an extra category button like so:
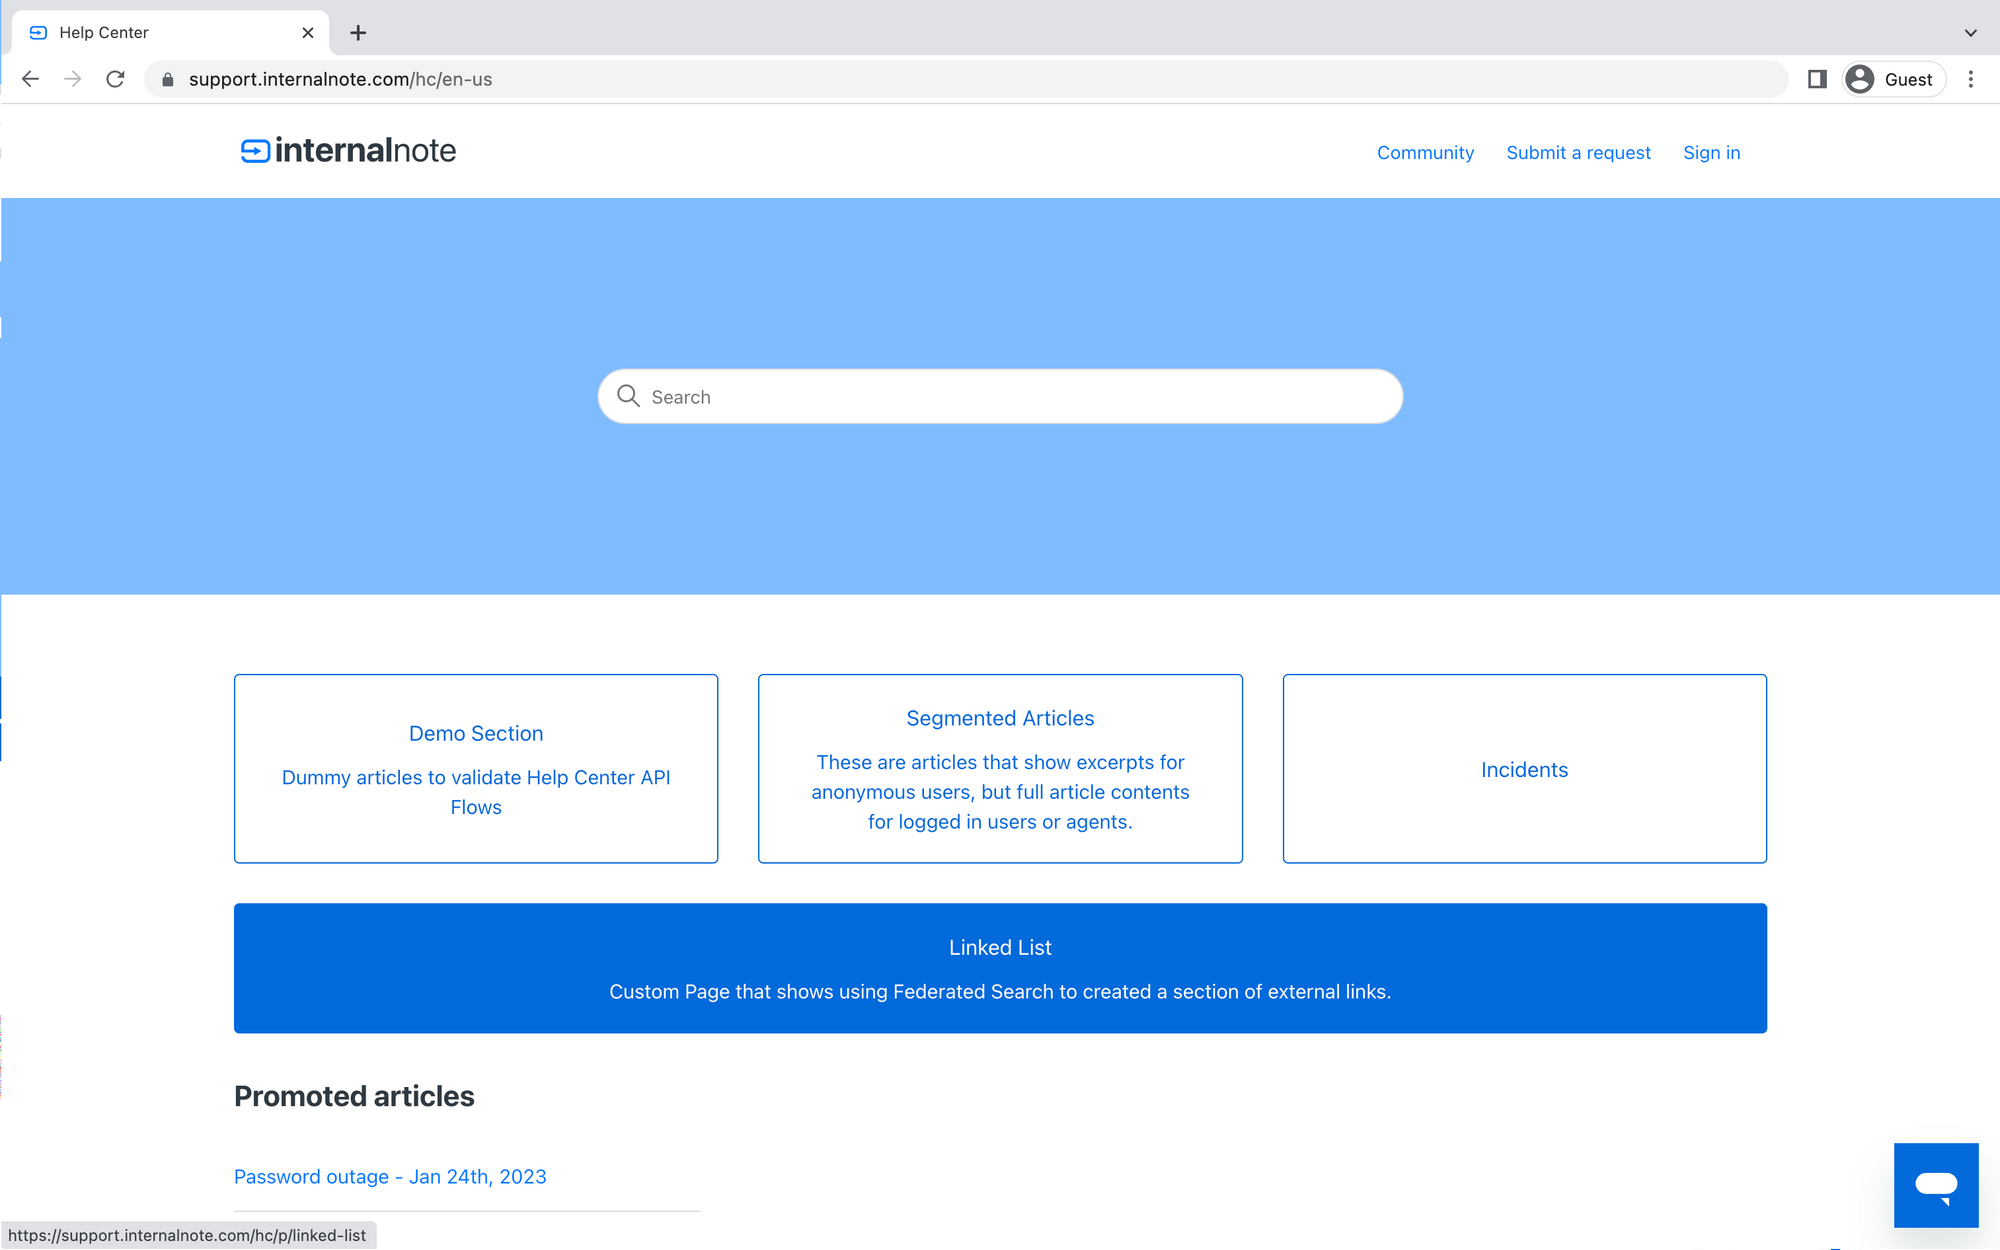
Just make sure to replace /hc/p/linked_list with the actual link to your Custom Page.
<ul class="blocks-list">
	{{#each categories}}
		...
    {{/each}}
    <li class="blocks-item">
      <a href='/hc/p/linked-list' class="blocks-item-link">
        <span class="blocks-item-title">
          Linked List
        </span>
        <span class="blocks-item-description">Custom Page that shows using Federated Search to created a section of external links.</span>
      </a>
    </li>
</ul>Create a Federated Search Record that indexes your Custom Page. That way your users can find it easily via search. It's a bit like Inception, but does the trick.
Conclusion
There you have it. We created a custom page that shows a bunch of links for your End-Users, and makes your Help Center even more powerful.