
Migrating from legacy objects to the new custom objects in Zendesk
Zendesk is retiring Legacy Custom Objects by July 2026, urging migration to new Custom Objects. The modern version offers improved field types, UI integrations, lookup fields, and better data management. Migration involves mapping, exporting, cleaning, and importing data carefully.

On this page
Zendesk's platform has long been focused around three core elements: tickets, users and organisations. These three core data types made the Zendesk ticketing system work, and these objects are still part of any modern Zendesk workflow.
But as customer care expanded, and we start looking into automation, adding context to agents and expanding use cases from just support tickets towards HR and IT use cases and complex omnichannel customer care support, that classic model gets limiting very fast.
Zendesk's core objects are expandable though. You can add custom fields to users, organisations and tickets to customise their dataset to match your business' needs. A ticket can store an order number, a user can store a contract number, and organisations can store a service level agreement. And while these custom fields ar a great starting point, they are just input fields with a single value.
So if you want store more context about an order than just its number, like the status, order date, products included and total cost, you might end up with half a dozen fields on your ticket filled in with relevant data. Similarly, an organisation might end up with a field for SLA type, contract date, duration and account manager.
This kind of setup quickly becomes complex to manage. If multiple tickets reference the same order, any change to the order would mean you need to update multiple fields. Similarly, if an organisations' SLA contract changes, those changes would need to be copied over to every active ticket for that organisation.
In order to make these kind of use cases possible, and make the experience of managing these kind of data easier within the platform, Zendesk launched Custom Objects in 2018. Custom Objects allow you to expand the core objects in Zendesk and create new data types in Zendesk. You can create an order object that contains shipping status, products, cost and order date as its record data. Or you can create a service contract object that contains the context for each contract. And you can then link those orders and service contracts to existing tickets, users or organisations.
Legacy Objects
When Zendesk originally launched Custom Objects they did so as part of their Sunshine platform. This meant they were envisioned as developer tools which Zendesk Partners, Marketplace developers or customers could use to build powerful new capabilities within the Zendesk platform.
These original custom object allowed you to define object types. Each object type could contain multiple attributes in the form of text, decimal, integer or boolean fields.
And with relationships you could link these object to users, organizations, tickets or other custom objects in Zendesk.
Fast forward to 2023 and Zendesk launched their new Custom Objects. Similar to the original ones they are record types that can contain a set of predefined custom object fields, with a much extended set of field types ranging from dropdown, multi-select, regex fields up to lookup fields.
But what really changed is the way Zendesk approached Custom Objects. Instead of a developer API without a UI, the new Custom Objects are deeply engrained in Agent Workspace and the rest of the platform.
There's a visual browser to view and edit records. There a data importer to easily import records via CSV. And the old relationships concept got replaced with Lookup fields that give agents and customers an interface to select objects, while storing the link information within the record itself, removing the need to manage a separate relationship list.
Elements like the object inspector in the ticket context panel and the ability to show objects on ticket fields are just a few improvements among many.
This brings us to today. As of January 15th Zendesk disabled the ability to add or edit legacy custom object types. Your data is still available, but you can't edit or add new objects anymore. The original Custom Objects are now designated Legacy Objects, and as of July 2026 they'll be removed altogether from the platform.
This means your legacy object types, relationships and record data will be purged.
Luckily we now have the new Custom Objects and their visual editor, data importer and improved ticket field types make migrating from legacy objects doable. But to be clear, it's not a one click process and it does involve a lot of spreadsheets and VLOOKUP().
Migration process
The migration process from legacy objects is basically a five step process
- Map your existing object and relationship structure
- Create new custom objects with a similar, but improved structure
- Export your old data with the new export tool
- Convert the exported data into files compatible with the Data Importer
- Import your data in the right order.
Mapping the existing data structure
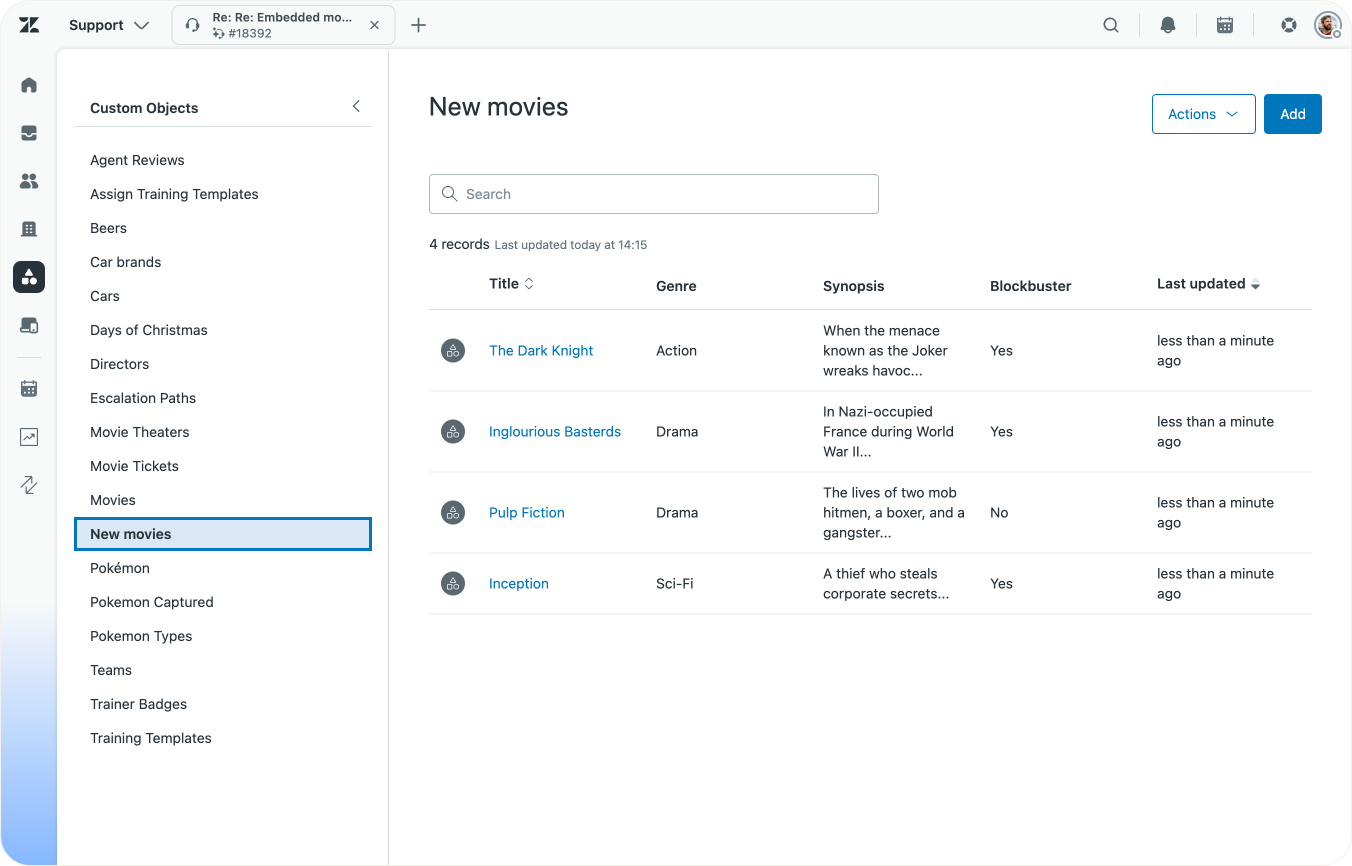
For this article we'll use a customer that runs a movie theatre. They store a list of movies in legacy objects, with context like genre, release year etc.
They show this context to agents via a sidebar app next to a customers' ticket. The link between the ticket and the movie is stored in a relationship.
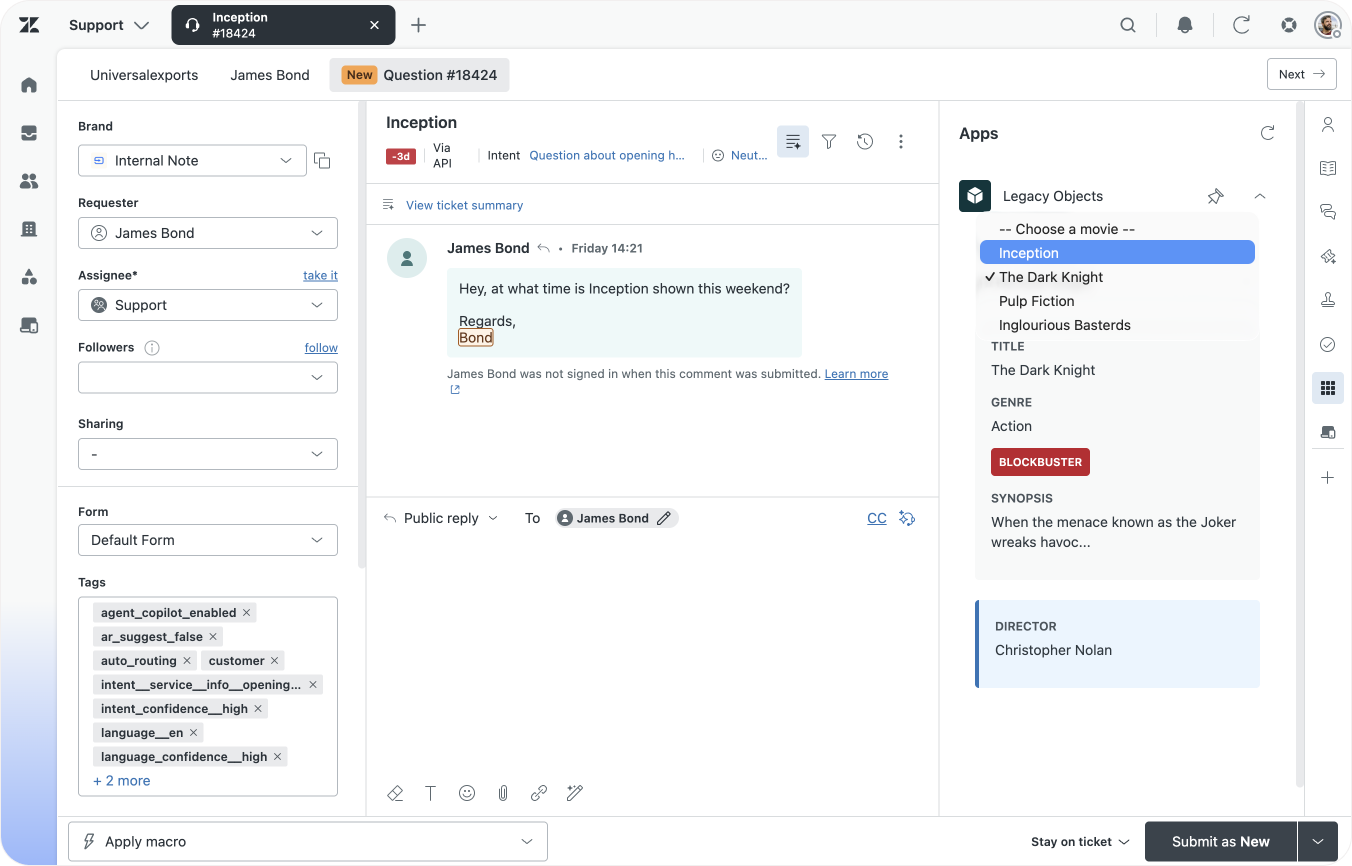
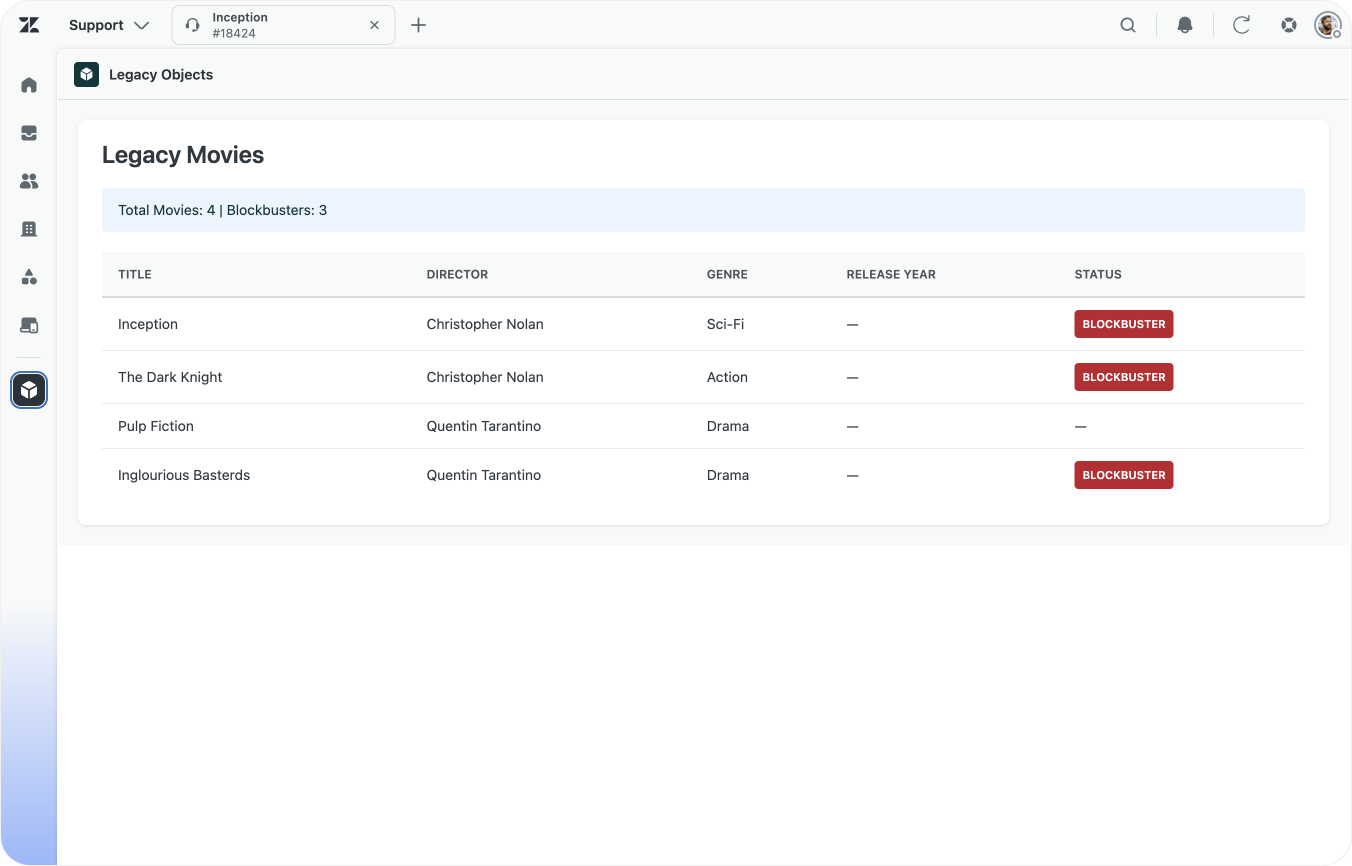
Examples of apps built to make legacy objects visible to Agents.
Record structure
The table below shows an overview of our legacy movie object.
| Field Key | Type | Description |
|---|---|---|
| title | string | Title of the movie |
| genre | string | The genre of the movie |
| synopsis | string | Summary of the movie |
| is_blockbuster | boolean | Is this a big movie? |
| release_year | integer | Year the movie was released |
| metadata_json | string | Metadata |
| external_id | string | External ID |
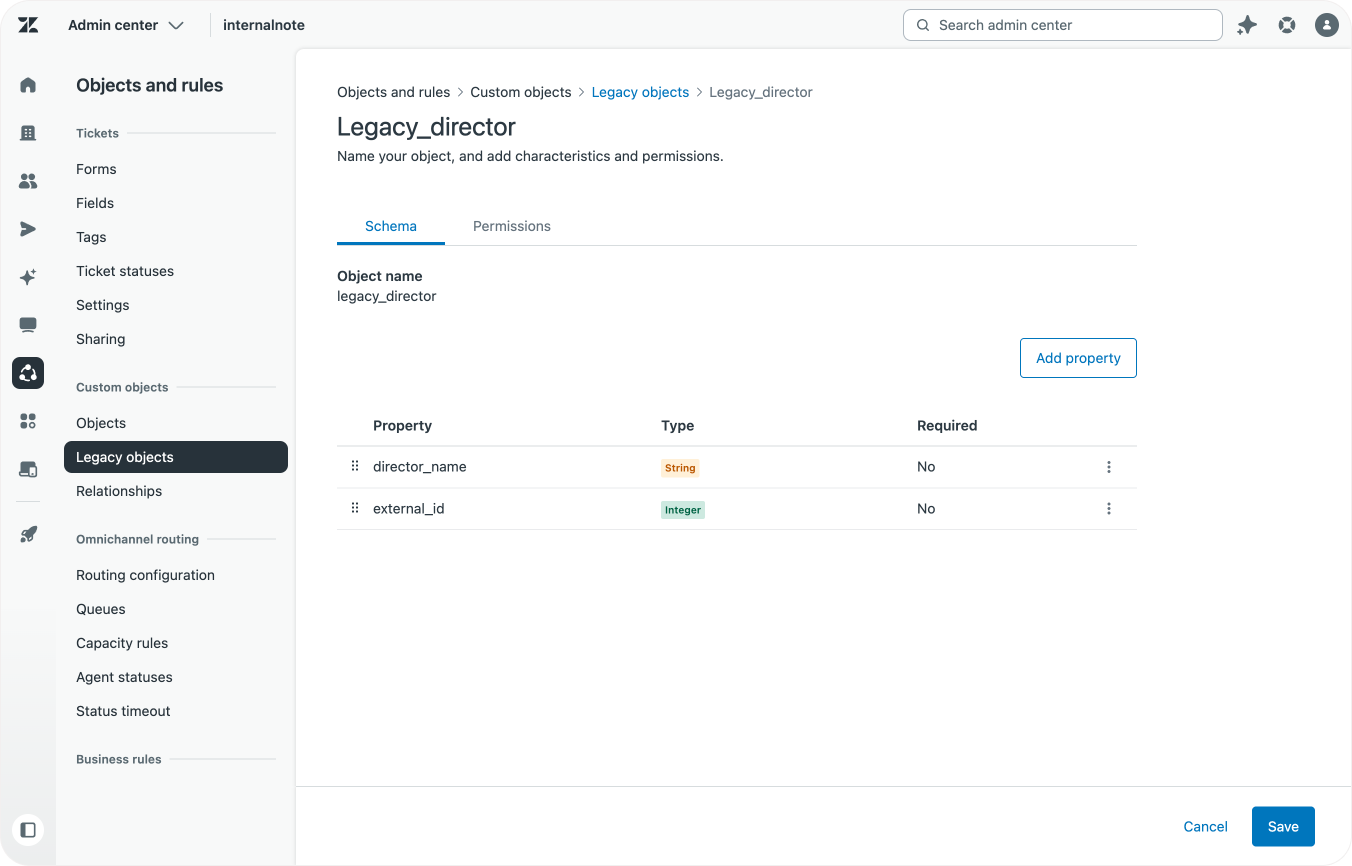
A movie is also link to a director. Directors are a separate object which are linked to the movie object.
| Field Key | Type | Description |
|---|---|---|
| director_name | string | Name of the director |
| external_id | string | External ID of the director |
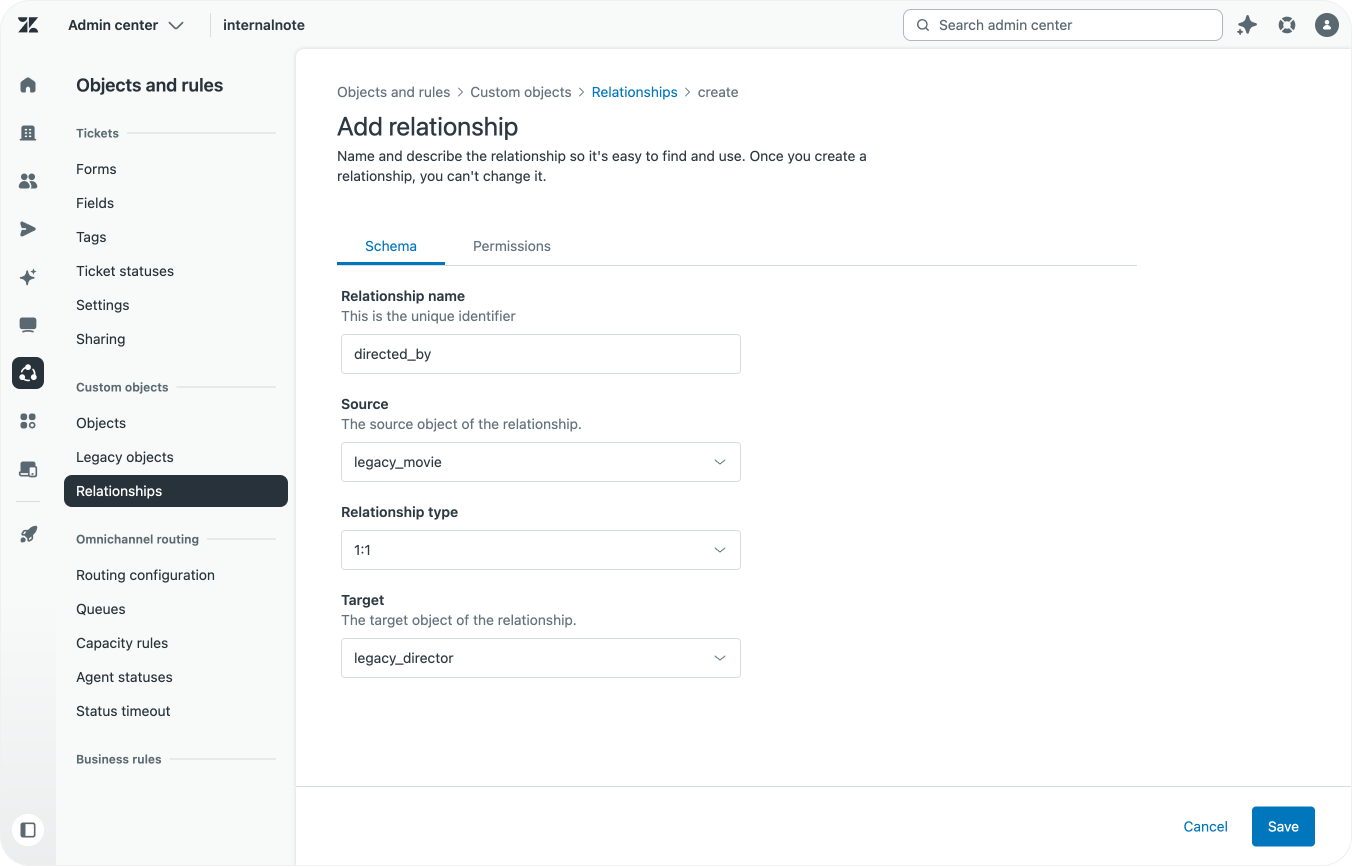
This director to movie link is done via a relationship. As you might have noticed, the movie object itself does not have a director reference. That data is only stored in the relationships.
{
    "data": [
        {
            "key": "director_to_movie",
            "source": "legacy_director",
            "target": [
                "legacy_movie"
            ],
            "created_at": "2026-02-20T11:21:19.000Z",
            "updated_at": "2026-02-20T11:21:19.000Z"
        }
    ]
}
You'll also notice that the movie object has a metadata_json element. Since Legacy objects are developer-heavy anyhow, some customers have chosen to store the raw data of their objects in objects, and have their sidebar app parse the JSON payload before displaying it to customers. It's a convenient shortcut made possible by the fact that legacy options asked developers to build both the object model and the sidebar app.
Sample record data
Below is an example of one of our movies stored in the legacy_movie object:
| Legacy Movie | |
|---|---|
| Type | legacy_movie |
| ID | 282218ba-0e58-11f1-ab0b-b9b628bb8cc0 |
| External ID | mov_001 |
| Title | Inception |
| Director ID | 101 |
| Genre | Sci-Fi |
| Synopsis | A thief who steals corporate secrets... |
| Is Blockbuster | true |
| Metadata JSON | {"rating": 8.8, "studio": "WB", "year": 2010} |
| Legacy Director | |
|---|---|
| Type | legacy_director |
| ID | ec90f691-0e58-11f1-ab0b-2f255613e8c5 |
| External ID | dir_101 |
| Director Name | Christopher Nolan |
Relationships mapping
And when we look at the relationship list, we can see a mapping between our director source and movie target.
{
    "data": [
        {
            "id": "f8167c42-0e58-11f1-88d8-7ddea28688c0",
            "relationship_type": "director_to_movie",
            "source": "ec90f691-0e58-11f1-ab0b-2f255613e8c5",
            "target": "282218ba-0e58-11f1-ab0b-b9b628bb8cc0",
        }
    ]
}
As noted earlier, these relationships are a separate list and are not visible when looking at the records themselves. This will have an impact when we do the migration of our data.
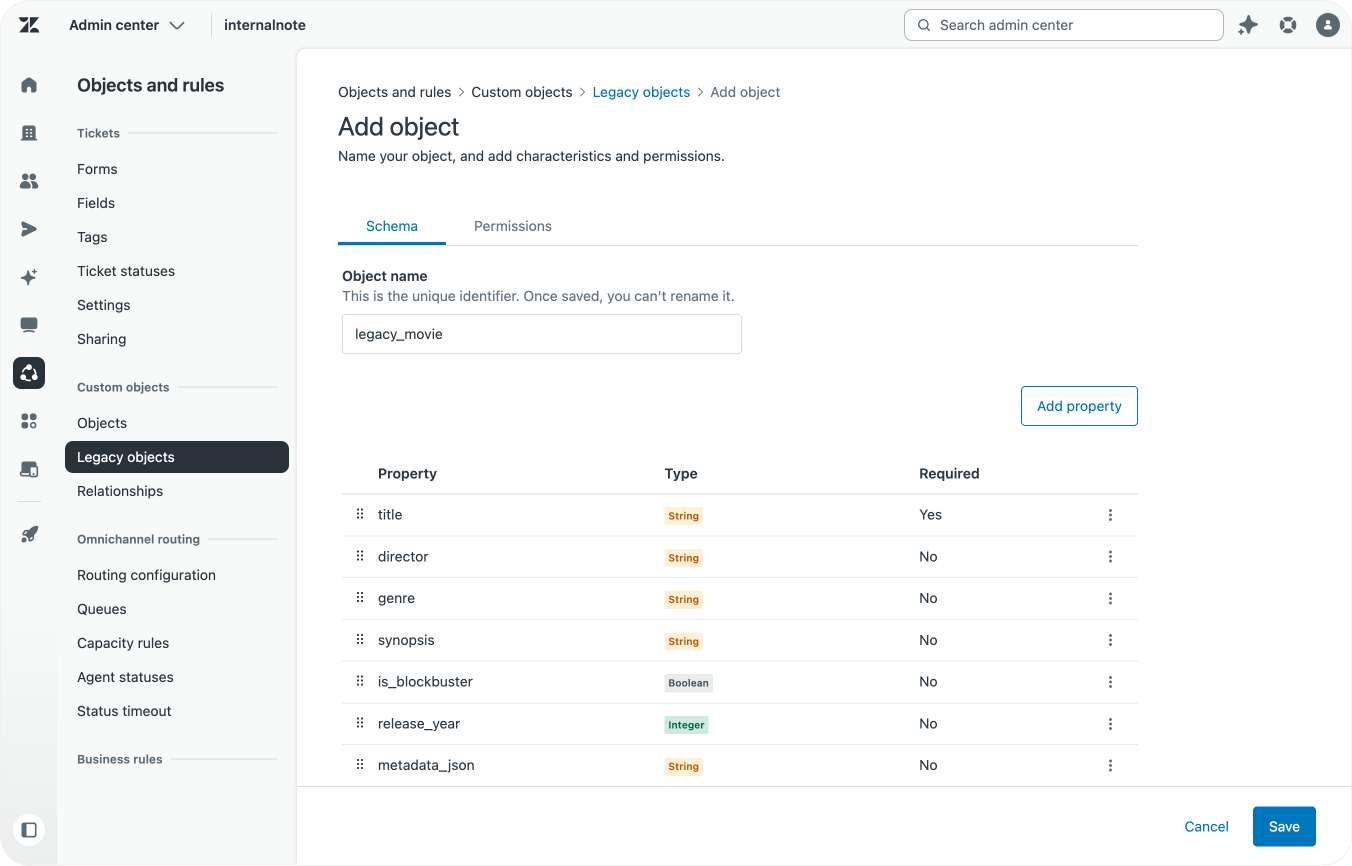
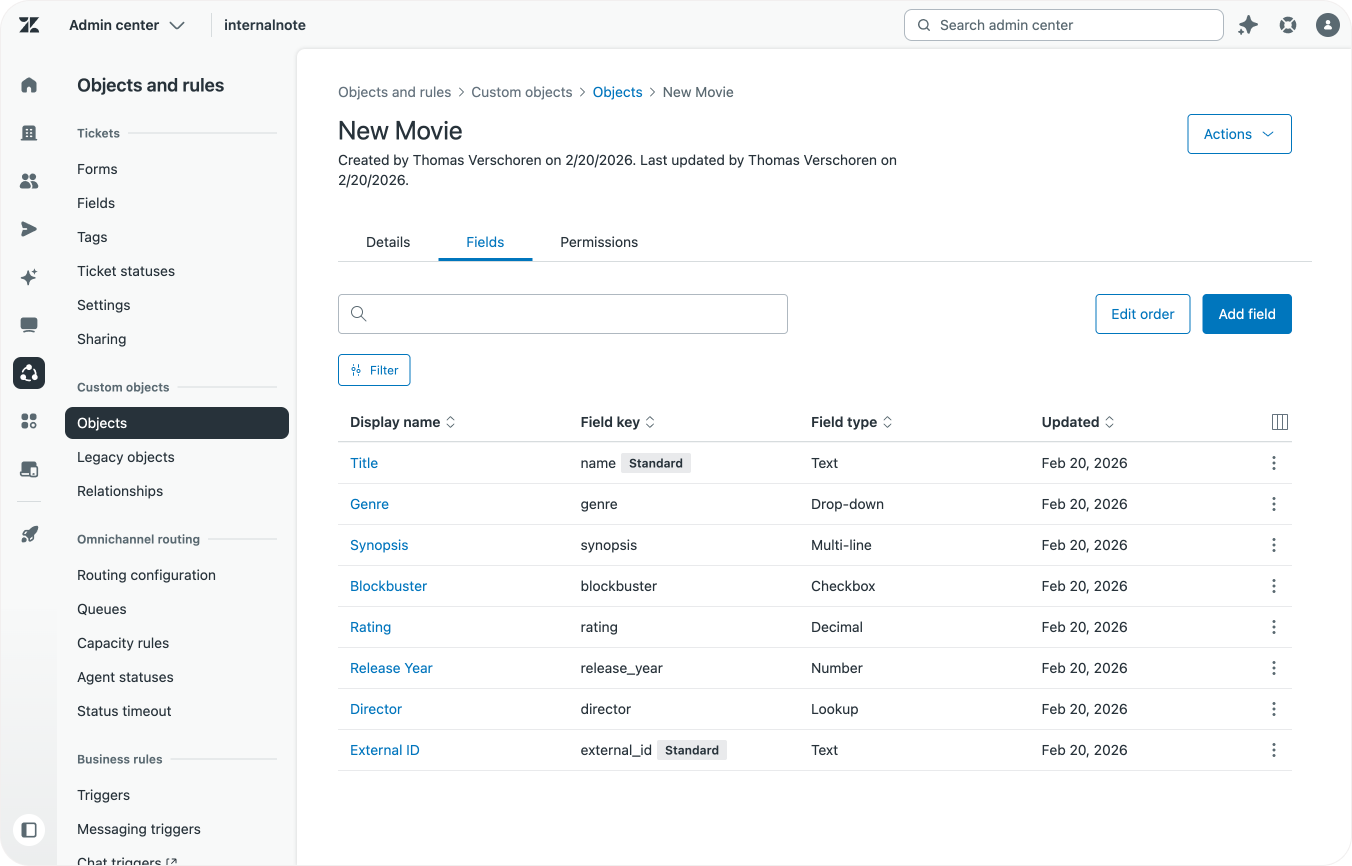
Create new custom objects
The new Custom Objects allow for an improved data model when compared to the legacy objects thanks to an expanded list of object field types.
When we look at our original legacy objects we can spot some ways we can improve the way data is stored:
- Genres are a predefined list of options. So instead of storing them as a
<string>, we can store the genres as adropdownfield. This makes it easier to filter, and prevents variations like scifi, SciFi and sci-fi. Don't create the dropdown field yet though, we'll do this later. - The synopsis of a movie is often a long paragraph of text. So storing it in a
textareainstead of atextfieldis a better way to present that data. - Since the new Custom Objects have a build-in preview next to tickets, we can probably remove the existing custom app and replace it with the native viewer. This means we need to convert our
metadata_jsonfield into two proper fields- Release Year, an
integer - Rating, a
decimalfloating value
- Release Year, an
- And finally, thanks to Lookup Fields we can store a movie's
directordirectly within our record, so we need to add a newrelation_lookupfield for this too.
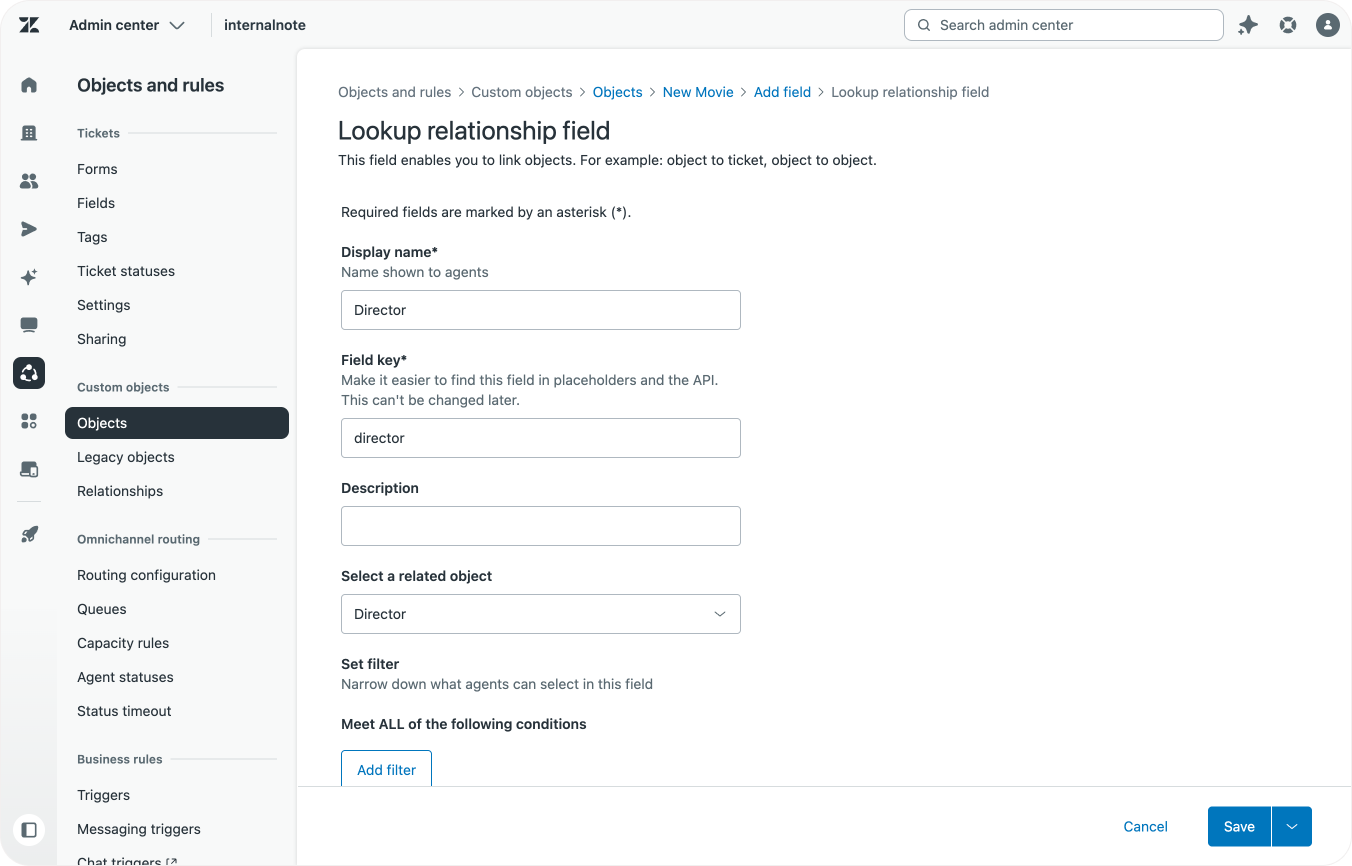
Speaking of directors, before we can add that lookup field, we need to first create our Director Custom Object, which just uses the default name and external_id fields.
This process of mapping out the old data and deciding how to structure your new records is arguably the most important step of the process.
While it might be tempting to just replicate what you have, make sure to have a list of available field types available when doing this exercise. Any field where you find yourself using the same values is a prime candidate for dropdown fields. Any array of data, or comma separated value in a text string, can become a multi select.
Another important factor is mapping out the relationships between your objects. Movies and directors is easy, within a movie record you select a director. But for more complex environments, it's best to create a flowchart first so you can see where the relationships lie, and which element can be considered a parent (which has a field to select a child value), and which are children (they get selected by parents)
Export Tool
Now that we have mapped our legacy objects, and created new empty objects, it's time to start looking at the actual record data in our objects.
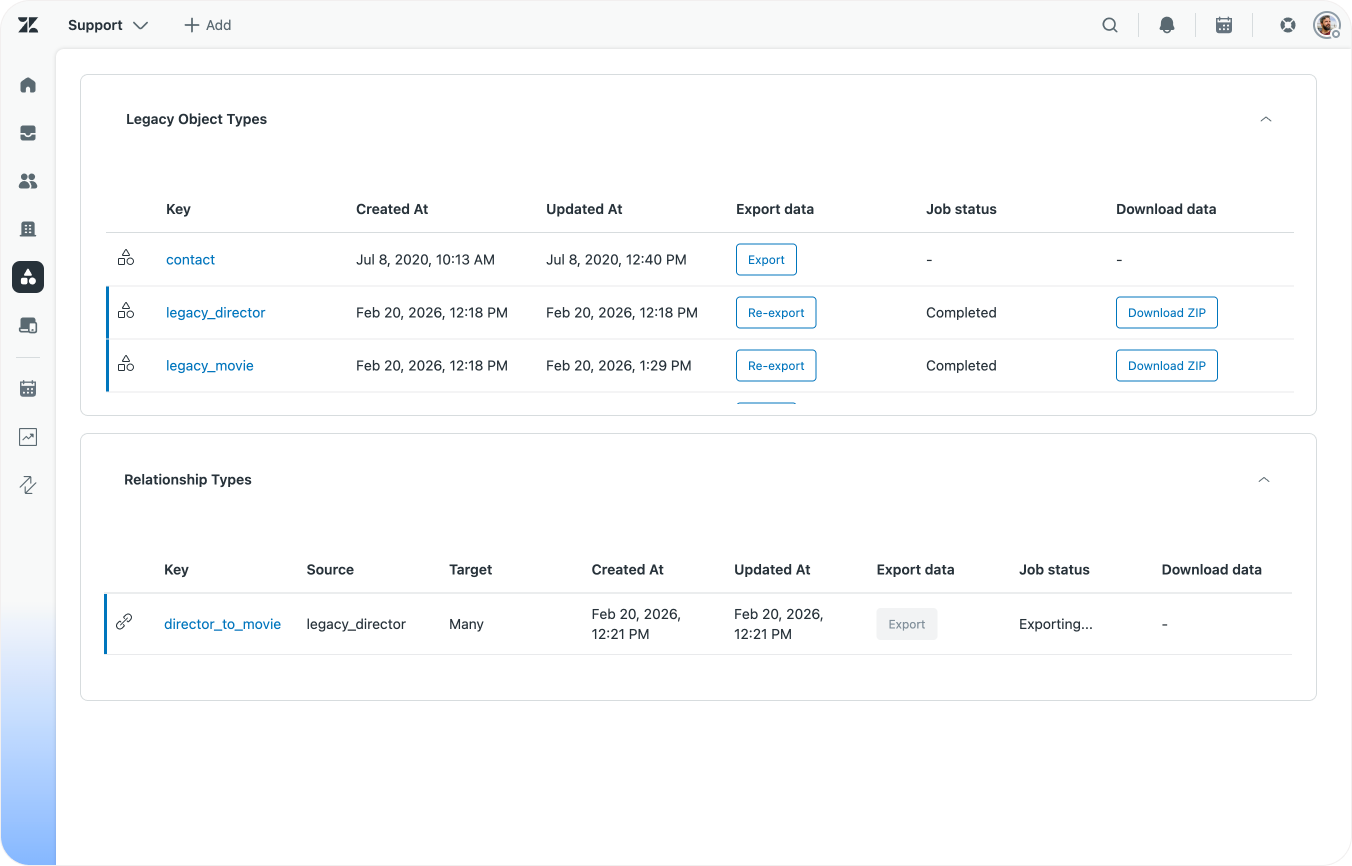
The first stop is getting the old data out of Zendesk. For this the Custom Objects team has built an export tool that allows you to export all your record data and relationship mappings as CSV files.
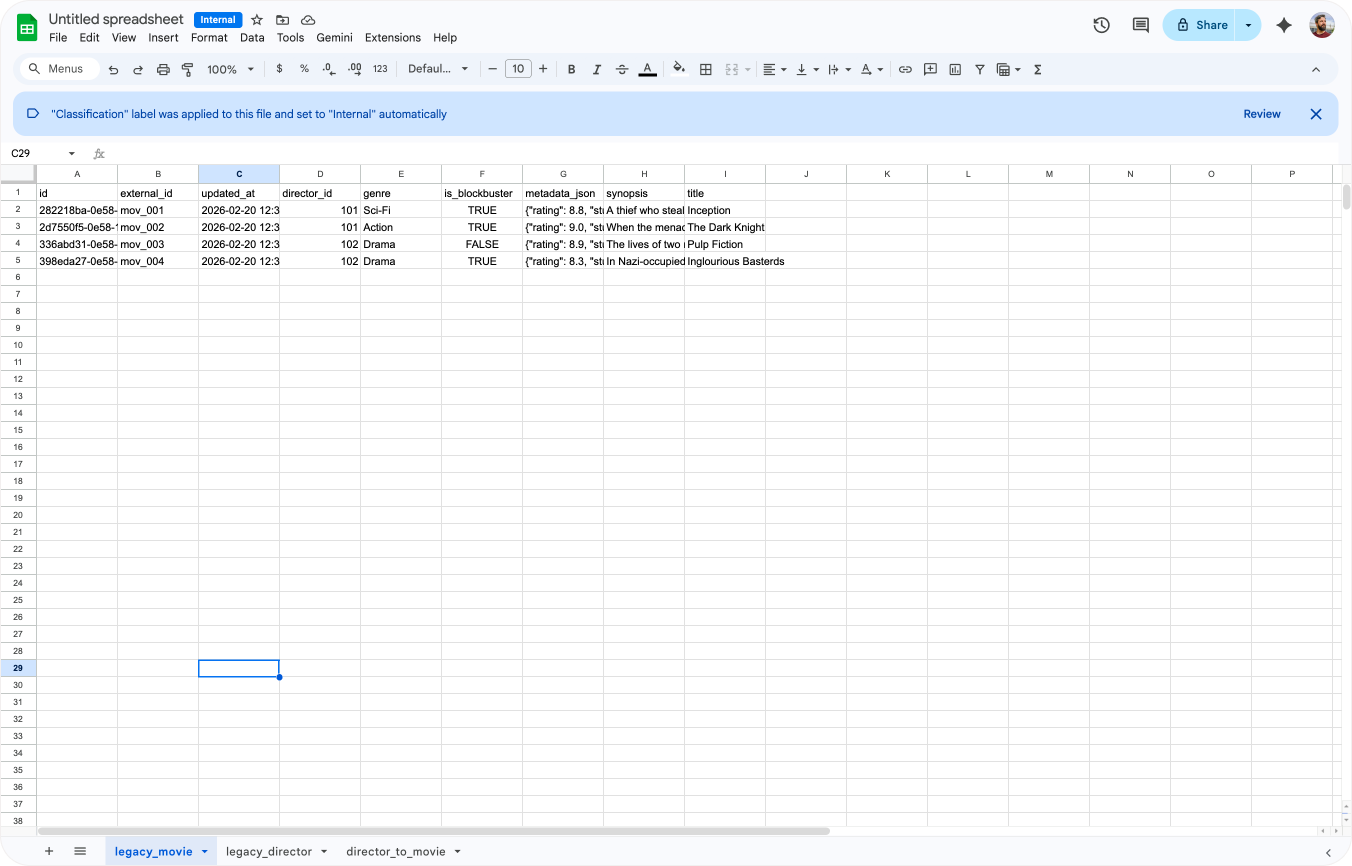
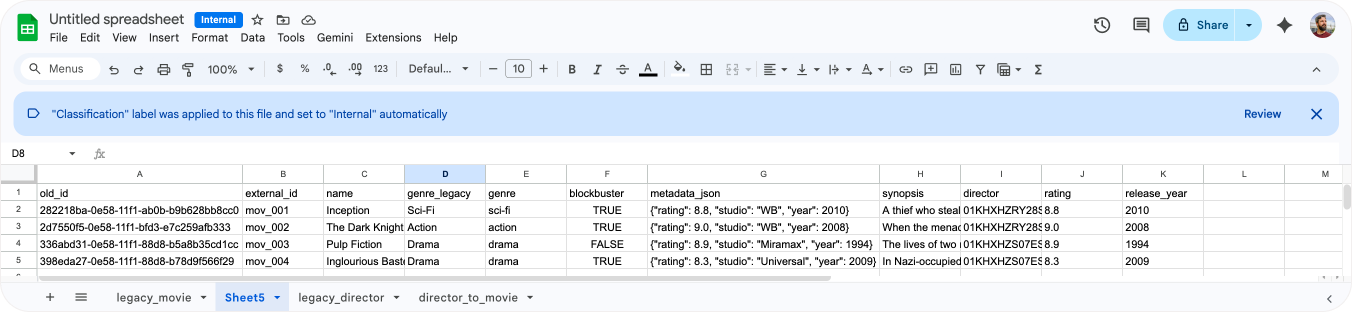
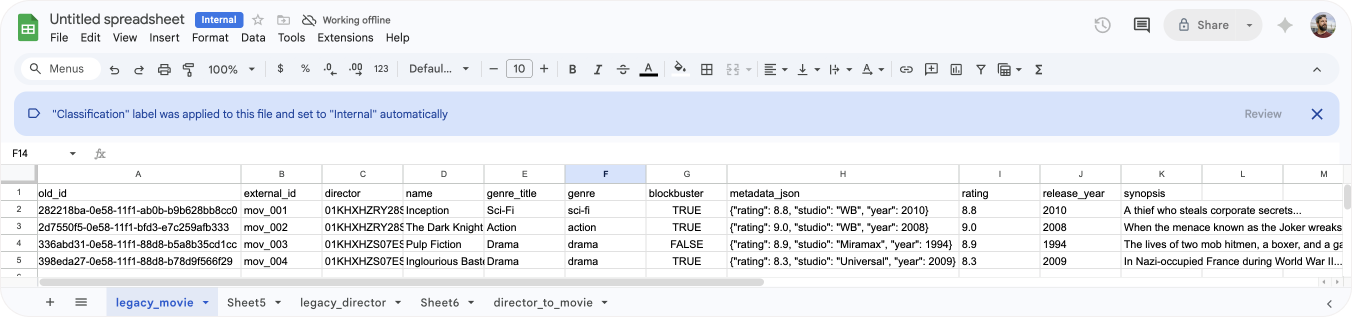
Run the exporter and retrieve all CSV files for the objects you're migrating. Once done, import all files into a single Google Sheet (or Excel) as separate tabs.
In our case we ended up with a single sheet with three tabs:
- Two tabs with record data:
legacy_movie,legacy_director - Our relationship data:
director_to_movie.
Converting the export files into data importer files
The next step is converting the record data tabs into a format that is compatible with the data importer. We'll also need to use the relationship data and migrate it over to fill in values for our director lookup field.
External IDs
Custom Objects benefit from having an external_id. It makes updating your records during re-imports possible since objects with the same external_id will get updated instead of duplicated. If your exported legacy objects don't have external_ids, I'd recommend repurposing the current id column and renaming it.
Remove unused fields
Columns like created_at or updated_at can be safely removed.
Any value you don't want to migrate over, like e.g. a field that stores DVD releases, can also be deleted from your record data sheets. This makes the remaining data cleaner and easier to validate.
Rename matching values
Most of the fields in your legacy records can be migrated 1:1 to the new Custom Objects. Fields like name, external_id, synopsis, blockbuster do not require any changes since they use the same field types. Or in case of a migration from text to text area, those values can remain the same too.
The one field you do need to rename or decide on is your primary field. Modern custom objects have a required name field, which is the value shown at the top of the record view. In our case the legacy title field seems like a good fit, so we should rename that column name.
Similarly, if you gave your fields different names when setting up the new object, make sure the column names match. For example, in our scenario the legacy object had a is_blockbuster field that is called blockbuster in the new object.
Once you complete this step you should have at least an name and external column. All other columns should match the name of your new Custom Object field for their corresponding legacy object fields.
Next step is making sure that the values in those columns are compatible with the new field types you might have selected.
Converting text fields to dropdown fields.
When remapping our object we turned the genre field into a dropdown field. This means it expect a predefined set of values.
So before we can move forward, we need to make sure our new genre field has all the unique values that are available in our export.
This can be done by creating a new tab in your Google Sheet.
- Name the first three columns
Value,Tag,Default - Add the following formula in the second cell A2
=UNIQUE('legacy_movie'!D:D). This will print a list of all the unique values for our genres from our original movie export in a column. - In the second column, add
=LOWER(SUBSTITUTE(B2, " ", "_")), and drag this line down. This way create a column of tags for your values by converting the movie genres to lowercases and replacing any spaces with underscores. - The third column should contain
falsefor every field.
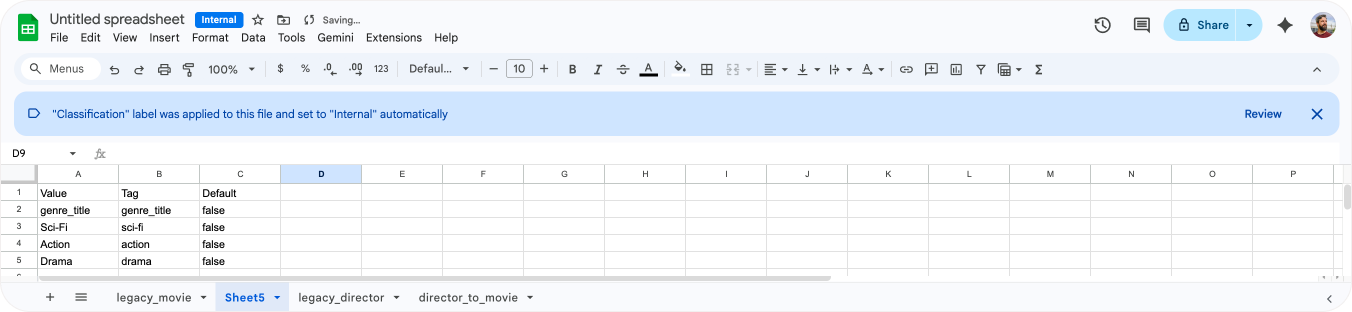
After you've got the list, export the tab as a .csv file.
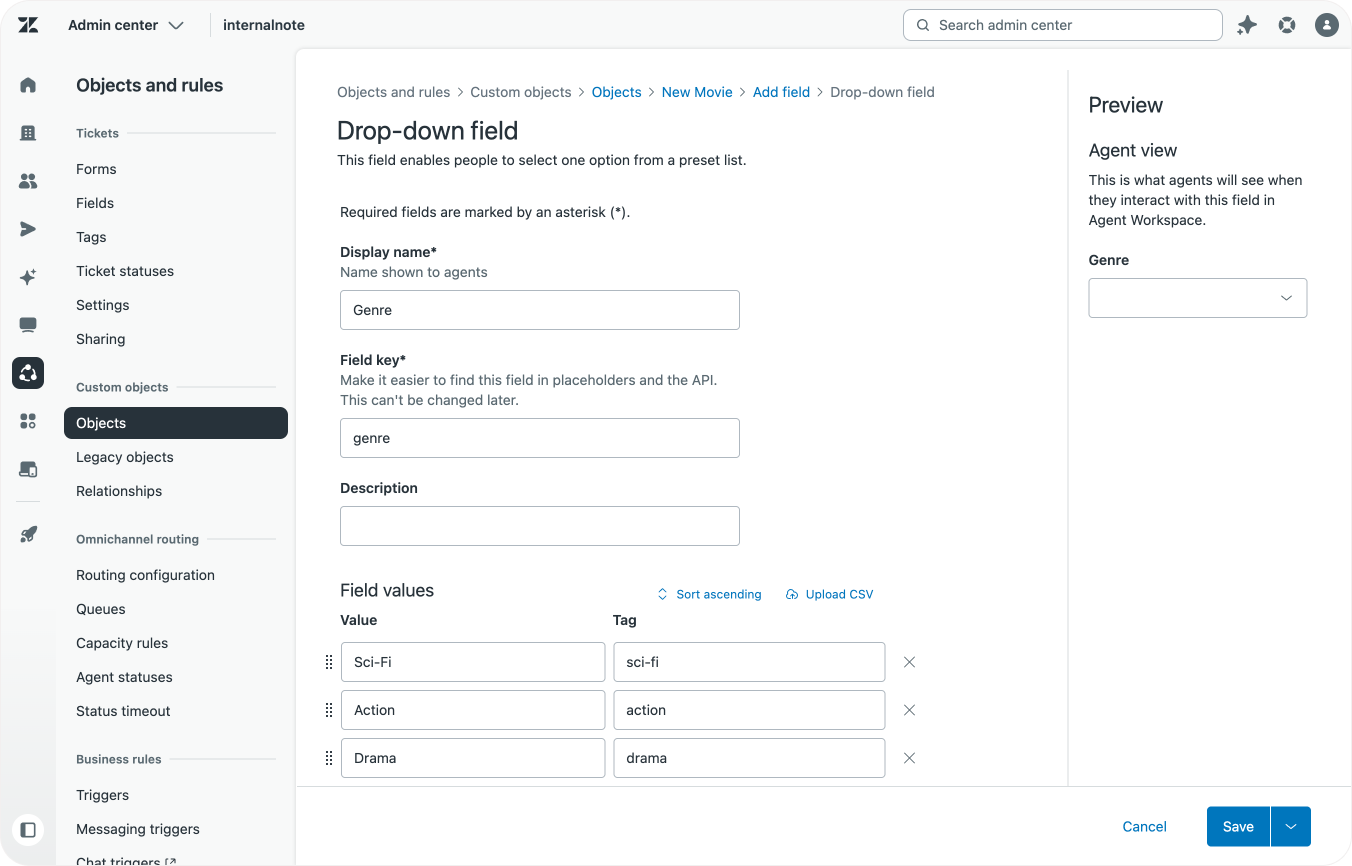
Now go to Admin Center > Custom Objects and select your new Custom Object. Add a dropdown field and import the CSV file via the upload button. And voila, now you've got a dropdown field on your record with all the values in your current exported data.
Do the same for every other field you want to convert to a dropdown.
In order for our dropdown to be correctly filled we also need to use tags, and not the current values in our import file.
In the legacy_movie sheet I added a new column next to the existing genre tab. Here too I used =LOWER(SUBSTITUTE(B2, " ", "_")) . Give this column the name of your new genre field, and make sure the original genre column has a different (unused) name.
| legacy_genre | genre |
|---|---|
| Sci-Fi | sci-fi |
| Action | action |
| Drama | drama |
| Drama | drama |
Handling the JSON metadata object
Our original object had a metadata_json object that stored the following value:
{"rating": 8.8, "studio": "WB", "year": 2010}Since this is a fairly simple JSON structure, we can use regex to extract our values into new columns.
- First we create two new columns headed
ratingandyearrespectively. - Then we add
=REGEXEXTRACT(F2, """rating"":\s*([\d.]+)")to the rating column - And we add
=REGEXEXTRACT(F2, """year"":\s*([\d.]+)")to the year column.
These regex functions will extract the values for rating and year, and put them in their respective fields. Drag the functions down to do this for all record lines.
| metadata_json | rating | release_year |
|---|---|---|
| {"rating": 8.8, "studio": "WB", "year": 2010} | 8.8 | 2010 |
| {"rating": 9.0, "studio": "WB", "year": 2008} | 9.0 | 2008 |
| {"rating": 8.9, "studio": "Miramax", "year": 1994} | 8.9 | 1994 |
| {"rating": 8.3, "studio": "Universal", "year": 2009} | 8.3 | 2009 |
Once you complete these steps in your legacy objects you should end up with a file that has a matching column for every field in your new object, filled with the correct data. That is, all fields except for lookup fields. These had no corresponding field in the object export files, but rely on data in the relationship export.
Migrating relationships
This brings us to the most complex part of the migration, migrating the relationships. Migrating these means we need to use the relationship export file to find related legacy objects, and then add these as values for the new Lookup Field we created in our new Custom Object.
A workaround would be to create an custom object that stores the original ticket ID as a string, and the new custom object as a lookup field. It won't offer you the same benefits as actual lookup fields, but at least your previous links are preserved after the July deletion of legacy objects.
Create the child objects
Linking objects with Lookup Fields is done via the id of an object in Zendesk. Since we need to link Custom Objects, we need the id of these new objects, and can't use the values of the old legacy objects directly. So we need to import our child objects first, before we can use their ids in the parent objects' lookup fields.
Step one is importing the director data into our new object. Our director object is fairly simple with just two fields, but yours might have multiple fields. So before you import, make sure to clean up that table as discussed in the previous steps above.
In my case, the only cleanup needed was adding an external_id field, and renaming the director_name attribute to name since that's the primary field I want to use for this object,
Once the file is cleaned up, export it as CSV and use the Data Importer to import your child objects.

Mapping the new record IDs
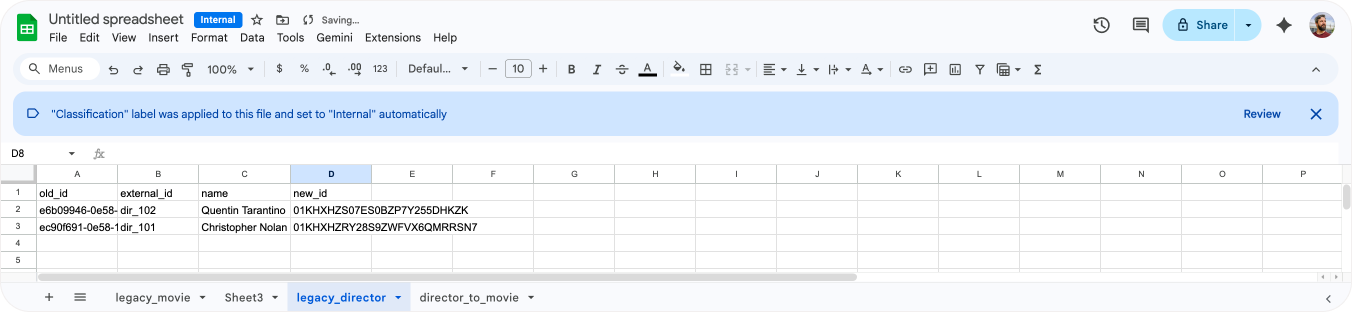
After the importer is done you need to map the IDs of the new objects in the legacy_director file for each record.
- Open
https://domain.zendesk.com/api/v2/custom_objects/director/records/in your browser - Copy the JSON payload shown
- Use a JSON to CSV service to convert the file to CSV (e.g. this one, but not affiliated with them!)
- Import the file into Google Sheets in a new tab
new_director.
New Director
| A | B | C |
|---|---|---|
| id | name | external_id |
| 01KHXHZS07ES0BZP7Y255DHKZK | Quentin Tarantino | dir_102 |
| 01KHXHZRY28S9ZWFVX6QMRRSN7 | Christopher Nolan | dir_101 |
In a new column in your old_director tab, add =VLOOKUP(B2, 'new_director'!$A:$C, 1, FALSE). With B2 being the field where my directors' external ID is stored, and 1 being the first column of my new_director file that contains the record ID. If your old objects don't have external ids, you can also use e.g. the name field as a way to look up the directors.
Doing all this gives us a list of the new id for each director.
old_director
| A | B | C | D |
|---|---|---|---|
| Old ID (Legacy) | external_id | name | New ID (Modern) |
| e6b09946-0e58-11f1-ab0b-e3c9997fbc39 | dir_102 | Quentin Tarantino | 01KHXHZS07ES0BZP7Y255DHKZK |
| ec90f691-0e58-11f1-ab0b-2f255613e8c5 | dir_101 | Christopher Nolan | 01KHXHZRY28S9ZWFVX6QMRRSN7 |
Mapping the relationship file
The end goal of these steps is to add the new id of each director in the director column of our movie import file. This way the lookup field can reference the right object record and the field is correctly filled in.
Now that we have a new id for each director, we can use that to enrich our relationship file. In our relationship tab, add a new column enter the following function =VLOOKUP(B2, legacy_director!$A:$D, 4, FALSE). This function takes the ID of the director in the old object (column B), lookup the new ID for that director in the old director sheet, and outputs the new ID of the director in column D.
| A | B | C | D |
|---|---|---|---|
| Relationship ID | Source ID (Director) | Target ID (Movie) | New ID (Director) |
| f8167c42-0e58-11f1-88d8-7ddea28688c0 | ec90f691-0e58-11f1-ab0b-2f255613e8c5 | 282218ba-0e58-11f1-ab0b-b9b628bb8cc0 | 01KHXHZRY28S9ZWFVX6QMRRSN7 |
| 0178ad5f-0e59-11f1-88d8-93ab4caad5d4 | ec90f691-0e58-11f1-ab0b-2f255613e8c5 | 2d7550f5-0e58-11f1-bfd3-e7c259afb333 | 01KHXHZRY28S9ZWFVX6QMRRSN7 |
| 0e9ca0c0-0e59-11f1-bfd3-25942d505073 | e6b09946-0e58-11f1-ab0b-e3c9997fbc39 | 336abd31-0e58-11f1-88d8-b5a8b35cd1cc | 01KHXHZS07ES0BZP7Y255DHKZK |
| 17c6aab7-0e59-11f1-bfd3-8378fad904b9 | e6b09946-0e58-11f1-ab0b-e3c9997fbc39 | 398eda27-0e58-11f1-88d8-b78d9f566f29 | 01KHXHZS07ES0BZP7Y255DHKZK |
Now that we know the new director ID for each relationship, we can finally run the last step, which is adding that id to our movie file.
In the movie sheet, we select the director column. This column maps our lookup field, and expects the ID of a custom object. Enter =VLOOKUP(A2, director_to_movie!$A:$D, 4, FALSE) as a field value. This will take the legacy id of our movie in cell A2, and lookup that value in our relationship tab. If found, it will take the value of column D, which is the new ID we stored earlier.
| A | B | C |
|---|---|---|
| Old ID (Legacy) | external_id | director |
| 282218ba-0e58-11f1-ab0b-b9b628bb8cc0 | mov_001 | 01KHXHZRY28S9ZWFVX6QMRRSN7 |
| 2d7550f5-0e58-11f1-bfd3-e7c259afb333 | mov_002 | 01KHXHZRY28S9ZWFVX6QMRRSN7 |
| 336abd31-0e58-11f1-88d8-b5a8b35cd1cc | mov_003 | 01KHXHZS07ES0BZP7Y255DHKZK |
| 398eda27-0e58-11f1-88d8-b78d9f566f29 | mov_004 | 01KHXHZS07ES0BZP7Y255DHKZK |
Importing the CSV file
Once we've mapped all record field, modified their format to fit the new field types, and mapped all relationships to lookup fields with object ids, you should have a clean Google Sheet that contains all your records in the right format.
If the file still contains additional columns, don't worry. As long as the columns you want to migrate have headers that correspond with the field identifiers of your new Custom Object, it'll work.
| Old ID (unused) | external_id | director | name | genre | blockbuster | rating | year | synopsis |
|---|---|---|---|---|---|---|---|---|
| 2822...8cc0 | mov_001 | 01KHXHZRY... | Inception | sci-fi | TRUE | 8.8 | 2010 | A thief who steals... |
| 2d75...b333 | mov_002 | 01KHXHZRY... | The Dark Knight | action | TRUE | 9.0 | 2008 | When the menace... |
| 336a...d1cc | mov_003 | 01KHXHZS0... | Pulp Fiction | drama | FALSE | 8.9 | 1994 | The lives of two... |
| 398e...6f29 | mov_004 | 01KHXHZS0... | Inglourious Basterds | drama | TRUE | 8.3 | 2009 | In Nazi-occupied... |
Once you're ready, export the Google Sheet as a csv file and use the data importer to import your movies.
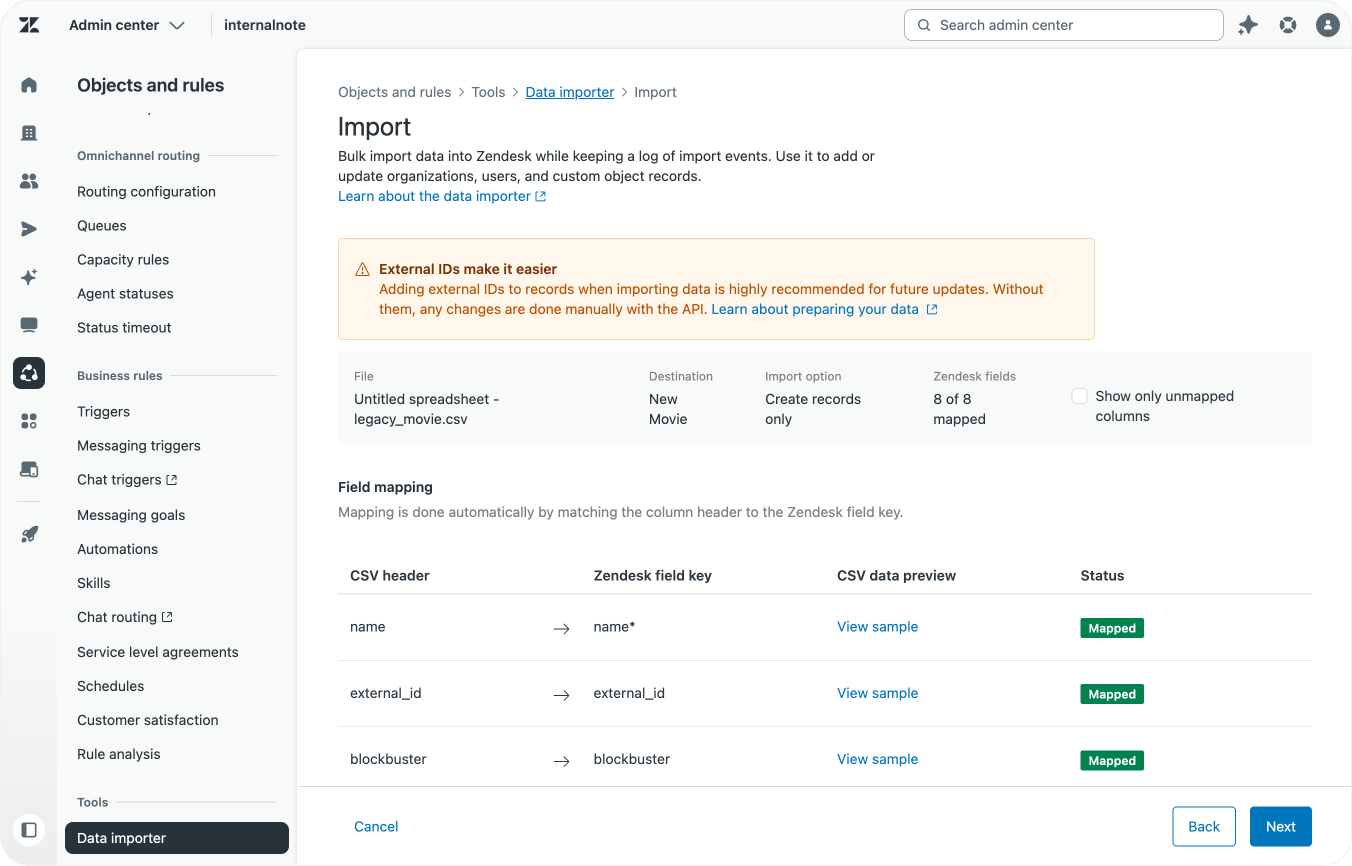
There's a few ways the import can fail:
- Bad column names: Before you import, you get an overview of all mapped columns. If you see columns missing, double check their titles
- Bad values: especially with integer, decimal or regex field you might get some fields that give an error during import because the expected format doesn't match what's in your Google Sheet. Note down the lines and fix them in your CSV. You can always reimport data as long as your elements have an external ID.
- Badly mapped Lookup Fields: Since mapping relationships contains a lot of steps and depend on previously imported values, you might get errors here too. Keep calm, and retrace your steps from the import of the child ticket up to the two mapping steps.
New Custom Object capabilities
Now that your migration is done you can be assured that your data is save and available in the new Custom Objects experience.
But having the data in Custom Objects is just one part of the equation. The data needs to be accessible to users, and there's a whole set of capabilities available with the new objects to enhance your workflows.
Add a lookup field on forms and tickets
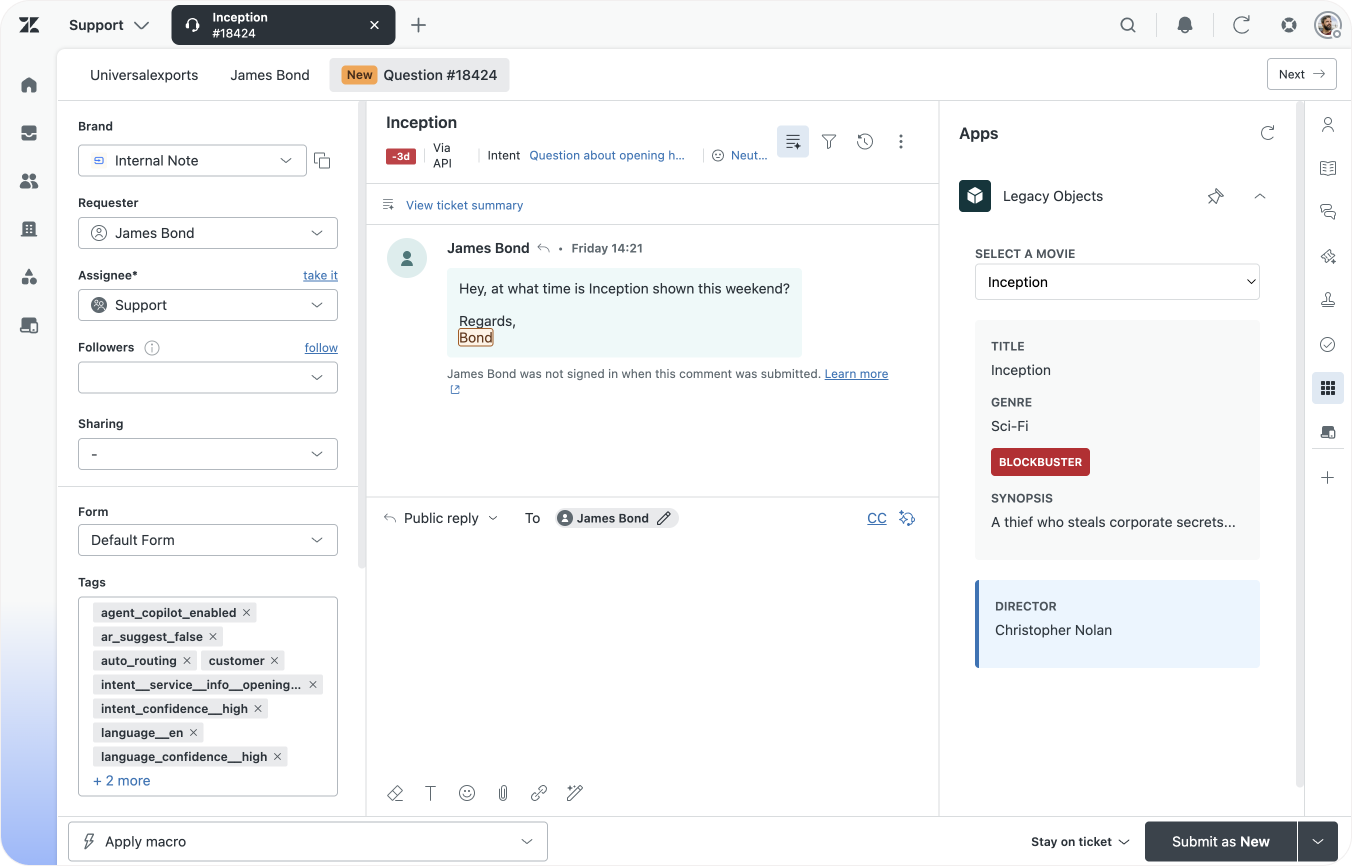
Zendesk Ticket Forms get a new field type you can use in combination with Custom Objects: a Lookup Field. Similar to how we linked movies and directors, we can also use these fields to link our movies to a specific ticket.
By doing so, Agents can also preview the linked record right next to a ticket, giving them a lot of information at a glance. If you're lucky, this preview might even replace your original custom app entirely)
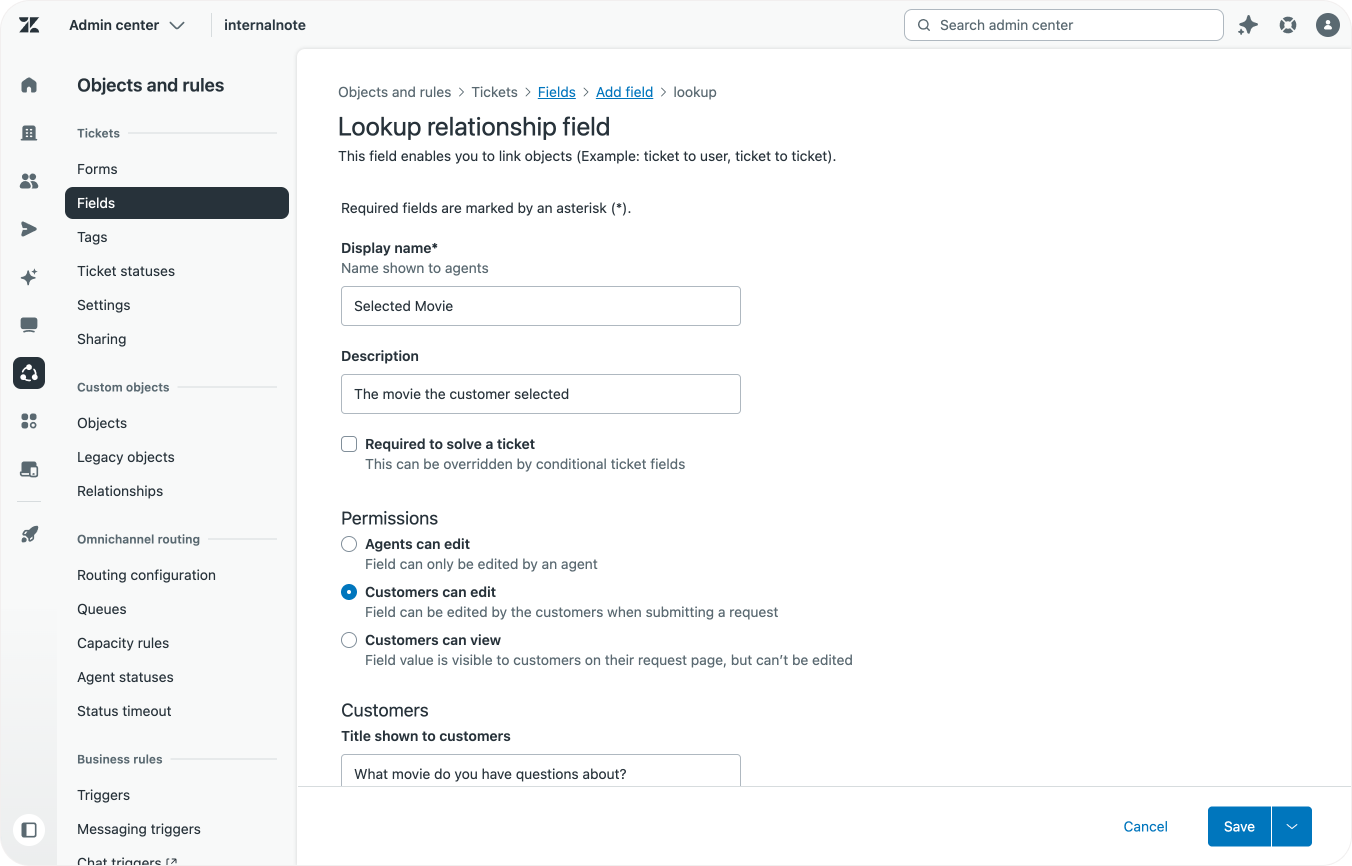
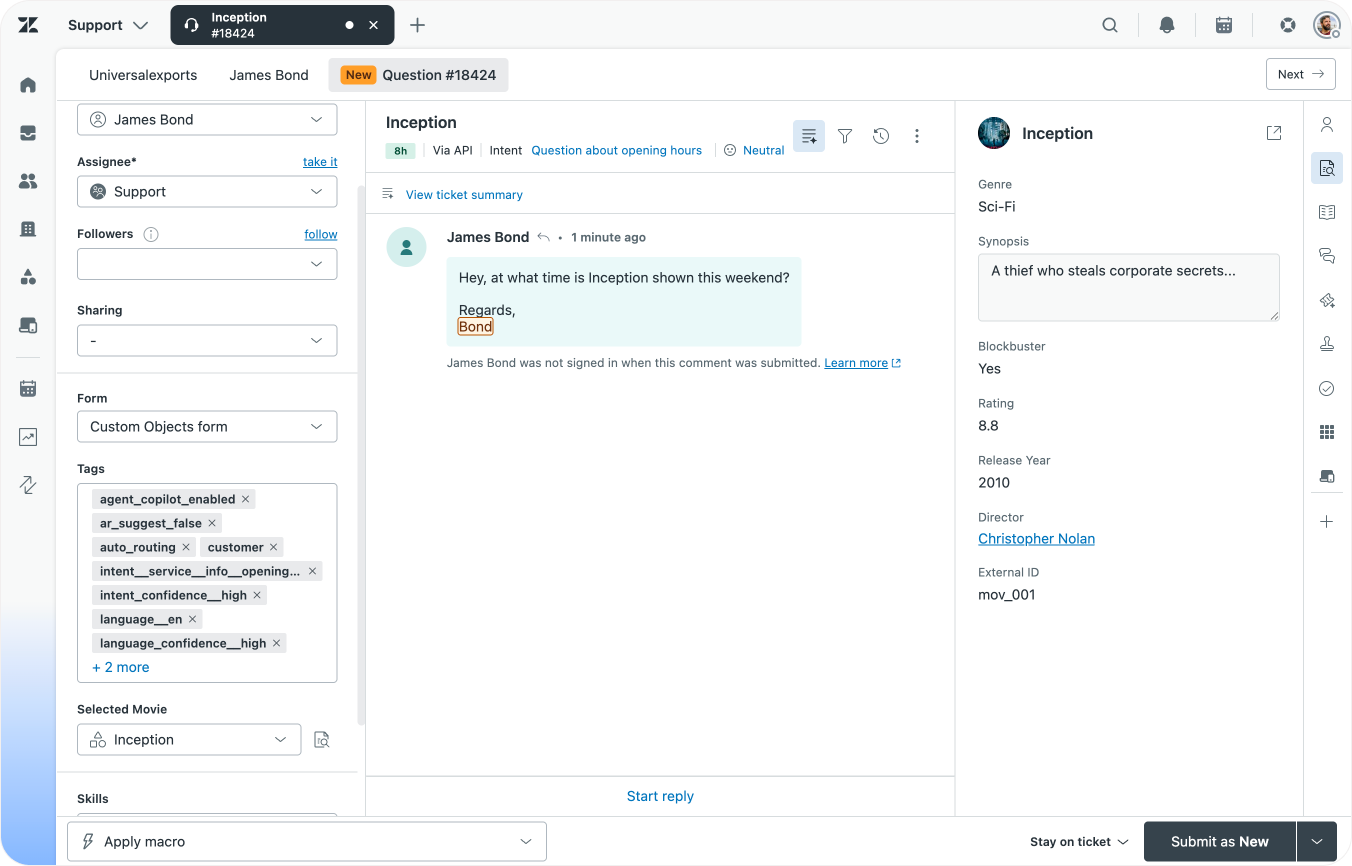
We can also make these lookup fields editable for users. This way they show up on your Help Center and users can select their movie from a dropdown field.
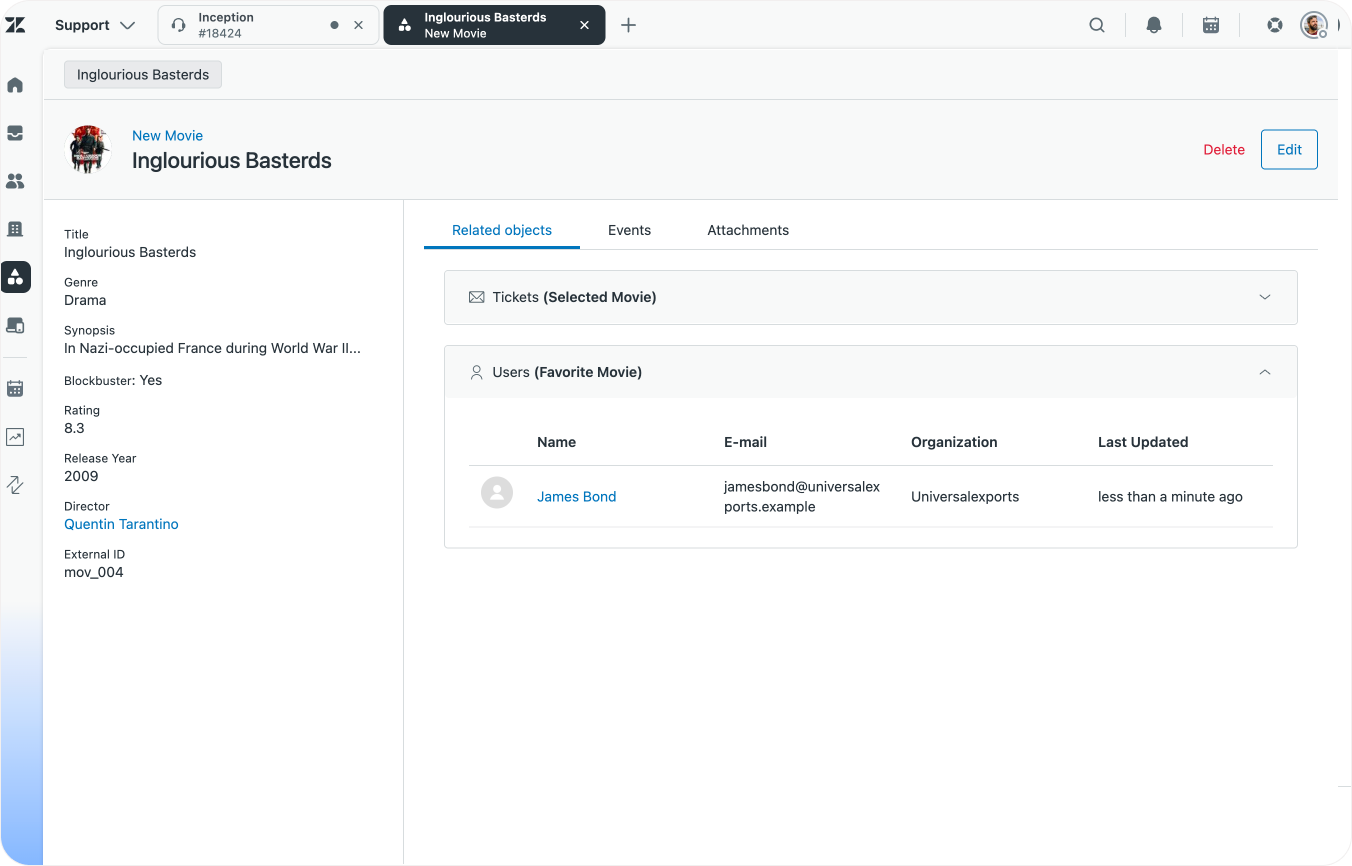
Link to user and organisation profiles
Similarly, we can also add lookup fields to users and organisations which link to our objects. A user could have a favourite movie for example.
Note that these relationships can work both ways. We can have a custom object (e.g. Service Contract) that contains a Lookup Field Account Manager that links to users.
And we can have an Organisation with a Lookup Field Service Contract that links to our Custom Object.
Enrich with attachments and images
We already talked about the extended support for custom field types. But the new Custom Objects also support images and attachments. We can add a movie poster to each movie, and upload the schedule of this month's screenings as an attachment to each movie.
A word on migrating sidebar apps
As we noted in the intro of this article, the Legacy Custom objects were a developer focused product that allowed them to define object structures and build custom apps on top of the API so agents can interact with that data.
When legacy objects disappear those apps will obviously not work anymore.
One approach to fix this would be to jump into your apps' code and start replacing all legacy API calls with their new equivalent, and remap their responses to your apps' data model. This approach works, but especially when relationships come into play, it'll get complex pretty fast due to the different nature of the way lookup fields work.
My advice? Give App Builder a try.
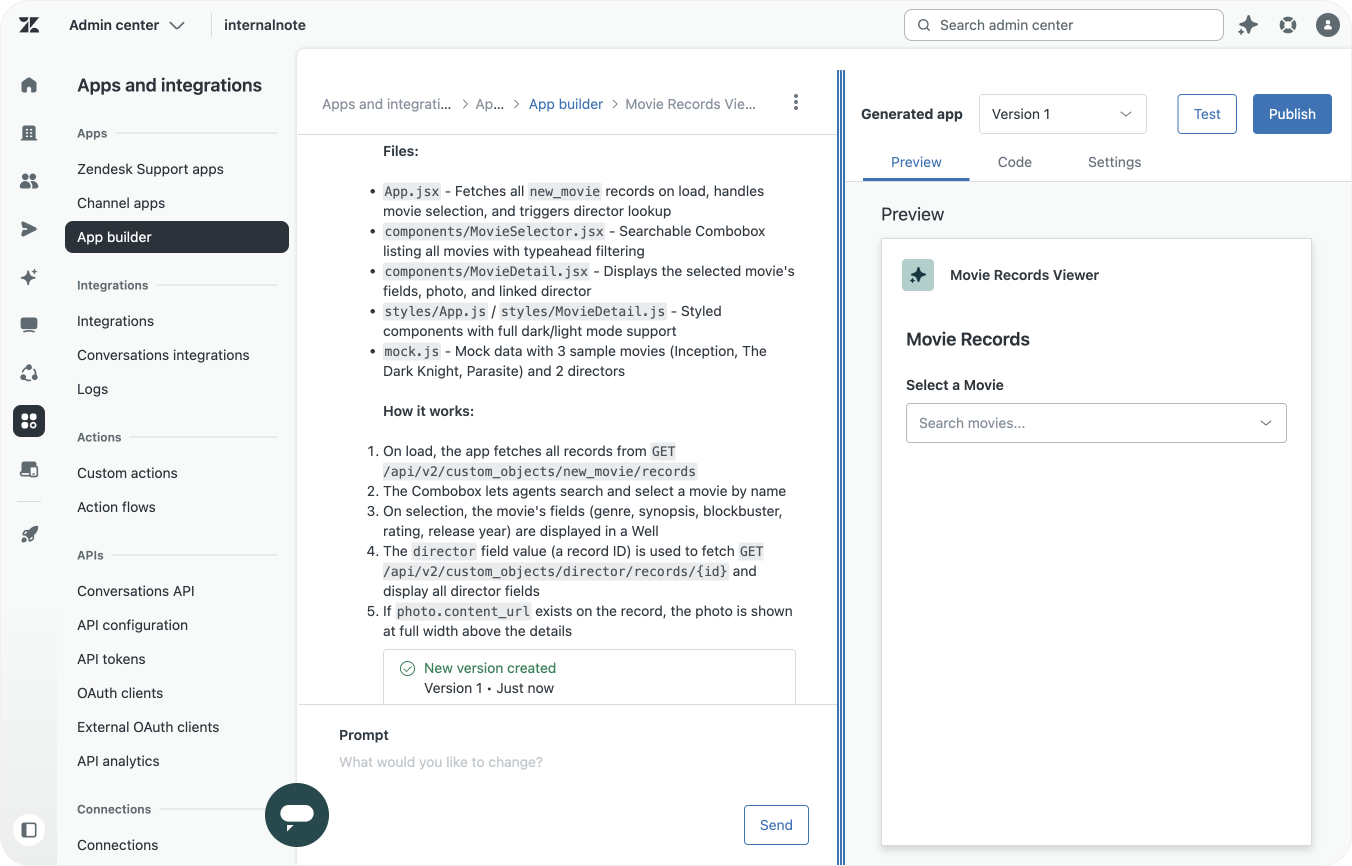

An old legacy app, App Builder doing its magic, and the modern result
Take your originals' app readme, or describe how your app works, while referencing the names of your newly created objects and object fields. You'll be surprised how quickly you can replicate your existing apps with App Builder, built on top of modern React, Zendesk design frameworks and the new Custom Objects APIs.
I have a custom object called new_movie with the following fields: genre,synopsis,blockbuster (checkbox),rating,release_year, director, "title": "Director" } ] }
Note that director is a lookup field that references director. Create a sidebar app that shows this object in a dropdown.
When selected, show the record and the linked director. Also show the photo if available (photo>content_url)
Complex, but doable
Migrating objects from the legacy object structure to modern Custom Objects is not a one-click migration, and it does take some considerable work and effort in Google Sheets. But luckily, this migration is a one-team deal and once completed it gives you plenty of benefits.
- There's a richer and native integration in Agent Workspace, making objects and record available in ticket fields, forms for end-users, a native object browser and a preview next to tickets.
- Custom Objects are also visible in reporting thanks to Lookup Fields making it easier to get insights in your data
- Custom Object triggers, and future capabilities for Action Builder, allow you to automate based on object data and actions taken on your data. You can for example escalate when a Service Contract expires, alert IT when an asset is assigned to a user e.a.
- Data Deletion schedules allow you to automatically purge objects based on filters. This benefits both your storage usage, or allows you to comply with local privacy regulations.
If you've read this article and still don't feel comfortable migrating records yourself, take a look at the Partner listing on Zendesk Marketplace. There's bound to be a local or trusted partner that can assist you!