Handling multiple support addresses in a support email
This article offers a solution for scenarios where customers email multiple support addresses in your Zendesk instance and you only see a single ticket being created.
Handling multiple support addresses in a support email

On this page
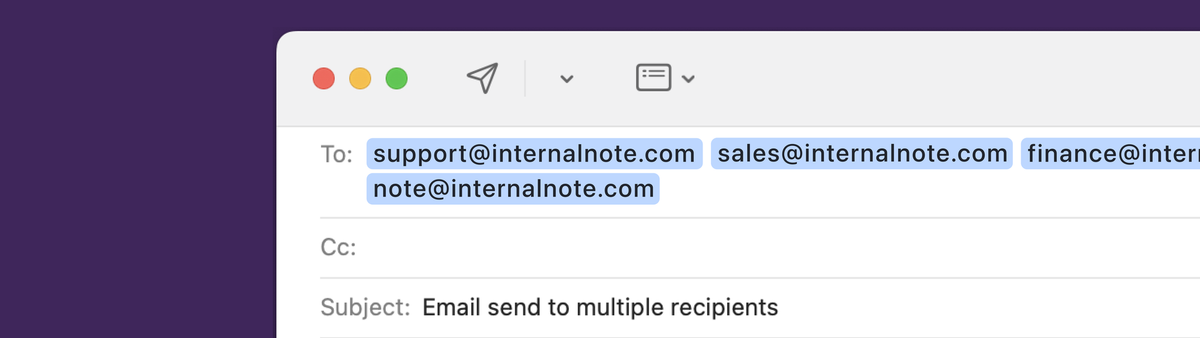
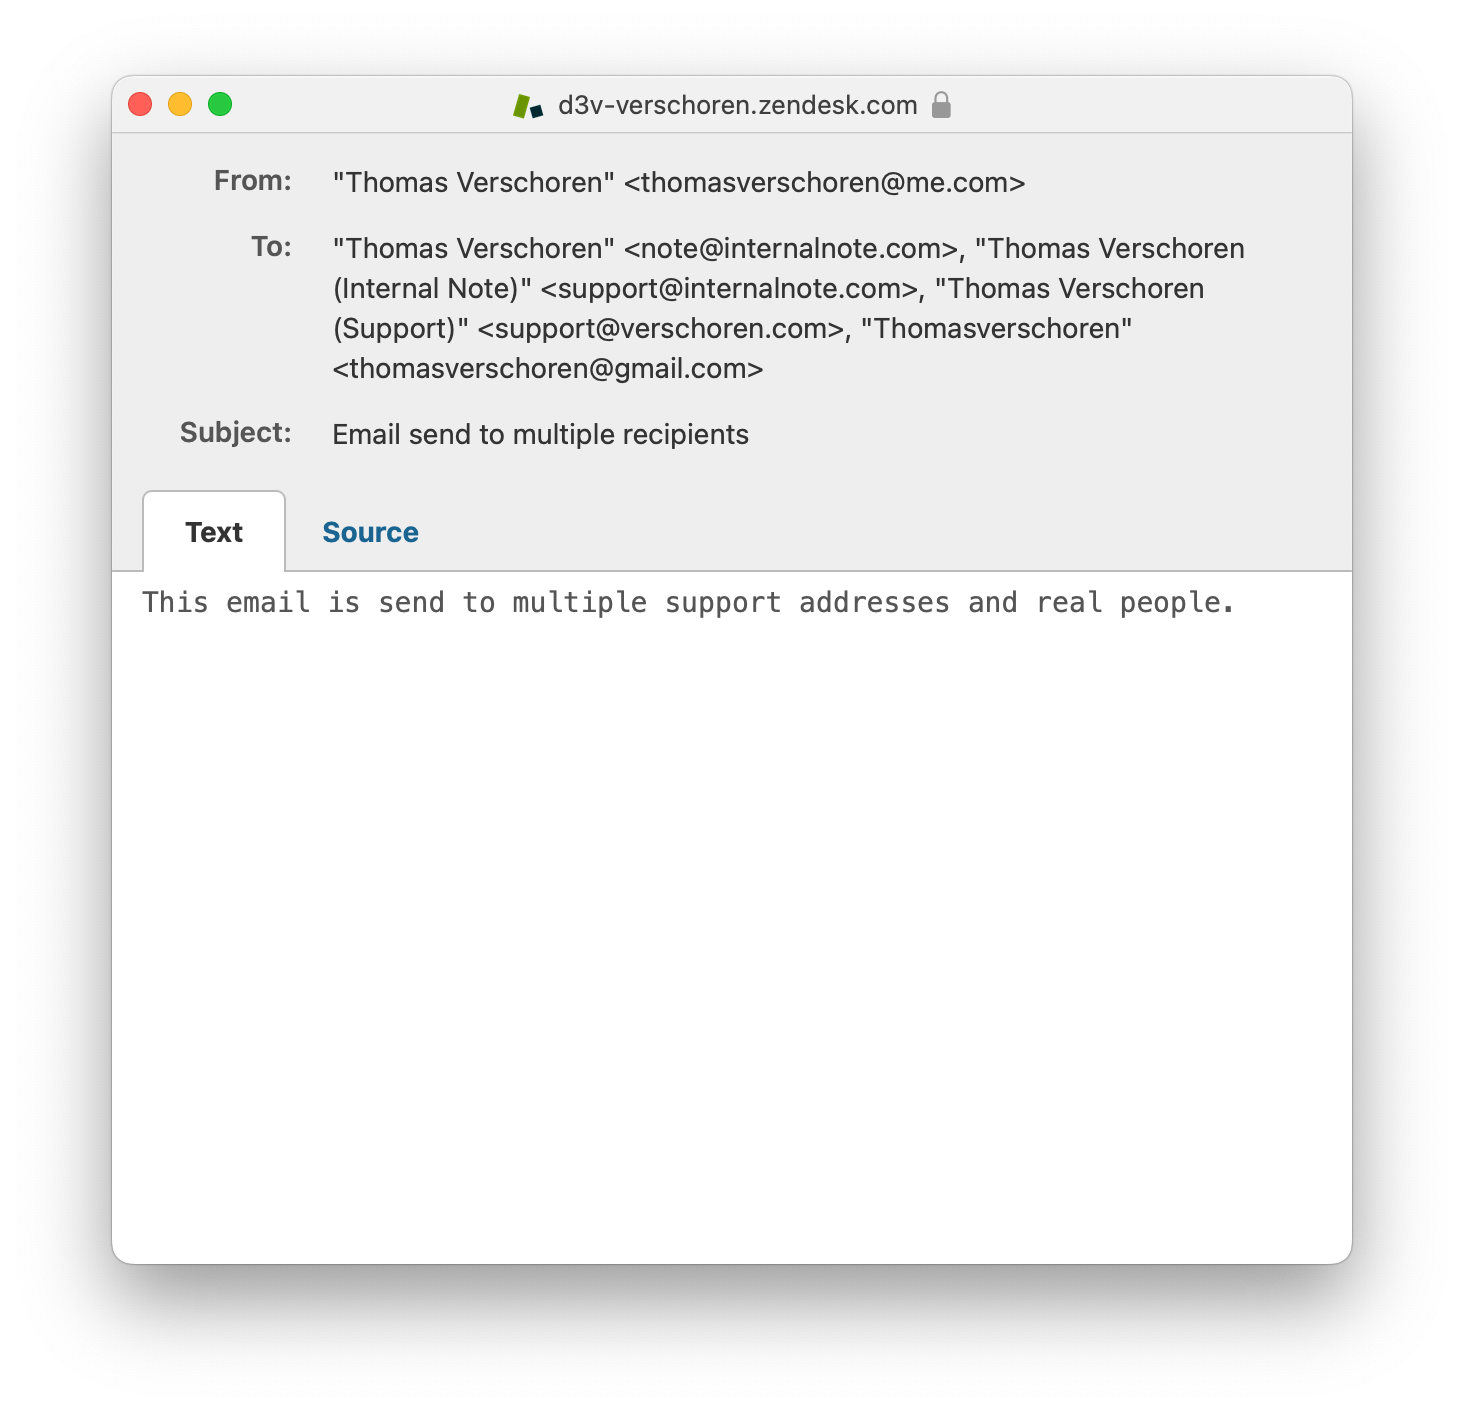
You might recognize this scenario: a customer contacts your support team and adds [email protected], [email protected] and [email protected] all in cc on the same email.
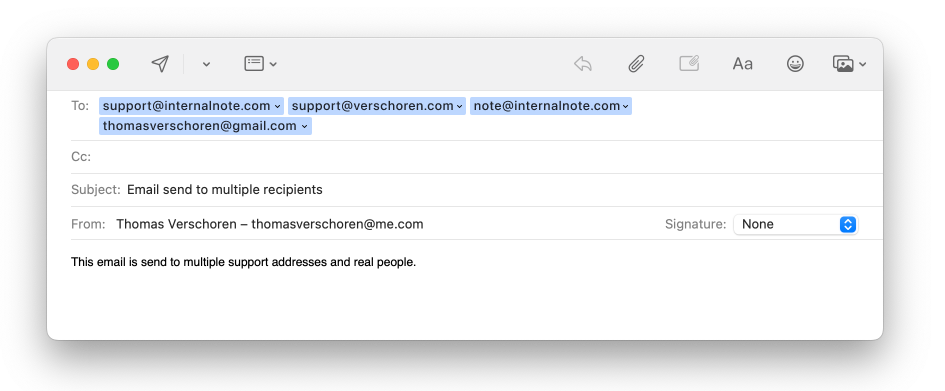
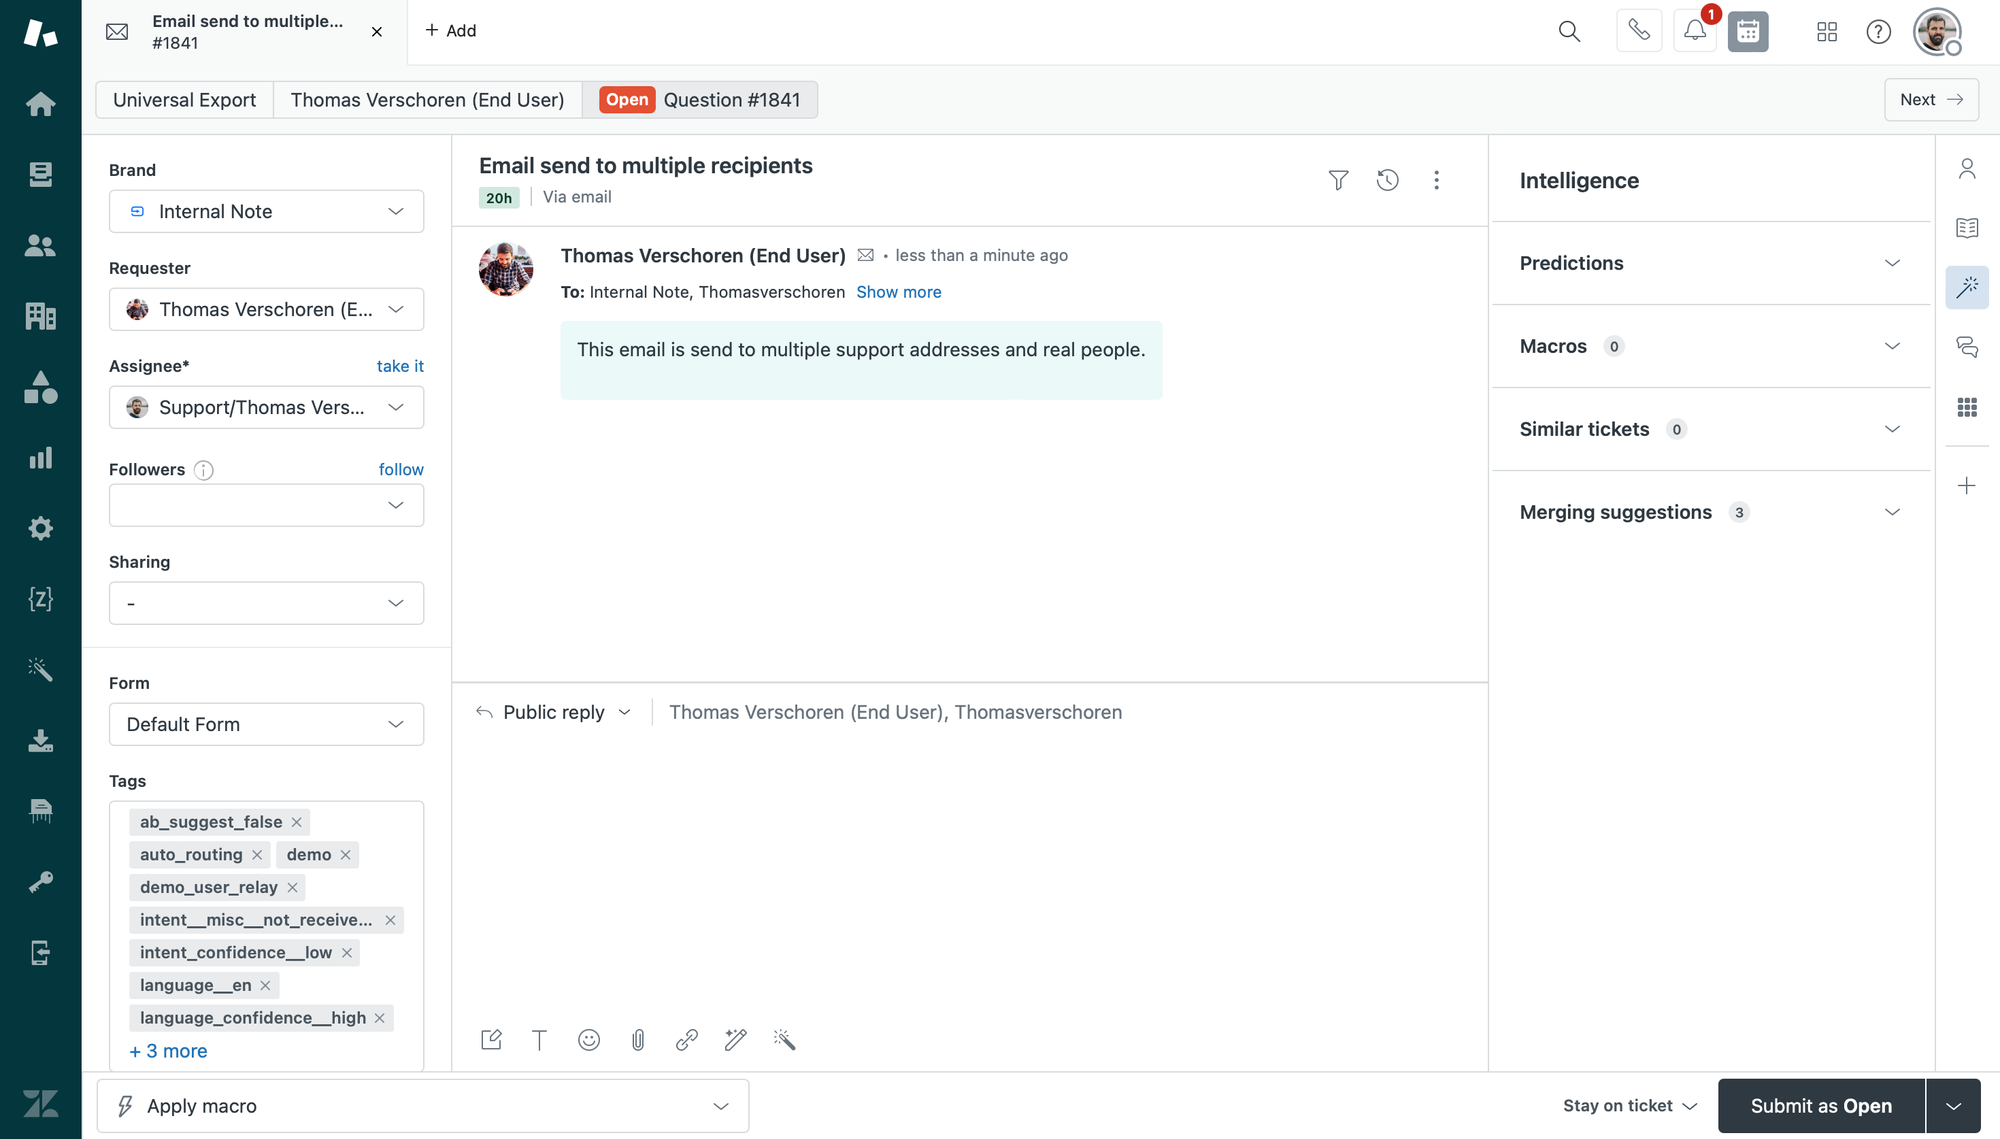
This email arrives in Zendesk and only one tickets gets created, and the fact that two other support addresses were part of the same email is invisible for your agents.
How to fix this
One easy way to find out if an email has been send to multiple support addresses, is by opening a ticket and going to the View Original Email option. This however is not the most discoverable way, and you need to be actively looking for such emails.
A better solution
A better method would be to somehow detect multiple support addresses in cc, and then clone the ticket for each of these addresses. That would create duplicate emails, but each email would be routed and handled as it if were emailed solely to that specific support address and assigned to the correct group.
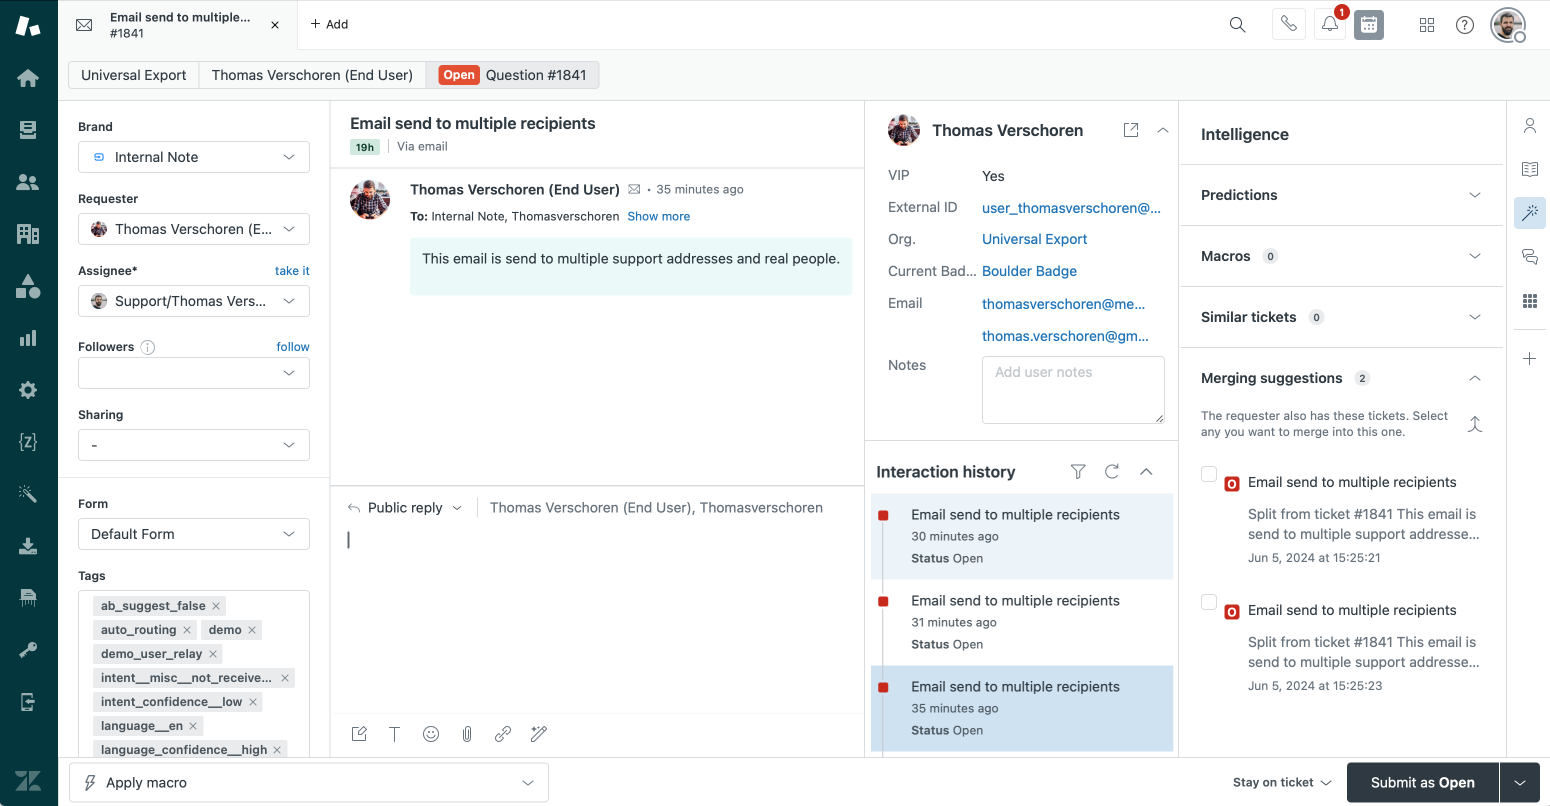
The confusion that may come from those duplicated tickets is solved by those tickets showing up in the customers' Interaction history in the context panel, or would be picked up by the Merge suggestions of Zendesk Advanced AI.
Flow
To build this flow we're going to need a Cloudflare Worker, or a platform like Make.com, Zapier or similar.
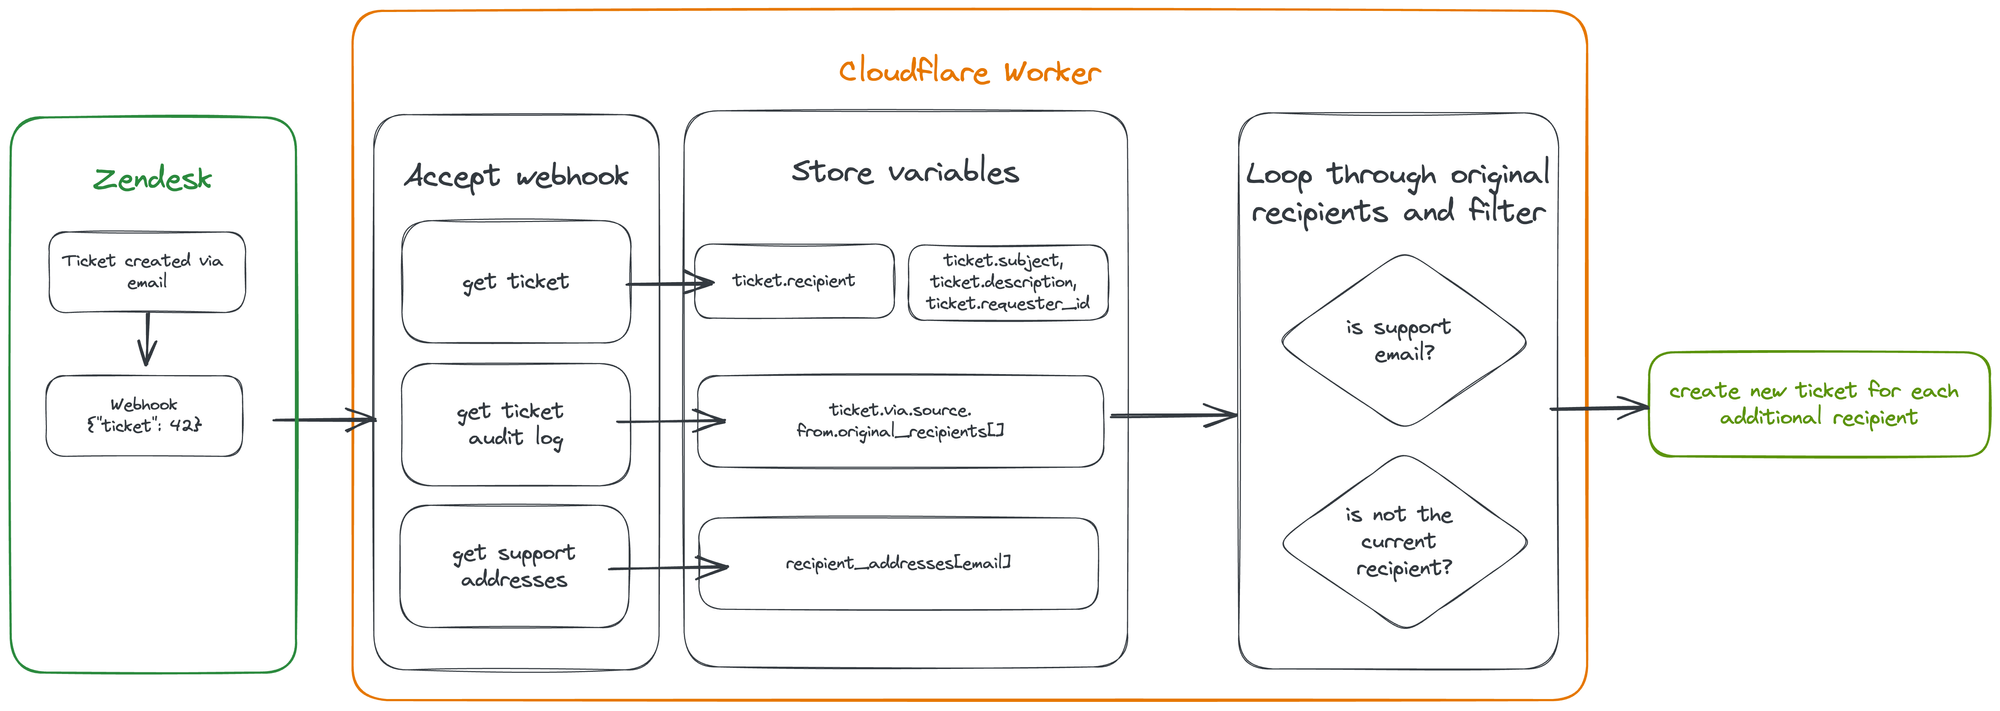
To make this flow work we need a few elements which we can all grab via the Zendesk API.
- If you want to detect all the support addresses in cc on an email ticket we can use the Audit Log (Events) of a ticket.
- To know if an address is a support address registered in Zendesk or a regular end-user, we need a list of all support addresses in the instance
- And we need a copy of the original Zendesk ticket in order to clone it.
Once we have these elements, we can use them in a flow like the one in the diagram below:
Setup
Webhook
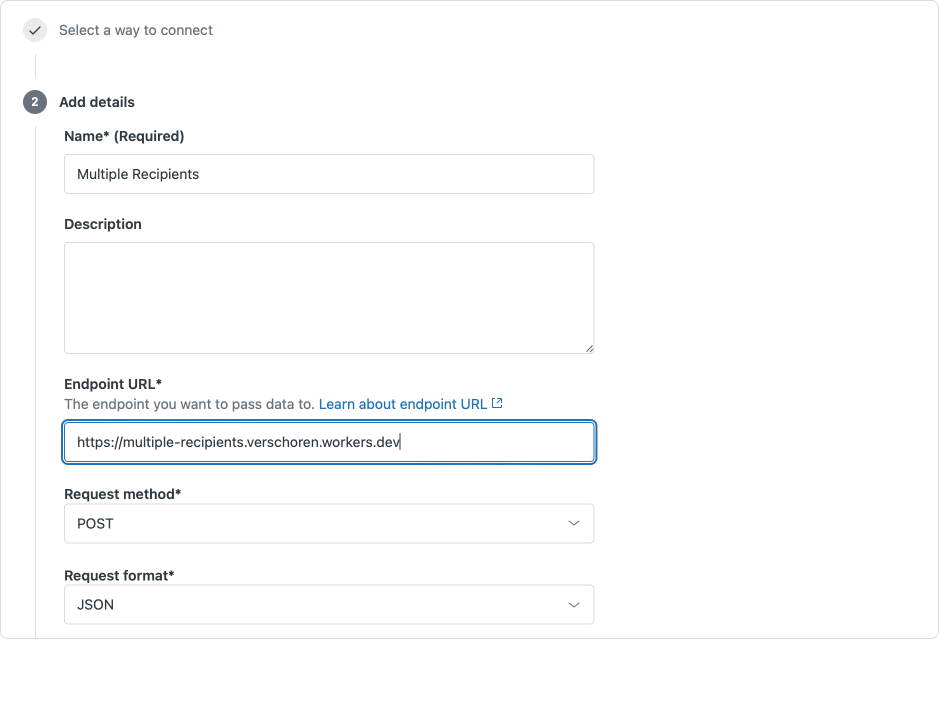
Once you've created your Worker (see below) or other webhook endpoint we need to add a Webhook to Zendesk. Note that we need to pass the ticket.id to the worker, so make sure the request method is a POST.
Trigger
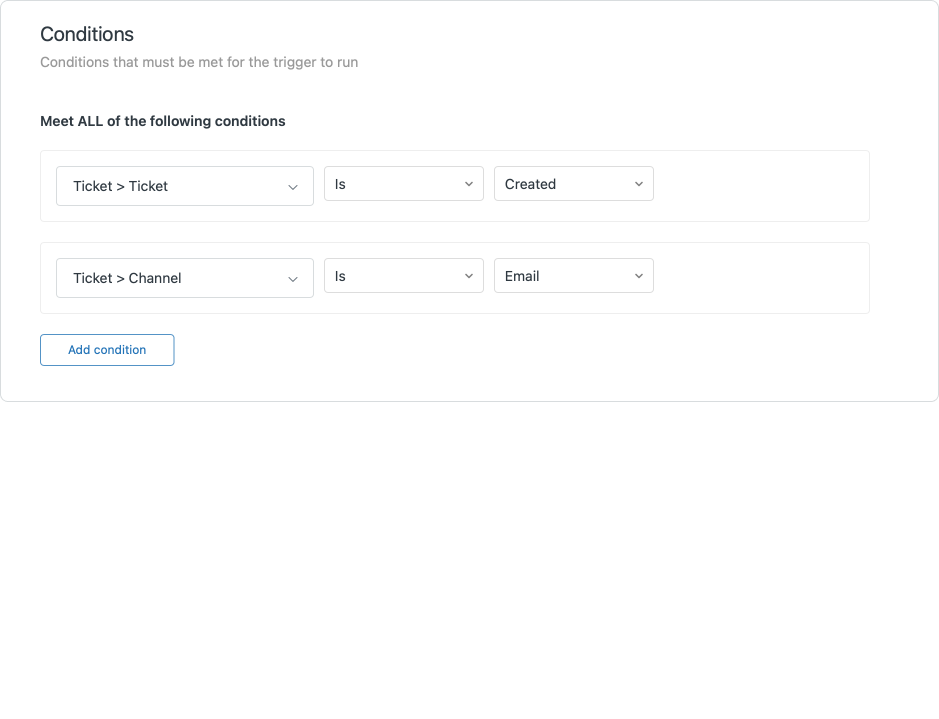
Next, create a trigger that fires when a ticket is created, and only for the Email channel. This prevents unnecessary calls to our worker since only email tickets can contain those multiple support addresses.
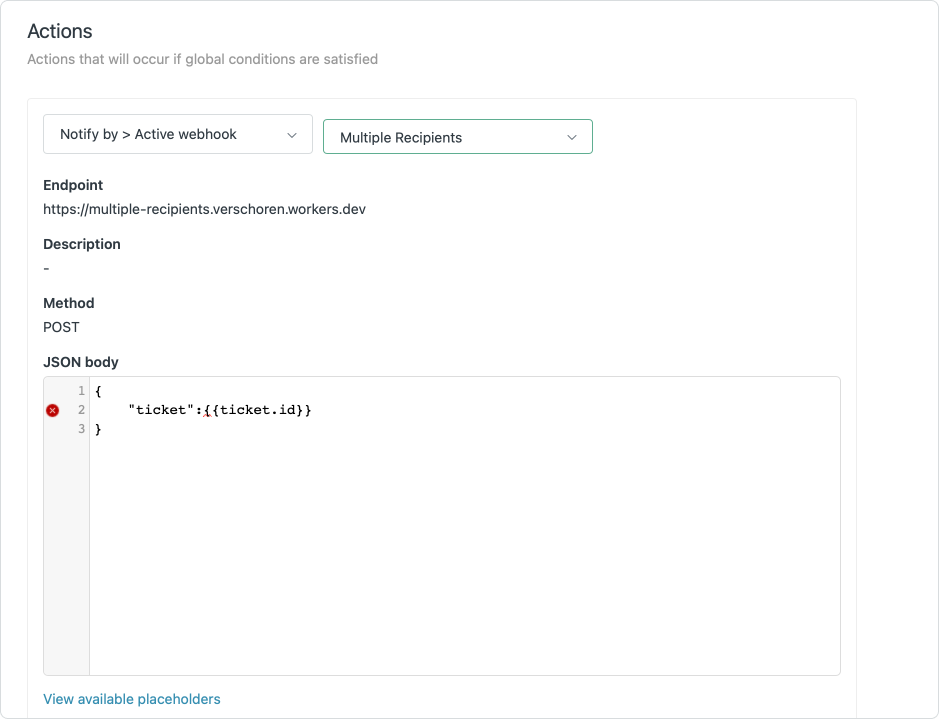
In the actions, select the Notify by | Active Webhook | Multiple recipients web hook we just created and pass the following payload
{"ticket": "{{ticket.id}}"}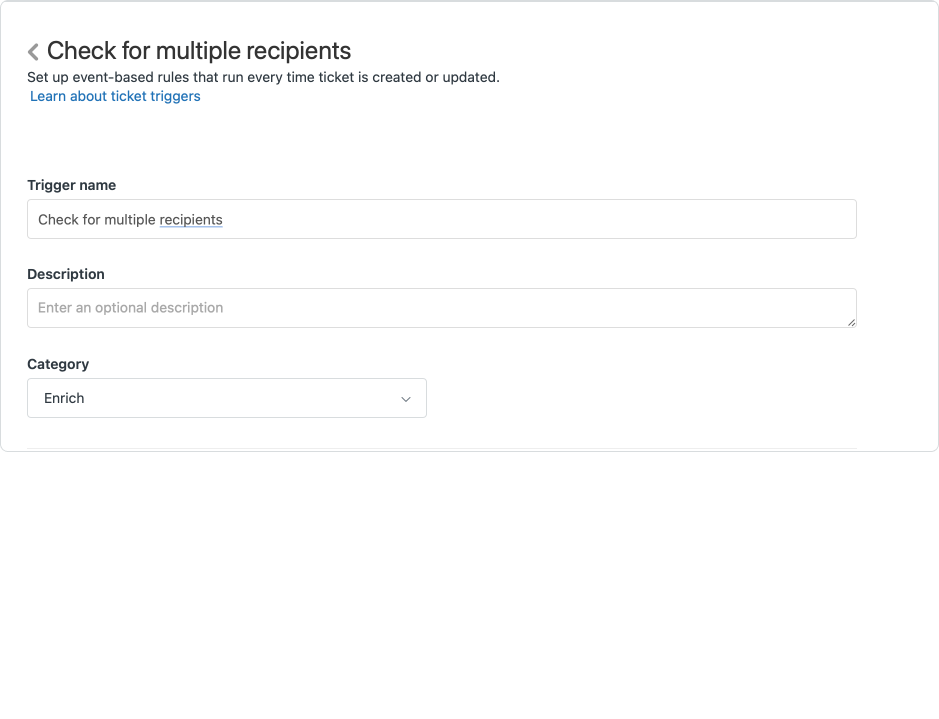
Worker
All code for this flow is available on GitHub. You can fork the repository, and use the Deploy to Cloudflare button to create your own version of this script for free.
 verschoren
One you've deployed the script successfully there's two things you need to change on the Cloudflare Worker variable page:

- Replace the SUBDOMAIN with your own Zendesk subdomain
- Add a TOKEN, make it a secret, and use a base64 encoded string of
[email protected]/token:zendesktokenwherezendesktokenis an actual token taken from the Zendesk admin center, and[email protected]is a real admin in your instance.
Code deep dive
Get Data
The first step in our code is grabbing the POST payload from our trigger:
var payload = await request.json();
const ticket_id = payload.ticket ? payload.ticket : "";
Next we have three functions to grab the ticket info, ticket audit log and support email addresses.
Get ticket info
async function getTicket(ticket_id, subdomain, headers) {
  const init = {
    method: "GET",
    headers
  };
  const result = await fetch("https://subdomain.zendesk.com/api/v2/tickets/42.json", init);
  let json = await result.json();
  return json.ticket;
}
This function calls the Zendesk API and returns a JSON element with all ticket information:
{
  "ticket": {
    "id": "42",
    "subject":"What happens at 88mph?",
    "description":"We're going back in time"
    "requester_id":"123456789",
    "recipient":"[email protected]",
    //...
  }
}
Get audit log
async function getAudit(ticket_id, subdomain, headers) {
  const init = {
    method: "GET",
    headers
  };
  const result = await fetch("https://subdomain.zendesk.com/api/v2/tickets/42/audits", init);
  let json = await result.json();
  let audits = json.audits;
  for (const audit of audits) {
    if (audit.via.channel == 'email'){
      var recipients = audit.via.source.from.original_recipients;
      return recipients;
    }
  }
}
This API returns the audit log of our ticket, which conveniently contains a list of original_recipients under the via|email channel key:
{
  "audits": [
    {
      "ticket_id": 1841,
      "via": {
        "channel": "email",
        "source": {
          "from": {
            "address": "[email protected]",
            "name": "Marty McFly",
            "original_recipients": [
              "[email protected]",
              "[email protected]",
              "[email protected]",
            ]
          },
        }
      }
      //....
    }
  ]
}
Get support addresses
The final step in our preparation is getting all the support addresses via the API. We parse the returned JSON and create a list of all support addresses in the instance called support_emails
async function getSupportAddress(subdomain, headers) {
  const init = {
    method: "GET",
    headers
  };
  const result = await fetch("https://subdomain.zendesk.com/api/v2/recipient_addresses", init);
  let json = await result.json();
  var support_emails = [];
  for (const element of json.recipient_addresses) {
    support_emails.push(element.email);
  }
  return support_emails;
}
Compare
Now that we have our required data, we can start processing the ticket to check if we need to create duplicates for additional support addresses in the original email.
for (const recipient of recipients) {
  //run check
}
Filter out current recipient
First check we want to do is filter out the support address that was used for the ticket that did get created. Since this email address got accepted by Zendesk, it's no use making another copy!
if (ticket.recipient == recipient) {
  console.log(`Skipped. Existing ticket for ${recipient}`);
}
Check if support email
Secondly we want to filter out any email that isn't a support address. The customers could've cc'd a friend, spouse or colleague and those should not trigger a duplicate ticket.
else if (!support_emails.includes(recipient)) {
  console.log(`Skipped. ${recipient} is not a support email.`);
}
And finally, if the ticket is a support email and isn't the original recipient, we want to create a ticket!
else {
  var new_ticket = await createTicket(ticket, recipient, ticket_id, subdomain, headers);
}
Create ticket
Since this is an email ticket we only care about the subject, description and requester. Email cannot set ticket fields or other metadata, so we don't need to pass these along.
First step is to define our ticket.
- Note we used a via.channel "mail" element to make sure the duplicate ticket is also processed as an email ticket!
- The recipient value is the support addresses that passed our filters in the previous steps.
var payload = {
    "ticket": {
      "subject": ticket.subject,
      "comment": {
        "html_body": `Split from ticket #${ticket_id}<br>${ticket.description}`
      },
      "recipient": recipient,
      "requester_id": ticket.requester_id,
      "via": {
        "channel": "mail"
      }
    }
};
Once we have our payload, we can POST it to Zendesk via the API as such:
async function createTicket(ticket, recipient, ticket_id, subdomain, headers) {
  const init = {
    method: "POST",
    headers,
    body: JSON.stringify(payload)
  };
  const result = await fetch("https://" + subdomain + ".zendesk.com/api/v2/tickets.json", init);
  var json = await result.json();
  return json.audit.ticket_id;
}
Conclusion
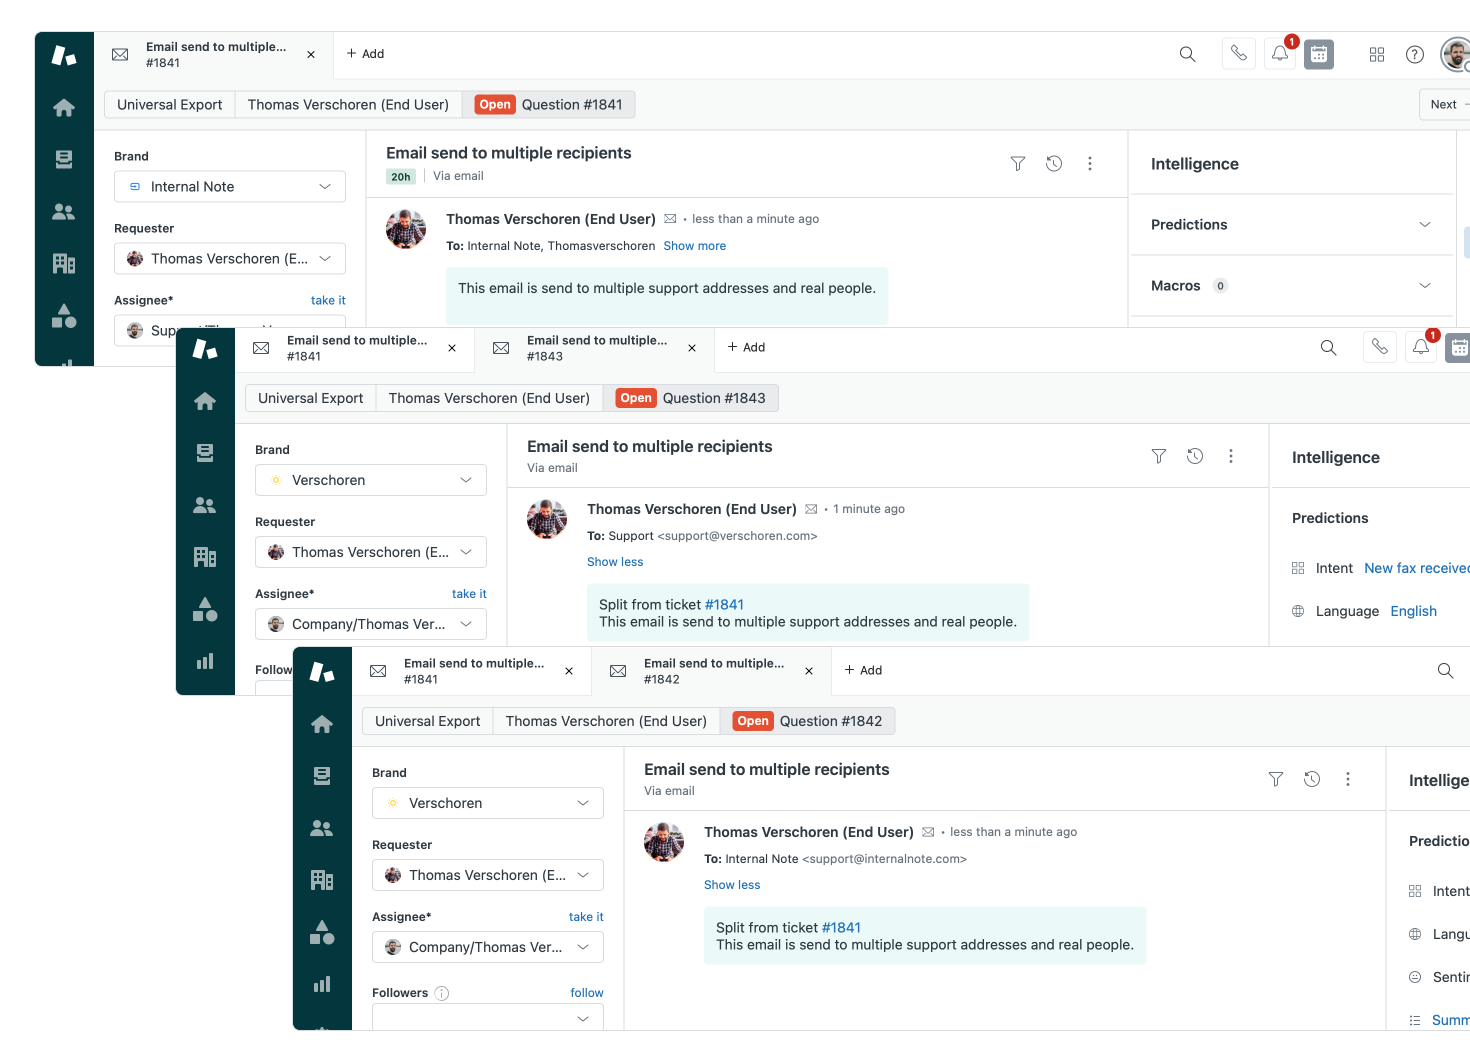
If all goes well, when we have an email that gets sent to multiple recipients, we'll see duplicates of the ticket show up after our trigger and worker runs successfully.
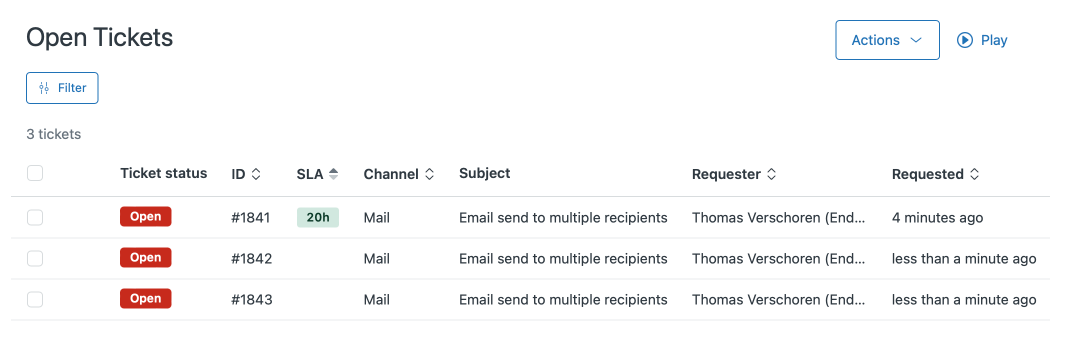
And each ticket contains the content of the original ticket but is created with another support address as the recipient. And each ticket has a reference to the original ticket as part of the description.