
What's new for Employee Services at Zendesk
This article shows you Zendesk’s new Employee Service suite, featuring AI automation, omnichannel support, custom service catalogs, advanced access controls, and productivity tools—enabling teams like HR and IT to deliver efficient, secure, and streamlined internal employee support.

On this page
Zendesk has traditionally always been a customer service focussed company. Their Omnichannel suite made it possible for companies to offer support to their customers in both the consumer and business-to-business space.
Customers could reach out over email, social, phone or web channels, making sure companies could be where their customers were. AI Agents, knowledge and processes made it possible to automate resolutions, providing faster 24/7 answers to for questions while also removing a lot of tickets from agents’ queues.
Agent Workspace with its unified inbox provides agents with context on the customer, showing not only the conversation they’re having, but also providing context via summarization, intent detection, insight in previous purchases and conversations.
And the Analytics and QA suite provides metrics in how their customer care team is performing, and insights on how to improve both the actual ticket handling, as filling in knowledge gaps.
Funnily enough, what makes Zendesk great at Customer Service also makes Zendesk ideal for Employee Service. Employees, just like customers, also have questions and problems that are often recurring in nature, and are handled by centralized teams if “just knowledge and automation” can’t resolve it.
For a long while now I’ve seen Zendesk customers using the available customer service suite to do just that. Offer IT support, provide a unified inbox for their HR team, or use tickets to handle facility work. Zendesk too has seen this use case, and since Relate they now offer a dedicated version of the suite specifically for Employee Services.
Employee Services
Employee Services differs from Customer Service in a few distinct ways.
For one, you know your employees. People are hired into the company and there’s a directory of employees that have role, manager and work location. This context makes it easier to define routing, setup approval flows and provide context. You often no longer need to ask the customer who they are, you already know.
This knowing comes in part from the fact that Employee Service is by nature an internal use case. Your intranet and company documentation and processes aren’t publicly accessible but live behind your SSO login window. Channels are shifted from social and web towards email and business messaging tools like Slack or Teams.
But not only your documentation is secured. HR is a highly private context. IT and ITSec lies at the core of your companies safety. Where customer service might use groups to split workload, and brands to differentiate their outside appearance, employee service uses private groups and departments to make sure there’s walls between teams. This way , for example, an agent from the IT team that has an HR question can only see the outcome, but not the internal notes on that ticket, or the HR questions from other team members.
The nature of questions is also different. Employee Services questions are either service related (I want the HR or IT team to do something), process related (How do I do my job) or policy related (What’s the rules around replacing my laptop). The Service related items rely on procedures for the team handling it, while processes and policies might be spread across various knowledge sources. IT might use Confluence, HR has a Workday guidebook, whereas other data might be spread across internal Slack or Google Drive channels and docs.
Where customer service handles orders, invoices or bookings, employee service handles onboarding and directories, IT asset management, procurement and workforce management. Different integrations, which require different connectors.
Over the last year, Zendesk has pushed their suite forward and added specific features and releases that offer native solutions for each of these changes. This turns Zendesk for Customer Service, used by HR and IT into a real Zendesk for Employee Service.
The work is not done yet though, but this article serves as a refresher on where we are today in that journey.
Channels
Providing support starts with offering channels for your teams to reach out. Employee Service at Zendesk comes out of the box with web messaging, email, web forms, voice and integrations for business channels like Slack and Teams.
Email and messaging
Both email and messaging offer the ability to resolve tickets via AI Agents. These leverage your existing knowledge base, imported knowledge sources and agentic processes to offer automated resolutions to frequently asked questions by either generates a response based on those knowledge sources, or by using custom actions to give personalized answers based on data in other tools.
Questions like “how do I request leave” or “How do I connect to our company VPN” can be answered over messaging or email with custom generated replies. While “How many days of leave do I have left”, or “when is the next company meeting” can be answered by integrating with your WFM platform or company’s event calendar.

Help Center
At the core of any good service offering is the availability of up to date documentation. Without it neither your customers nor your AI Agents can find answers to questions.
Zendesk’s Help Center lies at the core of this, and offers the same capabilities for Employee Service as it did for Customers, although there are some unique elements you need to configure in order to make it shine.
For one, since you’re probably using departments (see below) to split teams’ access, you might decide to also have specific Help Centers per team. For example you might have a Help Center for IT and for HR. This has the benefit that access and permissions are controlled per team, but also creates the problem that your team now has multiple places to search, one for each team.
There’s a few features that will help you make this experience a bit smoother.
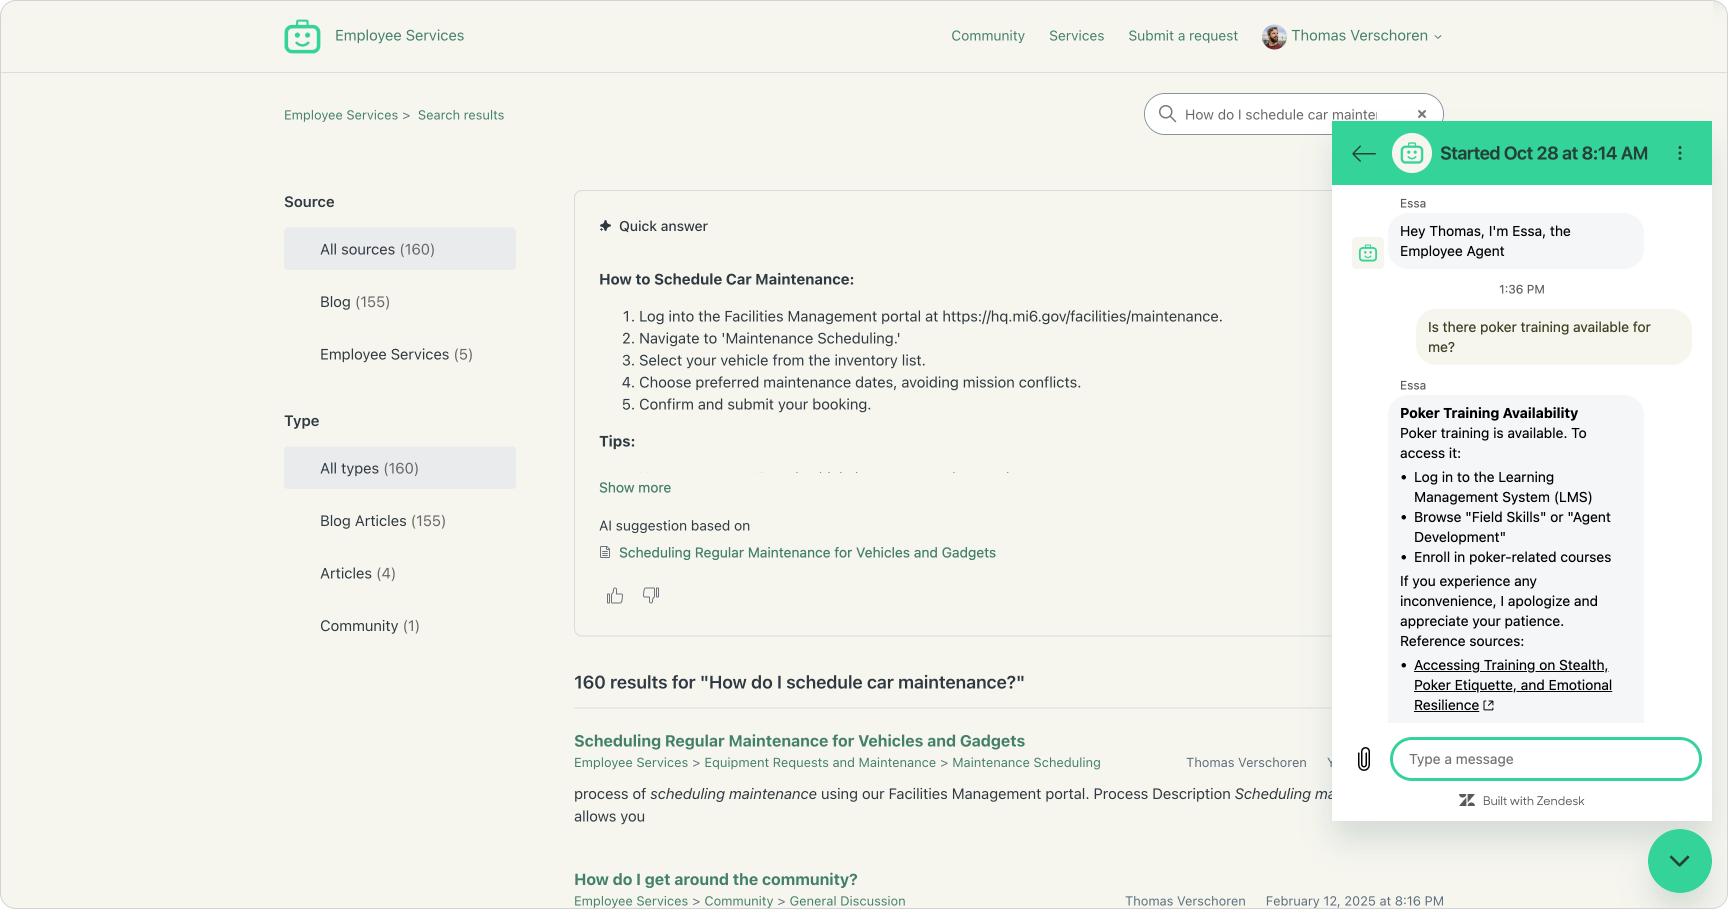
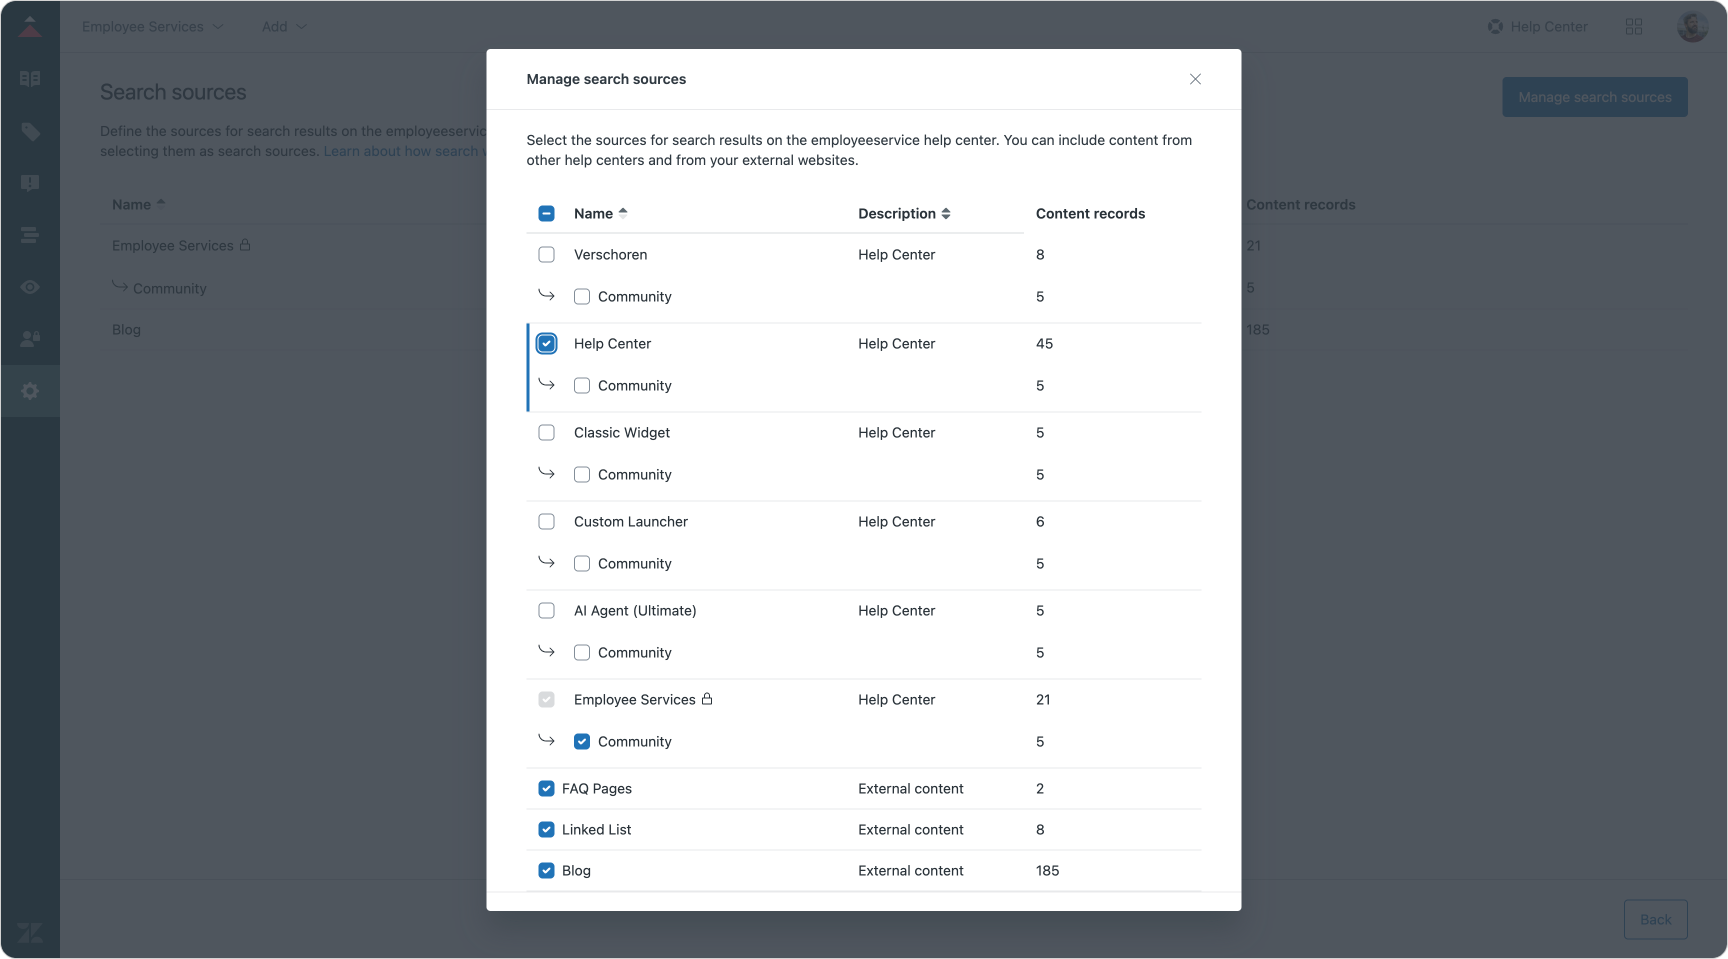
You can enable cross Help Center search making it possible for IT related articles to be surfaced in the HR and vice versa. This allows employees to search in a single Help Center, and they'll see results from multiple indexed websites, help centers and knowledge sources in one place.
Secondly, you can enable the new ability to show requests across brands in the portal. Be aware though, this impacts all brands so if you’re using a single Zendesk instance for multiple customer and employee brands, this might create some confusion for your customers.
Thirdly, Article Multi-placement is your friend. Since multiple procedures might be shared across teams or departments, you can leverage this new capability to make one article appear across multiple sections, instead of having duplicates you need to maintain.

A final thing to note is that the Help Center for Employee Service is locked behind authentication at all times. There is no public Help Center and employees always need to login via SSO (or Zendesk accounts) to get access. The new login inheritance of the web widget makes that user data automatically available to your AI Agents too, removing the need to setup custom authentication services for that channel.
And while that automatic login is welcome, it does take away the ability to have publicly accessible pages available to new hires or people not yet onboarded into the company.
Service Catalog
One major difference between CX and ES is that since it’s employees talking to departments they’re often specific services and procedures involved that are highly controlled and managed. Where customers might reach out with “my laptop is broken”, employees will rather reach out with “my device is due for replacement” or “I’d like to request a new display” or “I want to request access to a specific office”.
While AI Agents are perfectly suited for detecting these use cases and collecting the right context (what office?, which display?, what keyboard layout?), these kind of requests can also be handled via more traditional forms.
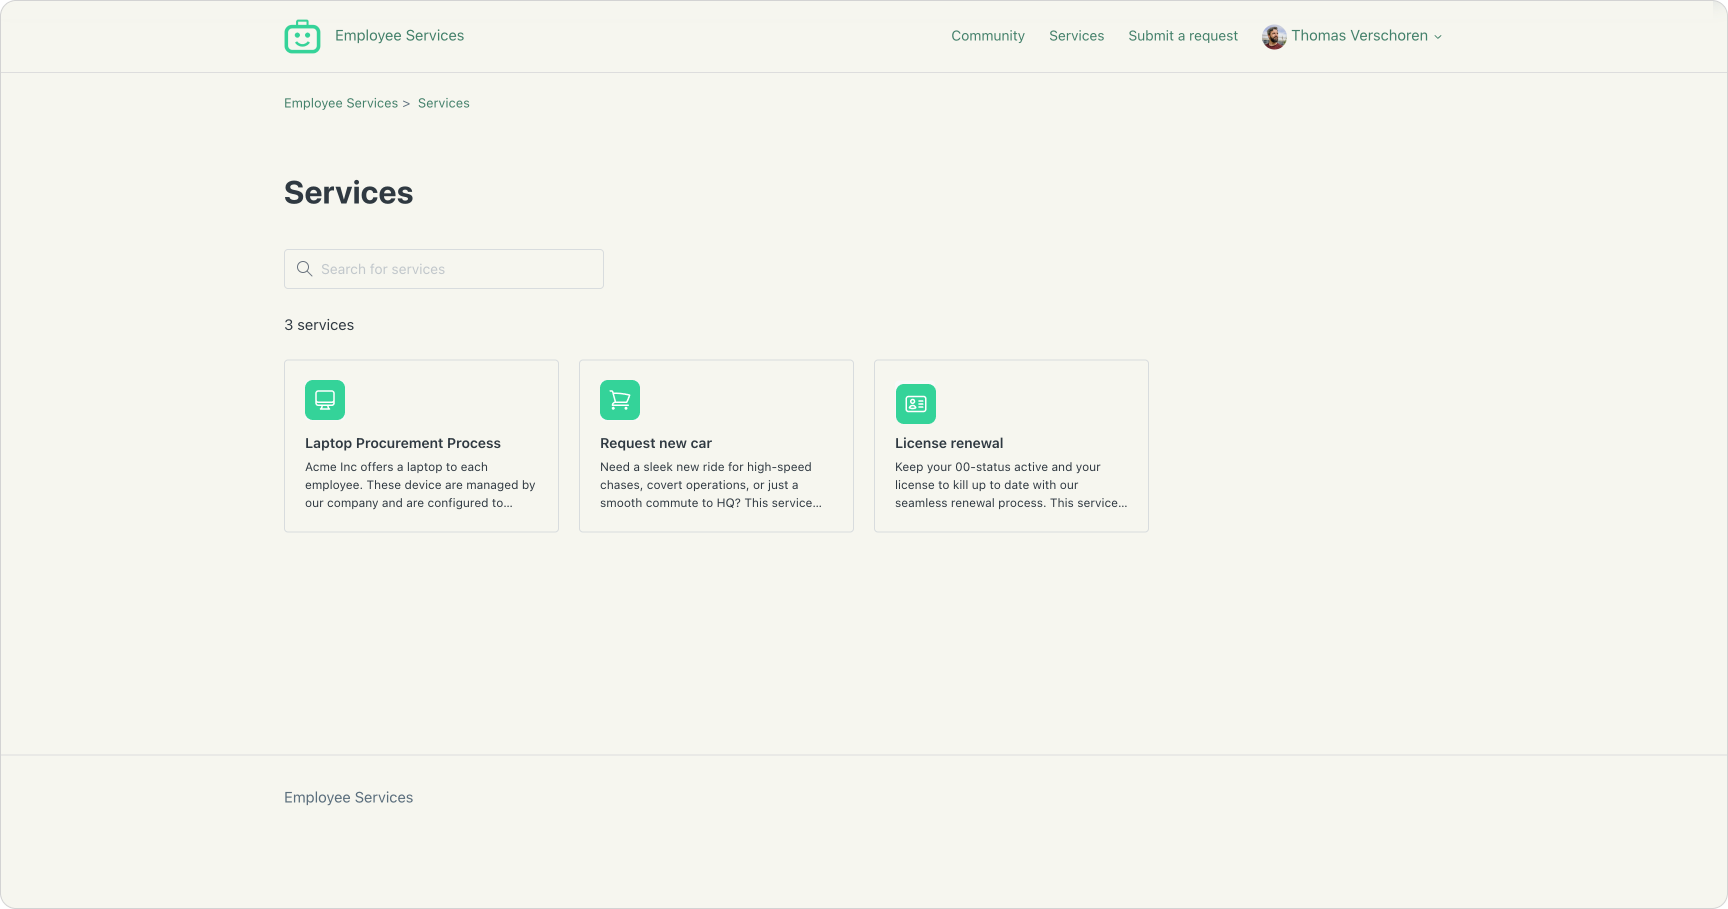
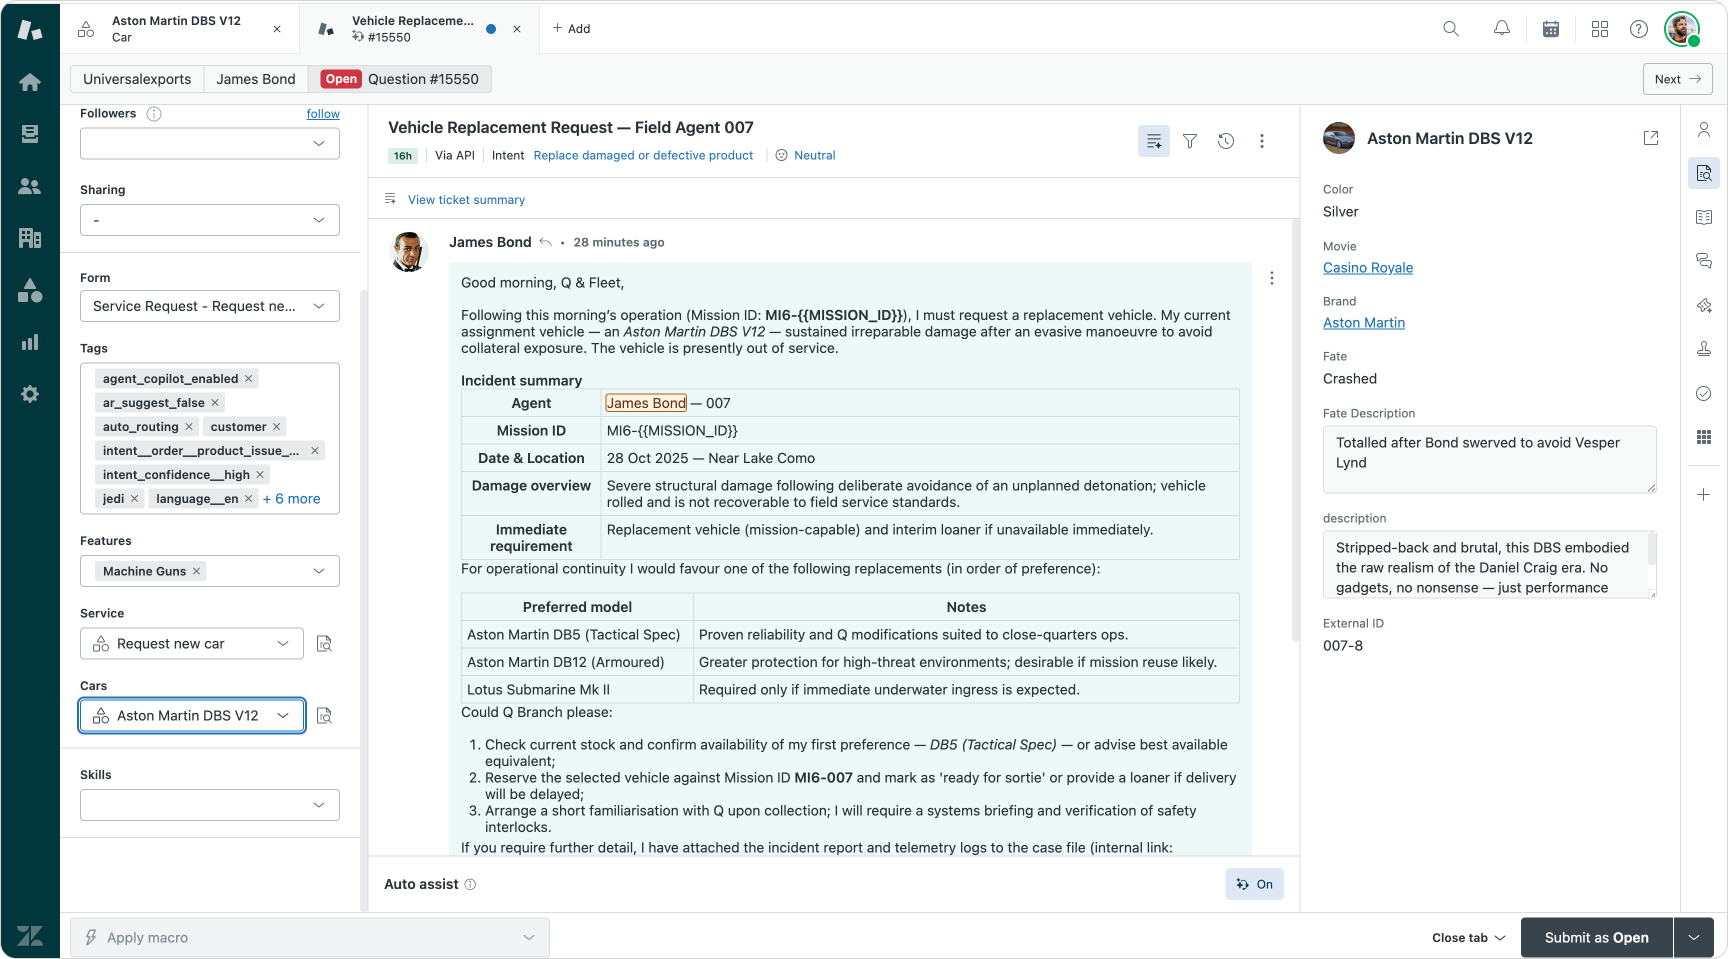
This is where Service Catalog comes in. This specialized version of forms offer a combination of an input form and process documentation. Employees can navigate to a specific services page on the Help Center where they can browse through your teams’ available services.
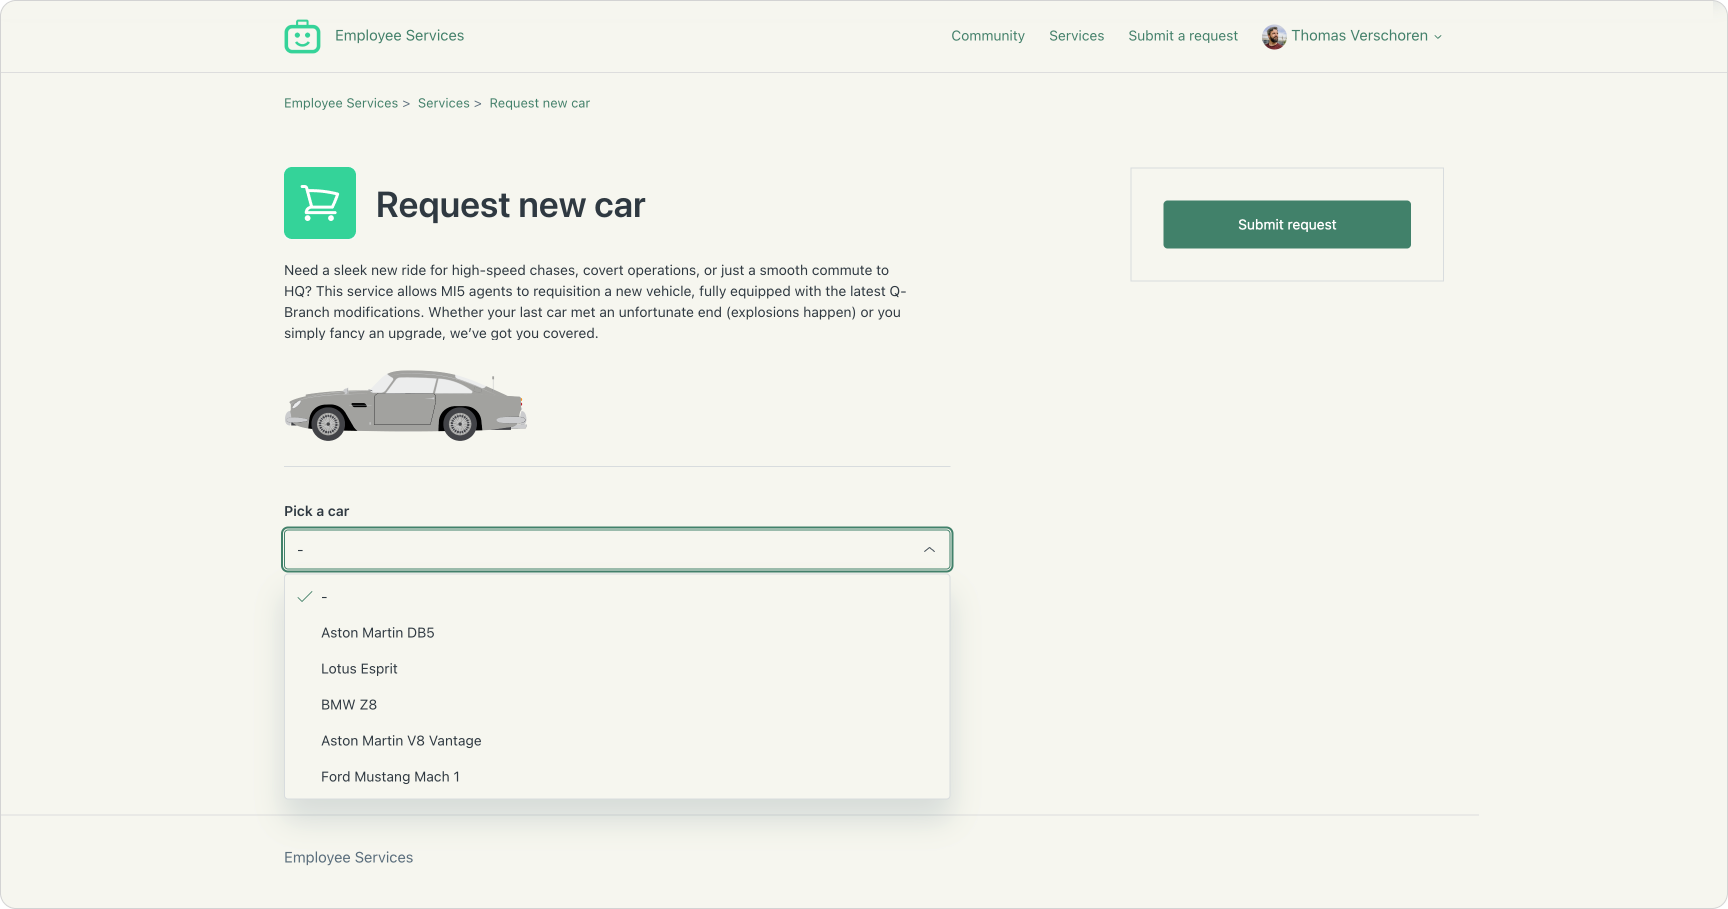
Each service can contain a description with images that describe what’s offered, and a form that allows the employee to request that service. That form exists out of the existing custom fields you’ve already got in your Zendesk instance, but it’s important to call out Lookup Fields here. As you’ll see later in this article, these allow you to embed Custom Objects in your forms, offering employees the ability to select a specific asset, location or other linked data type stored within Zendesk.
By combining description and form into a singular page, employees get both context and the ability to request the service at once. It removes the need to navigate between a help center article describing the ins and outs of the service, and the actual form to do so. If your service does require more than just a short description to explain the rules and requirements, you can also add links to other support pages right within the documentation.
Similar to regular forms, we can use queues or triggers to route these requests to the right teams and agents, and employees can follow up on the status of their requests right from within the Help Center portal.
Migrating to Services
If you’re already leveraging classic forms to offer services it’s worth a look into migrating those to the new service catalog. They offer more context to your employees in a cleaner UI, while retaining the same functionality and trigger or SLA setup in Admin Center with minimal changes.
An easy way to seamlessly migrate is to leverage redirect rules in the Help Center. Once you’ve created your new Service page for an existing form, you can use these redirect rules to automatically load this new page if a customer opens a bookmarked link to the old form.
//POST /api/v2/guide/redirect_rules
{
  "redirect_rule": {
    "redirect_from": "/hc/en-us/requests/new?ticket_form_id=1234567890",
    "redirect_status": 301,
    "redirect_to": "/hc/en-us/services/01JR7KA88MZ0049JG90HK4E92X"
  }
}
Teams and Slack
Email, Help Center and web widget won’t the only channels your employees use. Almost all internal communication these days happens within tools like Slack or Teams. Plenty of companies have already setup #ask-something channels to reach out to IT, HR or other teams.
Zendesk’s AI Agents and ticket flows do integrate with these tools however. This allows customers to reach out via DM to your AI Agent via the tools they’re already familiar with, while enjoying the same automation efficiency the classic Zendesk channels offer.
Departments
At the core of your Employee Service offering lies the teams working to support your employees. HR, IT and Facility teams make sure your team get the support they need to do their job.
Within Zendesk there’s a couple of ways you can setup your teams.
There’s the traditional setup where you have a single brand in your instance. Your IT and HR team each are a group within the environment. Roles are setup such that agents can’t access tickets in other groups, making sure there’s a wall between your HR team and the other agents’ in your environment.
This setup works, but scales badly. Your IT team evolves into multiple groups that manage devices, network, software. Or you implement a tier 1 and tier 2 support group to handle simple and complex questions. Your HR team is split across EU and USA. While routing tickets between multiple groups is part of omnichannel routing, once agents need access to tickets across groups, managing permissions gets complex.
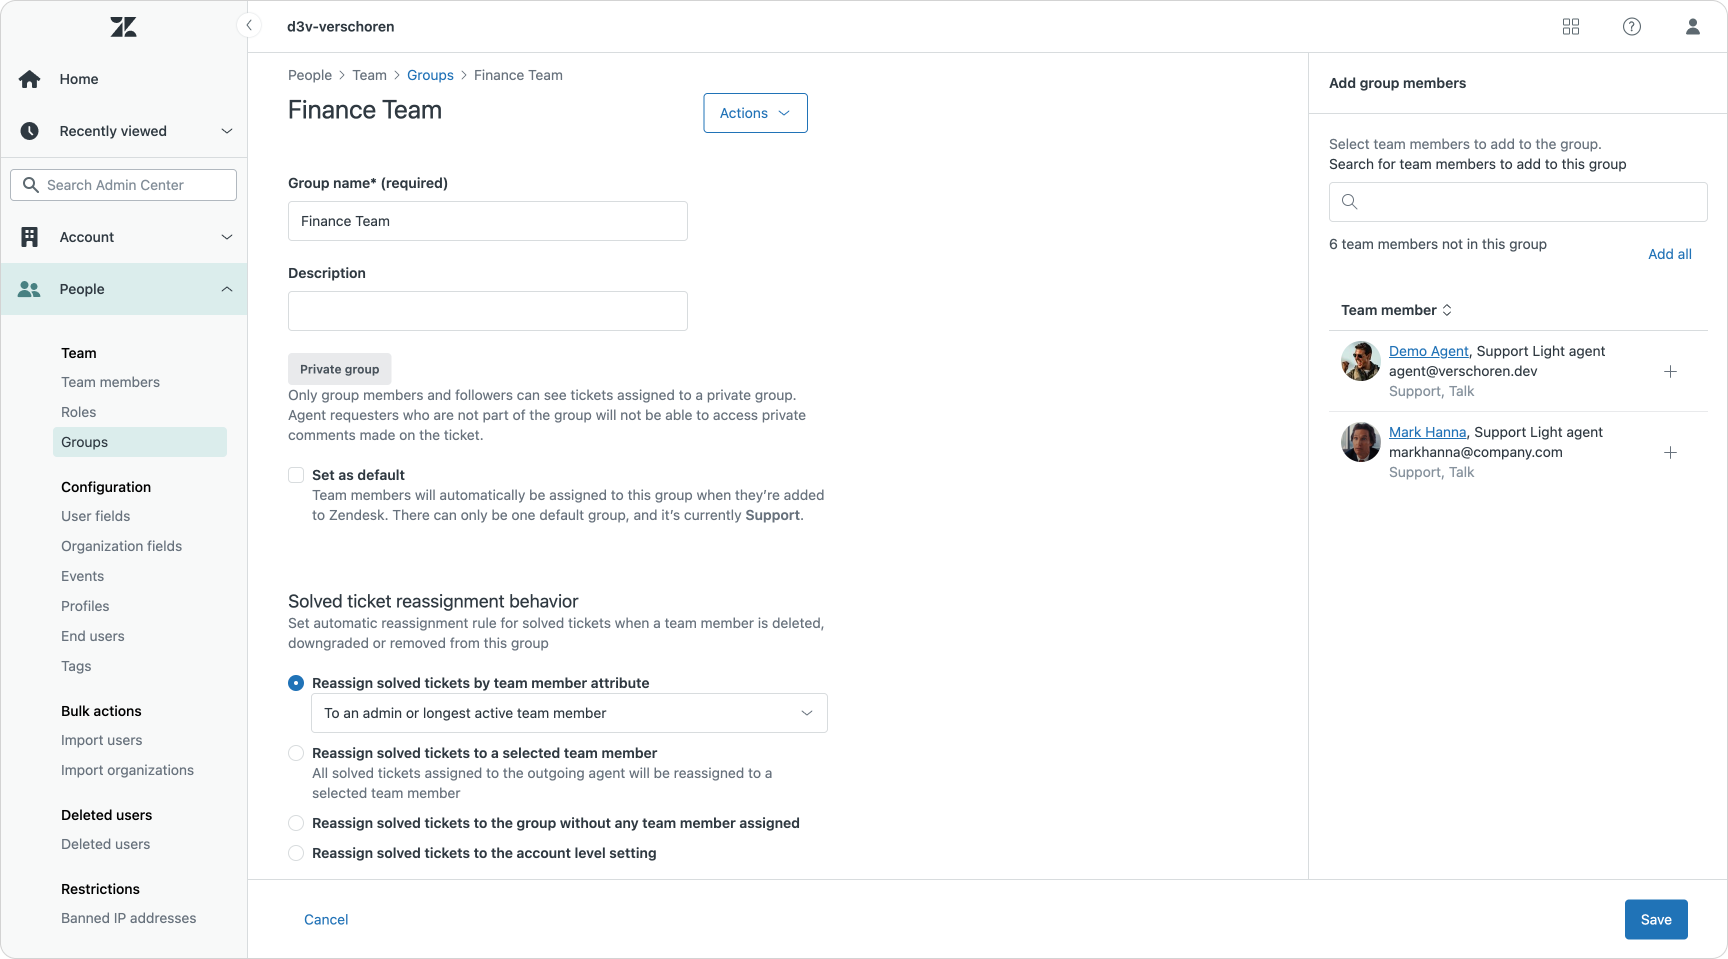
You can’t give agents access to tickets across groups, cause that gives IT access to HR. Adding IT agents to all IT groups is also not a good option cause that will get Tier 1 tickets assigned to Tier 2 agents that are solely in the Tier 1 group to read those tickets.
A solution here is the addition of private groups. These groups further restrict access to tickets, and are excluded from the “can see all tickets” permissions. IT Agents can see tickets across groups, and have access to both Tier 1 and Tier 2 IT tickets, while tickets in private HR groups remain hidden for them.
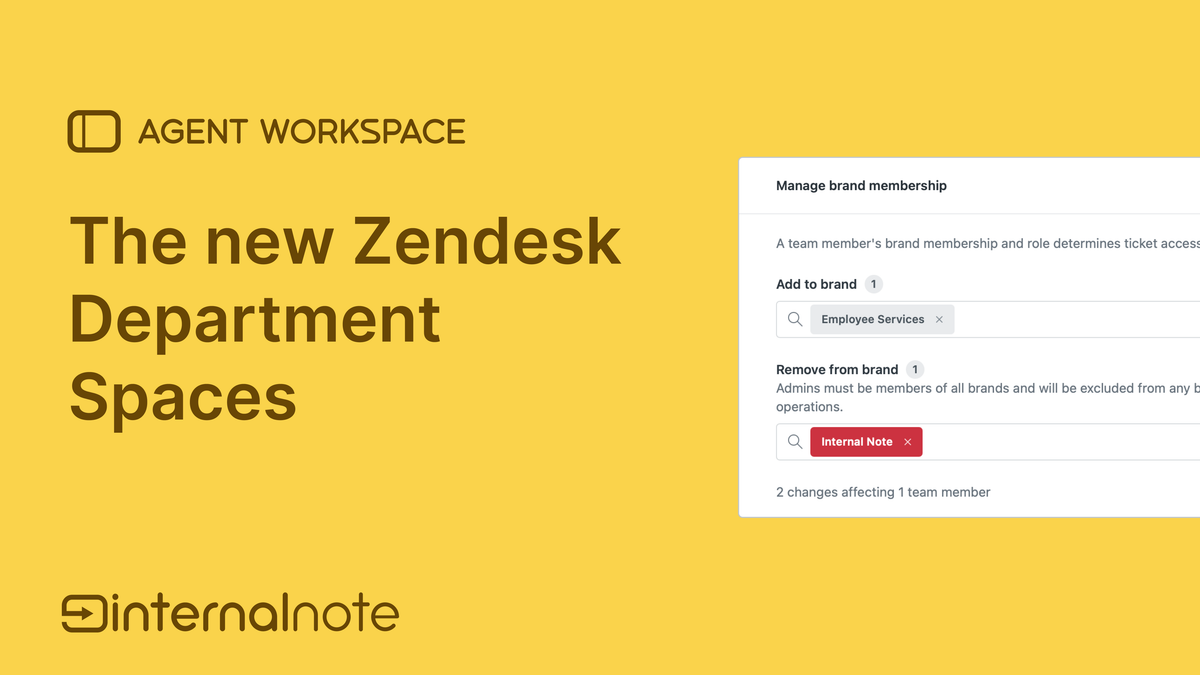
The third, and best solution, here is the new department spaces and brand based access. This new feature moves up ticket access to the brand level. Agents can be assigned to specific brands, and will only see tickets within that brand, regardless of the groups they or the tickets belong too. This will make sure that HR tickets belonging to the HR brand, are never visible to IT agents in the IT brand.
I wrote down a full overview of how these new department spaces work in a previous article on this blog. If you’re interested in deploying Zendesk for your teams, it’s worth a read!
Data Protection
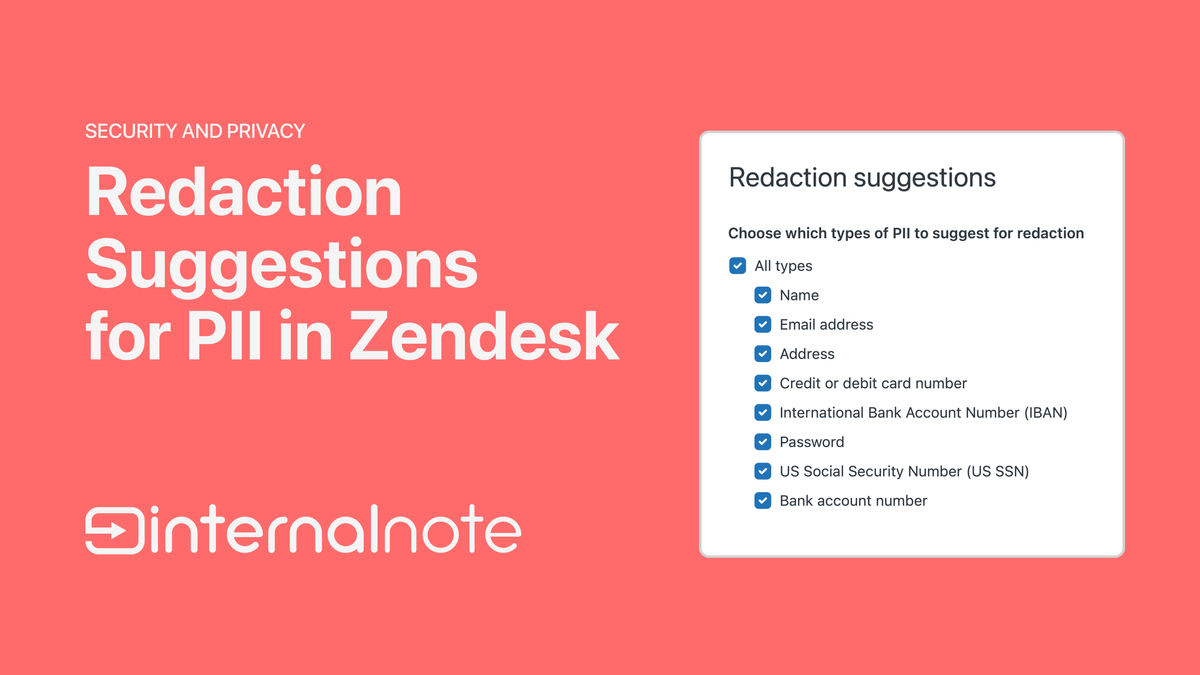
On top of the ticket based access rules, there’s also plenty of other ways to protect data in your environment. We’ve got the entity detection that’s part of intelligent triage, and the redaction suggestions as part of Zendesk’s Advanced Data Privacy and Protection add-on. These will make sure that critical information in your tickets is highlighted, and where needed automatically redacted. Useful in scenarios where you need birthday and address information of a new hire for identification purposes. That info is initially needed, but can, and should be removed from your tickets once processed or stored in the proper HR platform.
The upcoming End User field permissions option (now in EAP) will take this one step further by making it possible to hide specific user fields for some agents. That way HR can see address and other personal information, while IT only sees the role and manager of a certain employee.
Permission doesn’t stop at the agent level. There’s a whole set of custom roles for admins and team leads and agents alike that make sure they can only see, edit or delete specific parts of your Zendesk environment.
Agent Workspace
After an employee creates a request there’s two options. Either it’s resolved via an AI Agent, and we end up with a closed AI Agent ticket in Agent Workspace, or the ticket requires someone from your teams to actually handle it. Especially in cases of services like onboarding or IT, lots of these steps still require a human in control.
Zendesk’s Omnichannel Routing routes the tickets to the right team and agent based on type, content, employee or language, taking the workload, skills and availability of agents into account. Combined with WFM this ensures a fair balance of work across your HR and IT teams, while still making sure tickets are handled fast and efficiently.
Agent Copilot
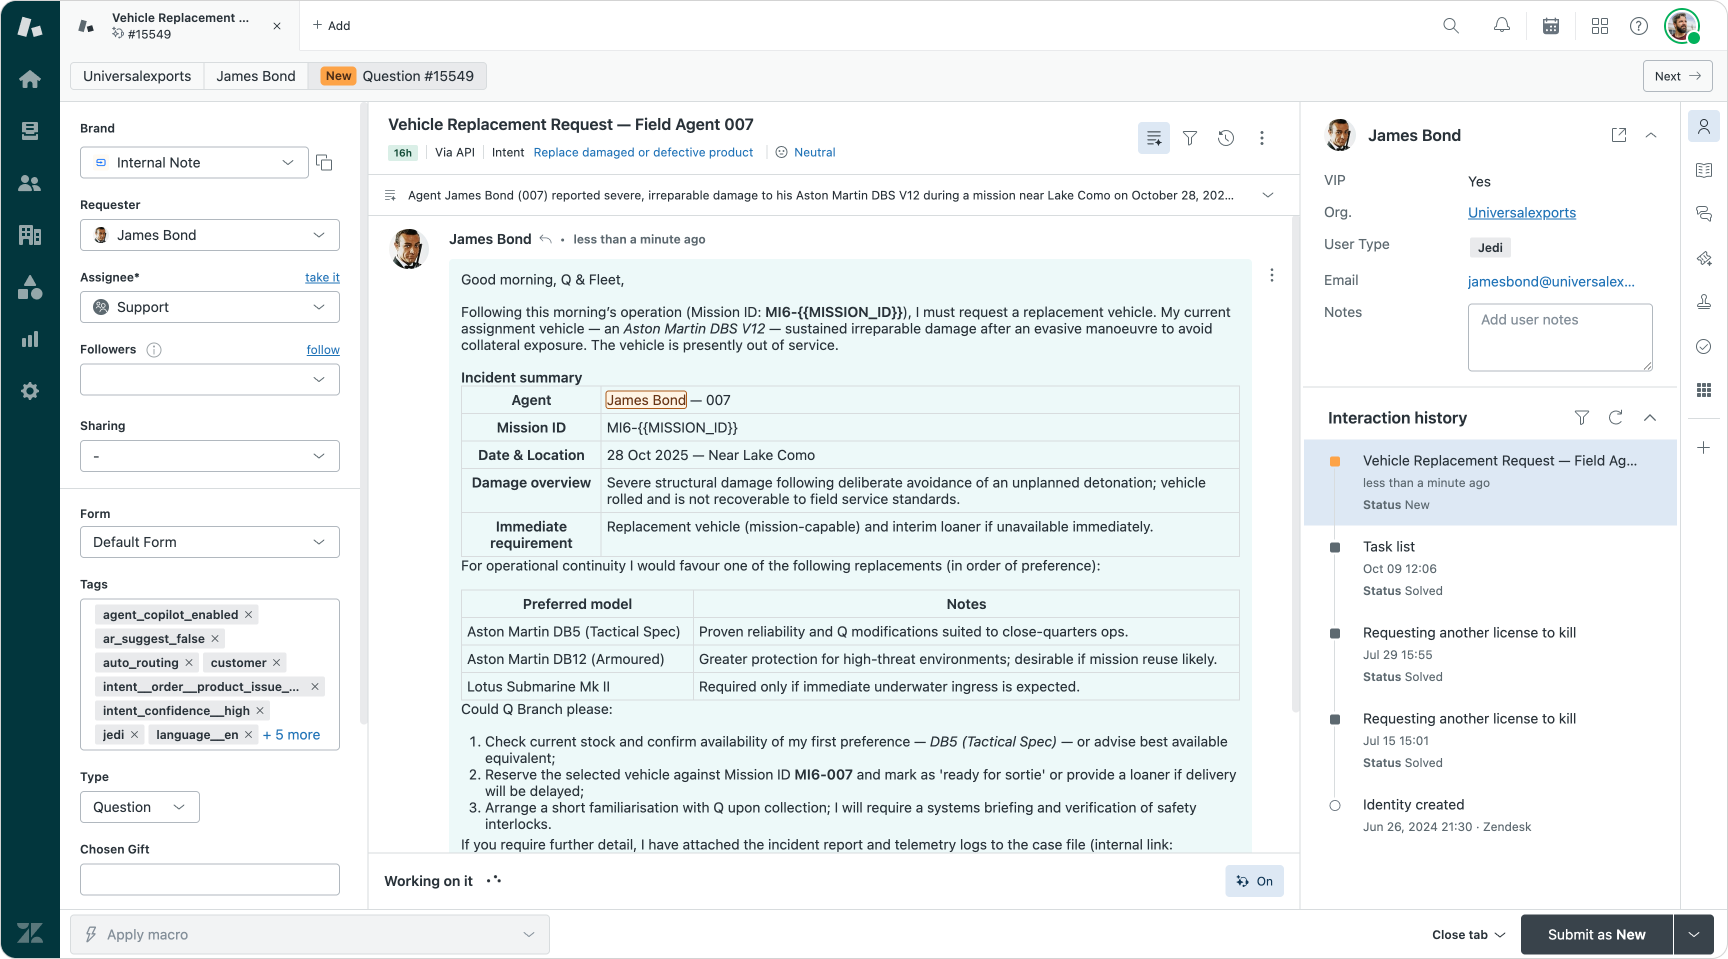
For those who have access to Agent Copilot, tickets get automatically tagged with the right intent (what is the ticket about), sentiment (how does the employee feel), and entities are highlighted in the conversation.
Entities can be things like buildings, devices, specific services or things as simple as the name of a holiday or department. Now that entities can be linked to existing custom fields they offer an easy way to make sure agents can see what a ticket is about at a glance.
Agent Copilot does more than just tagging though. It lists similar tickets in the instance. These are especially useful for unique scenarios. An employee with a very unique combination of local law and parental leave might require the HR agent to dive deep into documentation. But if a similar case was handled in the past, changes are big that ticket will be listed right next to the ticket. The agent can read the previous conversation, or refer to the ticket summary to quickly see how to handle this request.
Indexed knowledge is also available in Agent Workspace. The knowledge panel shows Quick Answers and relevant articles, while the suggested replies render comments for the agent based on knowledge articles, macros and previous ticket replies.
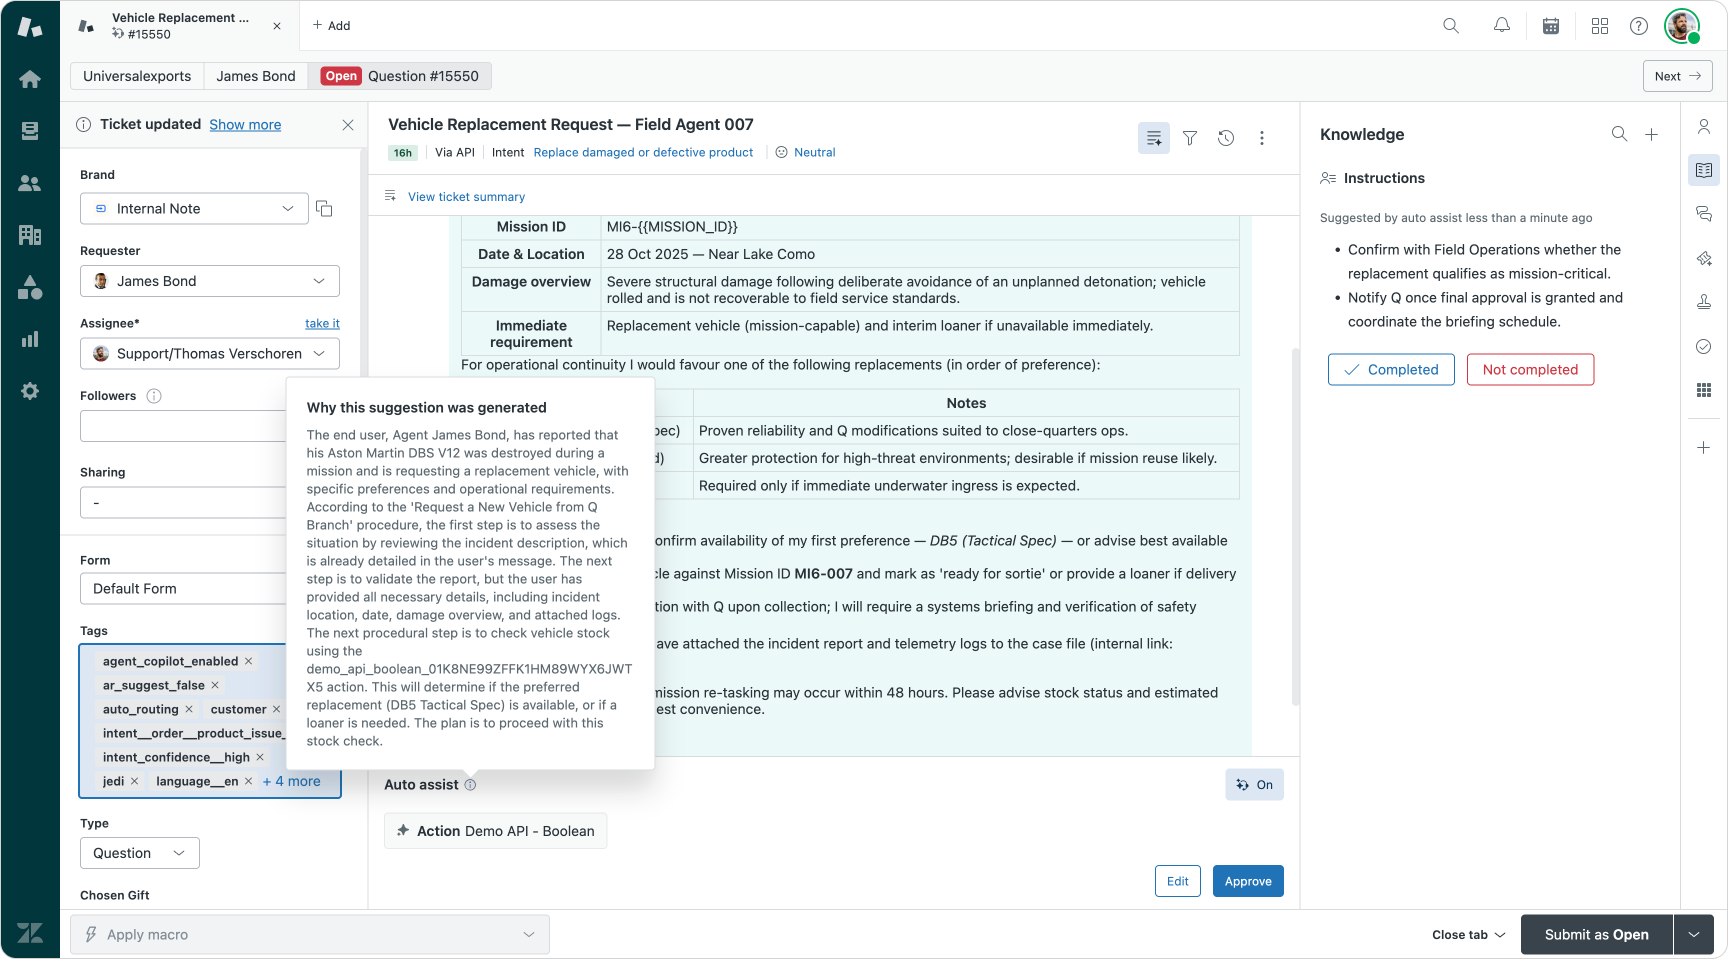
The real star of the show are Agent Copilot’s auto-assist procedures though. These allow you to store the entire process for e.g. new hires, laptop replacement or providing access badges right within Zendesk. You can define required information, list the steps to take and provide information for the customer. Auto-assist will take this process and check if all required data is there, and if not as the customer for that information. It’ll suggest next replies and next best actions for the agent.
Agents are always in control though. While Agent Copilot can automate lots of steps, and can suggest next best actions and replies, an agent can always modify the comment, ignore the suggested steps or take full control of the ticket.
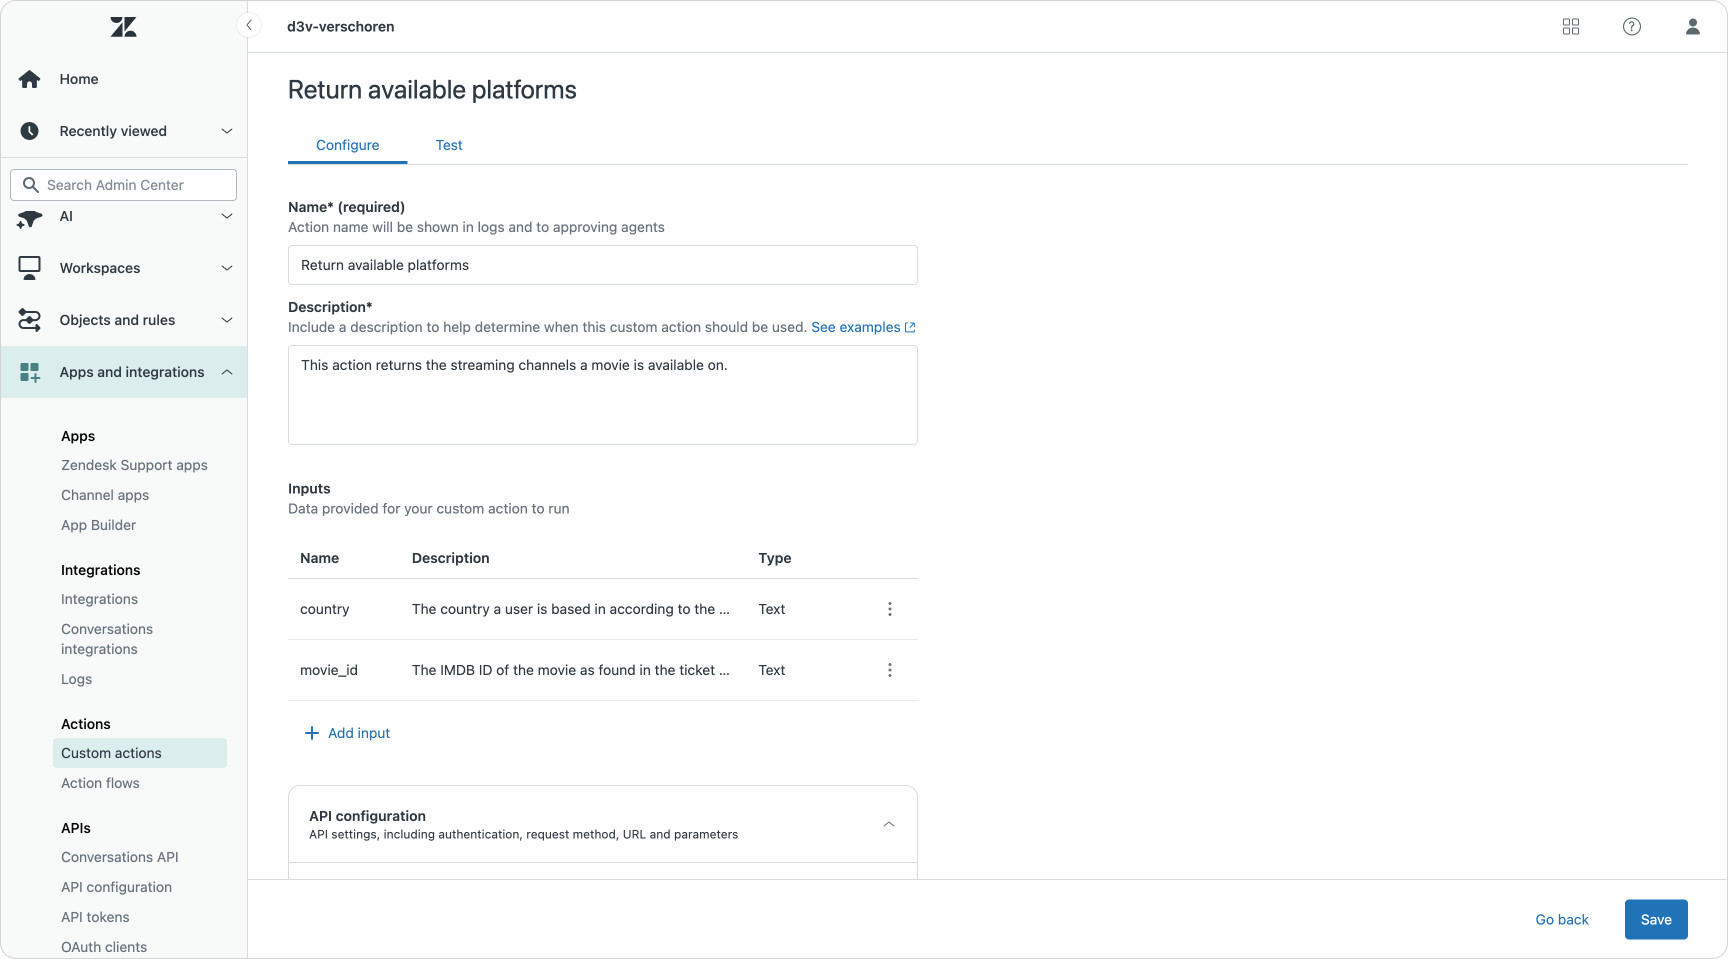
Action Builder and Custom Actions
Additionally, on top of suggestion replies Agent Copilot can also take action. It can update ticket fields. Change statuses. Execute macros.
You can embed custom actions that interact with external platforms like Workday, Jira or JAMF. This way you can take the provided information of a new hire and push it directly into Workday. Or if an employee moves houses, they can let HR know about the new address and an Agent Copilot procedure combined with a custom action can update the address in your Employee Directory.
There might be scenarios where there’s no APIs available. The ticket requires a physical action to be completed like shipping a laptop. Or the tool the agent needs to input the data in has no API. This is where Instructions come in. These are manual steps an agent needs to take that show up in Agent Workspace at the appropriate time. Once completed, Agent Copilot takes over again.
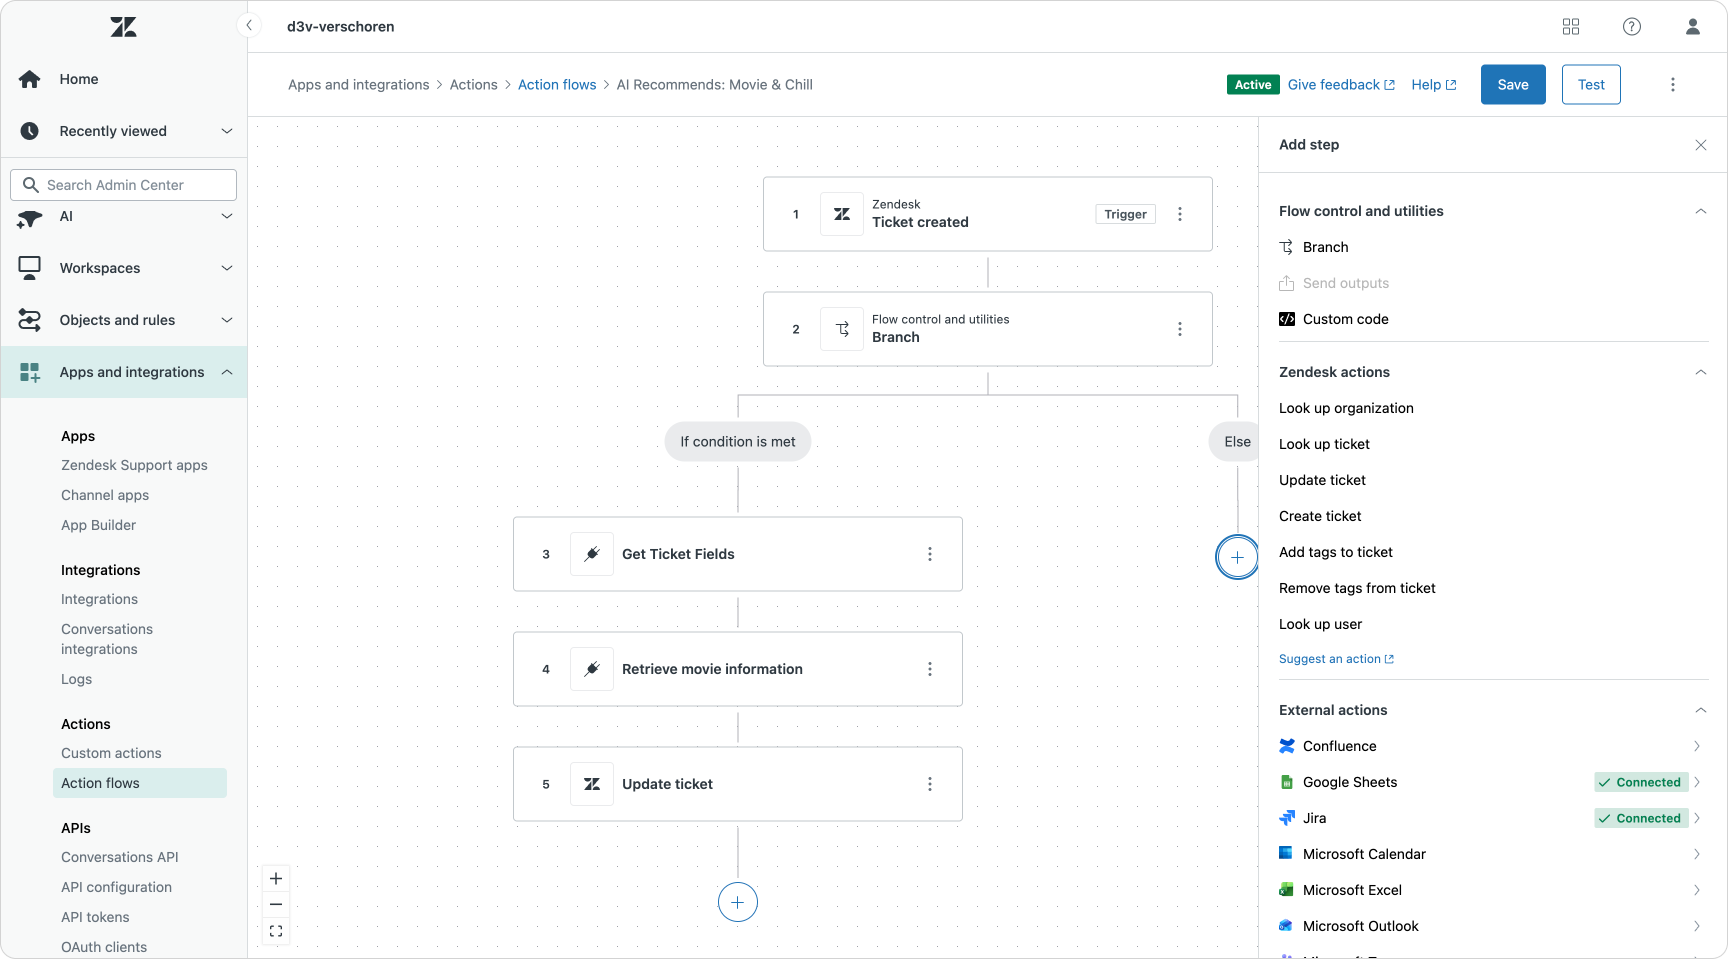
Some processes are a bit more complex than mere direct API integrations. There’s conditions. There’s data that needs to be pulled in from other tools and compared before you can move forward. These processes can be build by combining Procedures in Agent Copilot with Action Builder. Action Builder allows you to build out visual flows that can be called from within an Agent Copilot procedure, or can be executed automatically by defining specific ticket, user or organization update conditions.
You could use them for a laptop replacement flow. Where we first check eligibility by referencing our IT Asset management tool. If the employee is eligible we can check if their model is in stock. If it is, we can create an alert for logistics to ship it to the employee. If it isn’t we need to notify procurement to order new stock and alert the employee that there will be a delay. Action Builder’s flows can be used to build this flow, combined with custom actions that call our Asset Management platform, and platform integrations like Slack to notify the Logistics and Procurement teams.
Productivity Suite: Side Conversations, Tasks and Approvals
So far most of the elements listen in this article have been existing Zendesk Suite capabilities with small or bigger tweaks and releases to accommodate the Employee Service use case. But what makes this Suite version really tick are three productivity features that were build as part of the Employee Service initiative.
Approvals
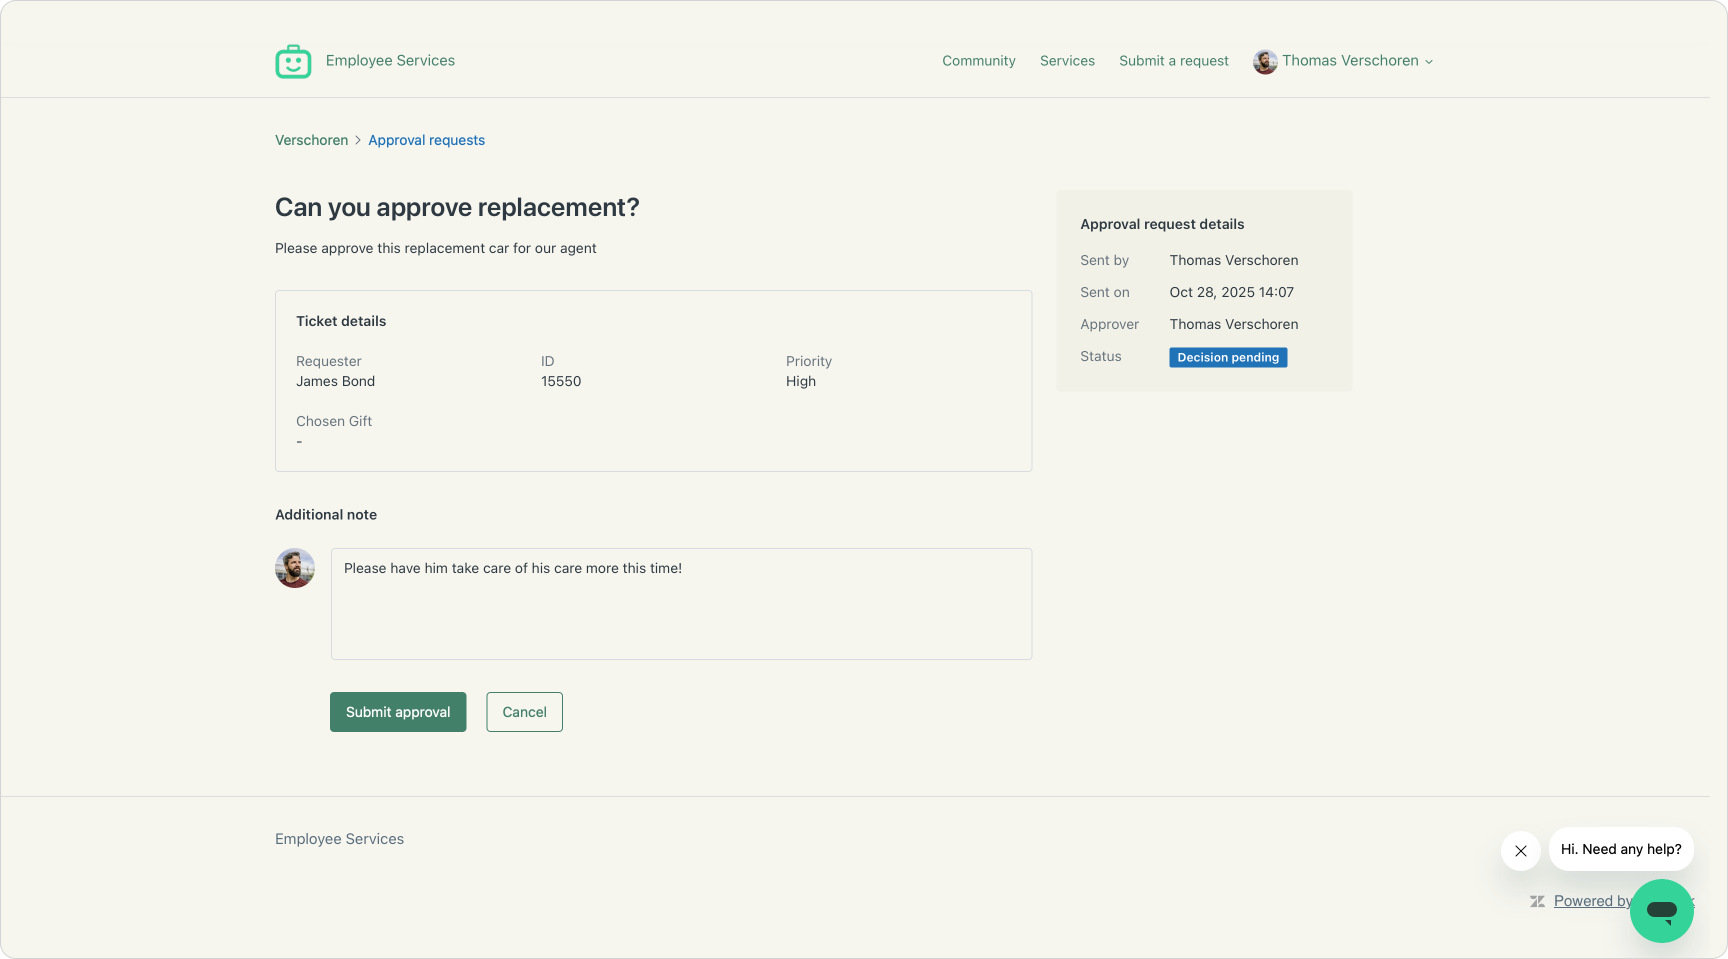
Approvals are a new capability of Zendesk that allows agents to request approval for an action from other agents, end-users or other employees in the company.
It works as follows:
- An agent works on a ticket and he needs approval. E.g. in an IT scenario he needs approval from a manager to replace a laptop. He selects approvals in the ticket sidebar, tags the manager, adds a message and reference to the ticket, and submits the approval.
- The manager receives an email and can approve the request in either the Help Center or Agent Workspace. This approval (or decline) shows up in Agent Workspace, and can be used as the basis for triggers or other automations.
It’s a core part of any process, and having this natively available in Suite makes a major difference for any workflow builder. Since the EAP announcement at Relate earlier this year, we’ve seen a couple of improvements to this capability already.
Approval statuses now show up in Agent Home and in Analytics reporting. We can manage who can add or remove removal requests. And we can prevent tickets with outstanding approvals from being solved.

What’s missing though are the more advanced features available in Marketplace solutions like Sweethawk’s Approve app. There’s no group approval request. There’s no way to automatically request approval, or to approve tickets based on specific ticket conditions. There’s also no way to set or request approvals via API. But these are not showstoppers. They’re more advanced features which, I assume, will arrive as the solution matures.
Tasks
The second new featured added to Zendesk’s productivity capabilities is a native Tasks manager. This new capability allows you to add a list of predefined tasks to a ticket. Agent can check off the steps in the task list as they go through the process of handling the ticket.
For now the feature allows you to define task lists, each of which can contain multiple tasks. A task has a title and an optional description. Tasks show up next to tickets in the context panel, and any agent on the ticket can check off the items in the list.
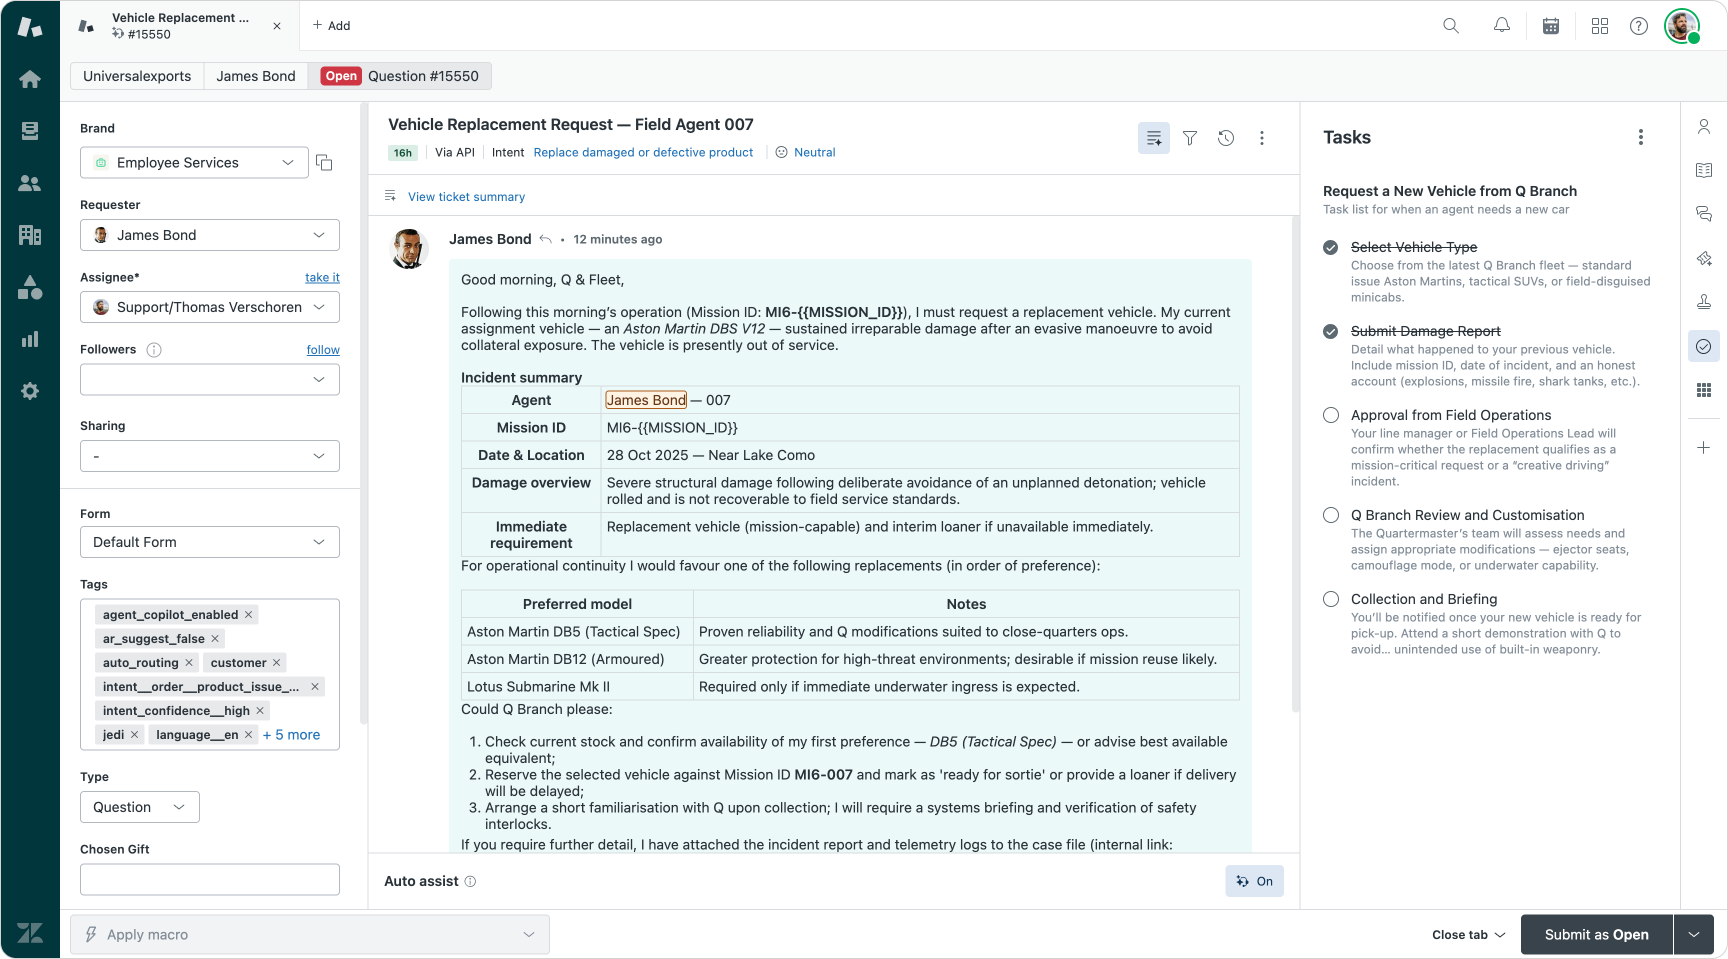
While this is a welcome addition to the platform, this first EAP release is quite basic. There’s no way to react to tasks being added or completed in any automated way. They don’t interact with triggers or action builder, tasks can’t add tags to the ticket and updates don’t show up in the ticket audit log.
There’s also no option to automatically add a task list to a ticket based on conditions, or a way for agents to add ad-hoc tasks to tickets. Tasks can’t be assigned. They can’t be made mandatory for closure. They can’t be used to create child tickets or side conversations. They don’t show up in Agent Home. There’s no due date or other management feature. They can’t interact with Agent Copilot instructions, and seem to live outside of the ticket lifecycle.
If the above list feels long and unfair to judge an EAP, you’re right on both accounts. For now I would still recommend to look at known players in the Marketplace, but as this initial MVP evolves and my wishlist becomes a feature list, it’s certainly worth revisiting (and I will).
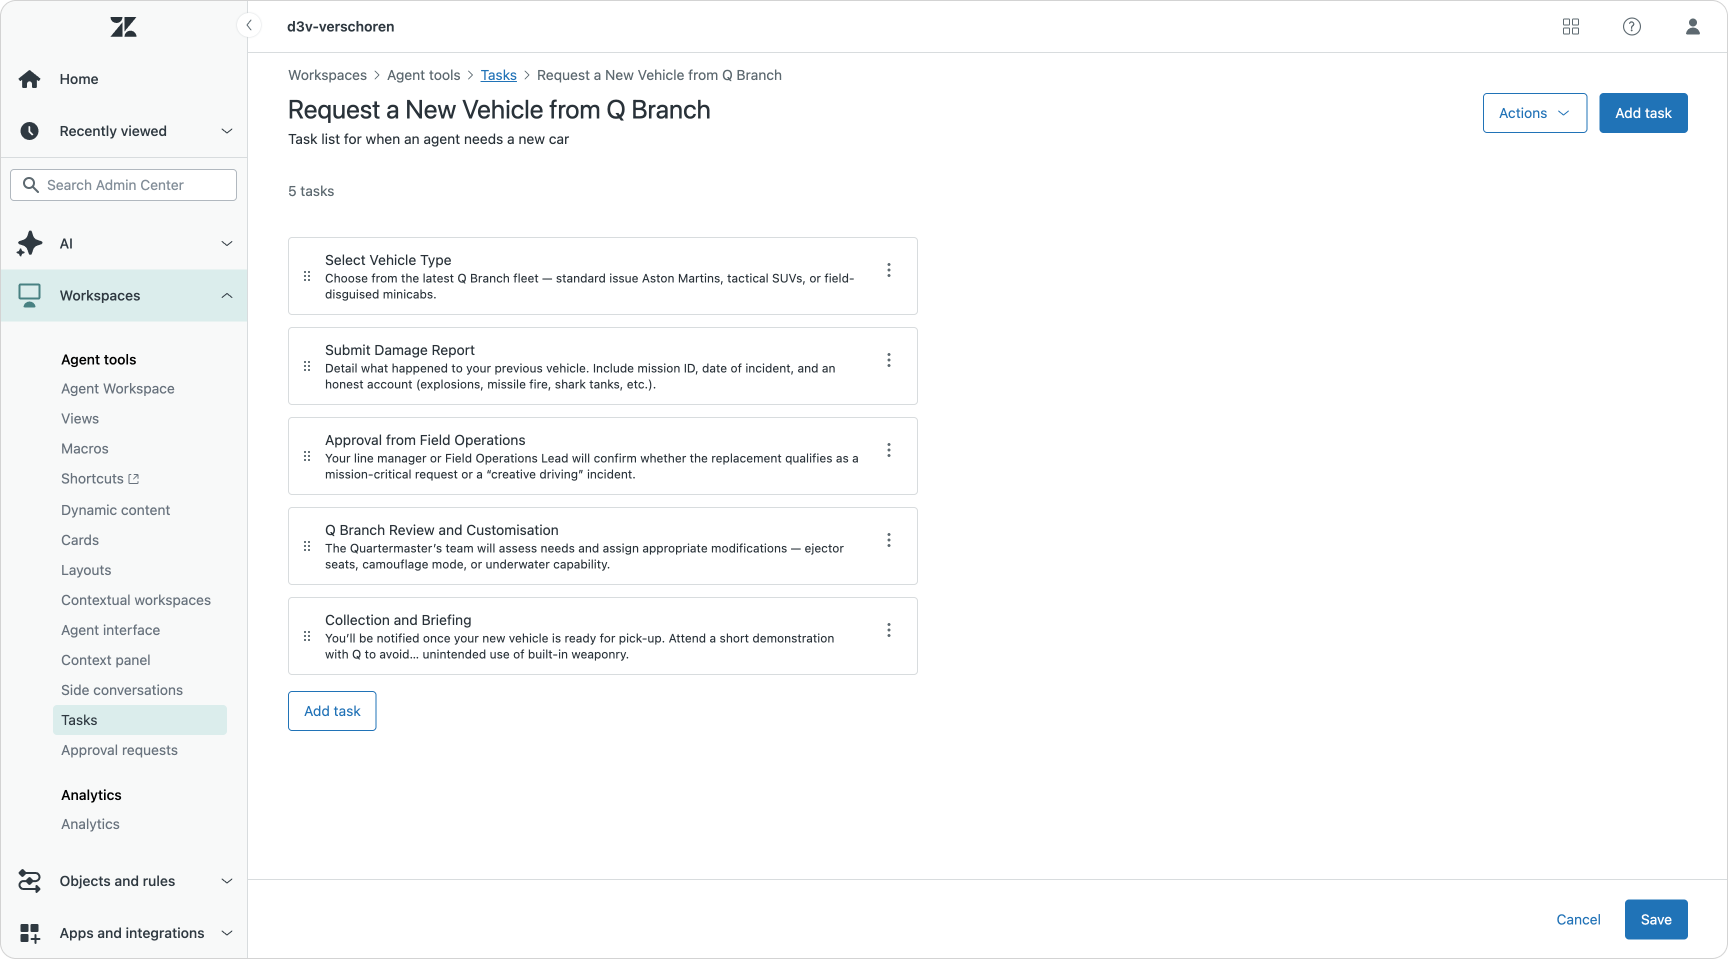
Side Conversations
The third element of what I like to call the productivity suite is Side Conversations. Originally created as an email to send emails from Zendesk related to the ticket you’re looking at, it’s now become a way to link all related conversations to a ticket. It supports email, but also supports child tickets and business tools like Slack and Teams.
Child tickets allow you to create a linked ticket that can be assigned to another agent in your team, or another department altogether. It’s useful in scenarios like onboarding where HR controls the entire process, but where IT needs to provision email accounts and laptops. The HR agent can create a child ticket manually, or we can automate this process via trigger or API, and the newly created ticket shows up in the IT queue just like any other ticket. This allows for some powerful workflow automation and makes sure the entire process is linked to that one ticket.
Similar, Slack and Teams integrations allow agents to reach out to colleagues in those tools. Any comments on the escalated question are visible in Zendesk, allowing for a smooth collaboration across tools, while each team can keep working in the tool they prefer.
I’d love to see deeper integration with Agent Copilot, Tasks and Action Builder here though. Adding a child ticket as part of an action flow, getting reply suggestions within the side conversation comments or automatically creating a child ticket linked to a task are just a few ideas.
Data and Custom Objects
So far we’ve seen how we can provide omnichannel support to employees. How we can leverage AI Agents and Actions for customers and agents to automate the process and how productivity tools like approvals and tasks can further improve workflows.
But while documentation and procedures are key elements to resolve tickets, there’s a third element that is part of an agents’s context and that is data. In traditional customer care we’re talking products, orders, bookings, contracts.
In an Employee Service context this means buildings, laptops, smartphones and signed documents. If IT needs to repair a laptop, they need to know who has which device. When facility needs to repair a coffee machine, they need to know in what building or room that machine is located. And if HR gets a signed document they will need to store that somewhere.
There’s plenty of ways to handle these scenarios. You could go to the marketplace and search for integrations with your cloud storage of choice, your IT asset manager or HR workforce tool. But not all data lives inside a proper tool. More often than not that list of buildings and rooms is just an excel*.***
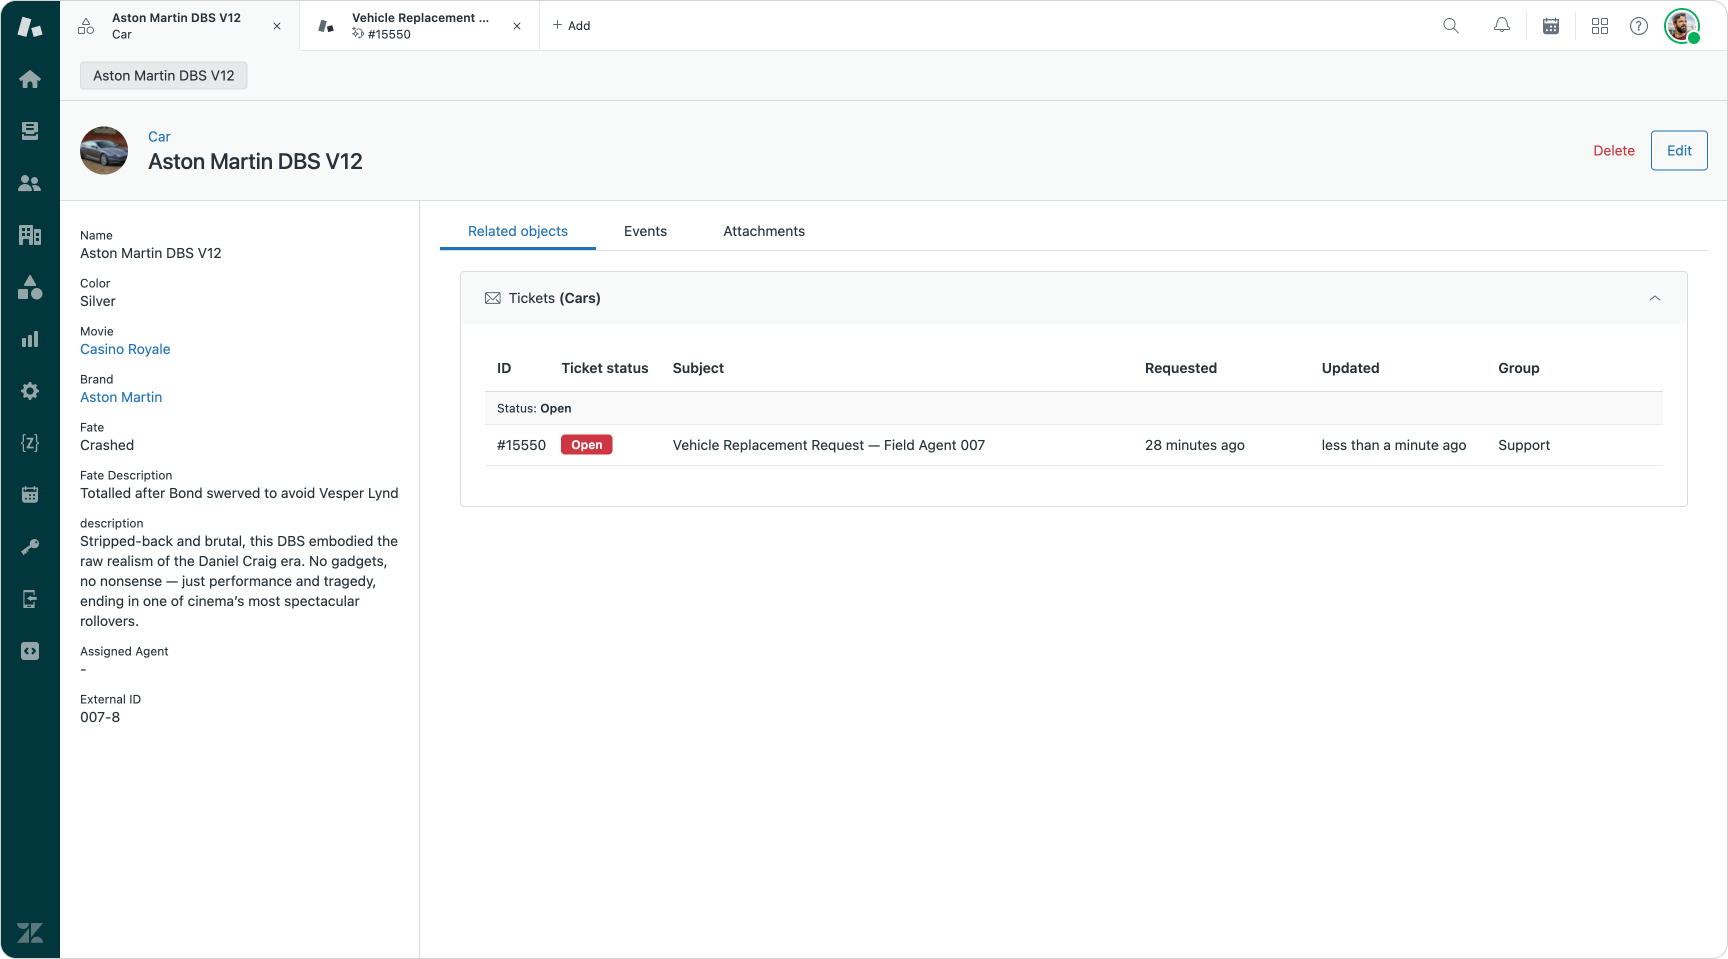
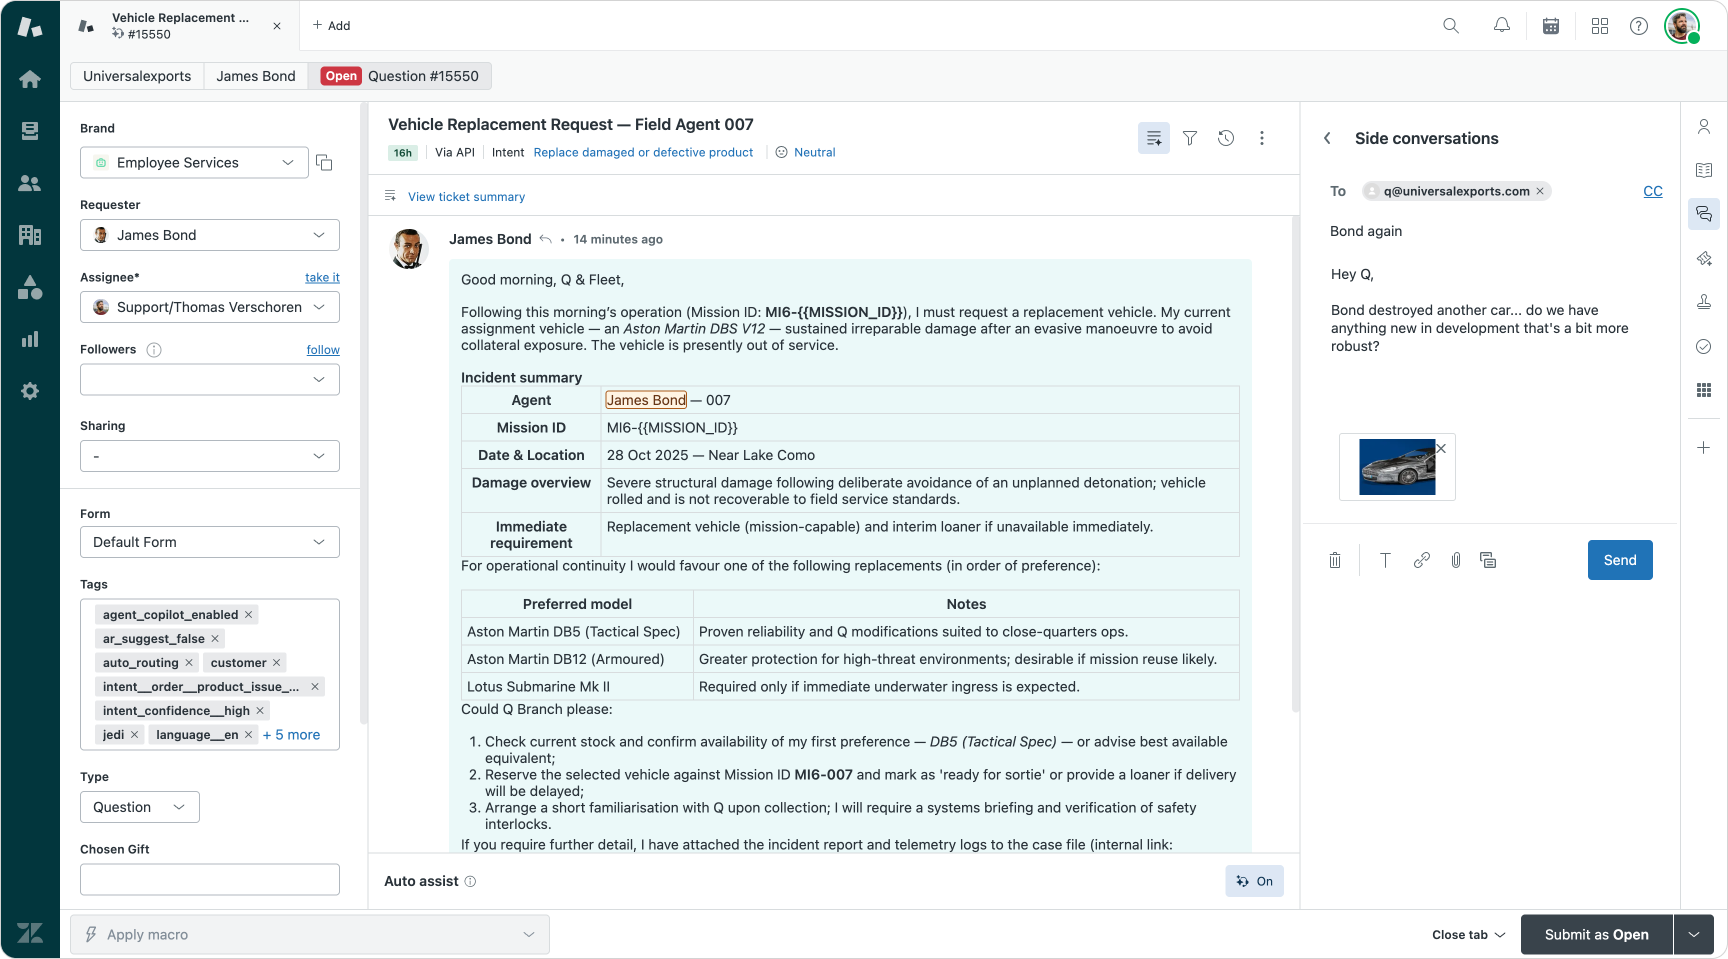
This is where Custom Objects come in. This extension of the Zendesk platform allows you to, well, extend the regular data structure of users, tickets and organizations with custom objects of your own. You can add an object that stores locations and buildings. Or an object in which you import all your coffee machines and water dispensers. Or you can use an API to keep your records in sync with your asset manager of choice.
Once your data lives in Custom Object, we can integrate it with tickets, forms and service catalog via Lookup Fields. Lookup Fields are linked fields that show users and agents a dropdown list of your object records. With the new filtering capabilities that list can be restricted to only devices a user owns, only coffee machines with an active service contract or only the vending machines at a specific location.
Records can also be used as part of triggers and automations. This can be done from the view of tickets and records alike. From a ticket standpoint we can automate an escalation via side conversation to a vendor if an is issue is created for a specific coffee machine. Or from a record perspective we can notify IT if a spare laptop is assigned to a user. And while these concepts might seem complicated at first, if you write down your processes and see a step where agents manually act after updating records, that’s the moment where triggers come into play.
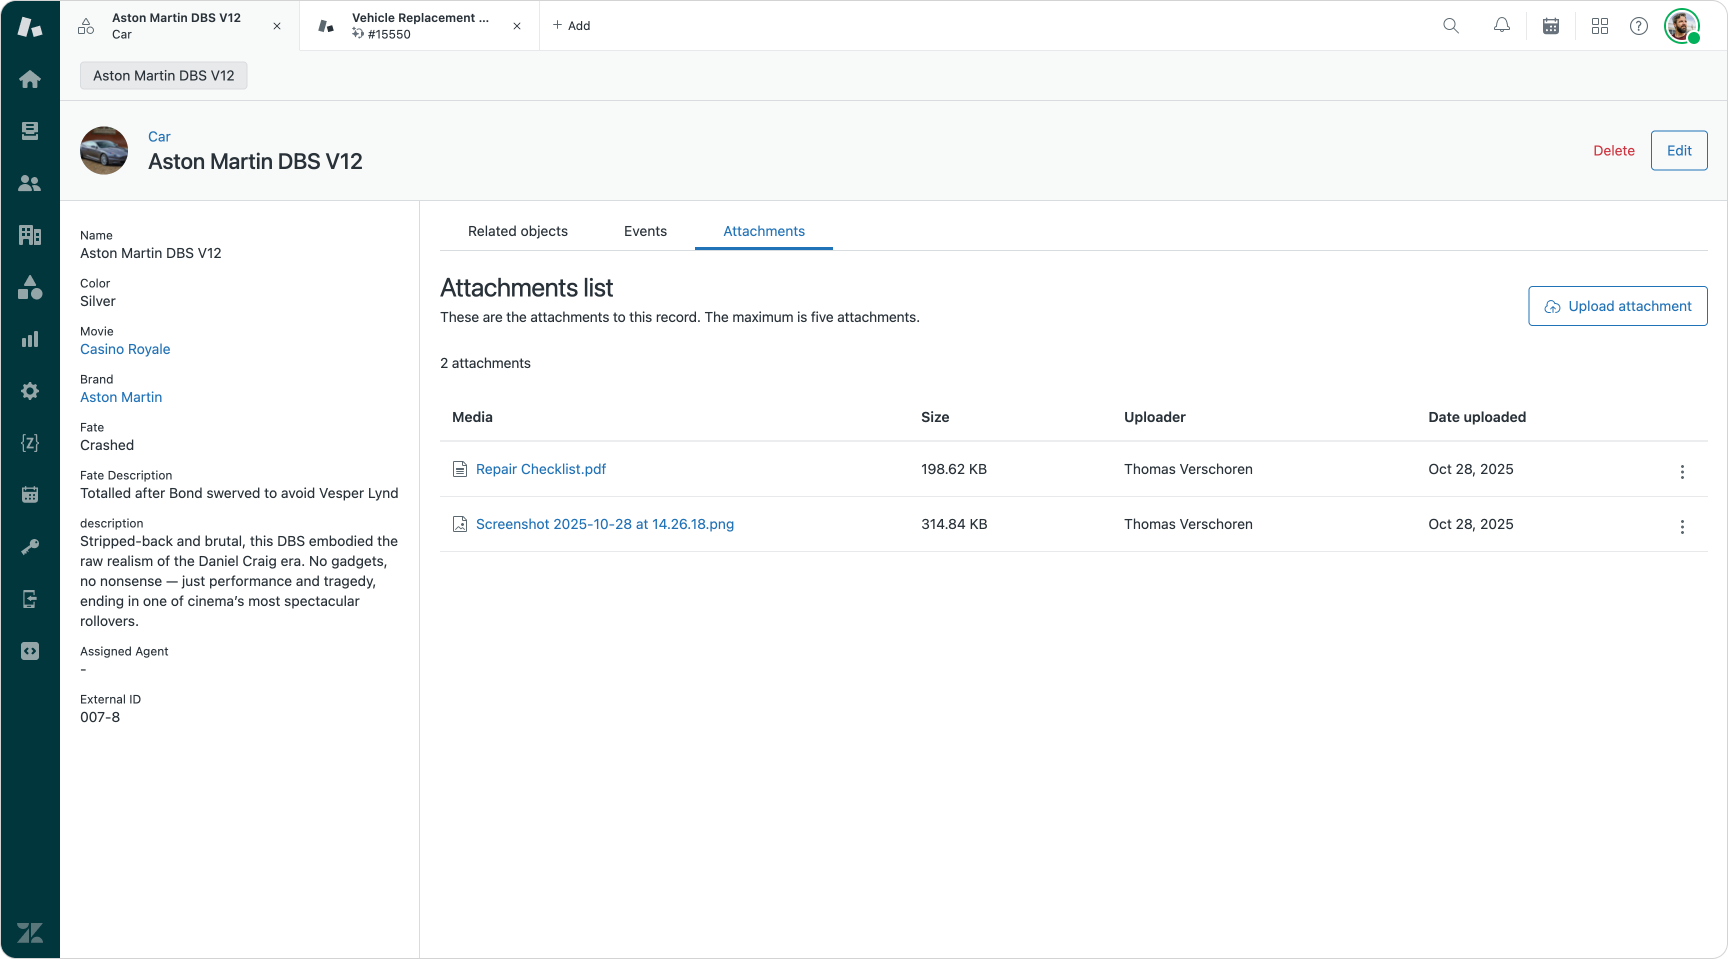
Since last month Custom Objects can also store additional attachments. You can add a hero image to each record that shows up in the context panel and record viewer. Or you can attach up to five documents to each record, useful to store service contracts on each record, add recent repair documents, or in the case of HR signed documents, contracts or other material.
Since those attachments might be confidential in nature, there’s strict access rules you can configure on who can see, edit or delete which object, or specific object record. This is done based on a combination of user roles, and unique properties of each record. E.g. the ‘Contracts’ record is only visible to people in HR, while the Facility agents in the Antwerp office can only see Facility assets and contracts for that location.
Future
As you can see Zendesk for Employee Service is a powerful version of the Zendesk Suite. It offers a range of capabilities as part of the platform itself making it fit your needs right out of the box.
Action Builder and actions for example offer easy ways to connect to Salesforce, Jira, Slack, Teams to get and set data. And as Action Builder evolves, this list of native plugins will only grow, making automated collaboration across tools and departments easier and easier.
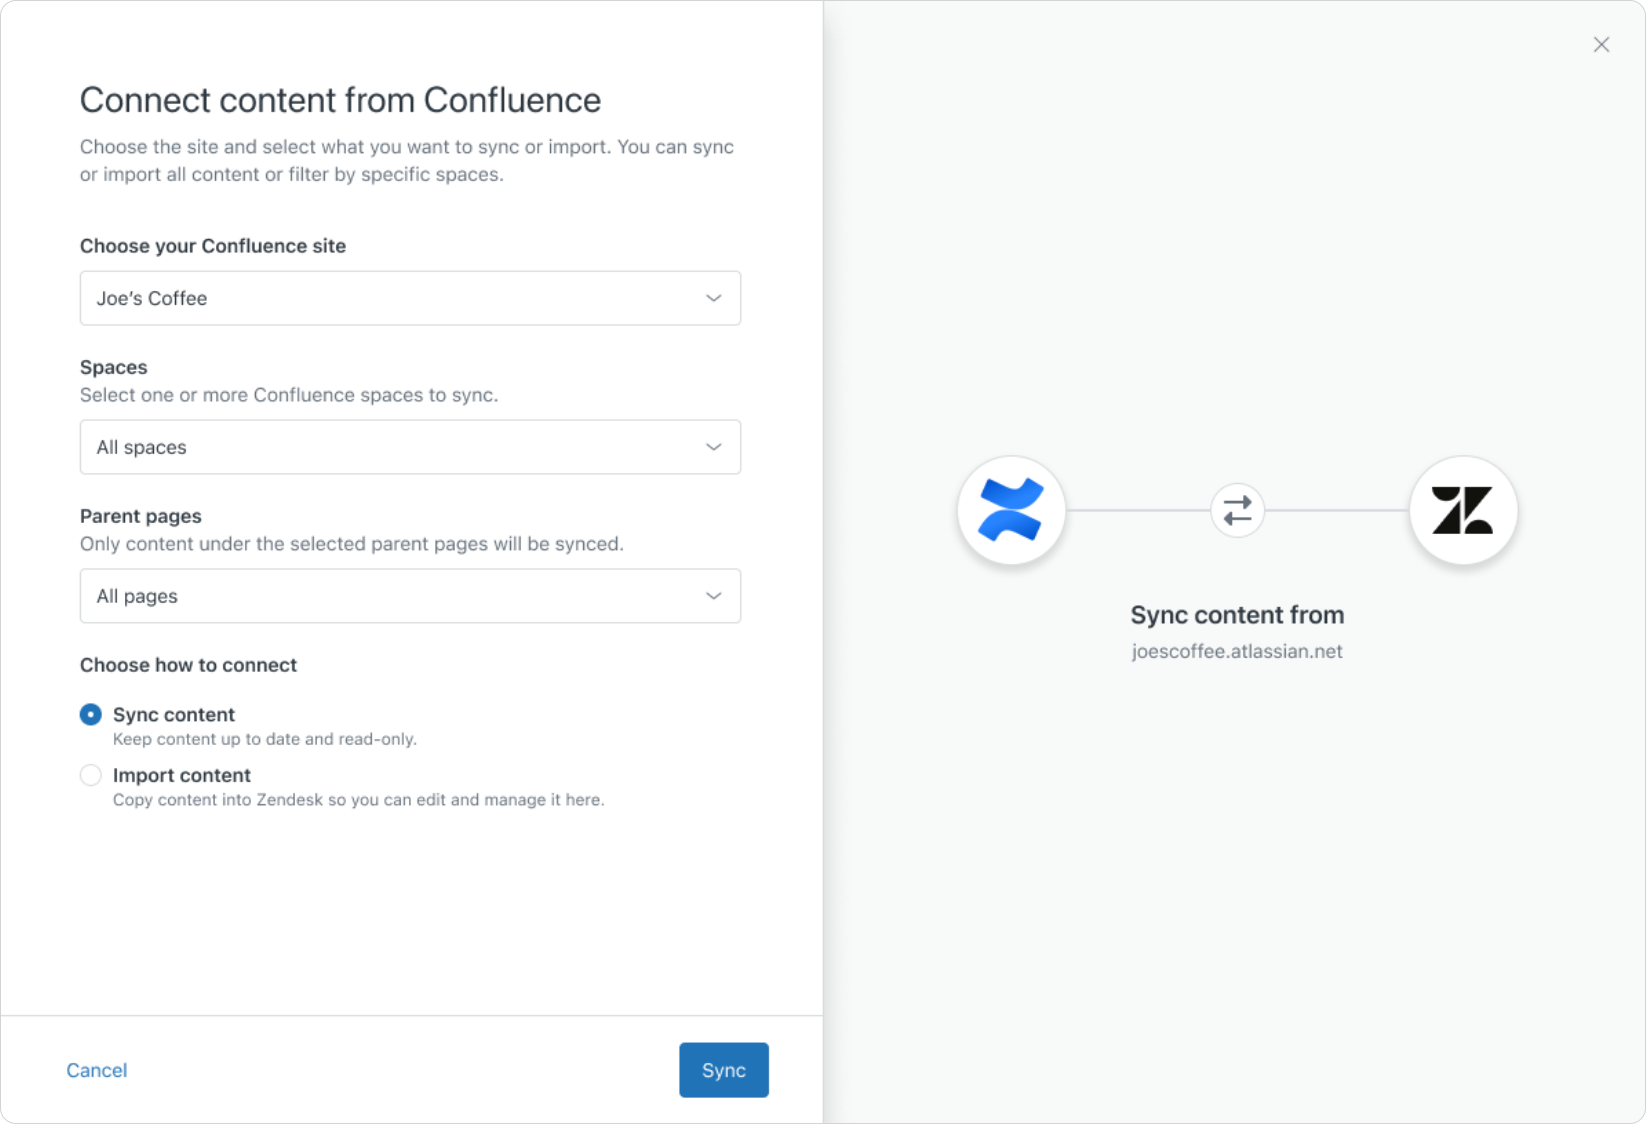
While the Zendesk Help Center offers built-in support for support articles, process documentation and service descriptions, chances are big not all your documentation will live in that tool. IT might document their releases in Confluence, while tools like Slack or Teams contain a lot of ad hoc information. Knowledge Connectors, like the recently released Confluence connector, will allow you to index (or import) the documentation that lives in those tools and make it available for AI Agents, Help Center search and Agent Copilot.
At the recent AI Summit Zendesk also showed off a new IT Asset manager that will be part of the platform. This manager will allow you to create or import IT assets and use them within Zendesk as part of your ITIL and ITAM workflows. It’s only just been announced, and first EAPs are planned for later this fall. For those that currently use Custom Objects as a custom build asset manager, this is great news. I’m always a fan of turning custom builds into native capabilities. It takes a way overhead and can often integrate deeper with the platform.
Conclusion
So, that’s a comprehensive overview of what’s possible today with Zendesk for Employee Services. A powerful set of automation capabilities focused on your employees.
In the next few weeks I’ll be publishing specific deep-dives on the new Tasks app, a deeper overview of all the new Custom Objects capabilities and a look at the renews Knowledge Connectors for federated search and Confluence.
So if you’re interested and are reading this on the website, go click that subscribe button top right. Internal Note is completely free and full of weekly Zendesk updates and insights!