Zendesk Security Checklist
One of the big Trends for 2024 is the idea that security no longer is an add-on but should be seamlessly incorporated throughout the customer journey. To get started the right way, I've written a Zendesk Security Checklist. It's a practical approach to improve the security of your Zendesk instance.
Zendesk Security Checklist

On this page
One of the big Trends for 2024 is the idea that security no longer is an add-on but should be seamlessly incorporated throughout the customer journey.
To get started the right way, I've written a Zendesk Security Checklist. It's a practical approach to improve the security of your Zendesk instance.
Email, Web and DNS
Zendesk comes secured out of the box with a fully validated set of email addresses and domains to get started. In my case that would be [email protected] for the support address, and a https://internalnote.zendesk.com/hc domain for my Help Center that's secured with an SSL Certificate.
However it's best practice to replace those with email accounts and a Help Center domain that are based of your own domain name. E.g. [email protected] and https://support.internalnote.com. Not only do those look better and reflect mine or your brand, they also give you full control later if you ever want to move away from Zendesk, migrate to another instance, or want to control security yourself. Doing this does not remove Zendesk's build-in security measures, it just shifts the branding and domains towards your own.
When it comes to securing your email communication there's a few basic settings you need to get right. First off, make sure you're using a custom support address (e.g.[email protected]) and it's set as the primary email address. This way you're never sending out emails with a @subdomain.zendesk.com email address, and your customers only receive emails from your trusted domain.
While you're in the list, it might also be a good idea to remove any unwanted email addresses from the list. A cleaner list is easier to manage, and less change of bad configurations.
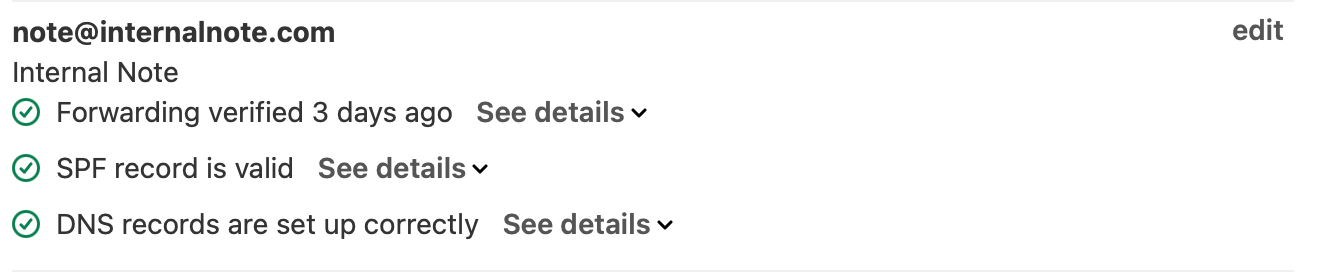
If you've added your own custom domain to Zendesk, you'll also want to validate the DNS settings for your support email addresses. The SPF record will make sure your email that gets send from Zendesk does not go into customers' spam.
The zendeskverification record binds your domain uniquely to that specific Zendesk instance, and the two DKIM records authenticate your outgoing emails.
| DNS | Type | Value | Comment |
|---|---|---|---|
| @ | TXT | v=spf1 include:mail.zendesk.com -all | You might have more values here |
| zendeskverification. | TXT | Random Text Value | Unique per Zendesk instance and domain. You can add multiple |
You can check if your settings are correct by validating if all items under Admin Center > Channels > Email are green. If some give an error, use this article to fix your issues. Note that you need to do this for each (sub)domain added to your Zendesk instance.
After validating all your email settings, make sure to go all the way to the bottom of that page and enable a Custom Domain for DKIM too. This will authenticate your emails as being allowed to be send from Zendesk with your custom domain, and will further prevent them going into spam.

| DNS | Type | Value | Comment |
|---|---|---|---|
| zendesk1._domainkey. | CNAME | zendesk1._domainkey.zendesk.com | Primary DKIM domain. |
| zendesk2._domainkey. | CNAME | zendesk2._domainkey.zendesk.com | Secondary DKIM domain. |
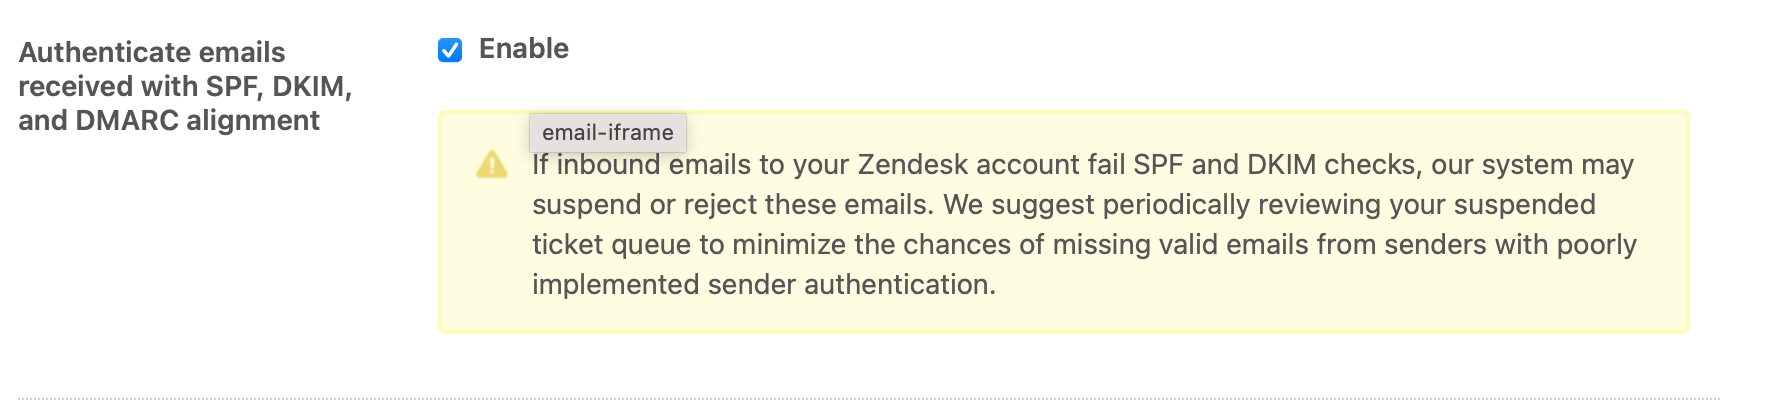
While you're in the Admin Center, also make sure to enable Authenticate emails received with SPF, DKIM, and DMARC alignment. This used to create a lot of suspended tickets, but now that DKIM and DMARC are more and more adopted, it actually helps reducing spam in your instance.
Help Center
The next item on the list is mapping the default Zendesk domain to a custom subdomain of your own. This is done by adding the following record to your DNS table:
| DNS | Type | Value | Comment |
|---|---|---|---|
| support. | CNAME | subdomain.zendesk.com | Help Center hostname |
Once you've done so go to either:
- Admin Panel > Account > Branding
- Admin Panel > Account > Brands > (choose a brand) (Enterprise)
And add your custom domain in the Host mapping field.
Next, go to Admin Panel > Account > Security > More Settings > SSL and enable a Hosted SSL certificate. Also make sure to enable HTTP Strict Transport Security to make sure you never fall back to HTTP

Web Widget
You can setup the Web Widget to be available only on specific domains. This prevents others from copying your widget code and embedding the widget on their own website. Doing this wouldn't give them access to your tickets or data, but would lend credibility to the rest of their website.
Agent Accounts
The second big block of security measures can be found in the way your end-users and agents sign into Zendesk. By default Zendesk allows anyone to create tickets, and users can create accounts with passwords stored in Zendesk itself.
You can choose to allow other login methods like social or business platforms, or, if you choose to allow Zendesk accounts, you can setup the security levels for passwords and enforce 2FA options to further secure your logins.
Login Methods
When configuring the way your agents login to Zendesk there's two methods available:
- You use the native Zendesk option and have agents login with credentials directly within Zendesk
- You have an Enterprise SSO solution like Microsoft, Google Workspace or Okta enabled in your company and want agents to login that way.
Enterprise SSO for Agents
The benefit of enabling any kind of SSO solution is that you centralise your agents' authentication flows within your company and control access to all your SAAS tools in once place. This makes on- and off boarding employees easier, you can setup a single account with security policies, and Zendesk, your email tool, your intranet and all other platforms linked will adhere to those policies.
Zendesk has some pretty good documentation on how to enable this.
what to do with the Zendesk authentication once an external authentication method like an Enterprise SSO is enabled?"
There's two ways to approach this.
- If you have external parties using your Zendesk, like e.g. contractors, who aren't in your Enterprise SSO, you can leave the Zendesk accounts enabled. This way Agents can login with their business account, and contractors can access Zendesk via
https://subdomain.zendesk.com/access/normalto login with a password stored in Zendesk.
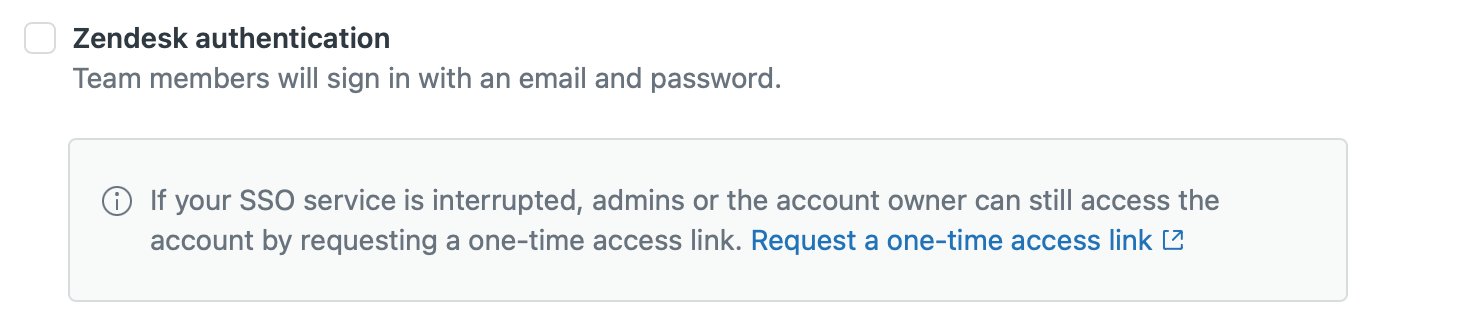
Obviously, this will also allow agents to login similarly, potentially circumventing your SSO policies. - If you never want someone to use a Zendesk password, you can disable Zendesk authentication. This way you can only login with your SSO account credentials. However, if your SSO goes offline, you're locked out of Zendesk too. Luckily admins can use the SSO Bypass via
https://subdomain.zendesk.com/access/sso_bypassto login with a one-time-password link emailed to them to gain access again and restore the Enterprise SSO options in that scenario.
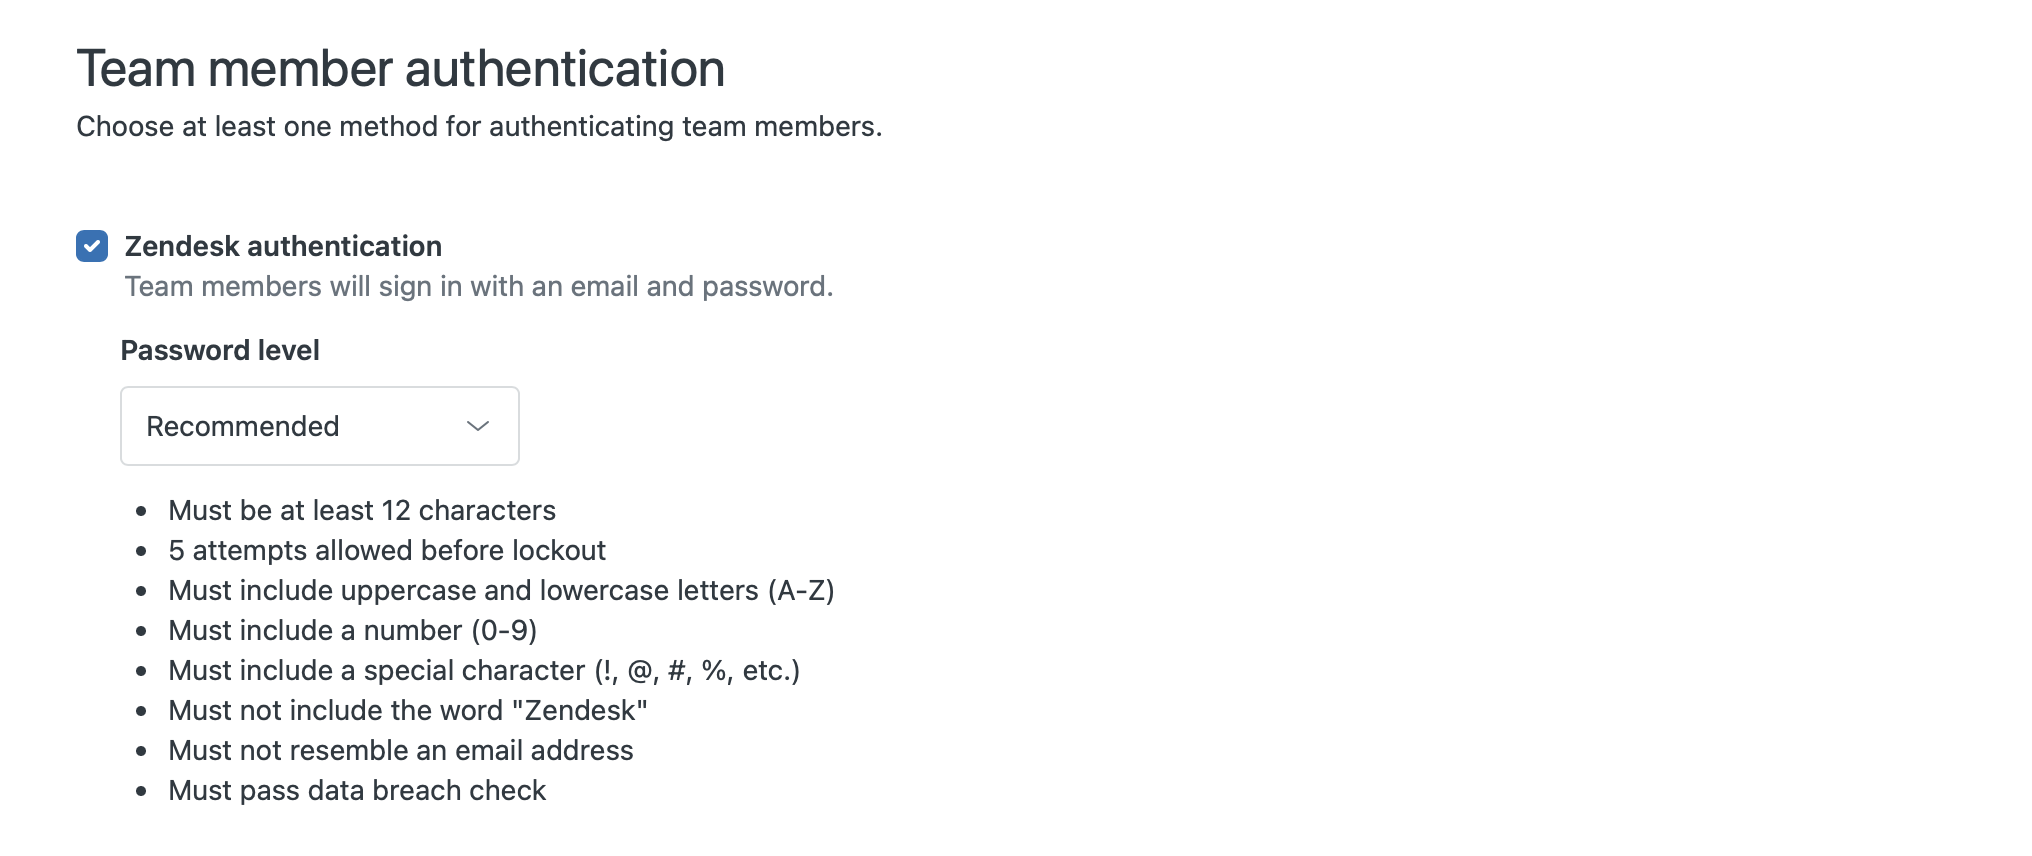
Zendesk Accounts
Since last month Zendesk now has a new Recommend setting for their accounts. This is enabled by default for all new customers, but existing customers might have a different option enabled. I recommend using this new setting by default since it checks for breached password matches via HIBP.
If you go to Admin Panel > Account > Security > Advanced there's also a few settings you might want to validate:
- Disable "Enable admins to set passwords". This setting allows admins to set passwords and then email them as clear text to customers. Passwords should never be shared and sending a reset password link from the Agents' profile is a better practice.
- Email notifications on password change should be enabled so people are aware of unwanted actions.
- Enforce 2FA to further secure Accounts. This is not required if you use Enterprise SSO solutions since they often have their own 2FA policies.
Roles and Permissions
Once you've setup the way agents get access to your instance there'a a few extra audits you can run to make sure agents have the right access and permissions.
Groups
First off, make sure your agents only belong to the groups they should have access too. Often agents are temporarily added to other groups to cover for colleagues during holidays, or are still in their old department groups.
The easiest way to handle this is to go to the Groups settings in Admin Center > People and do a quick audit of each group.
Ticket Access
Regardless of your instance having access to custom roles or not, you should check if Agents or their roles (enterprise) have access to the right tickets.
You can set an agent's access to tickets as:
- All tickets
- Tickets in agent's groups
- Tickets in agent's org
- Assigned tickets only
It's best practice to set this to the second option since this way an agents can work as a team on their assigned tickets, without getting access to other departments' work (important in case of HR or Finance scenarios).
Admin Access
If you're using Zendesk Enterprise you have the benefit of giving specific user roles limited admin access. This way you can allow Team Leads to e.g. manage Views or Macros, while keeping the rest of the Admin Center locked to a specific set of Administrators.
Best practice in this scenario is to create custom roles for Agents, Team Leads (with minimal Admin permissions) and Admins (all permissions). This way you can allow for customisation, while retaining control of your instance and preventing too many people from having full access rights.
I've even seen customers with roles for Guide Admin, Reporting Admin, Agent Workspace Admin, ... and assign these bespoke custom roles to maybe just one or two people in the organisation.
Agent Roles
Once you're done validating Agent group access, reviews your user roles and maybe created a few new "Light Admins", you need to review all your agents in Admin Center > People > Team members and make sure that only active employees are in that list. You can downgrade anyone else to end-user (or suspend them, see below). This is especially important in the case if light agents since they often get access to a lot of tickets for third line support roles, but are always outside of the Customer Care team and might be overlooked in reporting or audits.
Once your list is cleaned, go over the remaining agents and make sure they all have the right Ticket Access or Custom Role assigned to them.
Triggers
This one might seem weird but disabling all triggers that alert agents of incoming tickets is a security measure.
Imagine a scenario where a potential scammer creates an urgent message via email to [email protected].
If they enter, for example, a message that ask you to reset om your password by clicking here, then all your agents will get an email from your instance that they should do so. Some will see this as legit, and will do so. Phishing attempt: successful!
So disable triggers that alert your agents and train them to go to Zendesk regularly.
End-Users
This choice is not really about security but is more about catering to specific use cases like Financial Institutions or Internal Help Desk, instead of supporting every potential customer like most B2C setups would do.
Login Methods
Similar to Agents, one of the first things to look at are the login methods for end-users. But where the login for agents handles protecting your Zendesk instance and all the data within, authentication for end-users is important because it's the way to know if you're actually speaking to a specific customer, and to allow customers to find their past conversations.
By default Zendesk offers their own Zendesk Accounts and passwords. Here too I would recommend to pick the Recommended option cause it protects end-users from falling into the trap of re-using the same (breached) passwords. As for 2FA, the ability for end-users to enable this has just been announced!
Since good customer experiences is all about meeting the customer where they are and supporting them within the right context, it's important to also adopt that same process when it comes to authentication. So enabling social logins via Facebook, Google or Microsoft accounts offers the customer flexibility in choosing their channel of preference, while still making sure you get the right information: name, email and validation it's them.
Similarly, if you run your own login system for your webshop, product or platform, it might be worthwhile to look into linking that to Zendesk so you can offer a transparant SSO flow to your customers.
Messaging
Zendesk Messaging and the Web Widget allow you to authenticate users by passing along a JWT token. This gives agents the benefit they can see they're talking to the actual person, and removes the need for end-users to provide their name and email each time.

You can read all about enabling authentication for Zendesk Messaging in the widget and on your Help Center in the article below.
 Thomas Verschoren
Data Access
When working with end-users there's a few additional options to check. In Admin Center > People > End-users you should make sure that end-users can always change their passwords (in case of a breach elsewhere).
While you're in that section it might also be good to enable the "Validate Phone numbers" option. This makes sure the numbers stored are actual phone numbers and not just some random digits, so if you ever need them to map your customers' WhatsApp profiles or incoming Talk tickets, you know the data is good. (This will only show an error when numbers are edited or added and will not remove any exiting data).
Data integrity
So far we've handled communication and access to and from your Zendesk instance. This section will dive into the data that's actually in your Zendesk instance.
The first topic might be a controversial one, but I'm a big proponent of setting up some kind of auto-deletion rule for old and archived data because if the data isn't there, you never run the risk of exposing or leaking it. I wrote a full guide on this last week, so you can refer to that one if you want to clear some old data.
Thomas Verschoren
Redaction
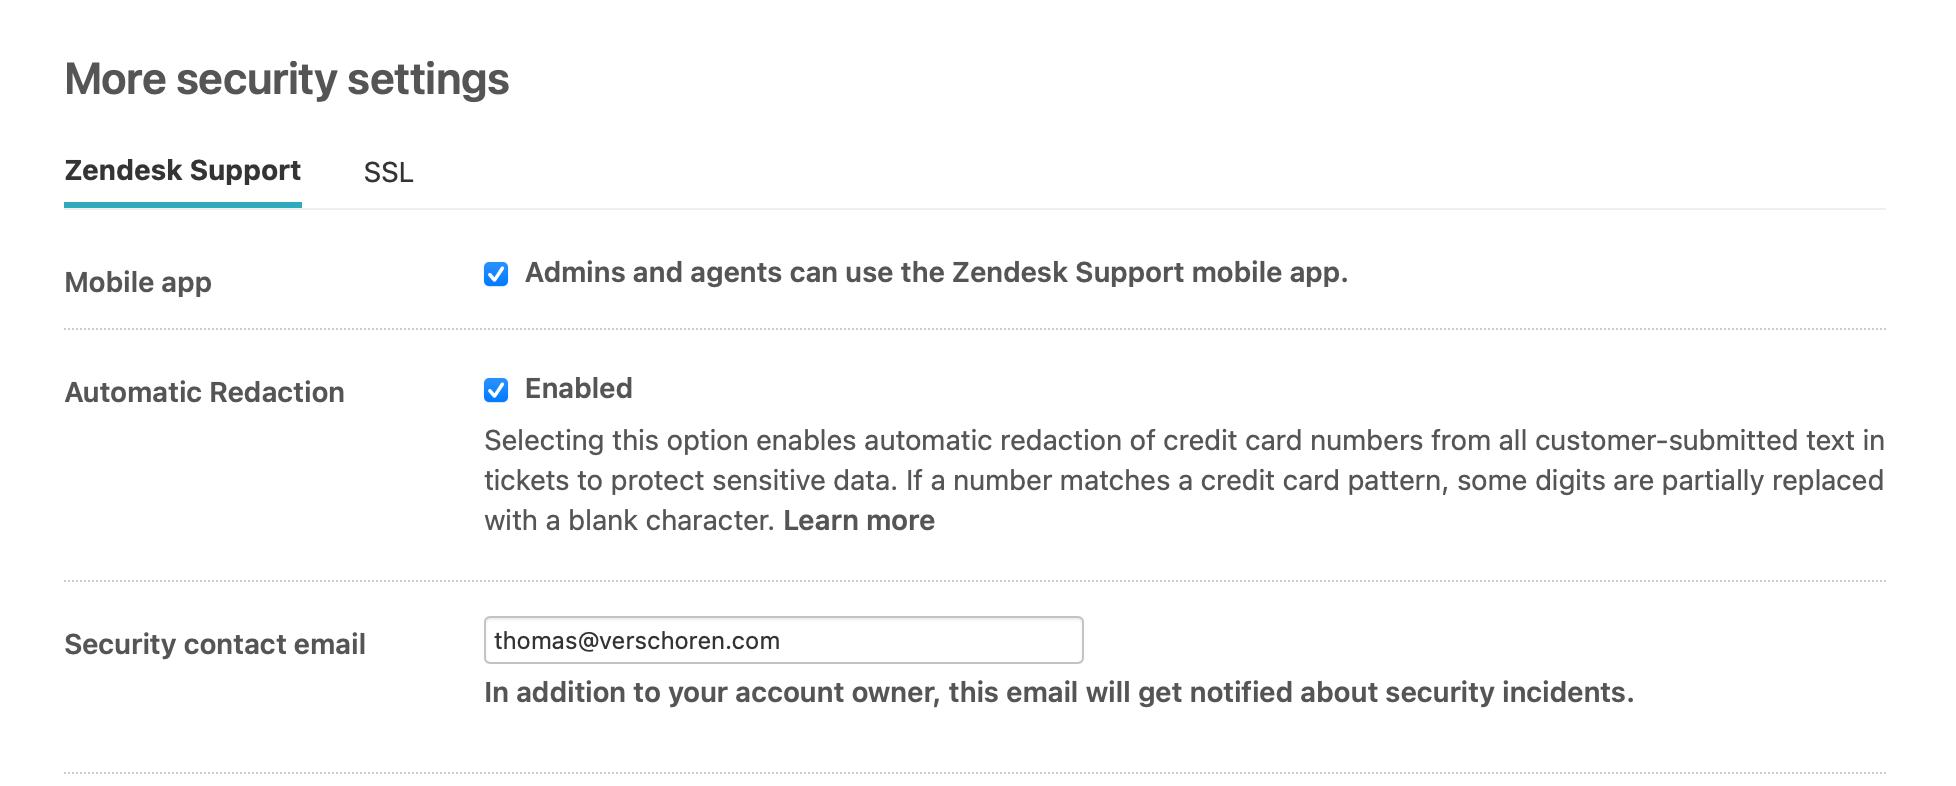
Next up, make sure to enable the Automatic Ticket redaction to make sure no credit card numbers show up in your system. It's also best to train agents to make use of the native redaction tools in the Agent Workspace so no sensitive or personal information remains in your tickets while they're being handled.
Marketplace Apps
Zendesk has a big marketplace with thousands of apps that add features to your Zendesk instance. Similar to how I go through the apps I linked to my personal Google account once a year, it's best to go over your Marketplace apps from time to time too.
Go to Admin Panel > Apps and Integrations > Zendesk Support Apps to find a list of active and enabled apps. If any apps are unused or no longer relevant you can disable or uninstall them. Whatever option you choose, they no longer get loaded when looking at tickets, reducing the risk of data getting send to tools you no longer need.
Disabling the app keeps its settings, and you might still need to pay for it, depending on its subscription model.
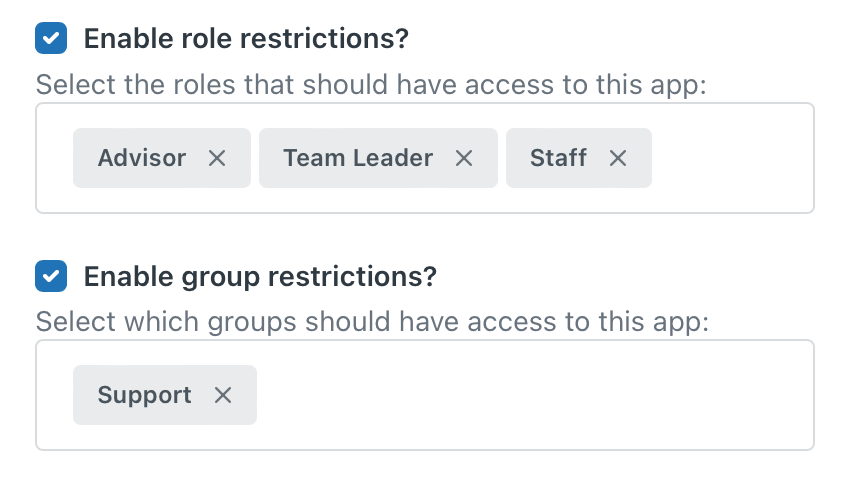
Once you've cleaned your app list you can dive into each app and enable group and role restrictions for each app. These settings allow you to configure the apps so that only a specific set of your agents can access them. For example, an app that shows invoice and payment information for your customers might be useful for your Finance team, but shouldn't be visible to the IT team. Similarly an app that shows employee information is useful for HR, but not for your Customer Care team.
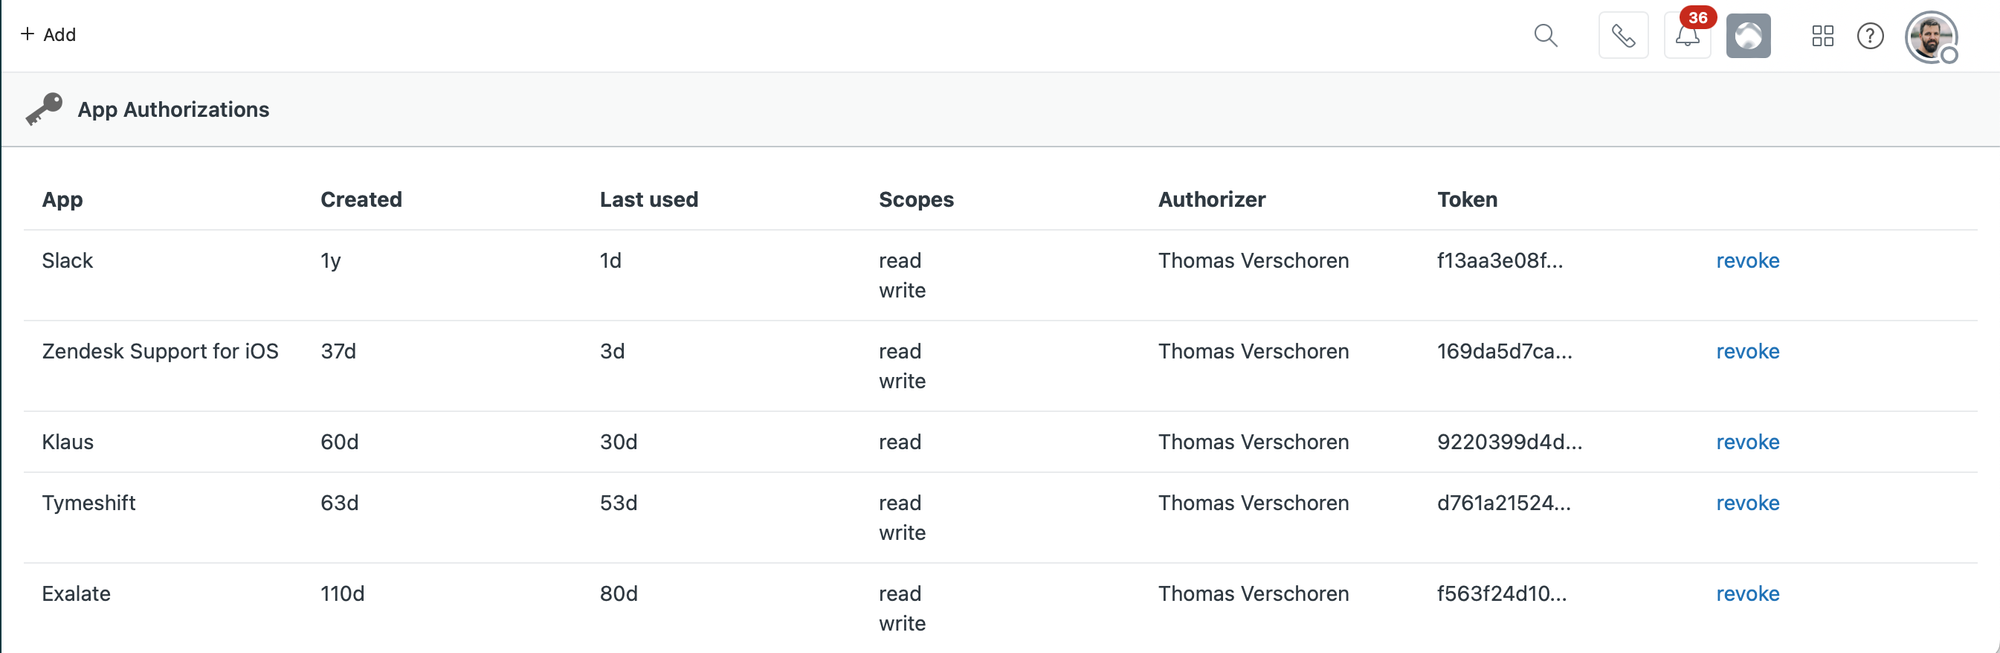
App Authorizations
Ever wondered with external platforms have access to your Zendesk instance? With the App Authorizations app from Zendesk Partner Sweethawk you get a nice overview of all tools you ever added to your Zendesk, and a one click option to remove their access.
Zendesk API
API Access
Zendesk has an extensive and powerful API that can be reached via a few authentication methods, not all of which should be enabled for it to work as expected.
By default Zendesk allows for password access and also has a Token access. If you've enabled 2FA like mentioned in the earlier recommendations Password access will not work anymore. I recommend disabling it by default and switching to API tokens with a unique Token per integration. This reduces the risk of leaking passwords, and if one gets leaked, you can rotate that one to a new one without affecting the other integrations.
Next, go through your list of API tokens and remove all Tokens that have never been used, or have not been used in the last 3 months. You can always generate new ones if you need them.
If you only have a single token active but know you have more than one integration, I highly recommend adding additional tokens per integration and migrating them each to a unique token.
Webhooks and Targets
Webhooks are used to send data out of Zendesk to external platforms. They can be added by Admins, or can be installed as part of Apps and Integrations you installed via the Marketplace.
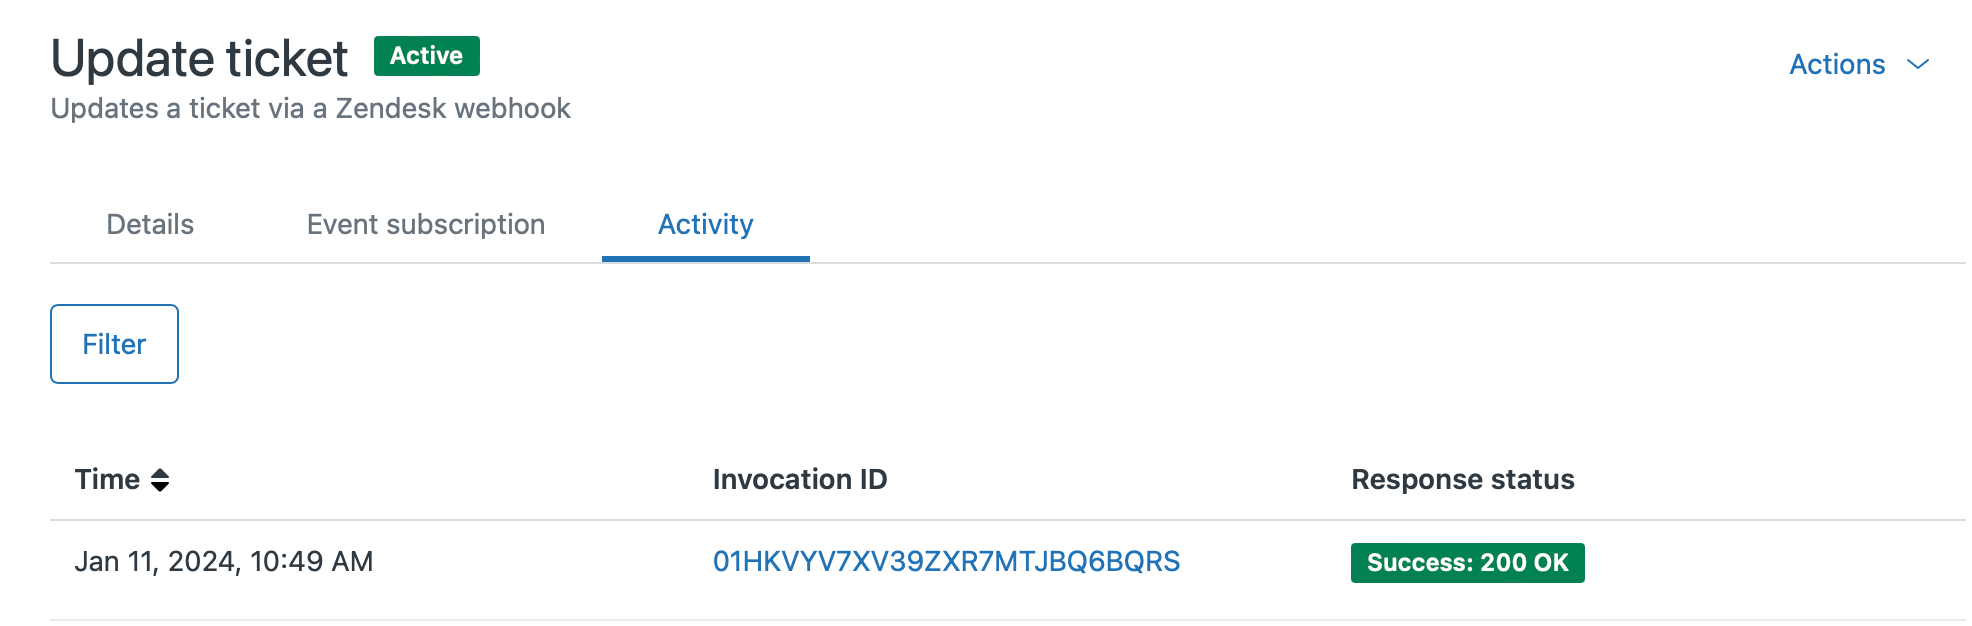
Normally, once you uninstall a Marketplace app, its linked Webhooks will be removed too. But it's best practice to go over this list and check if there are any unknown or unwanted Webhooks in the list. You can open a Webhook and look at the Activity tab to see if they've been recently used, and what data got sent out.
You can use the Actions dropdown top right to disable or delete any unneeded webhooks.
Admin Center
Audit Log
If you're using Zendesk Enterprise you get access to the Audit Log. This log gives you insight in any Admin changes made in your instance, as well as any ticket or user deletions that might occur. So if you're ever in a scenario where something weird happened with your data, or you want to know who made a critical change in your instance, that would be the first place to start looking.
Security Alerts
Zendesk allows you to subscribe to security alerts for your instance by entering a security contact via the admin panel > Account > Security > More Settings.

You can also subscribe to status updates about your instance via https://status.zendesk.com.
Advanced Data Privacy and Protection add-on
We can't wrap up this security checklist without a mention of Zendesk's newest add-on: the Advanced Data Privacy and Protection add-on.
This add-on adds an extra layer of security on top of the existing features:
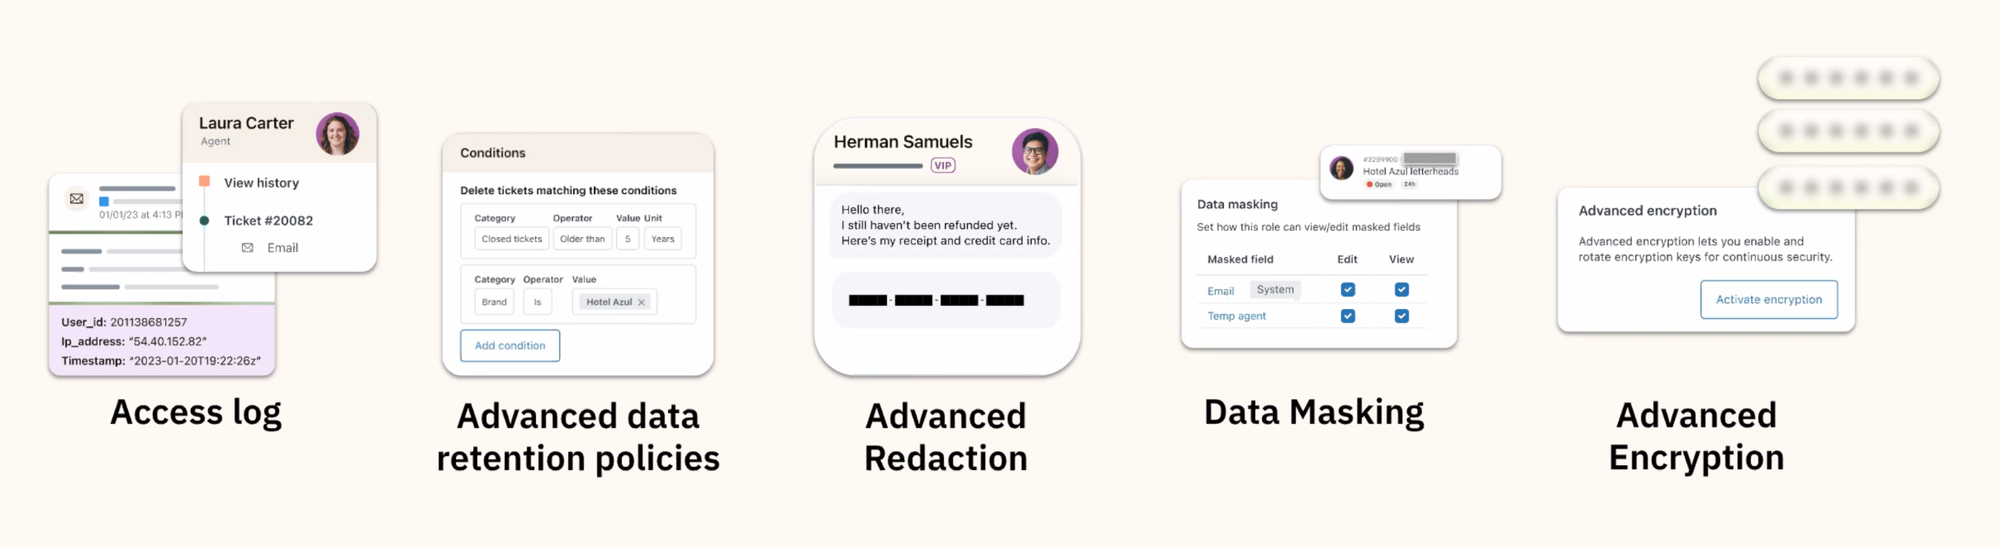
| Access Log (EAP) | Expands the Audit Log with insights into what each agent looked at in your instance |
| Advanced Data Retention Policies (EAP) | This allows you to setup more complex ticket deletion rules |
| Advanced Redaction (Announced) | Automatic redaction of more than just credit cards |
| Data Masking (Announced) | Hide specific ticket and user fields for specific sets of agents |
| Advanced Encryption (EAP) | BYOK Encryption |
Since most of these are announced and not generally available, I'll write more about it once I can get my hands on all the features.