An in-depth overview of Proactive Messages for Zendesk
Discover the new Zendesk proactive messaging. Learn about the main features and advanced flows, including the ability to show proactive messages based on specific marketing campaigns. Target customers based on their locale, or offer a premier experience to VIP users.
An in-depth overview of Proactive Messages for Zendesk

On this page
Last month Zendesk launched their Proactive messages for Zendesk Messaging. This new feature allows you to reach out to customers by showing a small popup on top of your Zendesk widget. If the customer clicks on the message or widget, you can then immediately route them to the right intent and try to proactively offer them solutions to any questions they might have.

Proactive messages basically offers the same functionality as the old Zendesk Chat triggers, albeit with a lot less options. The new feature misses visitor location, time stamps, page view count, tags or reacting to a customer initiating the chat.
What we lose in functionality, we win in ease of use. The new Admin UI is a breeze to use with a modern UI, a better flow to setup the messages and build-in reporting.
Proactive messages are currently available for the Web Widget and Mobile SDKs.
In this article we'll dive into the main feature set, and then go into more advanced flows. One more advanced flow allows you to show proactive messages to customers that match a specific marketing campaign, based on UTM Campaigns tags.
We build a specific flow based on a customers' locale, and combine Messaging authentication and tags to offer a premier experience you your VIP users.
Let's dive in.
Feature Preview
You can test out the flows described below on this page.
https://demo.internalnote.com/proactive
Some flows use specific code to make them work, especially the logged in user scenario. Take a look at the repository to see how it works:
 verschoren
Let's start with a basic Setup
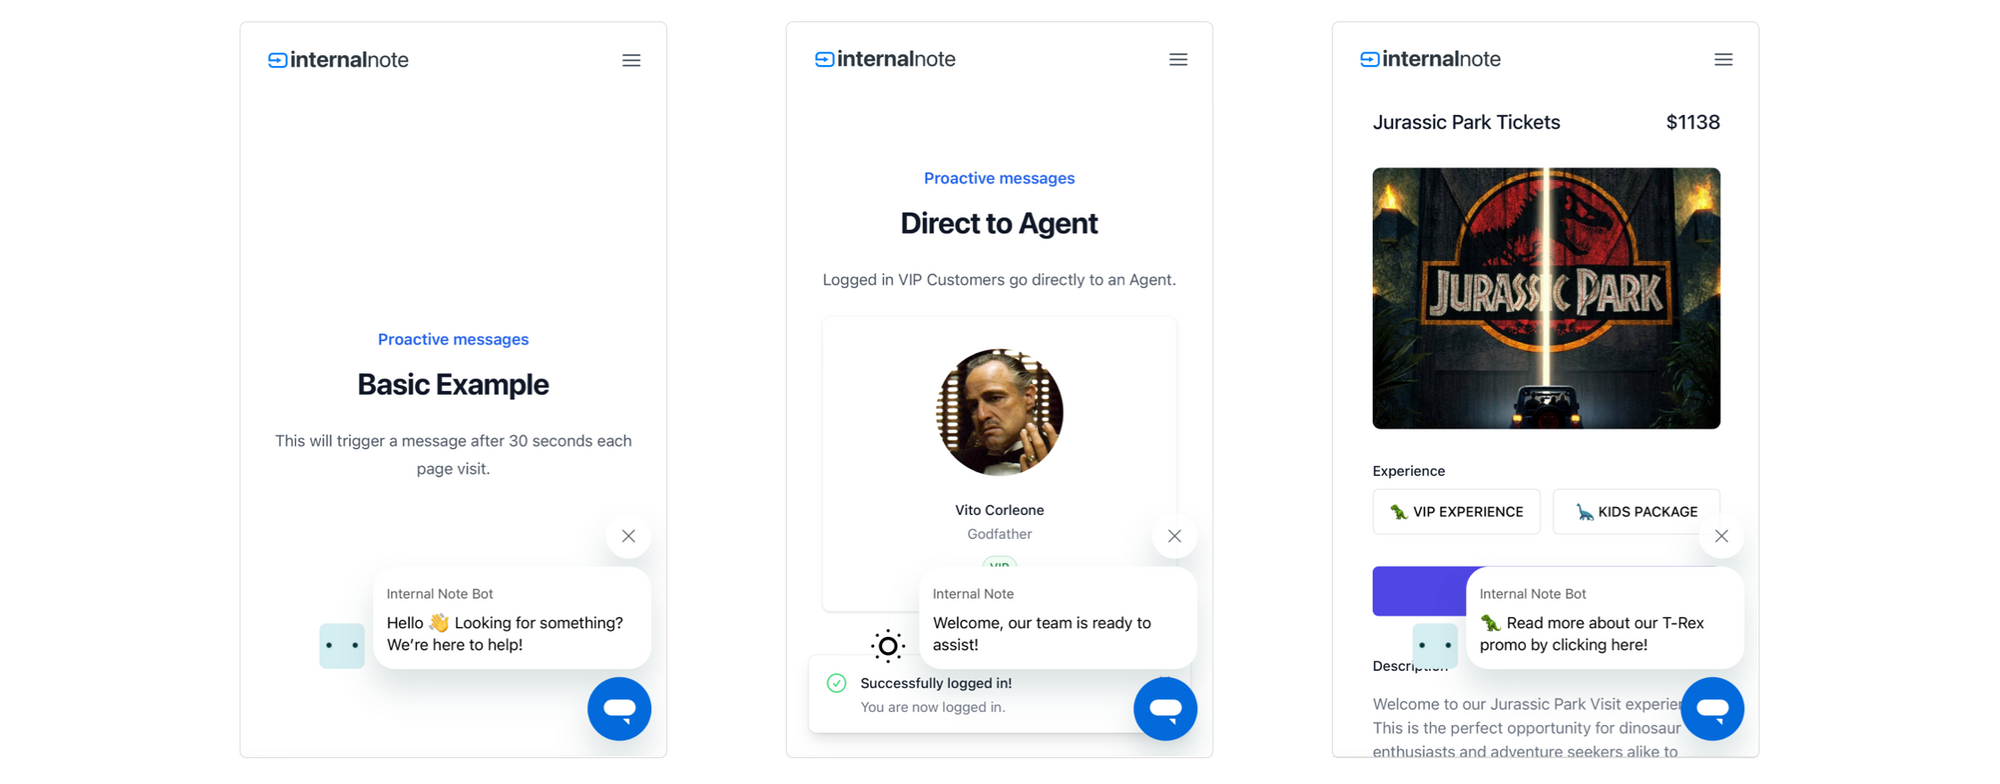
We'll start with a pretty straightforward example. A customer visits our sample page and looks at the homepage for 30 seconds.
They're greeting with a welcome message that then shows info about this website.
The way it's setup is as follows:
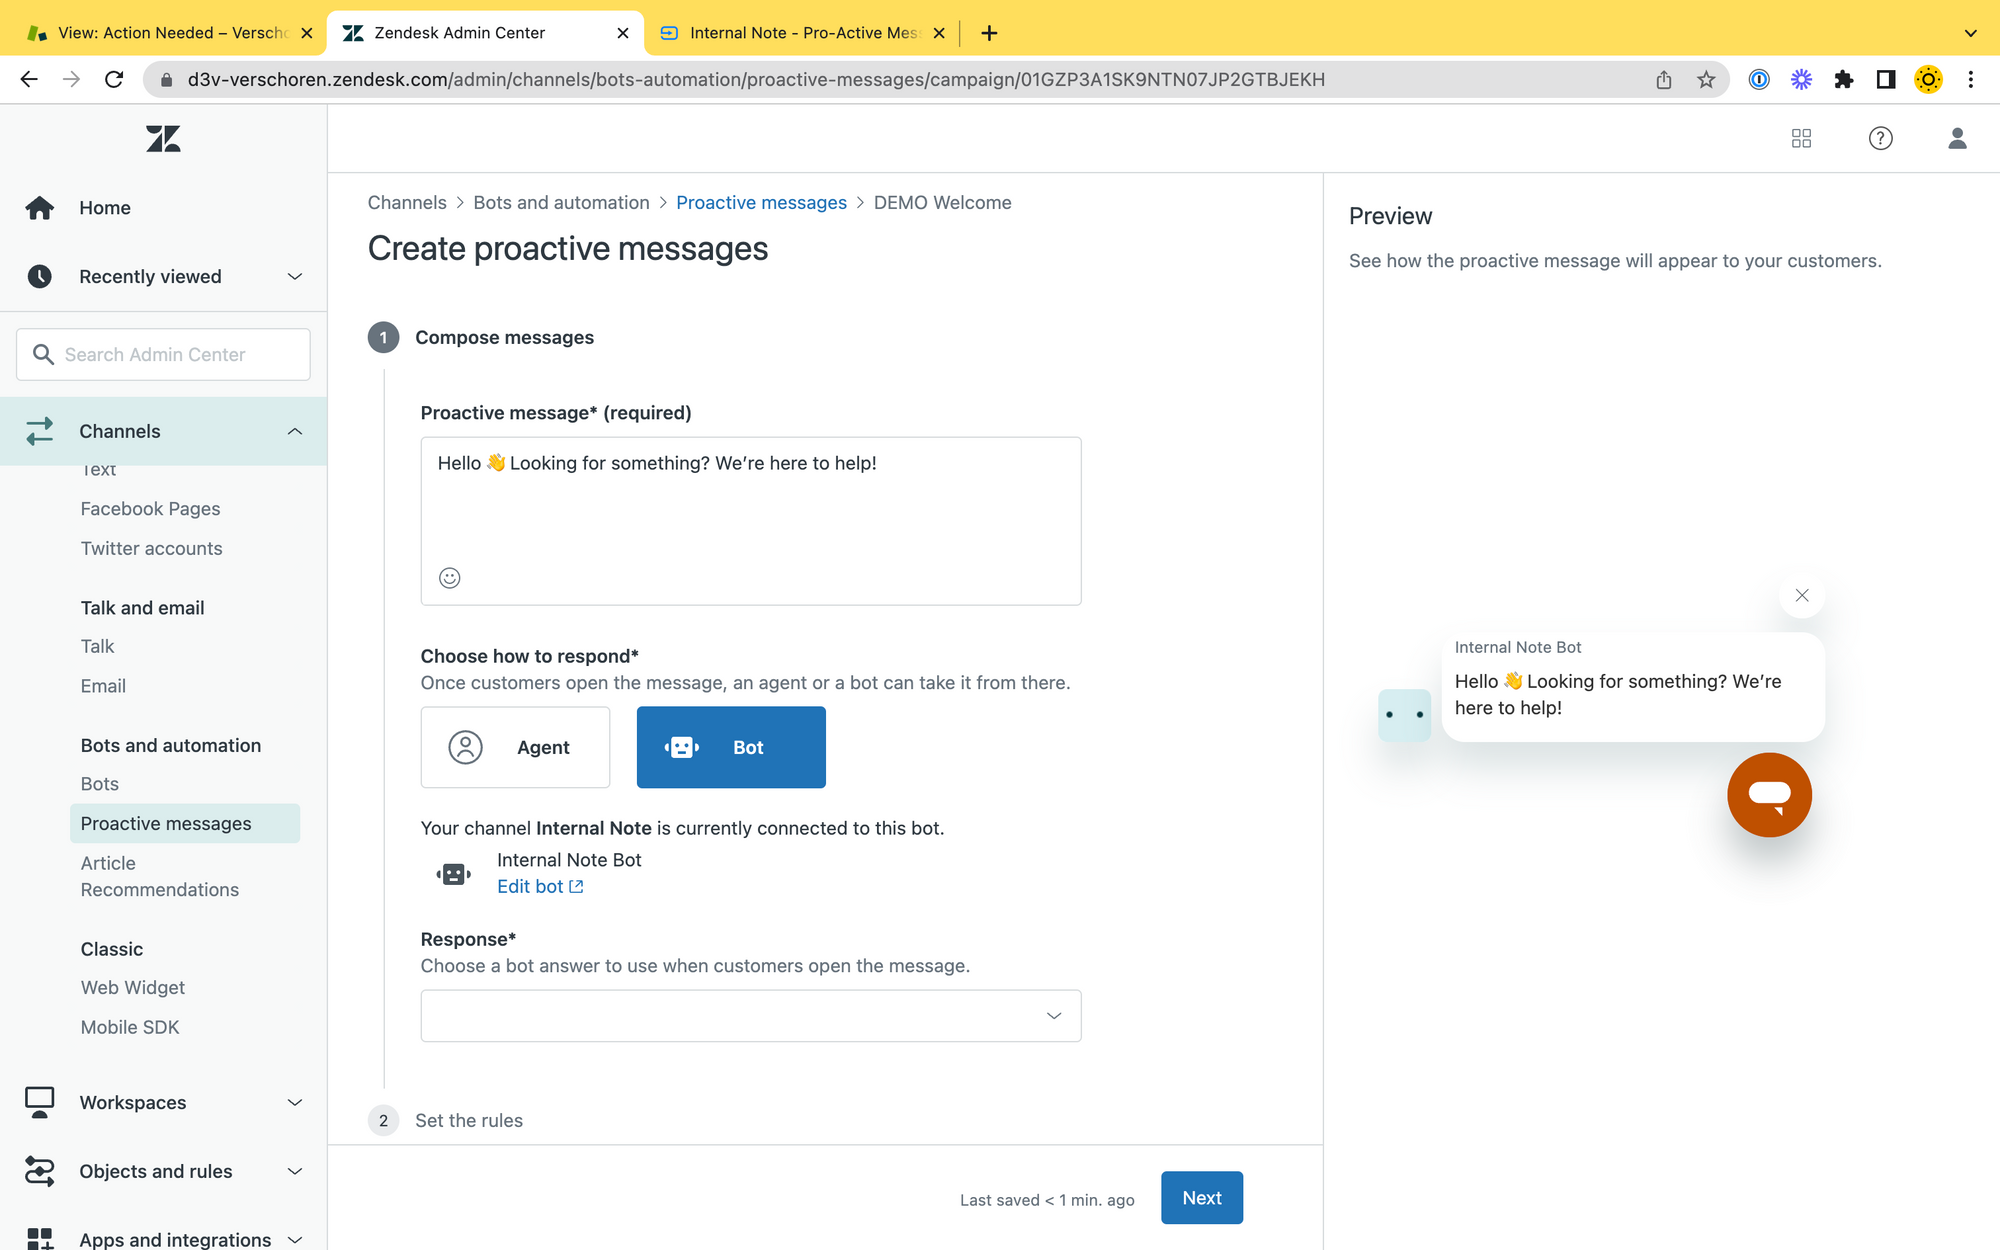
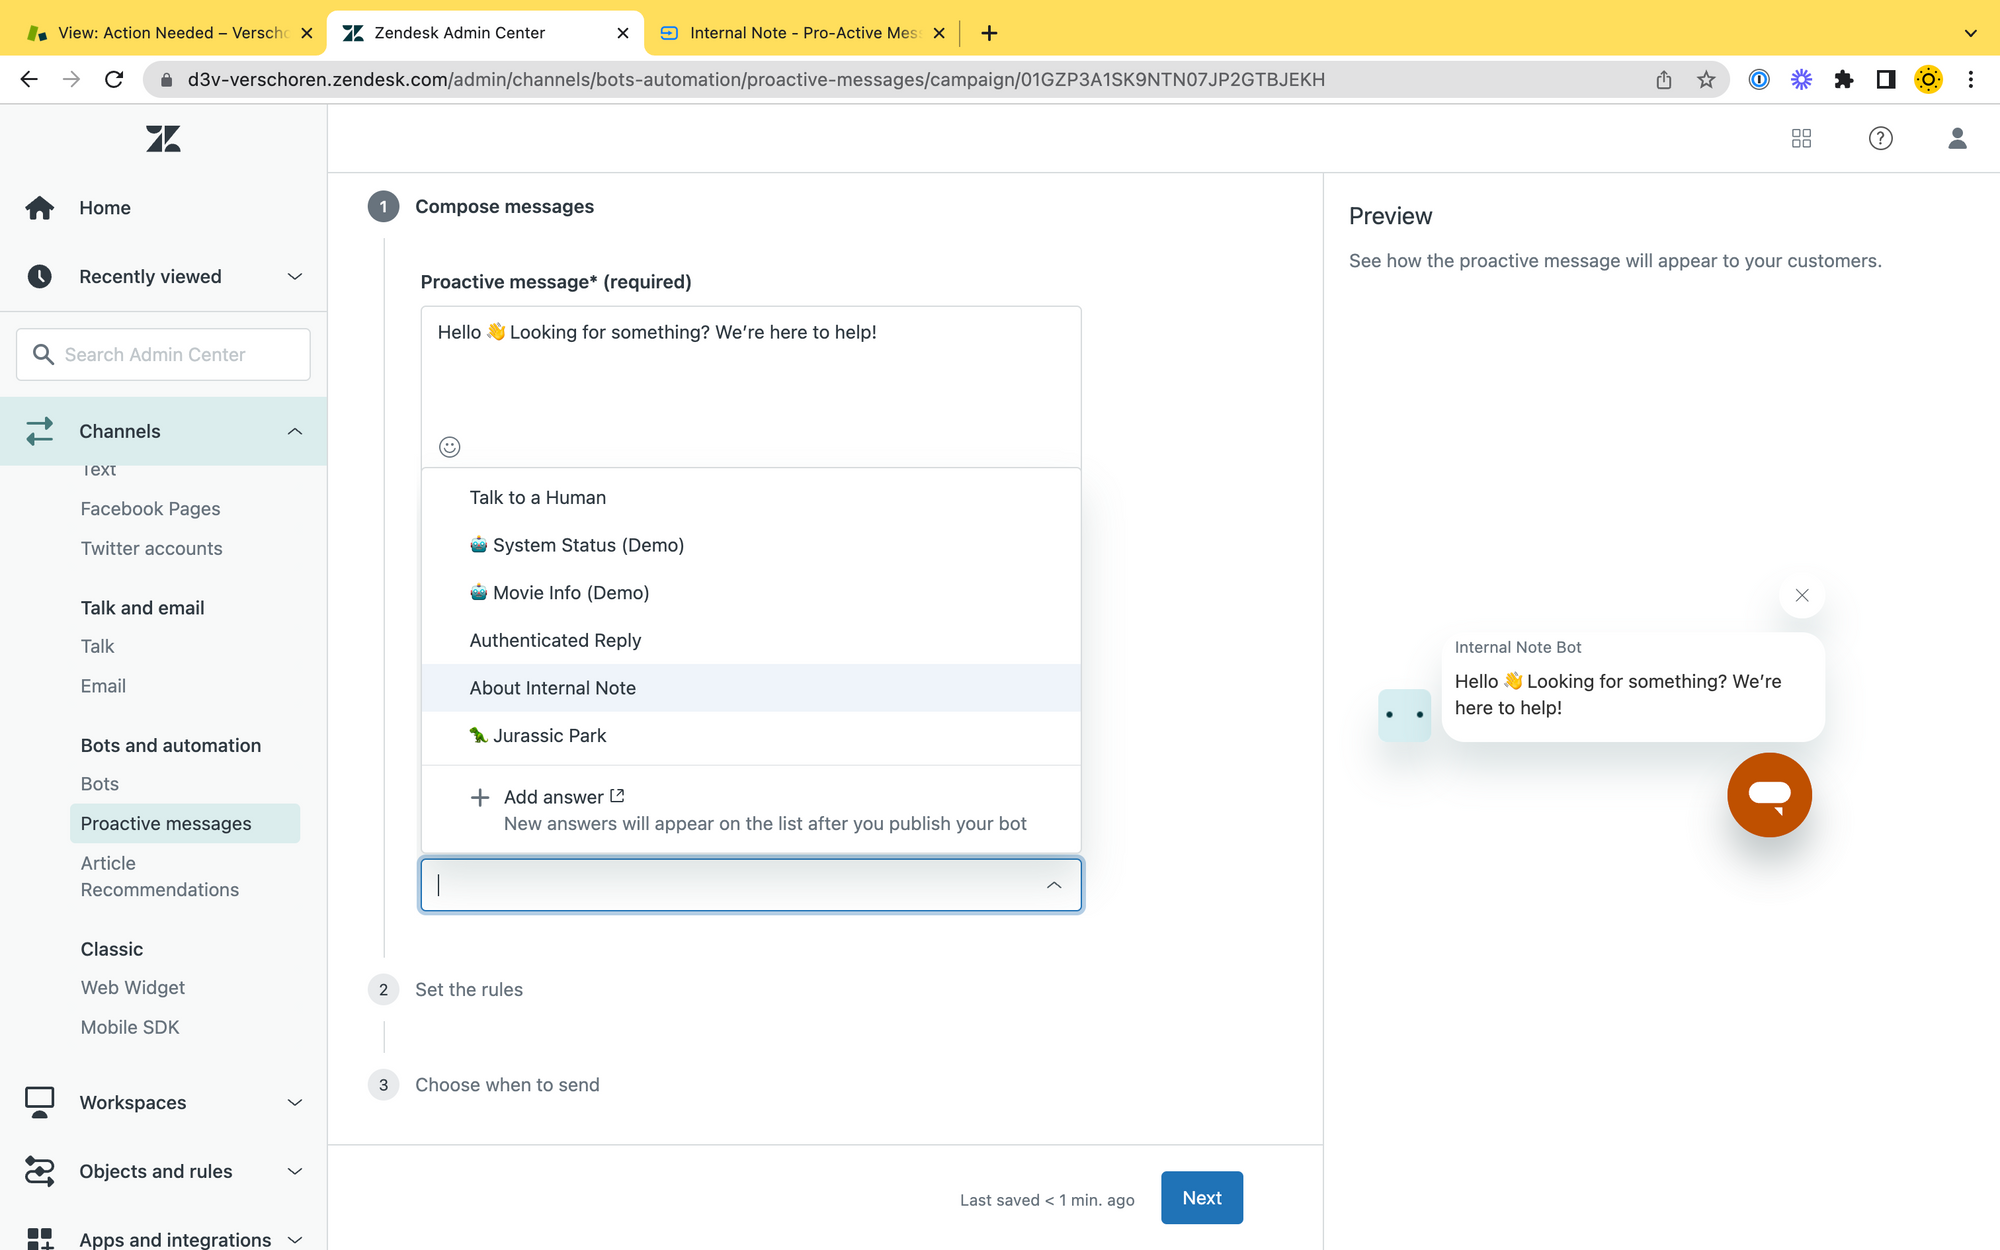
Compose the message
- We first create a new proactive trigger and assign it to the right brand and channel.
- We then Set a proactive greeting and select the
Botoption. - We already build an Intent "About Internal Note" which we can use for this trigger.
Triggers
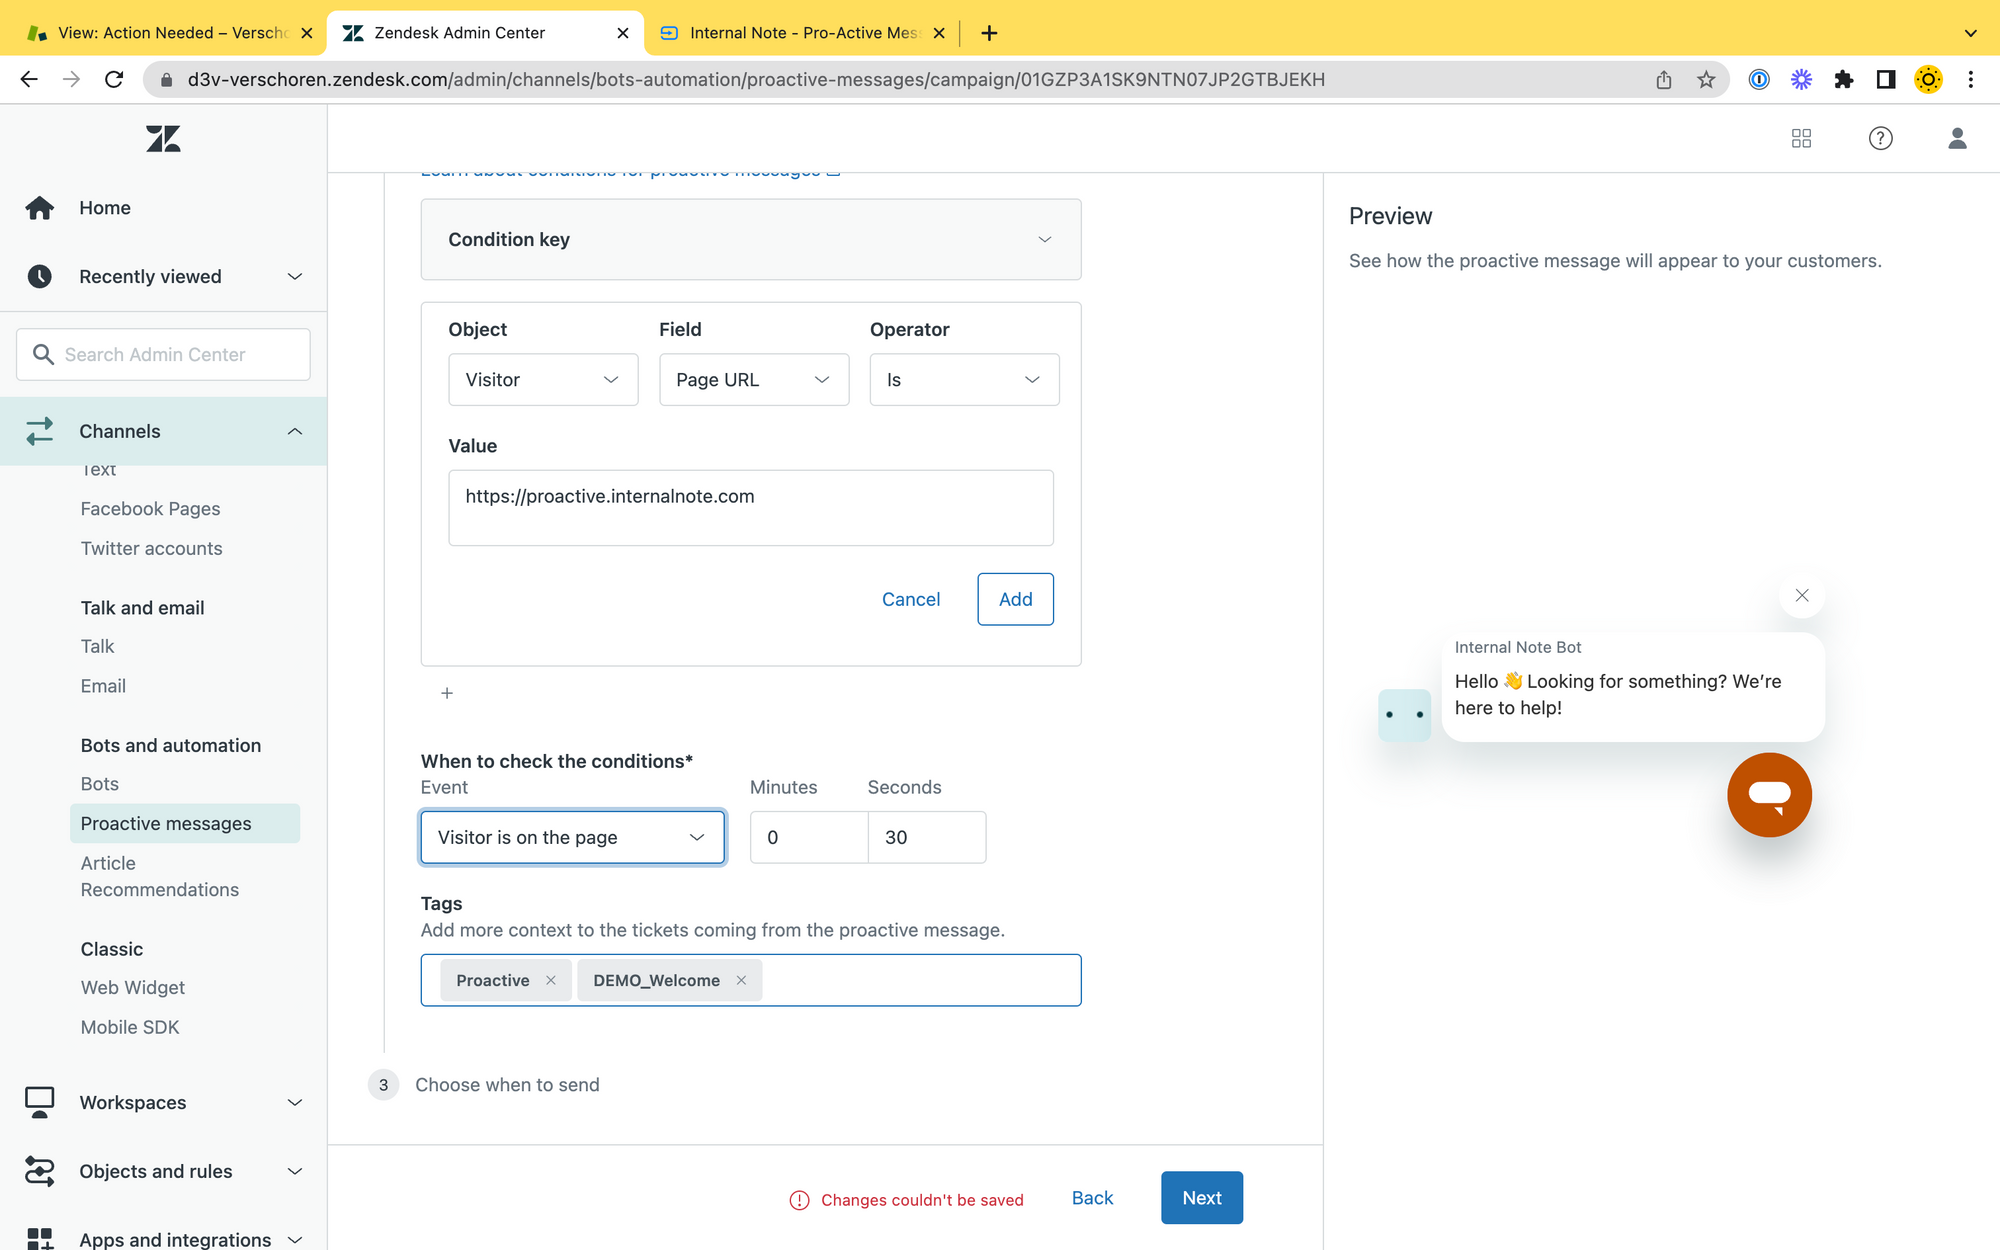
Next up we select a trigger. Triggers are basically the rules that define when a trigger will fire. We can select both Visitor based options (title, url, repeat visitor), or Device based rules (Language).
For this basic example we'll set a rule as follows: Visitor.Page URL is https://proactive.internalnote.com . This will match our homepage exactly, and will make sure it won't fire on subpages. If you change the trigger to contains at least one of the trigger will fire on any page.
Frequency and Timing
Once we setup that trigger we can then choose when we want the message to appear.
- We can choose to show the message upon payload or after a delay
- We can choose between always and outside or inside business hours
- We can choose to show the message once per user, once per session or each time.
For this basic demo I chose to show the widget after 30 seconds, ignore business hours and show it once per session. You can test it out on https://demo.internalnote.com/proactive
Advanced Flows
In this next section we'll build three advanced flows:
- A way to target customers based on marketing campaigns.
- A premier experience for your VIP customers build on top of Authentication.
- Handle customer locale for better assignment and routing.
Target based on URL Parameters
Sometimes just targeting based on the page path is a bit to generic. Luckily the Visitor.Page URL rule is flexible enough to even target specific tags and parameters in the URL. Which opens a world of possibilities:
- You can a marketing campaign and want to target users with a specific
?utm_sourceor?utm_campaigntag. - You run a webshop and want to target visitors that are looking at a very specific variant
?variant_sku=1977
Example
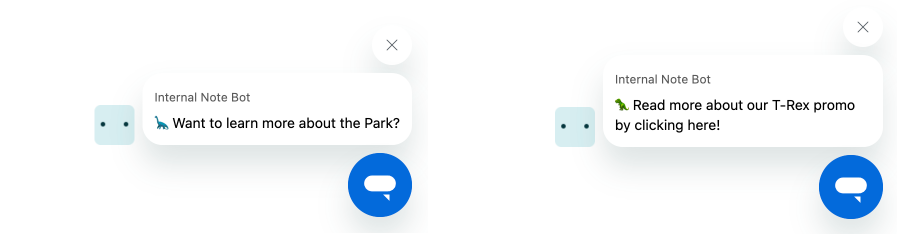
I have two example product pages on my demo environment:
- A regular Product page that most customers visit - link
- The same product page but tagged with an
utm_campaign=trextag. This tag is for example added when customers arrive at the page from a specific ad. - link
The regular page shows the proactive message on the left, whereas the customers matching my campaign get a specific promo message.
Setup
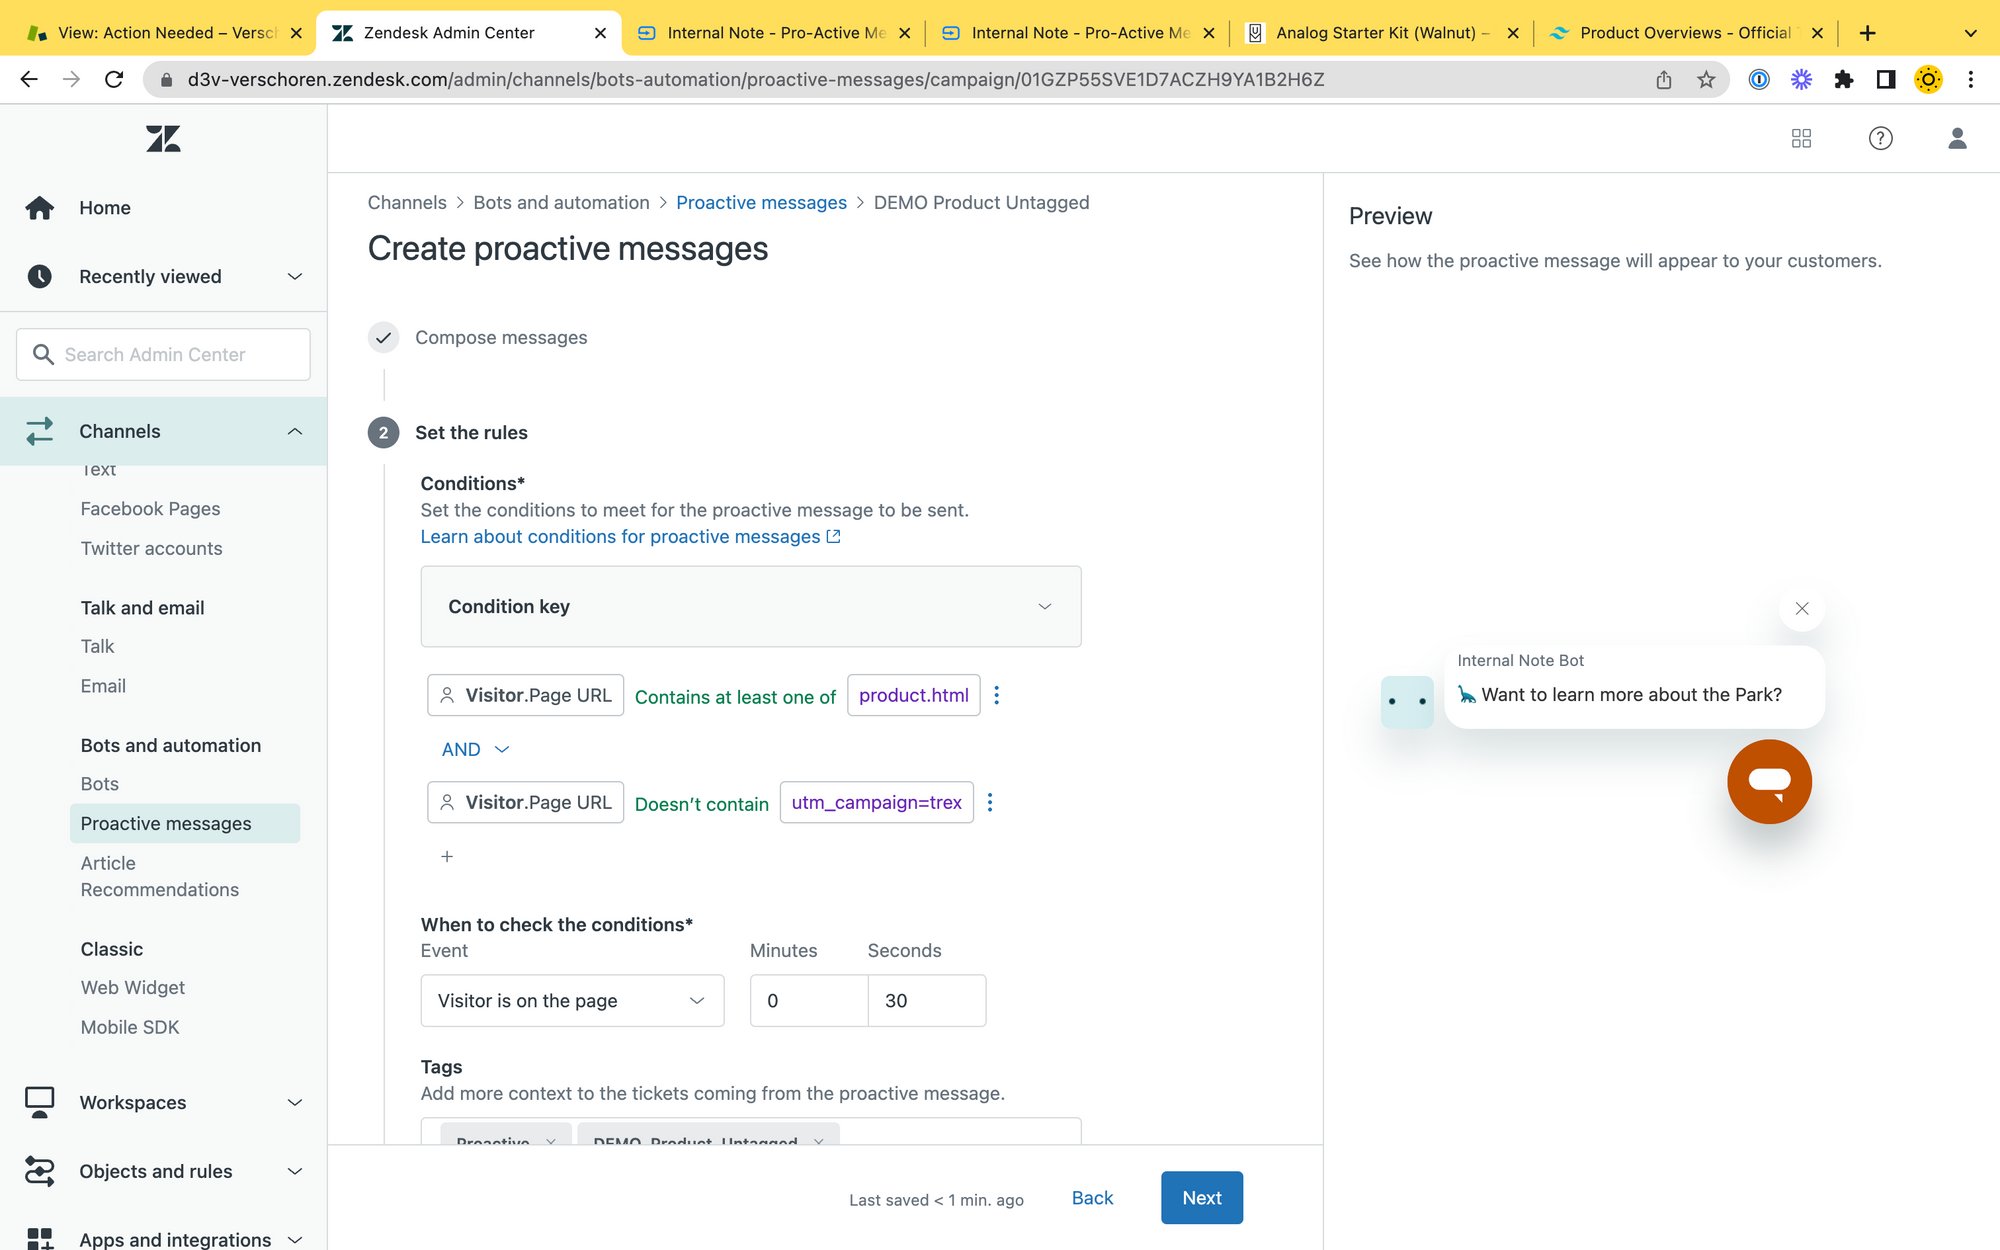
If you only wish to target the campaign users, you can create a proactive flow that has the following rules:
- A rule to match the campaign tag:
Visitor.Page URL contains at least one of utm_campaign - A rule to restrict only to product pages:
Visitor.Page URL contains at least one of product
If you want to create proactive message per campaign you can create multiple proactive messages which each exactly mapping to one campaign tag:
- Proactive Message #1:
Visitor.Page URL contains none of utm_campaign=trex - Proactive Message #2:
Visitor.Page URL contains none of utm_campaign=raptor
In my demo I created a generic trigger for product pages that don't contain a campaign tag, and a custom one for the T-Rex campaign.

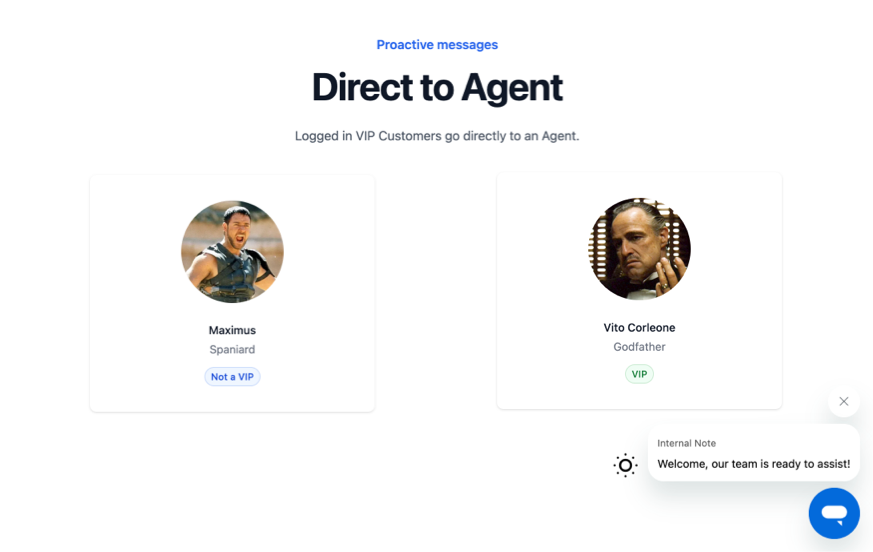
Flow 3: Offer a premier experience to VIP Users
The next flow expands on the custom URLs flow but combines it with Messaging authentication.
Example
We have a website where customers can login with their account.
Once logged in we have two types of users:
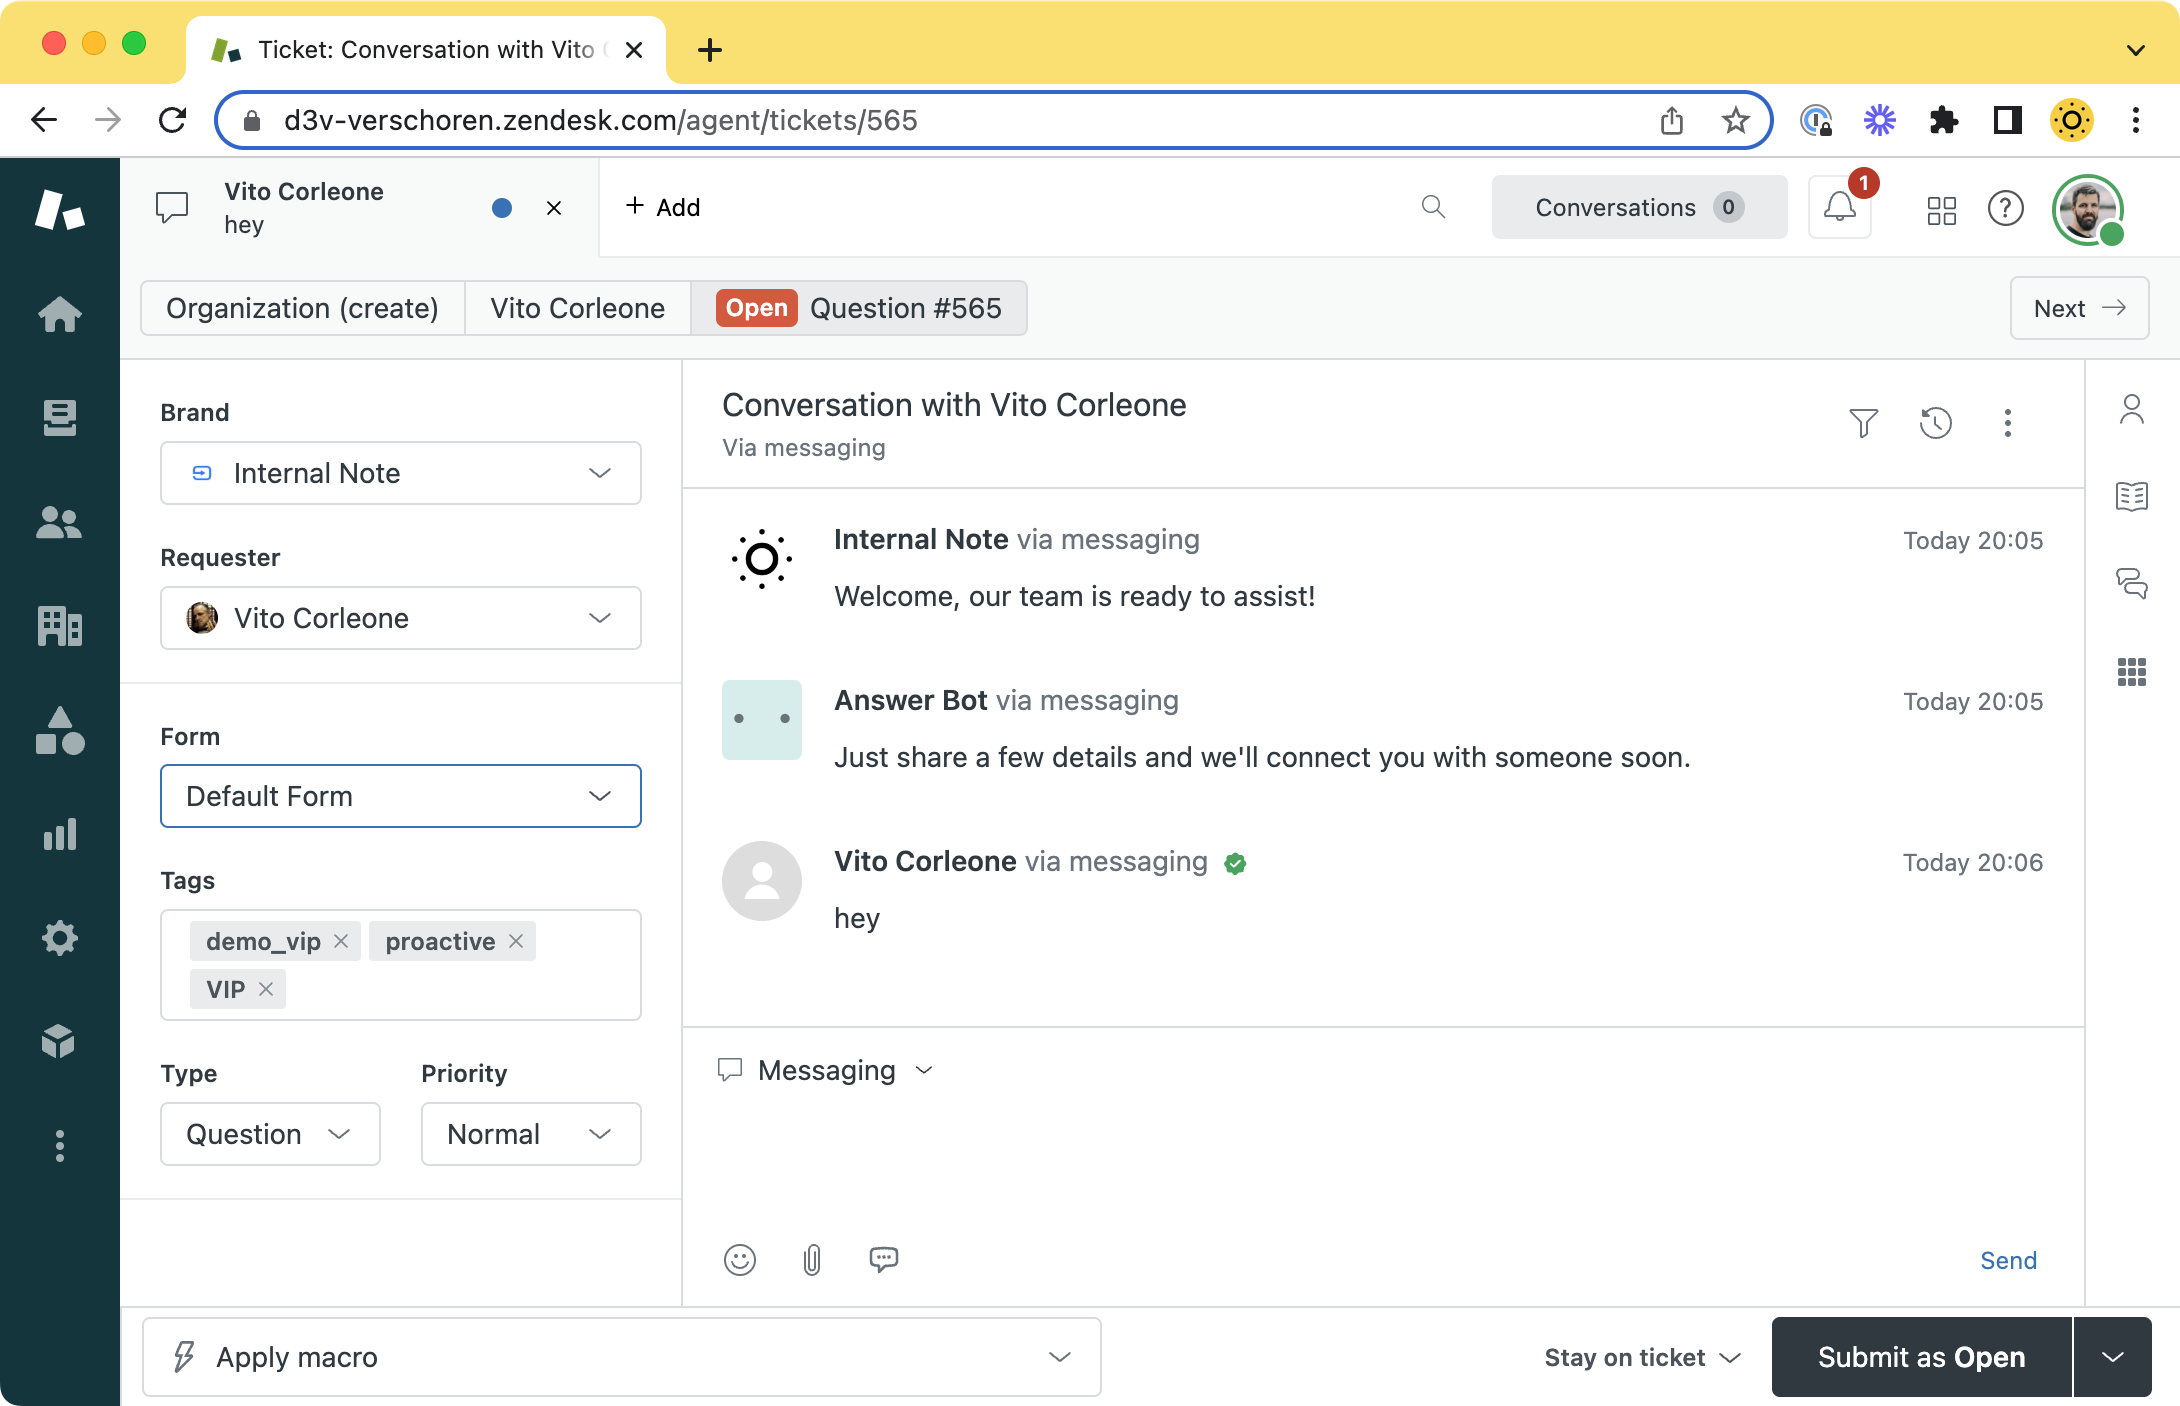
Our webmaster made it so that whenever a VIP user logs in we get a unique hash added to the URL #vip. We can now setup a rule that checks for the hash in the URL and immediately shows a proactive message that will contact the VIP Customer to an Agent, instead of the Chatbot.
Setup
This flow is a bit more complex though than just another URL rule.
The page also makes use of the Authentication Flow of Messaging. This makes it so that the logged in VIP users not only get a notification we're there to help them, we also:
- Add a tag to those tickets
VIPso we recognise them in Support - We authenticate so the user is not asked for a name or email
- If any conversation was already active, they can just resume their session.
Agent flow for a Proactive message, and have an authenticated user, the message will still asks for details but not show the fields for the user to fill in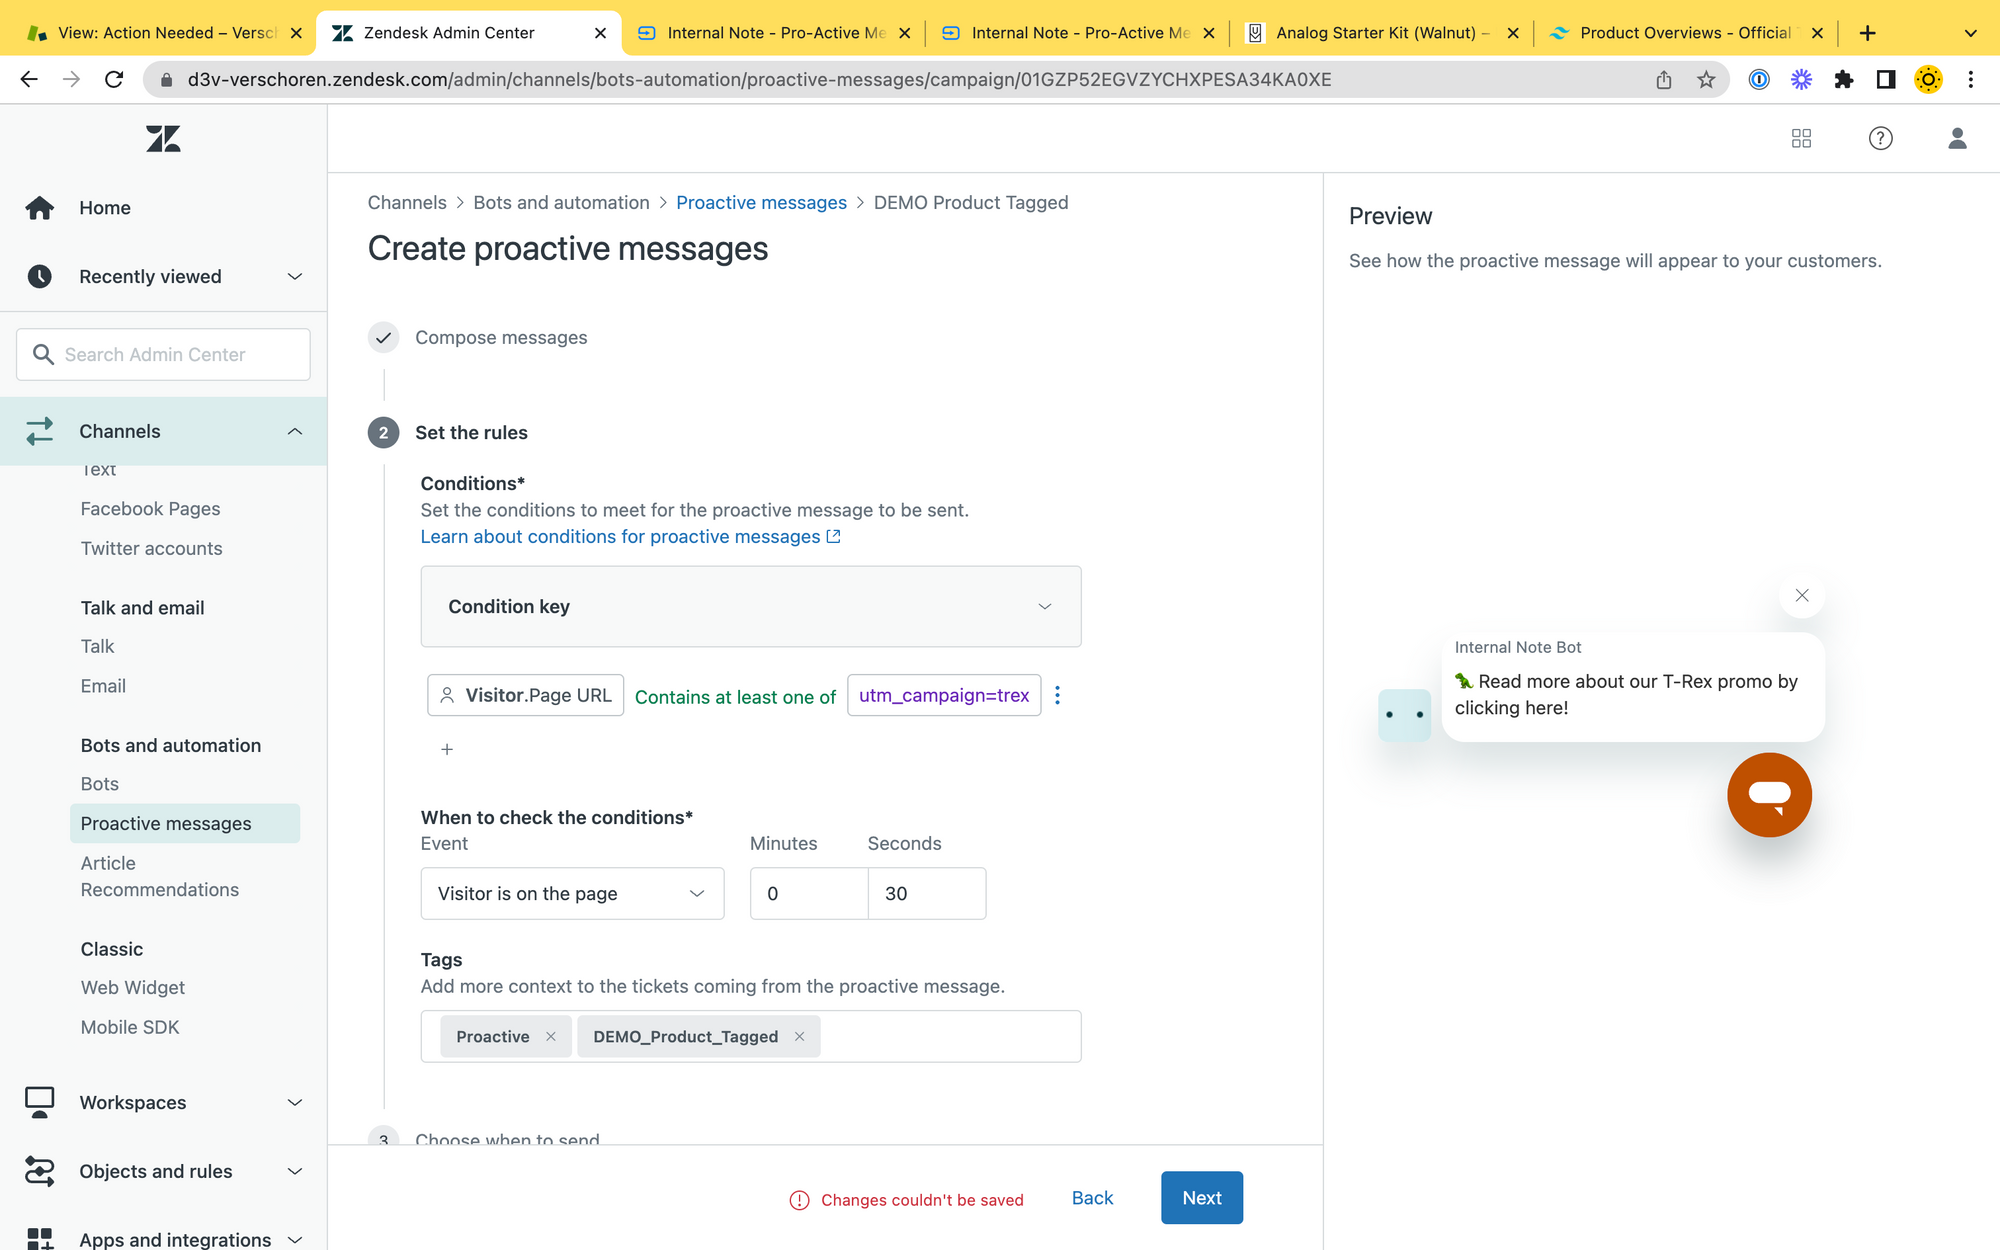

Regular users have the benefit of being logged in too on this page, but aren't prompted for support and will have to pass the Chatbot first.


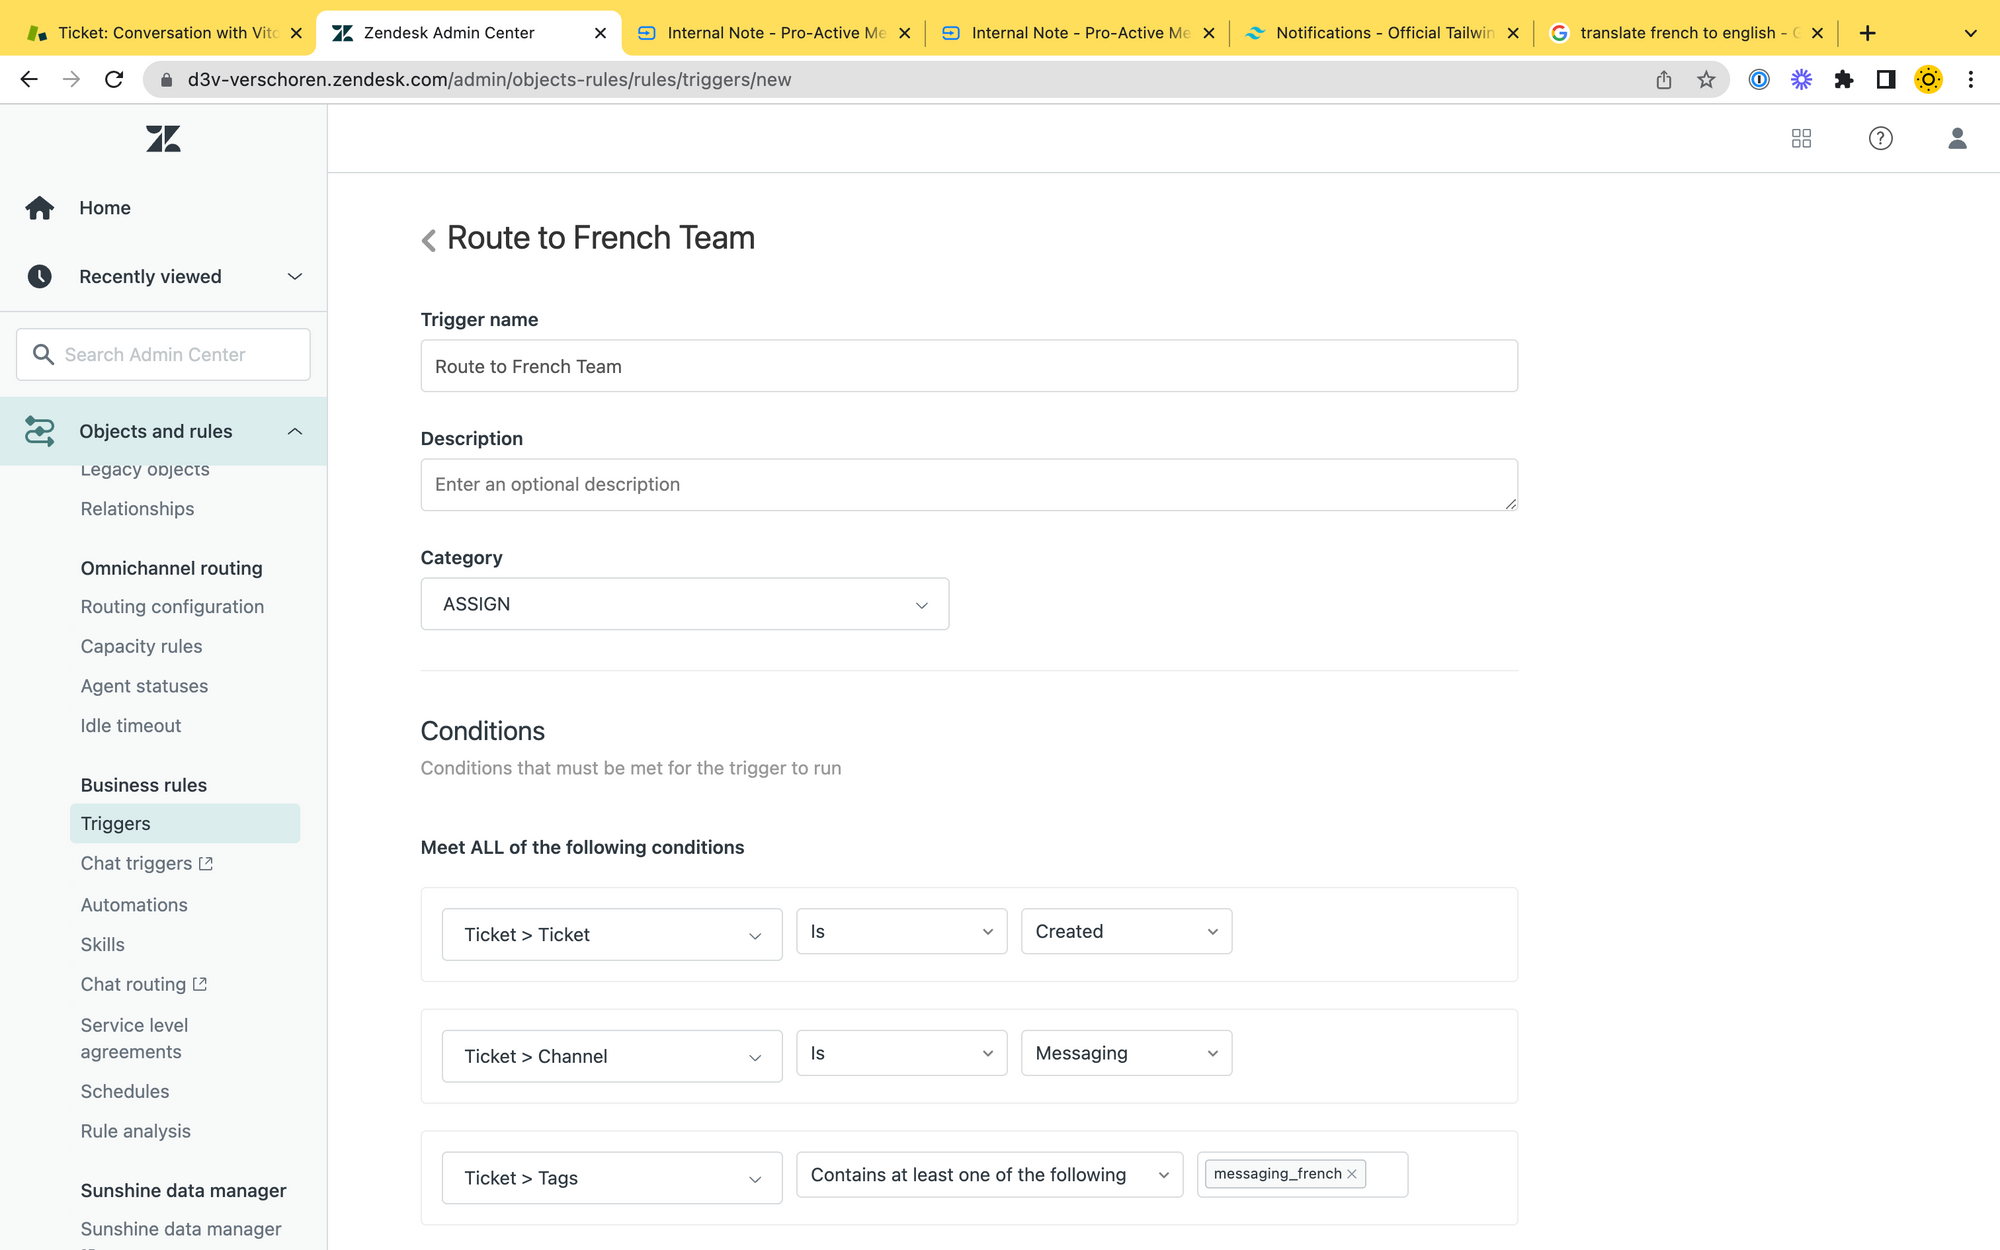
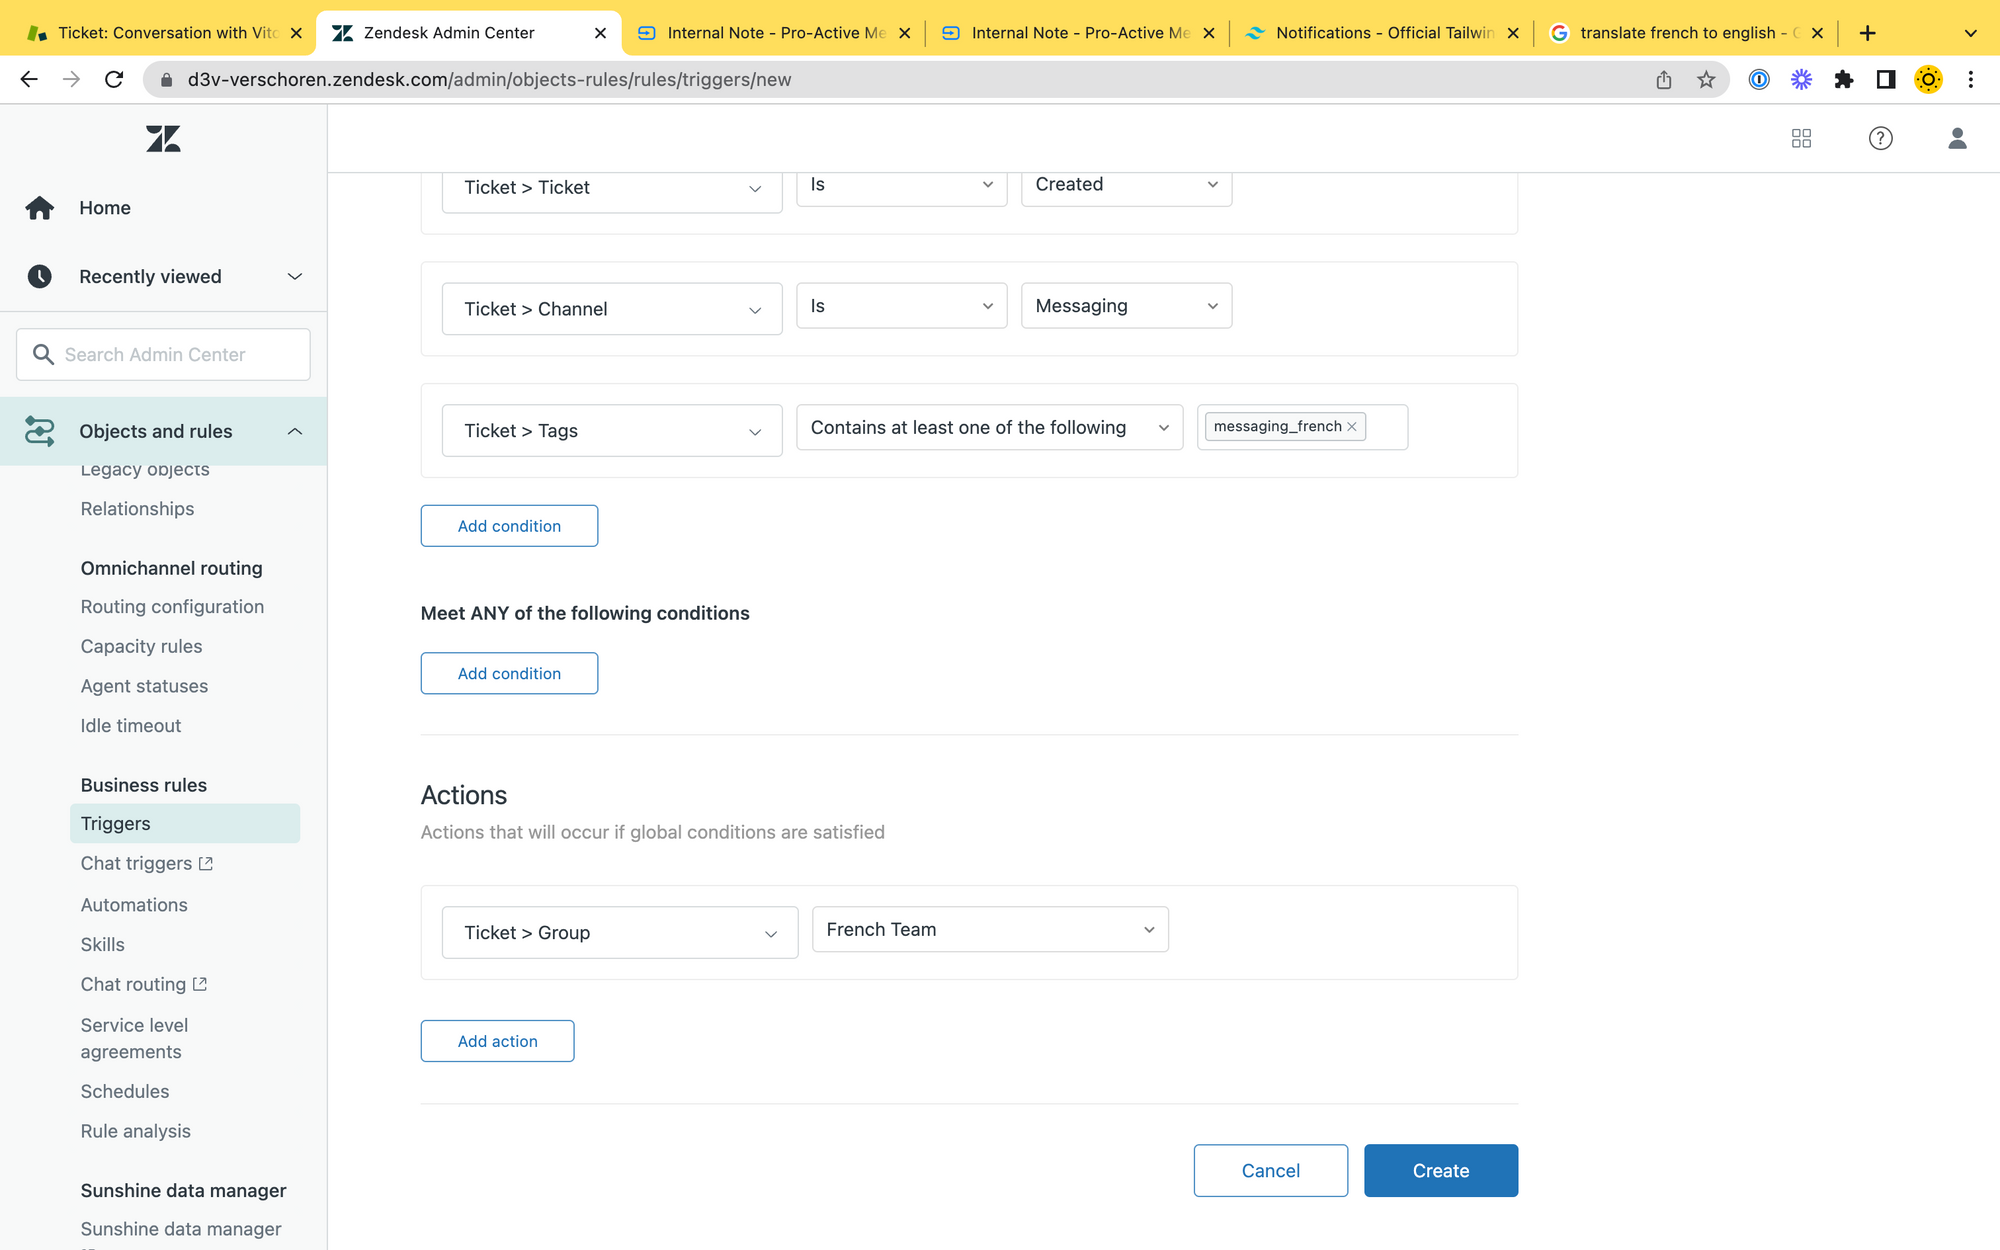
#VIP tag.Flow 4: Assignment based on locale
This final flow will trigger a specific pro-active message for french speaking customers and will use a Device.Language trigger condition.
See this page to test out this flow
Landing Page
When you have a webpage that serves multiple countries you probably also have a language switcher somewhere on your website that sets the locale of your website. Most often this happens with a https://domain.com/fr/ path.
Whenever you setup such a flow, it's also useful to force the Zendesk Widget to follow that locale too by adding to your website just below the widget embed code.
zE('messenger:set', 'locale','fr')Setup the Proactive message
Once we have a website that is localised, and (optionally but advices) a widget that follows that translation, we can create a rule set that uses the Device conditions instead of the Visitor conditions to trigger a proactive message.
In this scenario we filter on Device.Language is fr to react to pages for the french market. Note that we also add a tag Messaging_French to these conversations.

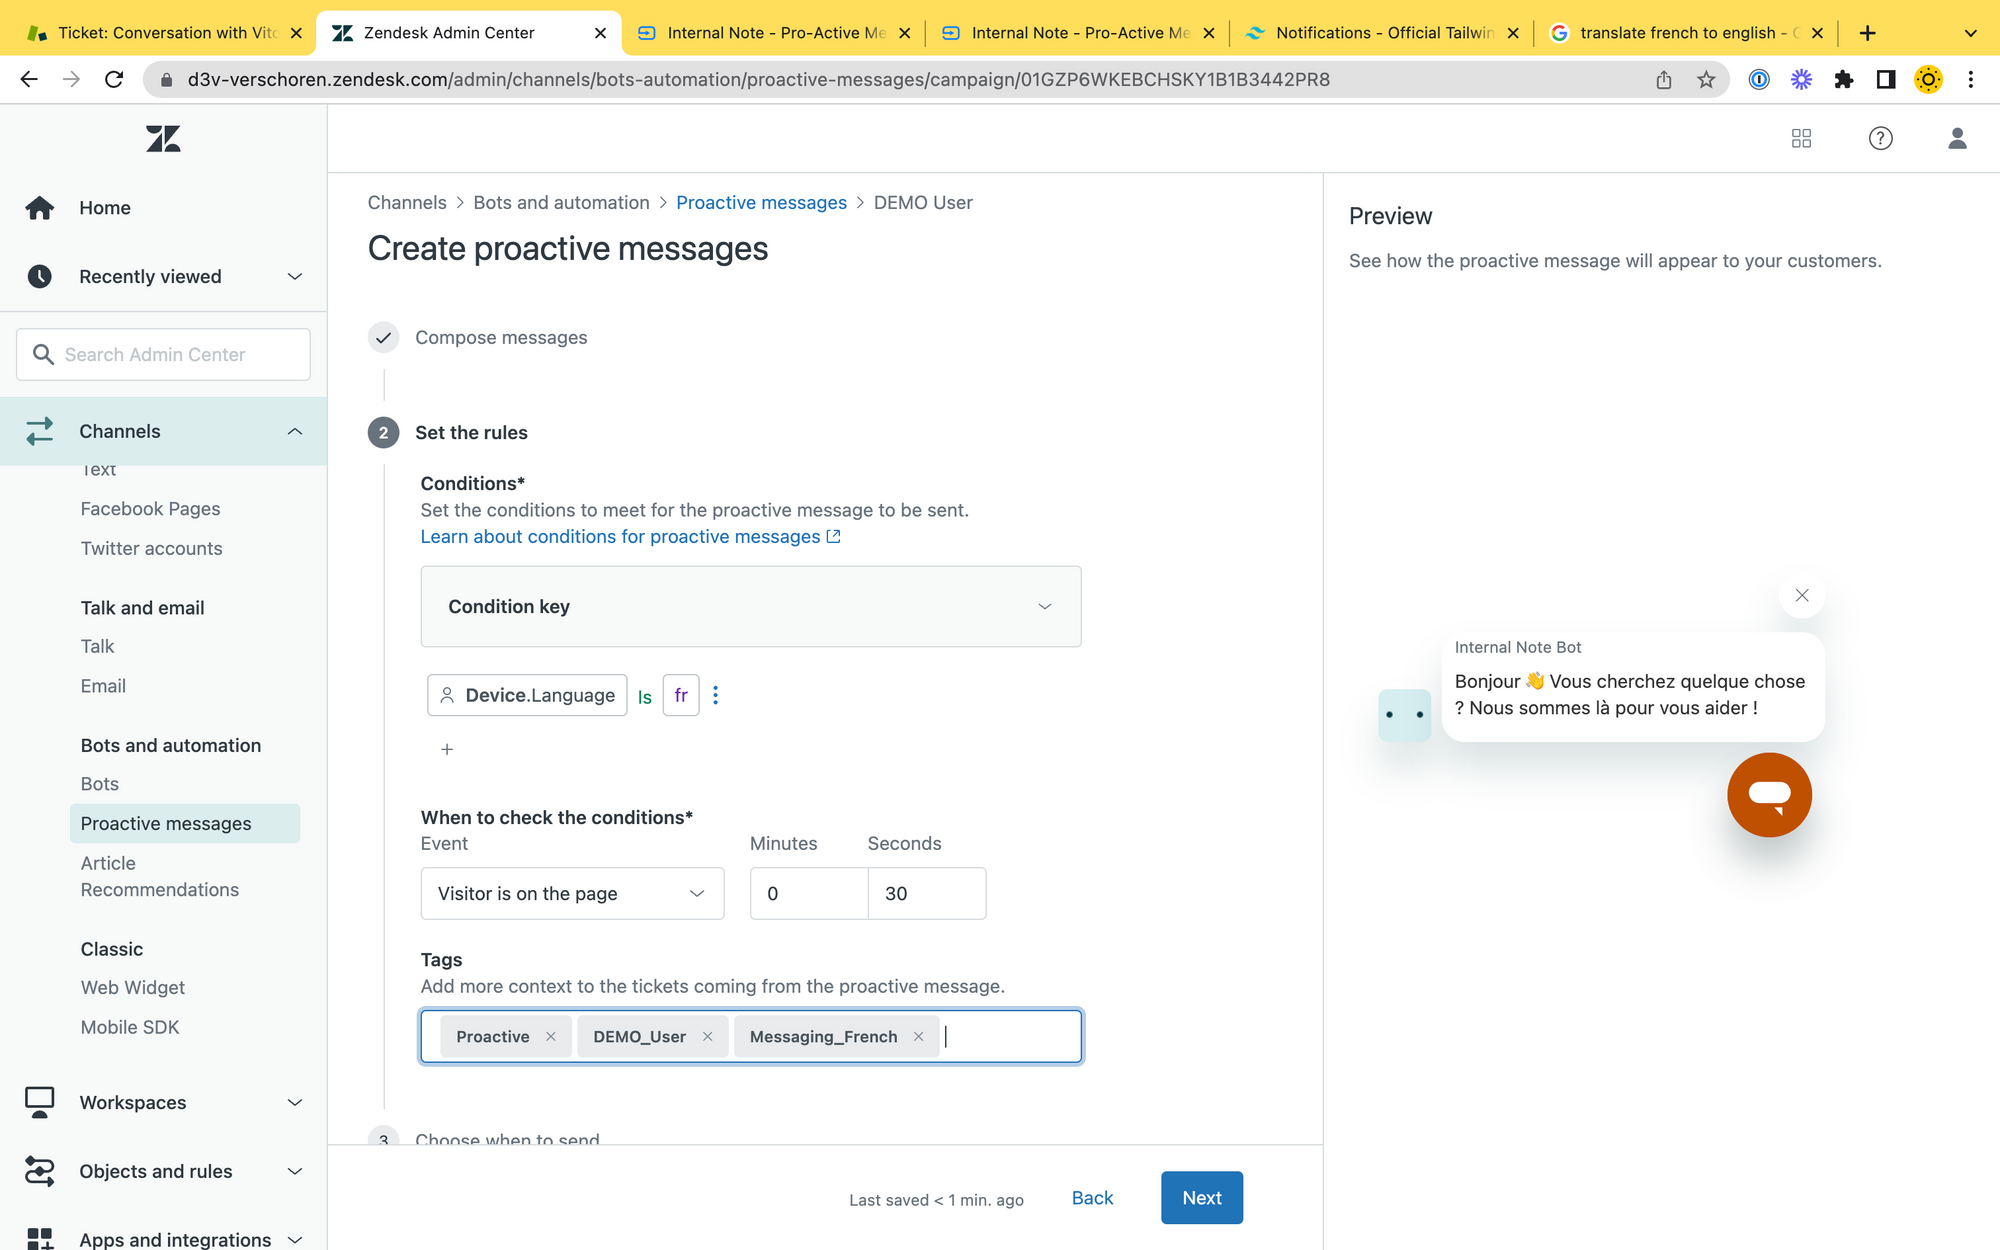
Setup an assignment Trigger
Thanks to the trigger, all conversations that start in french will now be tagged with a specific tag, and we can use a trigger to route them to a dedicated team.
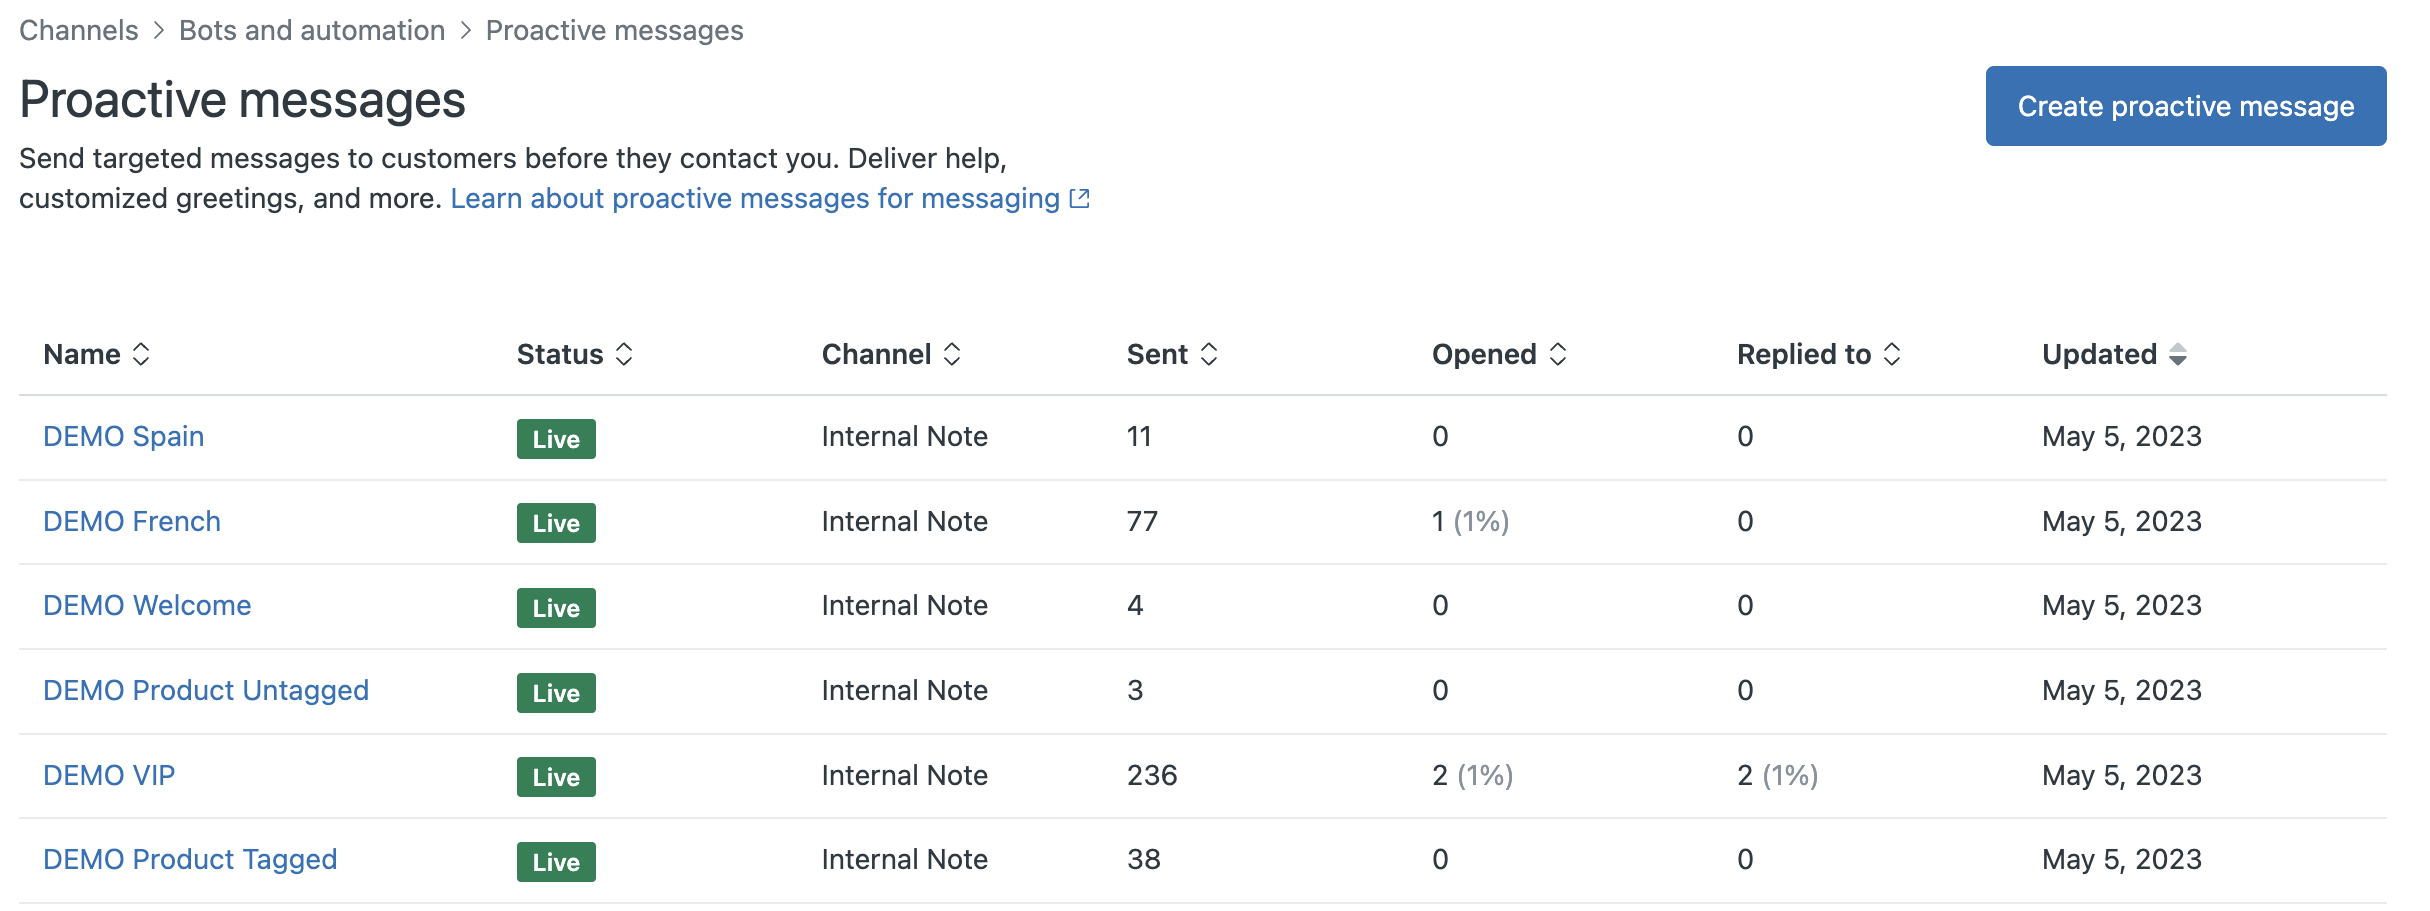
Reporting and impact
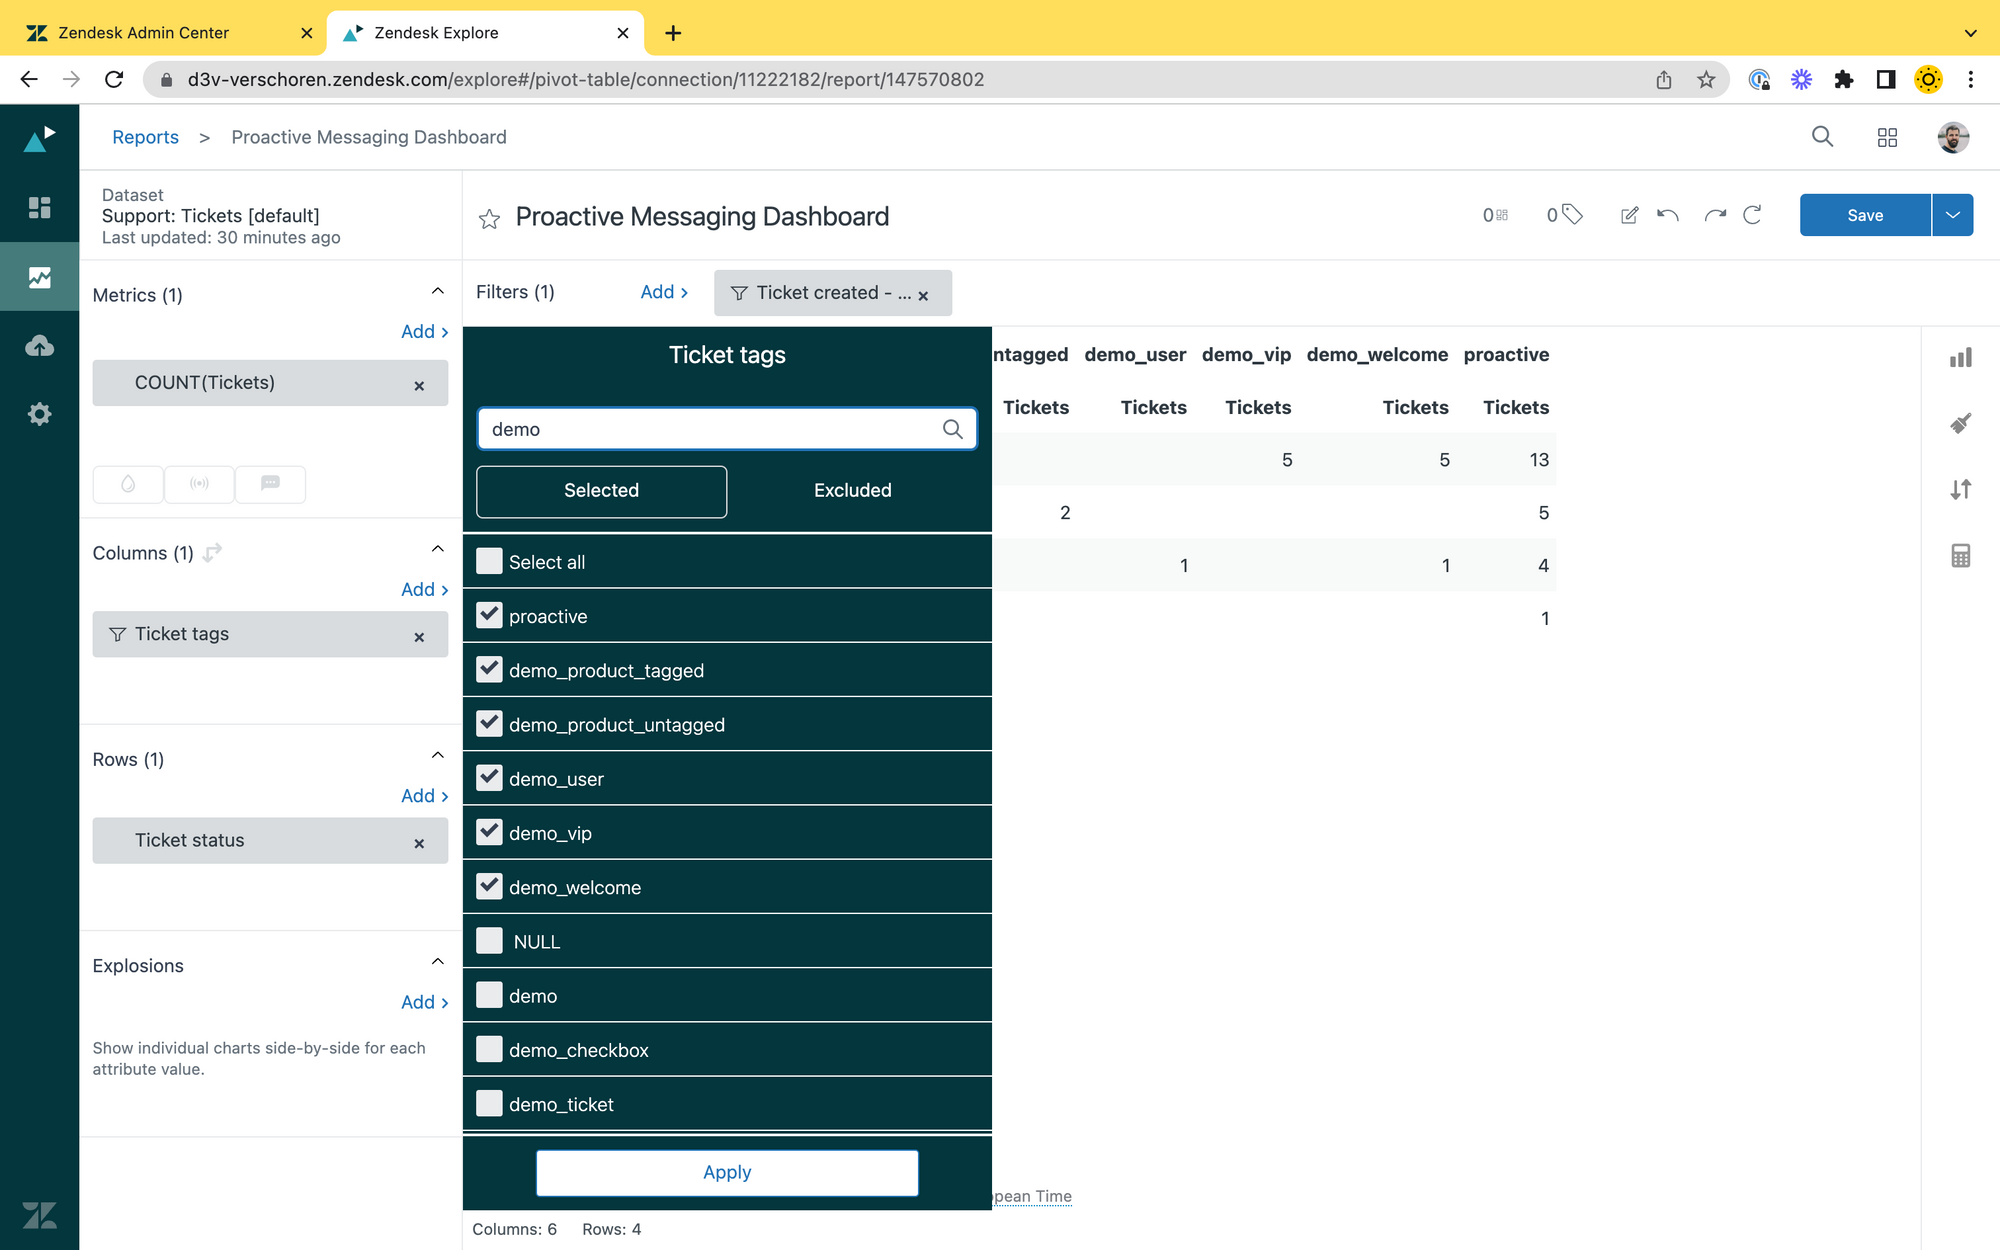
The Proactive messaging feature in Zendesk has a nice overview in the Admin Panel to monitor the effectiveness of your campaigns. For each proactive message you can measure the sends, opened and replies in a nice overview.
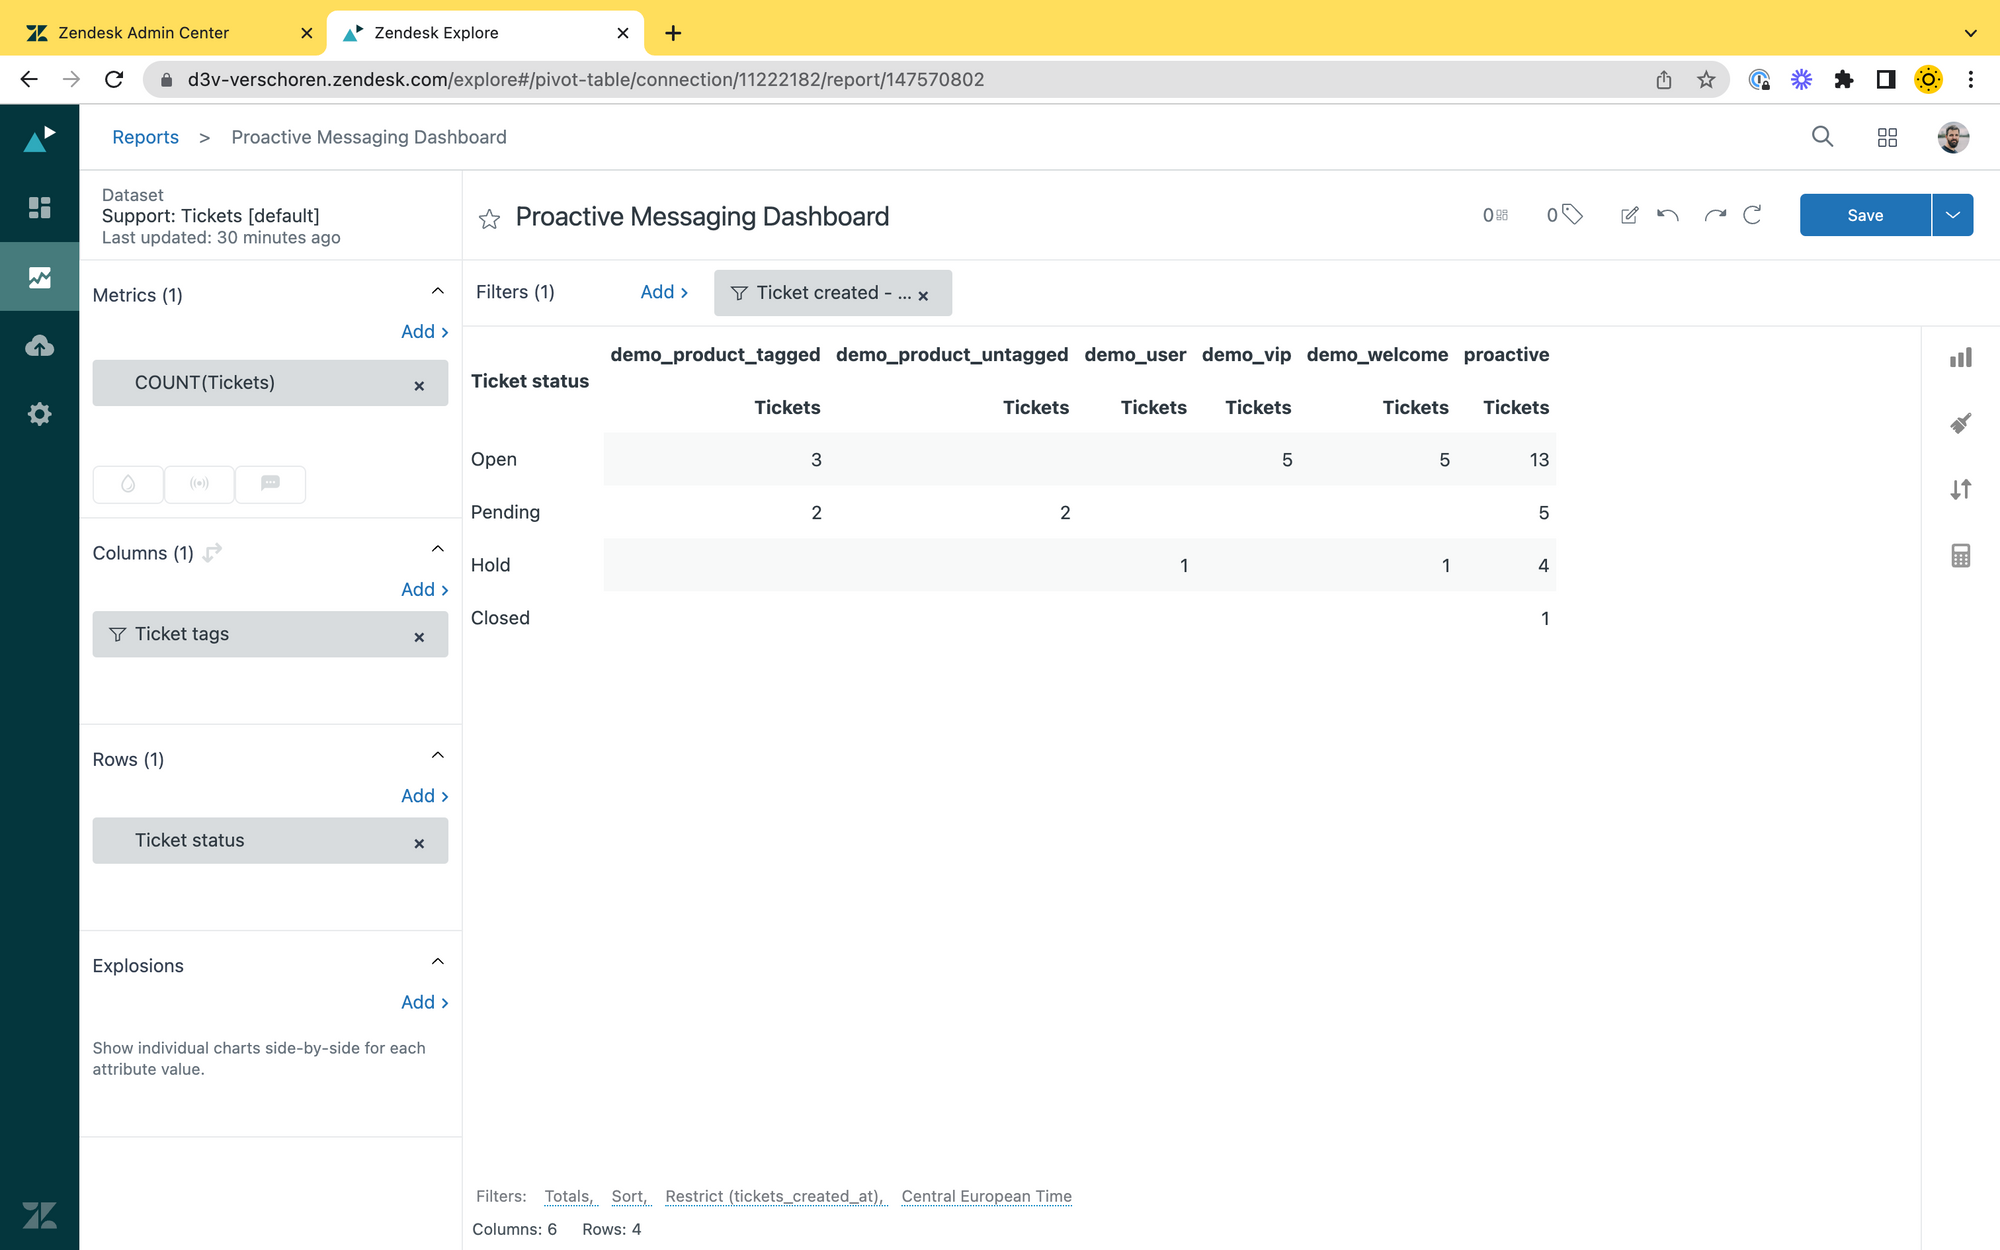
Personally I find it a bit weird that this data is not (yet) a part of Explore, but thanks to the tags used on the tickets created, you can still pull in data into Explore and get some insights in your campaigns there:
Limitations
The examples above show that there's quite a lot of complex flows that can already be build with Proactive messages.
However, while playing with the tool, some limitations did come up.
Rules and Conditions
One item I would love is to get access to a users' logged-in state to trigger different messages. This would make the VIP flow above a lot nicer, or would prevent us from annoying logged in customers, while still targeting visitors. similarly, being able to reference the name of the logged in user would be nice too.
Alternatively, rules would benefit nicely from allowing regex matches for more complex parsing and the ability to read localStorage cookies to have more nuanced triggers.
API
Another omission I find curious is the complete lack of any API or developer toolkits for this.
I would love to be able to trigger a proactive message or intent client side via e.g. zE('messenger:proactive', 'message', 'type:intent','tag')
Similarly, a way to create, update, (dis)able or delete proactive messages via API would make it possible for tools like Hubspot to schedule and deploy campaigns automatically.
Similarly, I'd love to be able to schedule messages. E.g. launch our proactive campaign next Monday.
Tags
While exploring flows for this article one of the ideas I had was to create a few Proactive Messages tagged with distinct tags (e.g. apple, pear, orange).
My idea was to combine those tags with the new Conditional Step in Flow Builder to automatically select the right path based on the assigned tag.
Sadly, Tags are only applied once a conversation starts, so there is no way for pro-active messages to filter intents.