Zendesk Custom Objects - Part 4: End-User and Forms
This is a four-part series on Zendesk's new Custom Objects feature. The articles cover setup, data import, using Custom Objects in forms and with agents, expanding user profiles, and displaying Custom Objects in Help Center forms.
Zendesk Custom Objects - Part 4: End-User and Forms

On this page
In this four part series we'll explore the new Custom Objects from an admin, agent and end-user standpoint.
Custom Object Series
The first two articles showed you how to set up custom objects and how agent can interact with them. The previous expanded user profiles with Custom Objects and showed how you can use them to trigger different priorities based on linked records.
This article will wrap up the series by solving a missing feature in Zendesk: Showing Custom Objects in Help Center forms and make the selected record available to agents.
 Thomas Verschoren
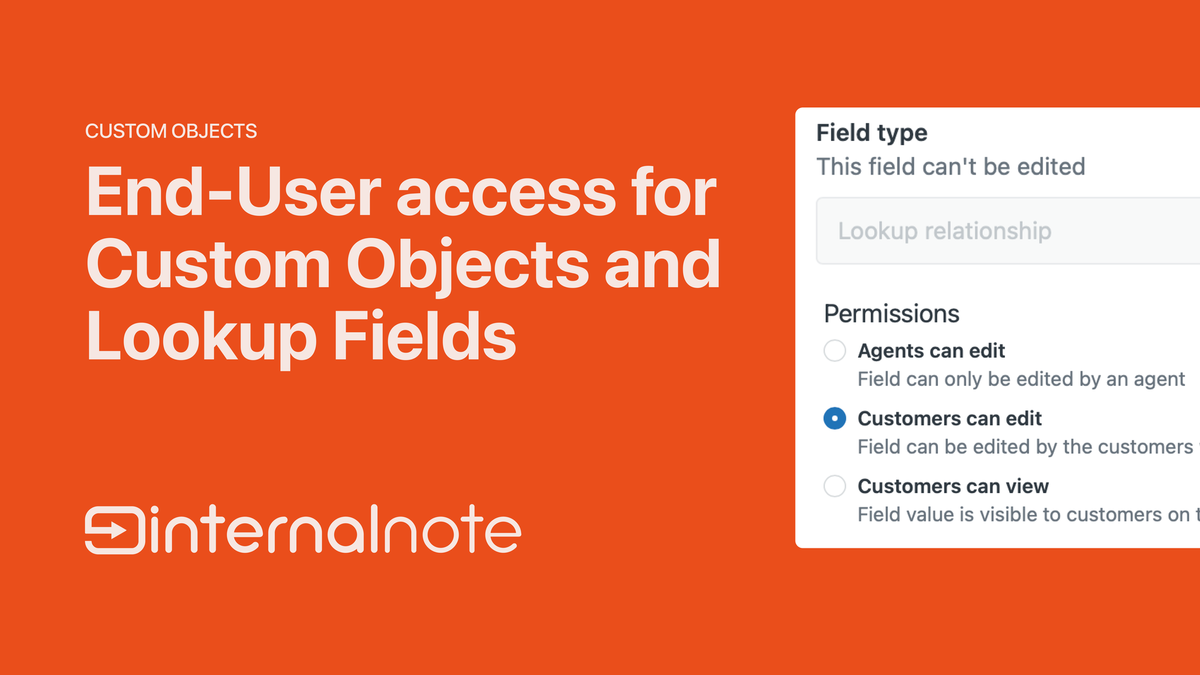
Zendesk has released a native solution for this feature. The steps in this article still work, but I recommend migrating to the native solution!
Custom Objects for End-users
The previous Legacy version of Custom Objects allowed us to set permissions for both agents, admins and end-users. This way you could make the objects available as read-only elements for (anonymous) end-users and use the API to inject custom objects on your Help Center.
This new version of Custom Objects manages the permissions entire via the Admin Panel. We've previously used the permissions to give our agents edit rights to link Pokémon to a specific end-user in the previous article.
Sadly, with the migration to this new version, the ability to give end-users access to the objects has been lost. This is partially due to an inherit security risk with the ability for Custom Objects to link users and organisation via Lookup Fields. If not done carefully, this might make your entire customer list available in e.g. a Lookup Field on a form. For this reason, the end-user is currently not available out of the box.
There are scenario's where it would be useful to have these objects available though. Maybe you want your customer to select a specific device when filling out a form. Or you want to show a list of retail locations to handle a return, based on a Location Object in your Zendesk instance.
This article will show you a workaround to fix this limitation.
What we're building
In this article we'll build the following flow:
- A user opens a specific Help Center form on the Help Center
- We load a dropdown of all Pokémon for them to select
- Once they choose a Pokémon we pass the ID to a hidden intermediate ticket field
- When the ticket is submitted we use that field to set our Pokémon Lookup Field
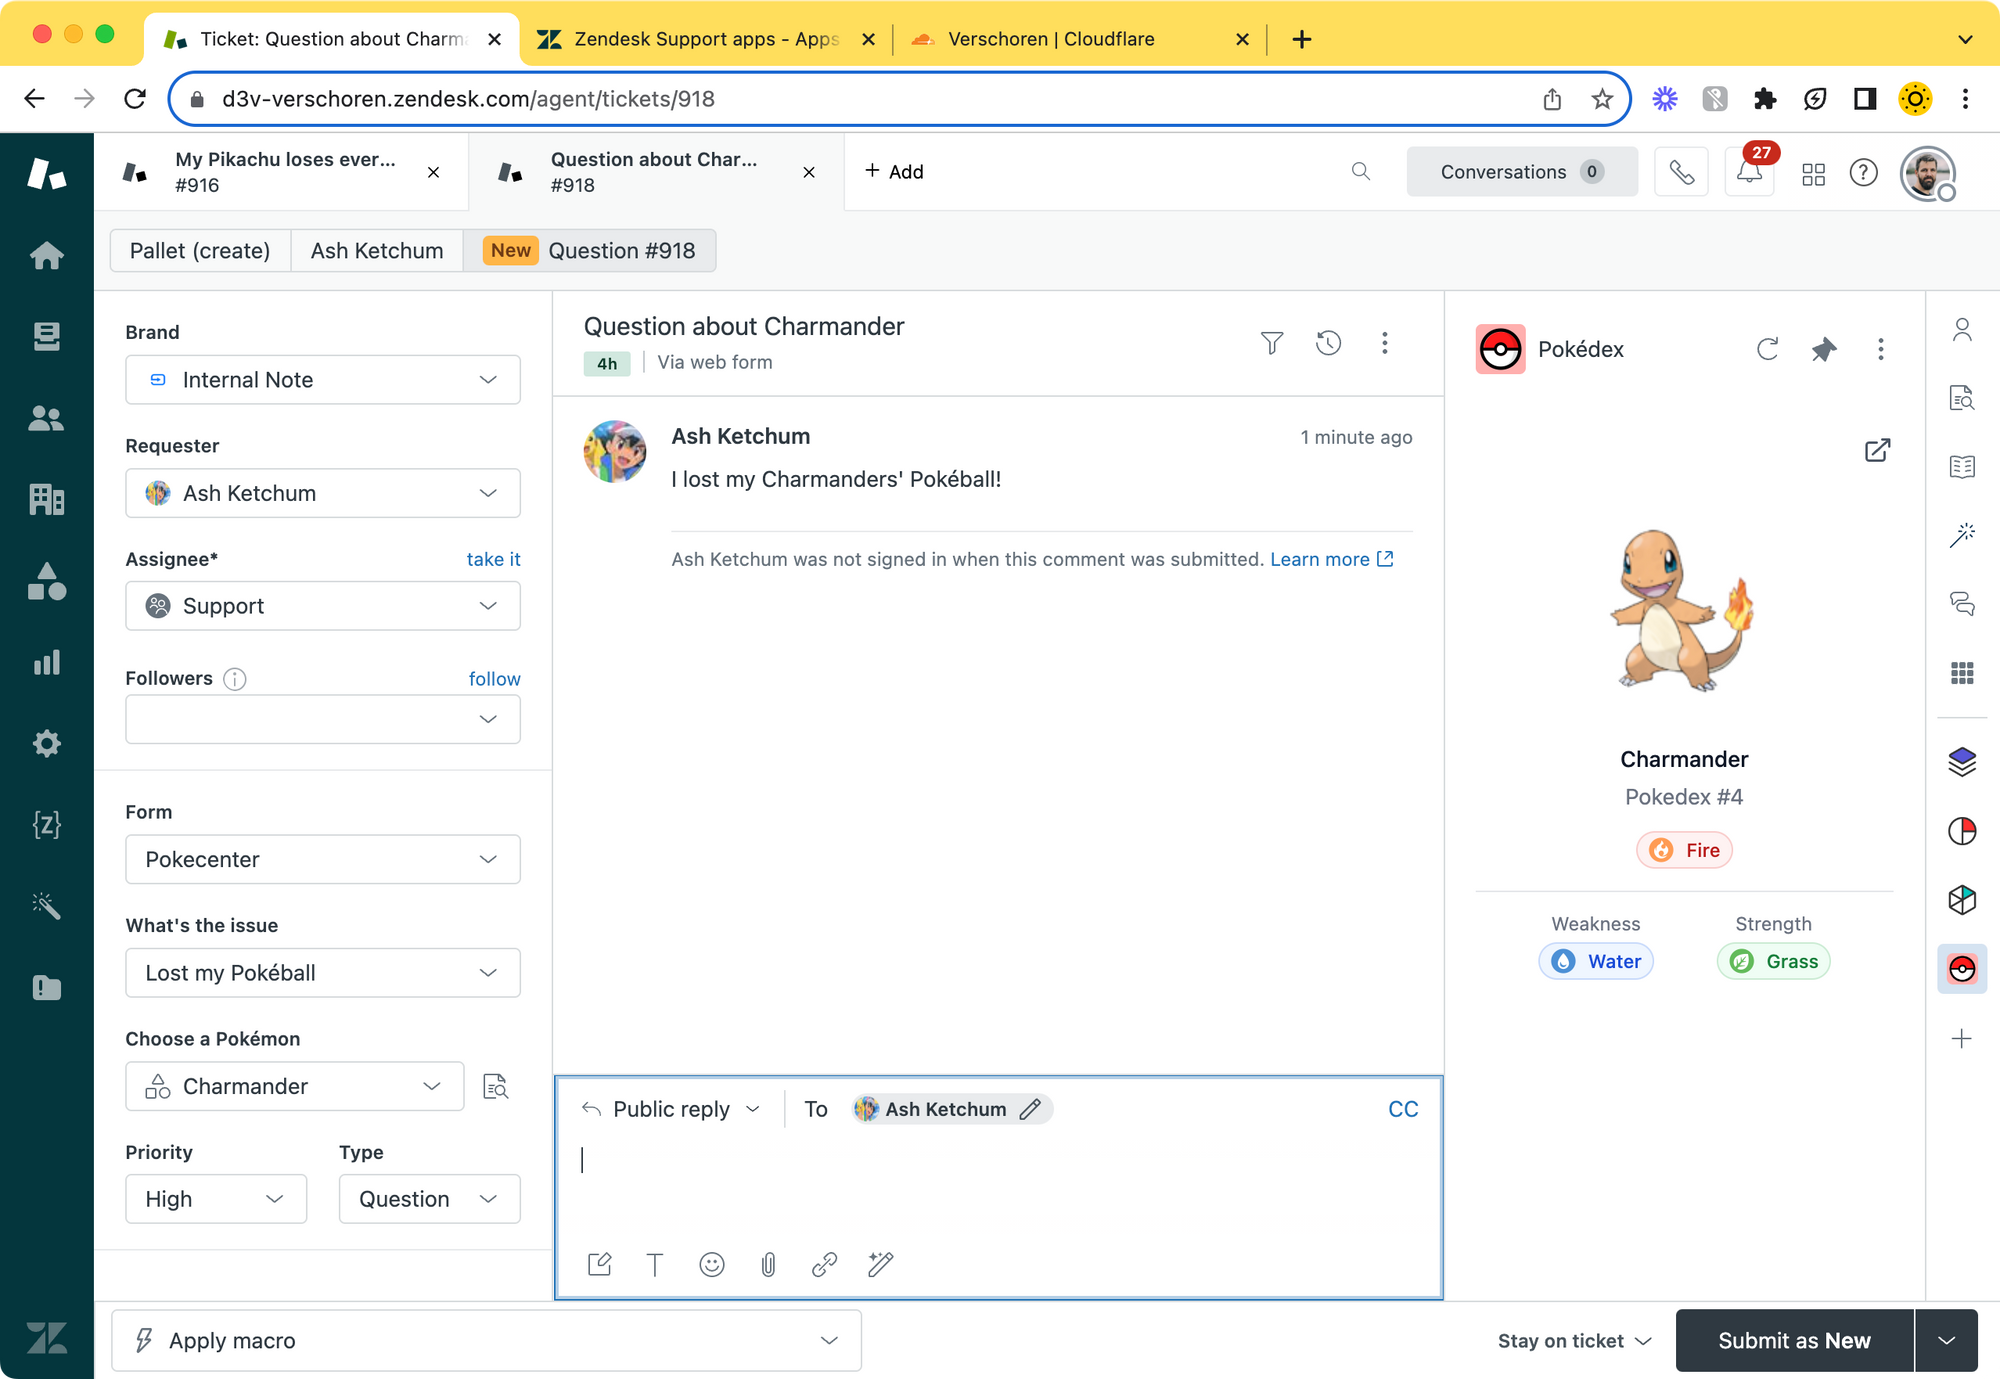
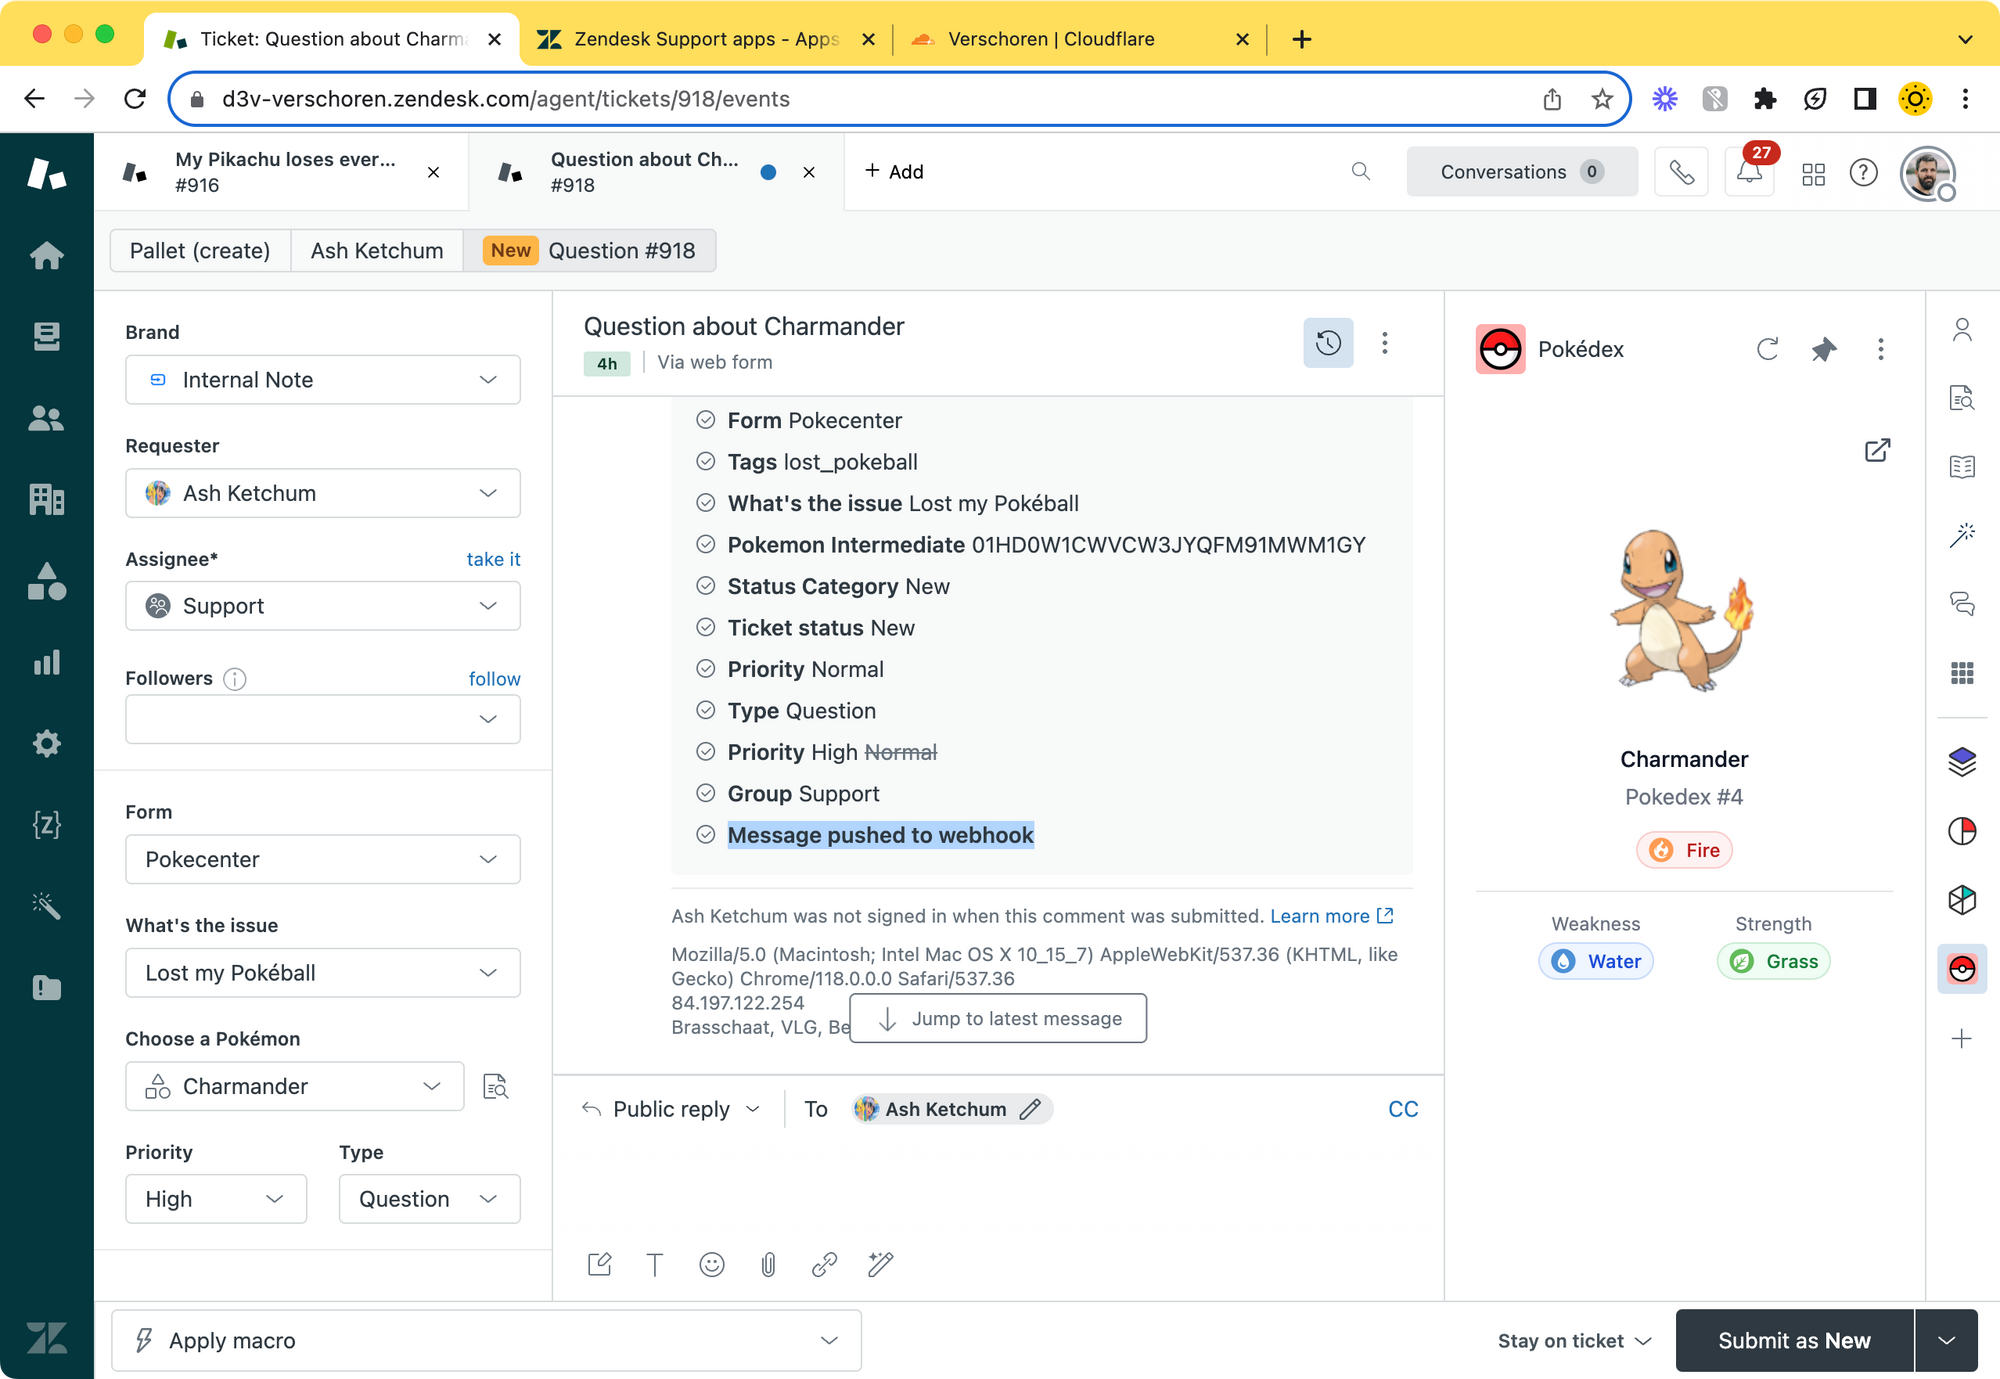
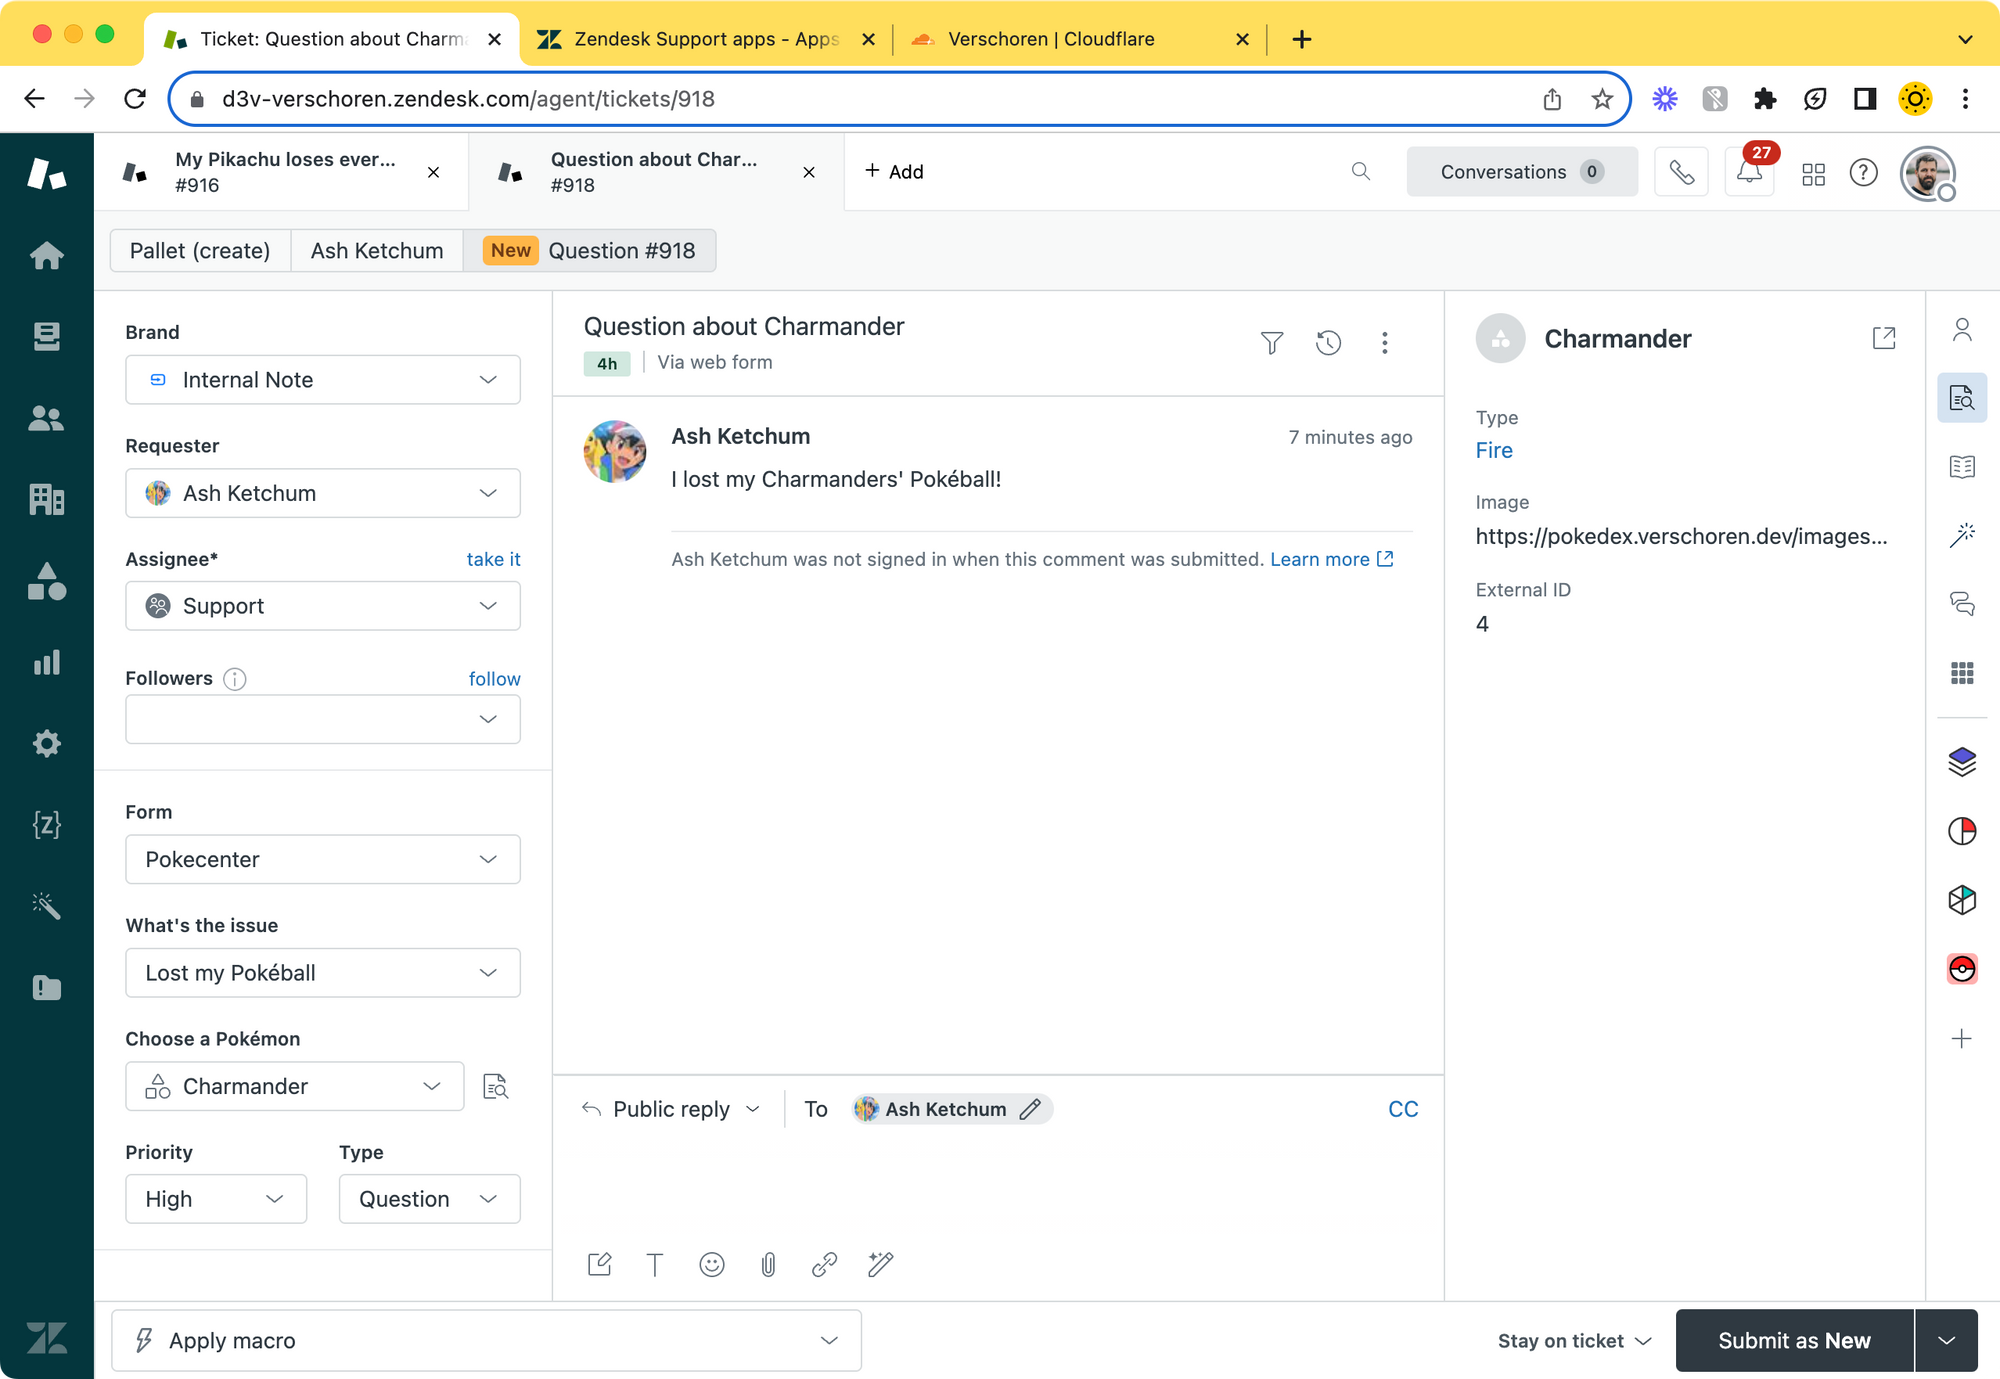
- The agent sees the linked object in the Agent Workspace and can view it's data next to the ticket.
Getting the data to the Help Center
The easiest way to fix the end-user limitation is to use an external service as a proxy to (securely) load the API.
This proxy would be reachable from your Help Center, gather the records via API remotely, and return the JSON data back to the Help Center to use in your code.
Securing the connection
Since we are proxying the data from our Zendesk instance to a public Help Center it's important to consider the security implications of this.
Only allow your website
Zendesk recently introduced Help Center JWTs to secure outgoing connections to external services. They wrote a clear example in this article on how to use it.
Access-Control-Allow-Origin to lock the API to just our environment. This article focusses on leveraging the API after all and your deployment might not necessarily use the same Cloudflare environment as me.Scope the API
My proxy only supports the /api/v2/custom_objects/pokemon endpoint, and only allows for GET requests. This way the exposed data is limited to known data I don't mind being public.
It's going to be public by design once I add it to my webforms anyhow.
The Proxy Code
I added a sample worker to this repository in the /worker/index.js folder.
 verschoren
This worker takes the incoming URL and uses the path and parameters to create request that goes to Zendesk.
If I make a request to https://myworker.workers.dev/api/v2/custom_objects/pokemon/records.json the worker will take the URL and turn that into https://subdomain.zendesk.com/api/v2/custom_objects/pokemon/records.json and add the necessary authentication tokens.
We'll also filter the incoming request to only support GET requests and filter the pathname to only allow for custom_objects/pokemon .
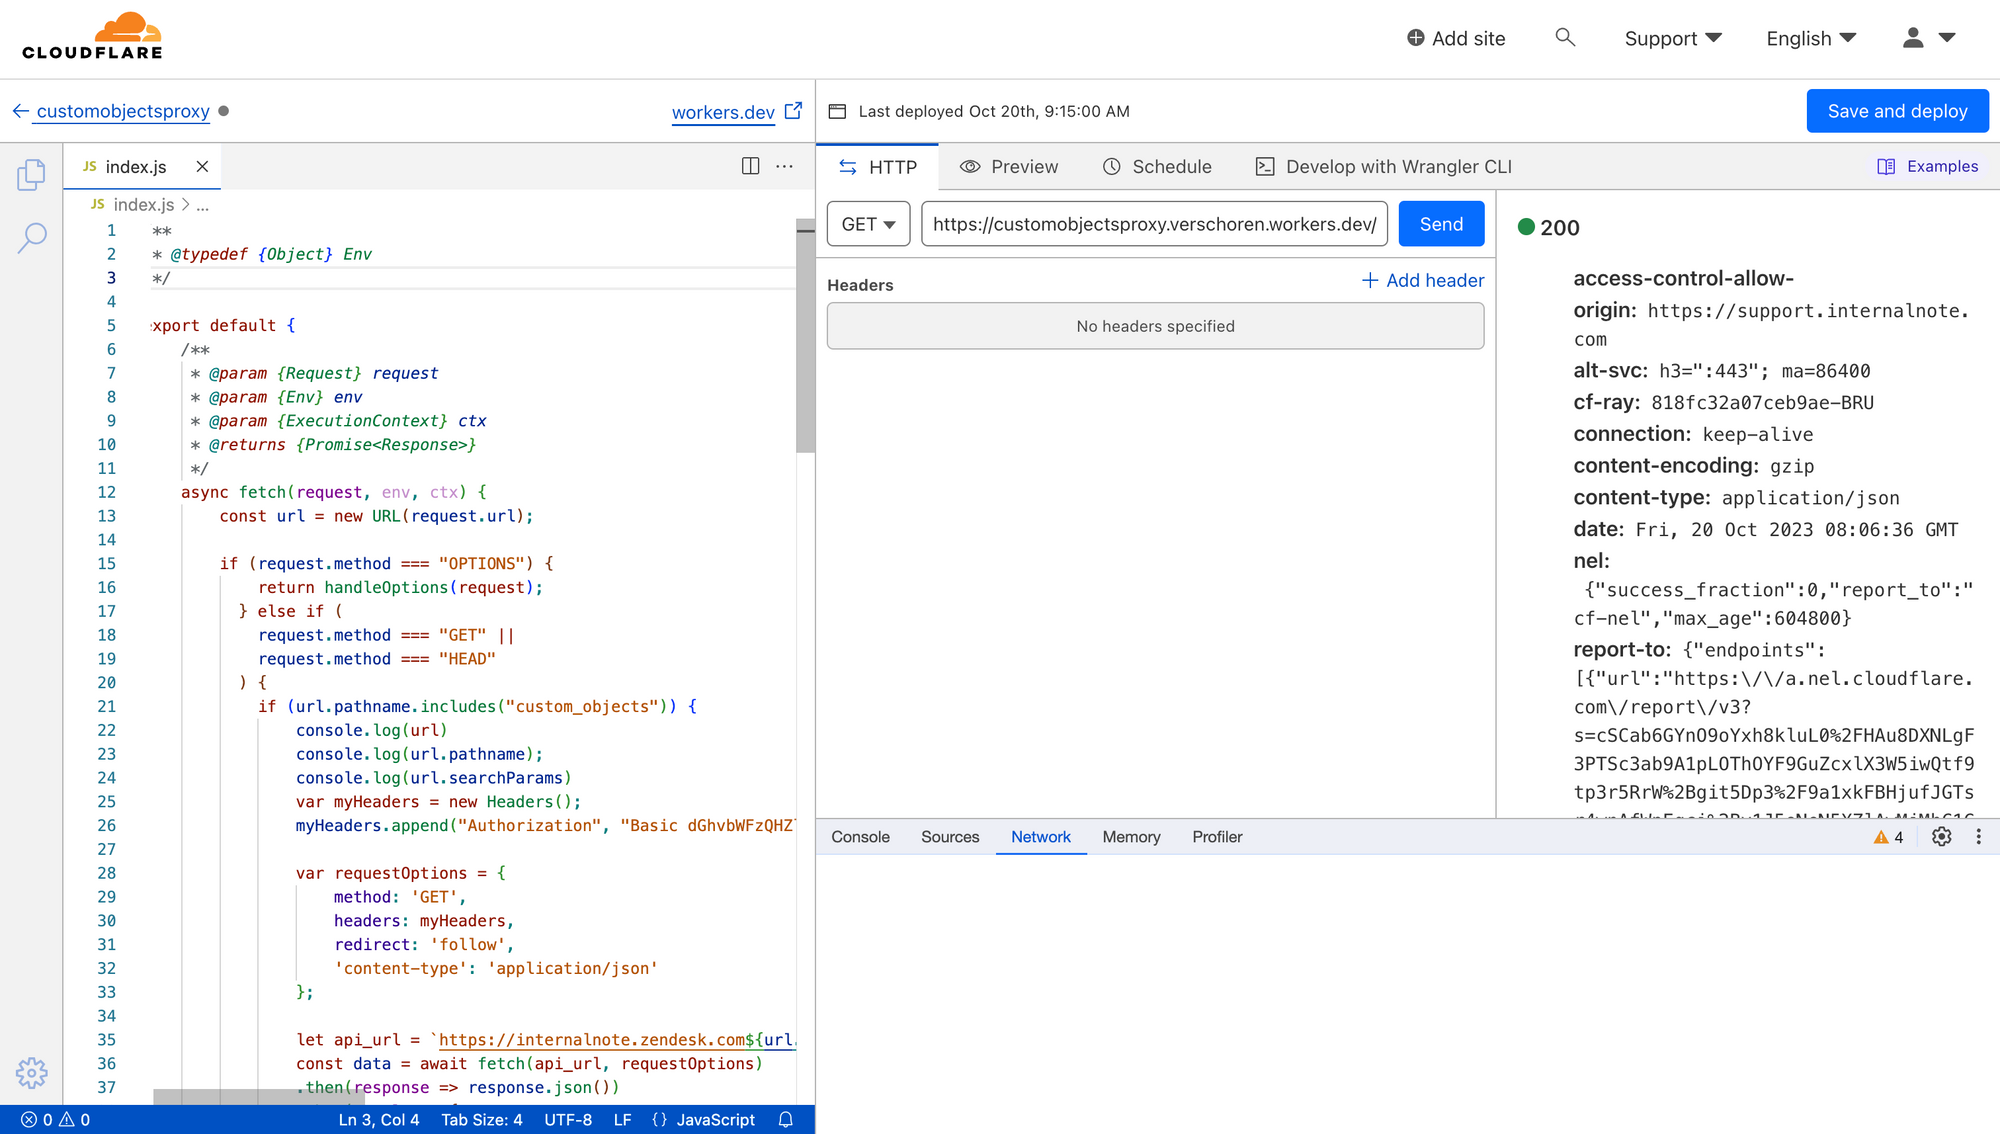
Do deploy this code you can go to https://workers.new and create a new Cloudflare Worker. Copy-Paste the code from the repository in the editor.
You'll need to change the following four parameters:
const zendesk = 'https://internalnote.zendesk.com'; //your zendesk domain
const custom_domain = 'https://support.internalnote.com'; //your help center custom domain
const authentication = '' //base64 encoded username/token:api_token
const object_name = 'pokemon' //name of your custom_objectOnce you've deployed you'll need to copy the URL of the worker. That will be similar to https://customobjectsproxy.verschoren.workers.dev.
Setting up the flow
Setting up the rest of the flow is done entirely in Zendesk. We assume that you've already read the previous articles in this series. This means you have a form for your Pokémon inquiries, and have created a Lookup field that links to a Pokémon Custom Object.
Create an intermediate field
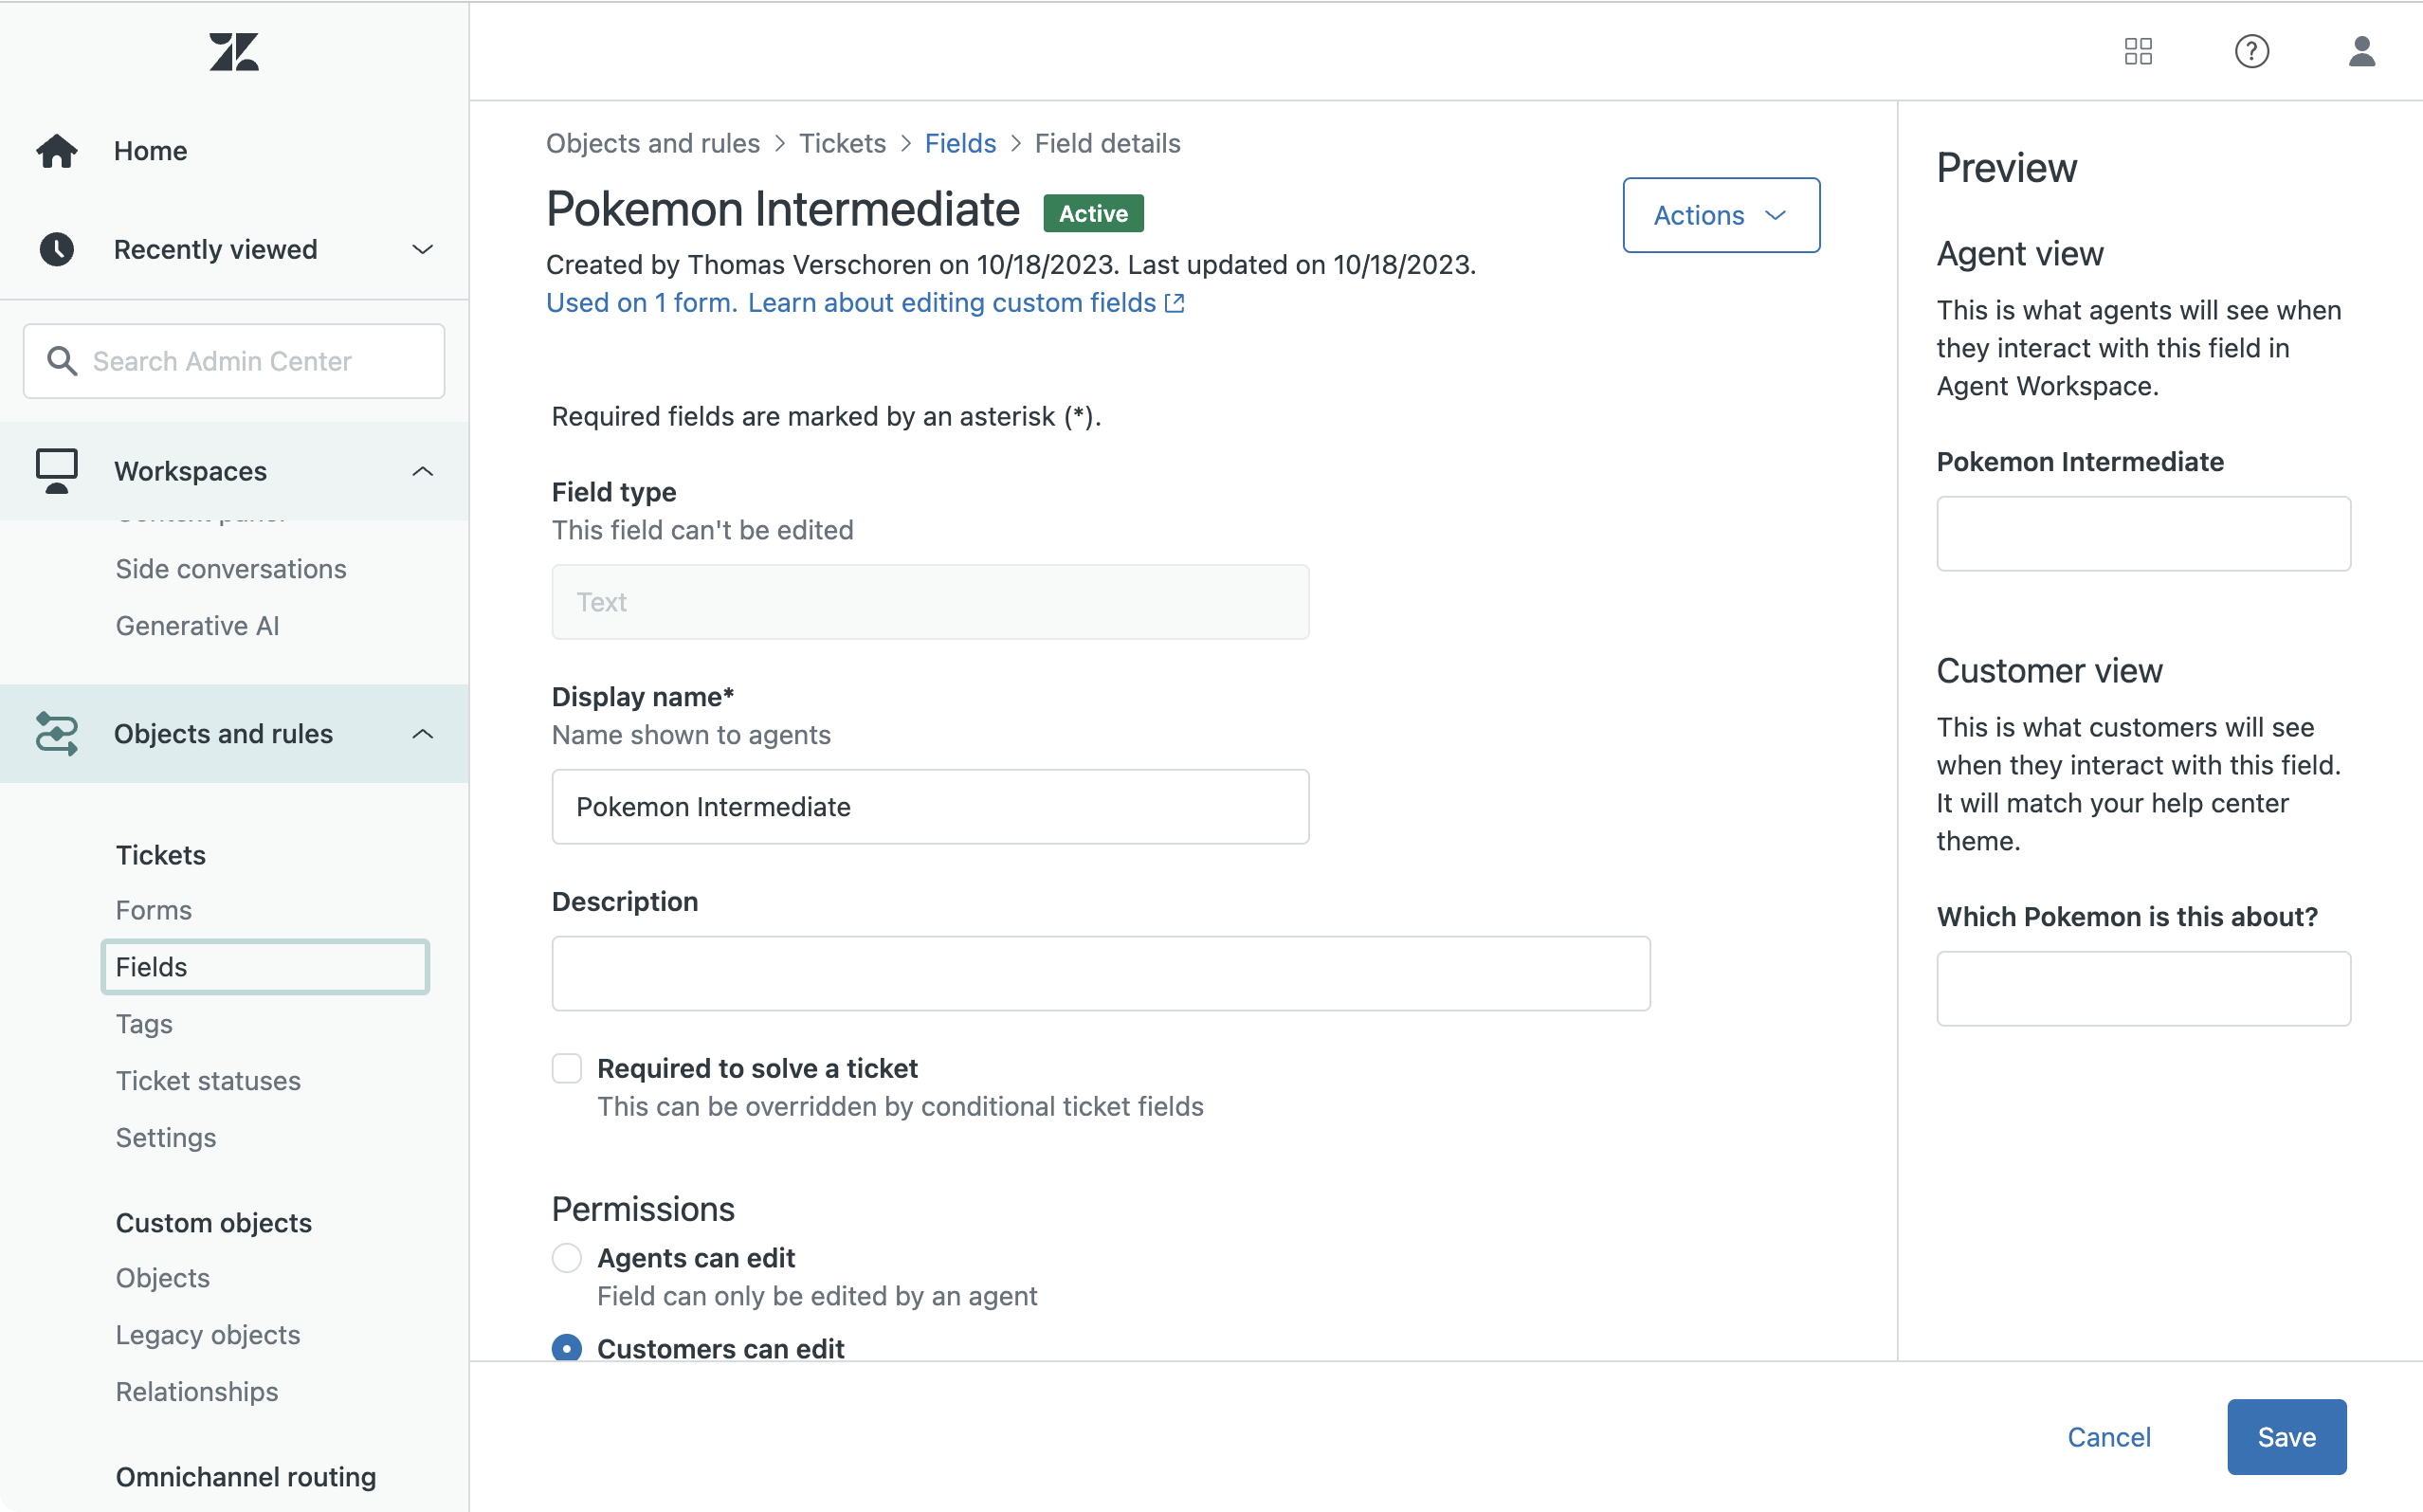
Zendesk does not allow us to create Lookup Fields for end-users, which is the reason we need to build this in custom code.
To be able to pass the chosen Pokémon from the webform to the agents, we'll need to use an intermediate text-field that will (invisibly) store the ID of the chosen Pokémon.
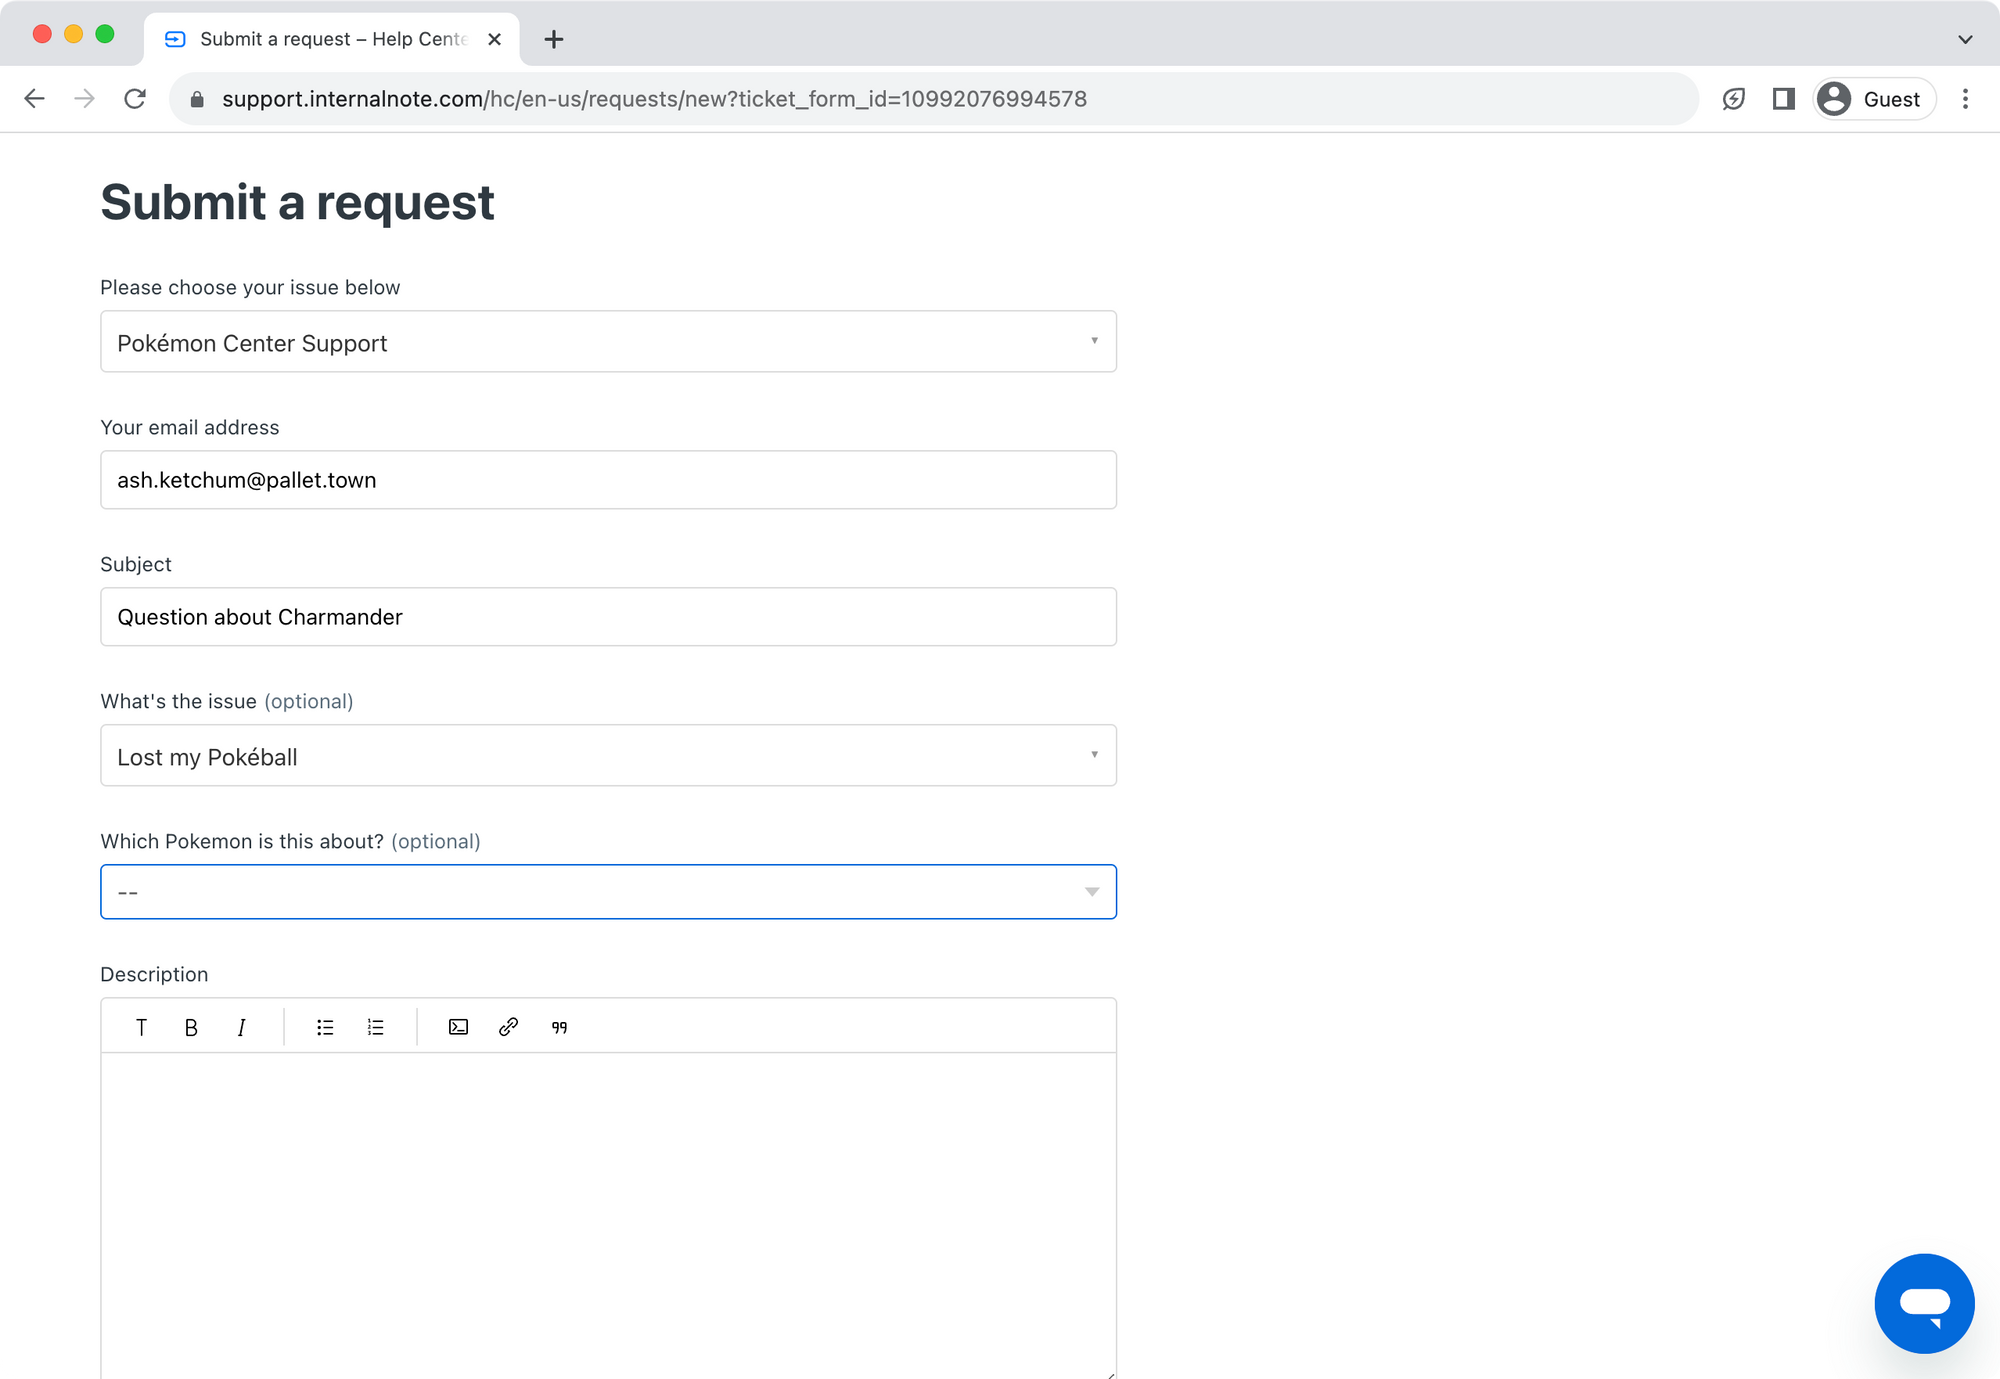
To do this create a new Ticket Field of Type text. Call it Intermediate Pokémon and copy down the ticket id.
Make sure customers can edit the field, and add it to the your Webform.
Setup a webhook
The end result of this flow should be the a filled in Lookup Field that shows the agents which Pokémon the end-user is talking about.
Since end-users can't fill in Lookup Fields, we want them to fill in the Intermediate Field and we'll use a webhook and trigger to fill in the Lookup field for them.
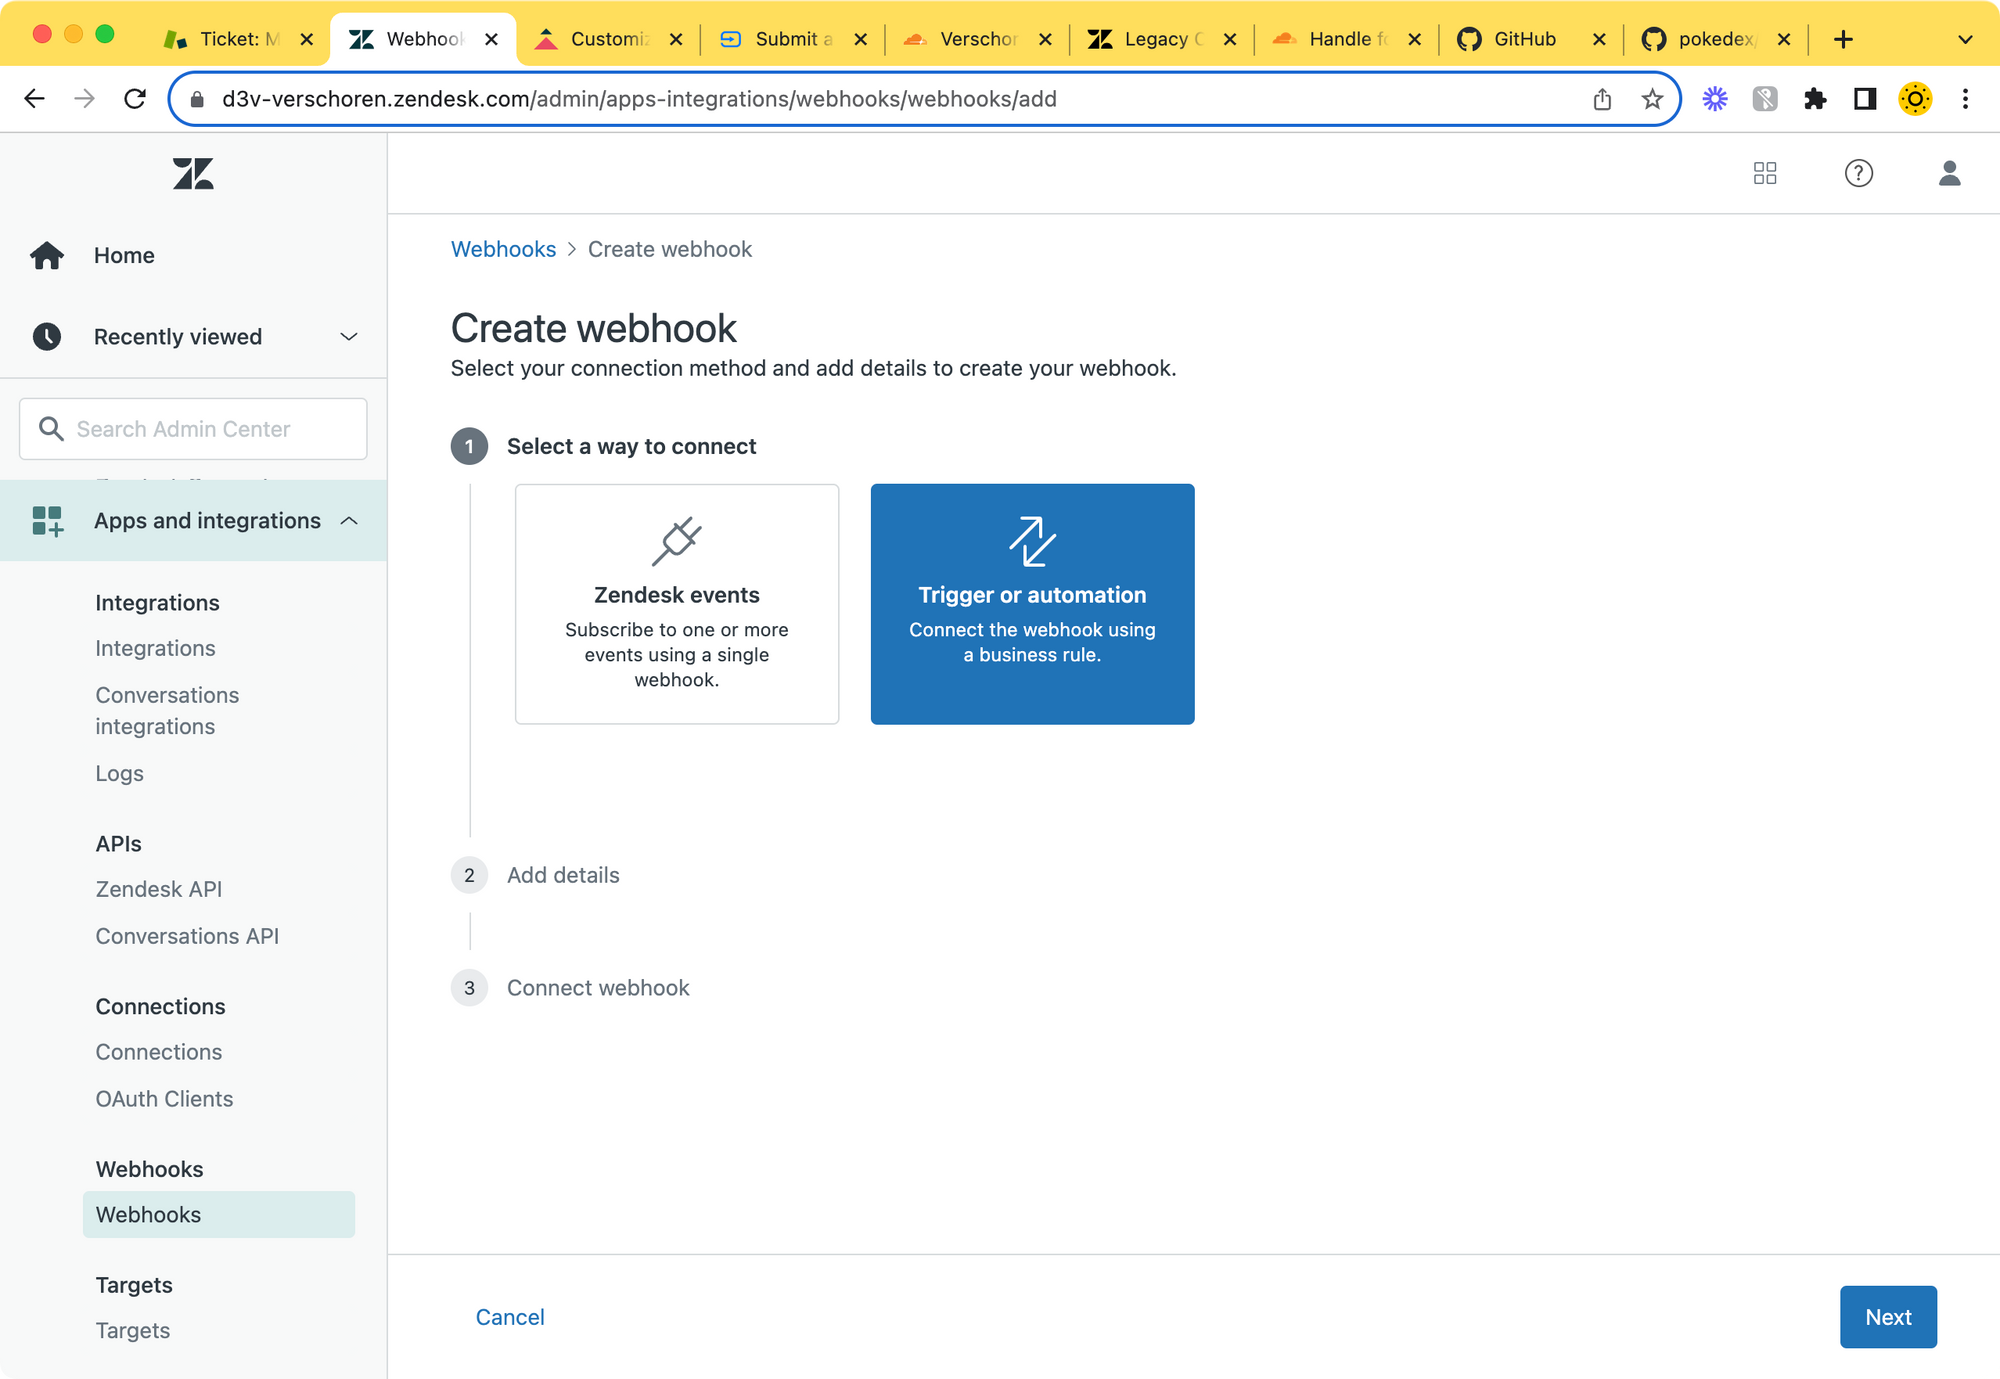
First off we need an 'Update Ticket Webhook'.
Go to the Admin Panel > Apps and Integrations > Webhooks and create a new Trigger based webhook
- Name: Update Ticket
- Endpoint URL:
https://d3v-verschoren.zendesk.com/api/v2/{{ticket.id}}.json - Request Method:
PUT - Authentication: Basic Authentication:
[email protected]/token:zendesk_token

Setup a trigger
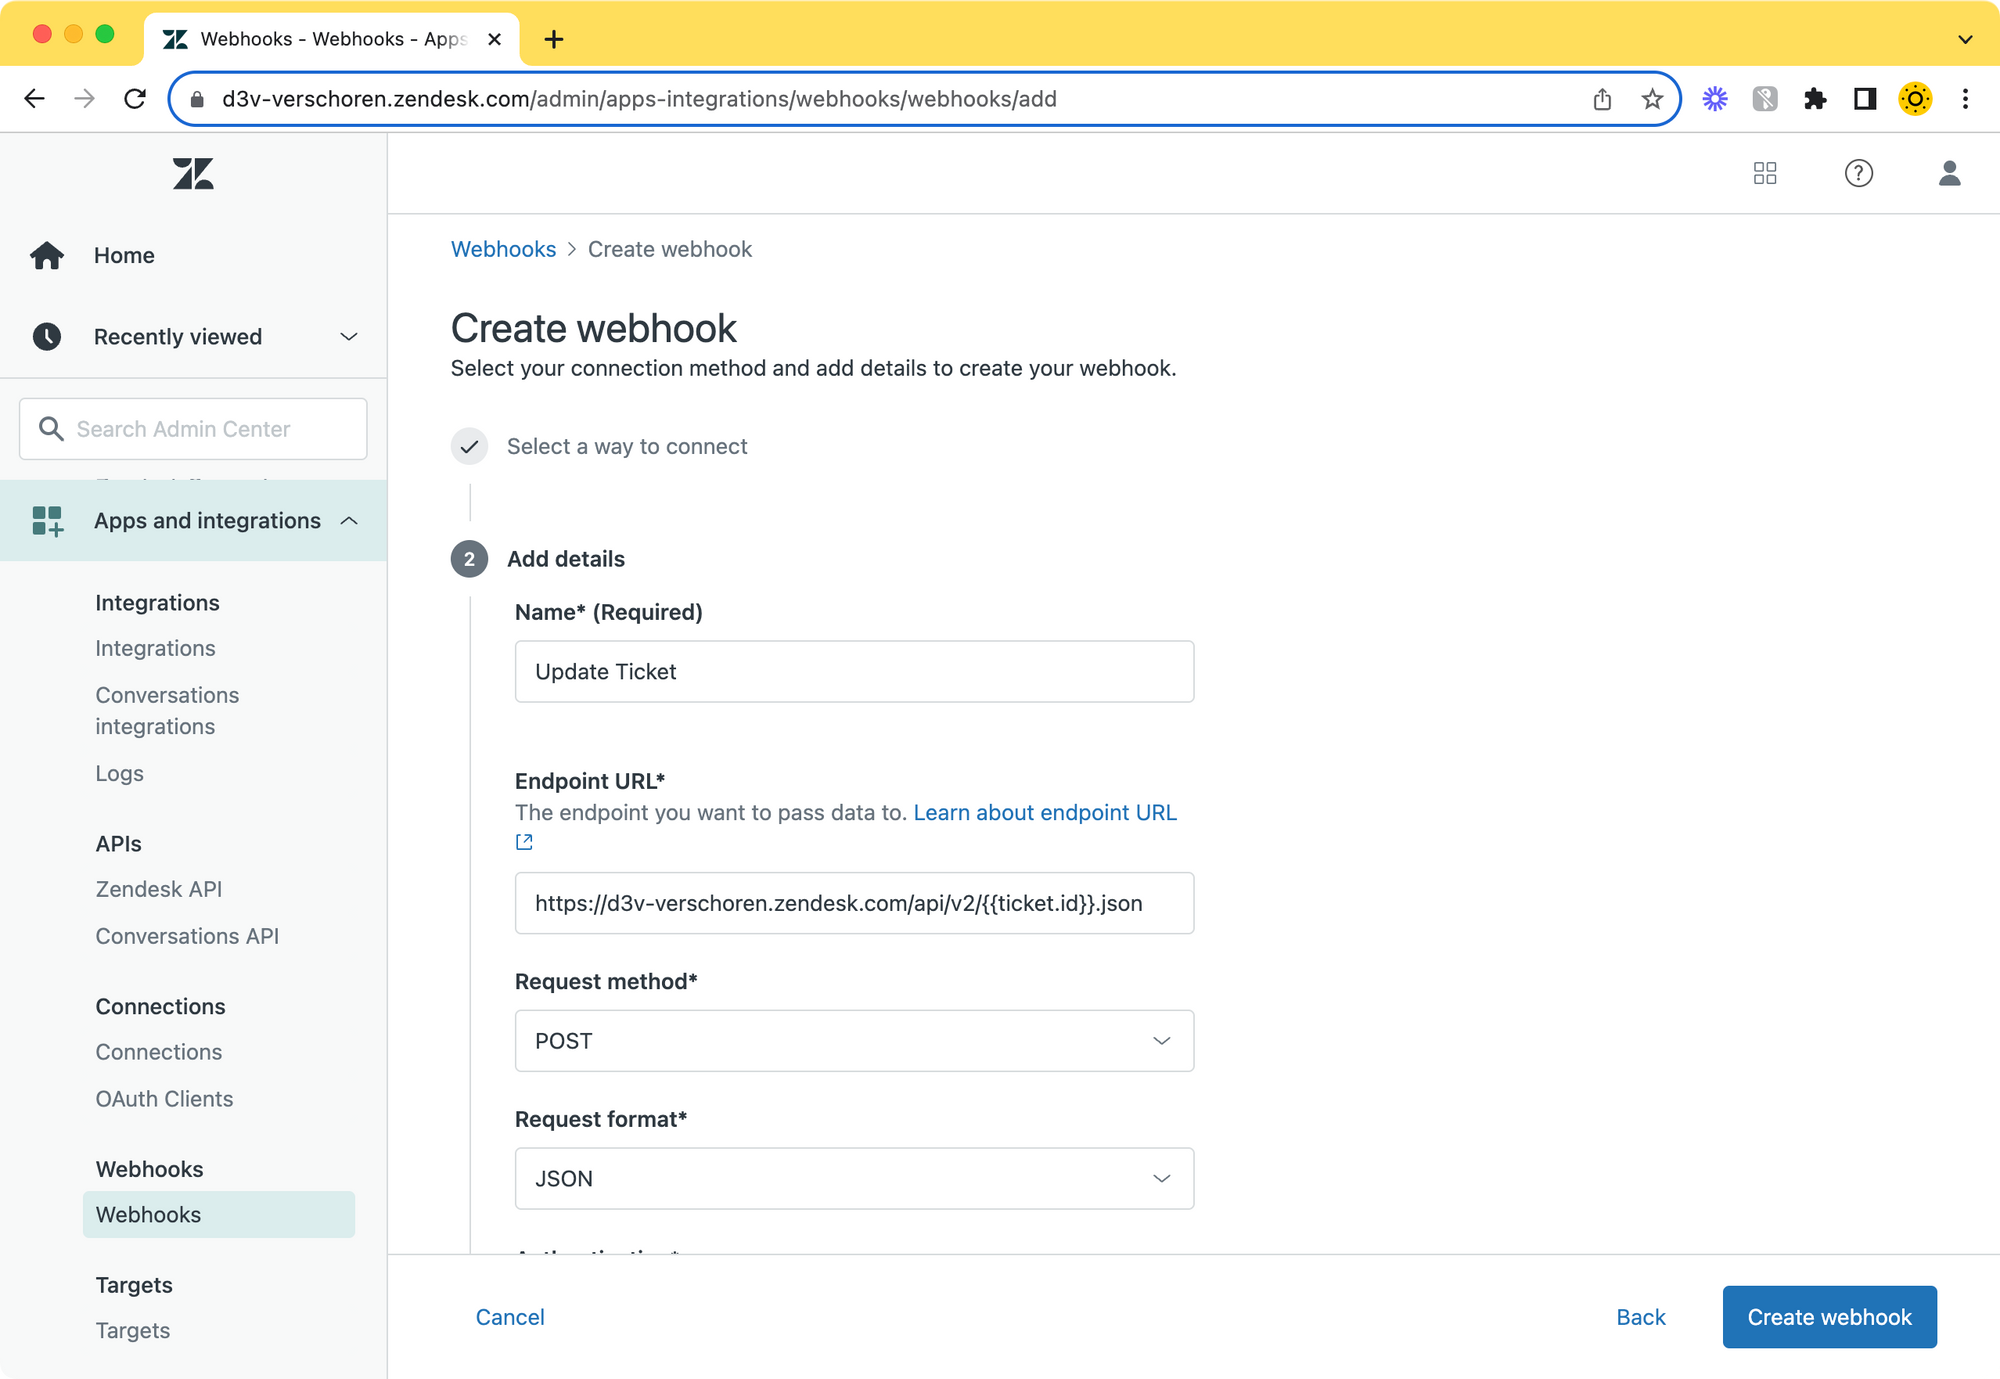
And to wrap up the Admin setup of this flow, we'll need a trigger that reacts whenever a ticket is created and puts the value of the Intermediate Field into our Lookup Field.

Create a trigger with the following conditions: we want to only run this when a ticket is created in our Pokémon Form, and we want a value to be present in the intermediate field (meaning a Pokémon has been chosen)
Once these conditions are met, we want to execute a Webhook that calls the Update Ticket webhook via Notify > Active Webhook.
Add the following payload to the webhook. Note that id should be the ID of your Lookup Field, and value should be the id of your intermediate field.
{
    "ticket": {
        "custom_fields": [
            {
                "id": 14502103878802,
                "value": "{{ticket.ticket_field_14512152430226}}"
            }
        ]
    }
}
The Help Center
We've now got two out of three pieces setup. We have a way to get the Custom Object records for end-users, and we have a way for the object the end-user has chosen to be added to our Lookup Field.
We do miss one piece of the puzzle: we need to show a list of Pokémon to our end-users, and set the chosen option to our Intermediate Field so our trigger can use it.
The way we'll do this is by replacing the intermediate field with a custom dropdown of our own. Whenever the customer chooses an option in the dropdown, we'll fill in its value in the intermediate field so our trigger can use it.
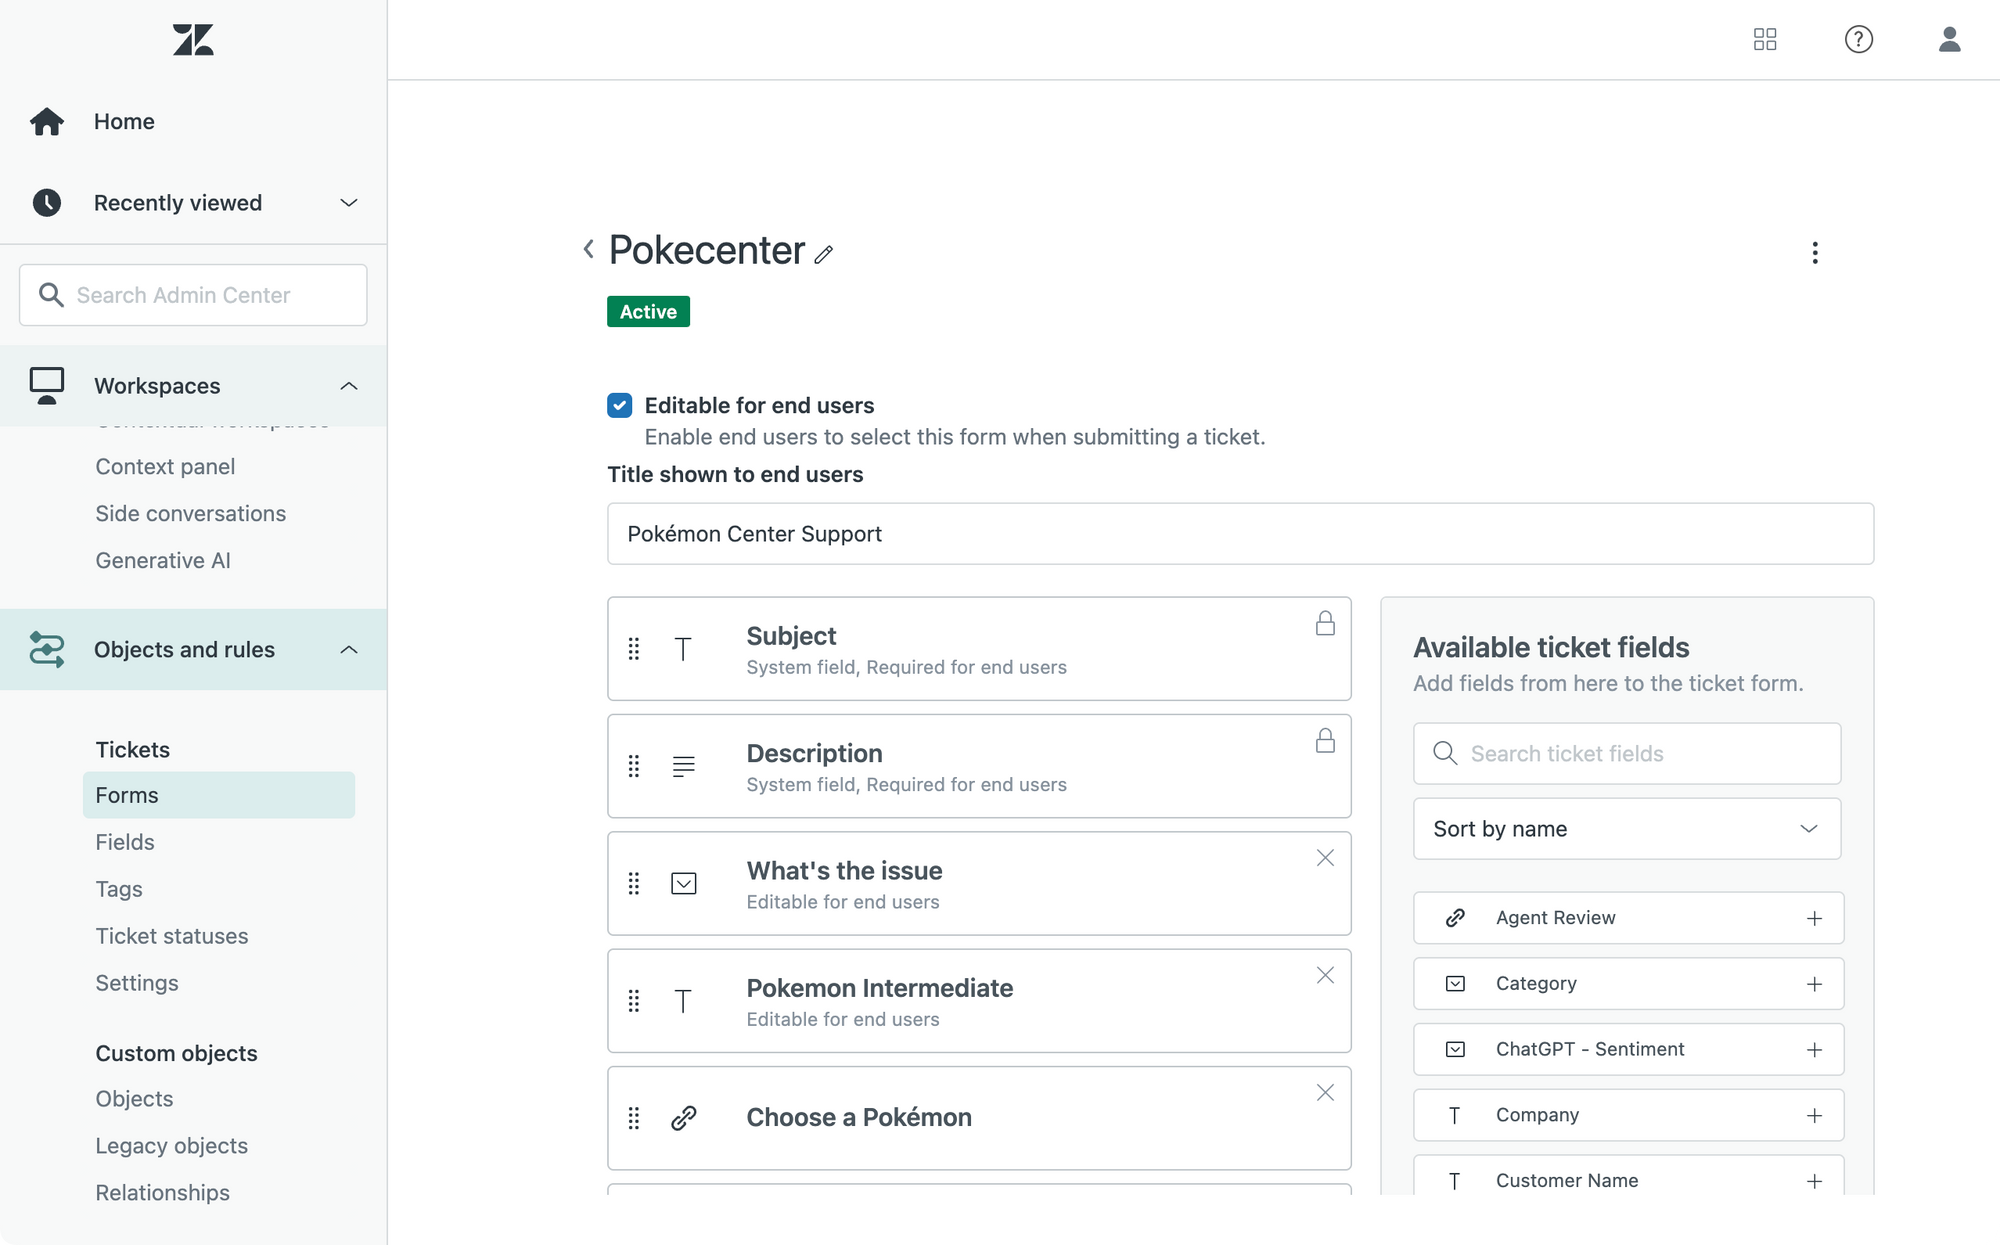
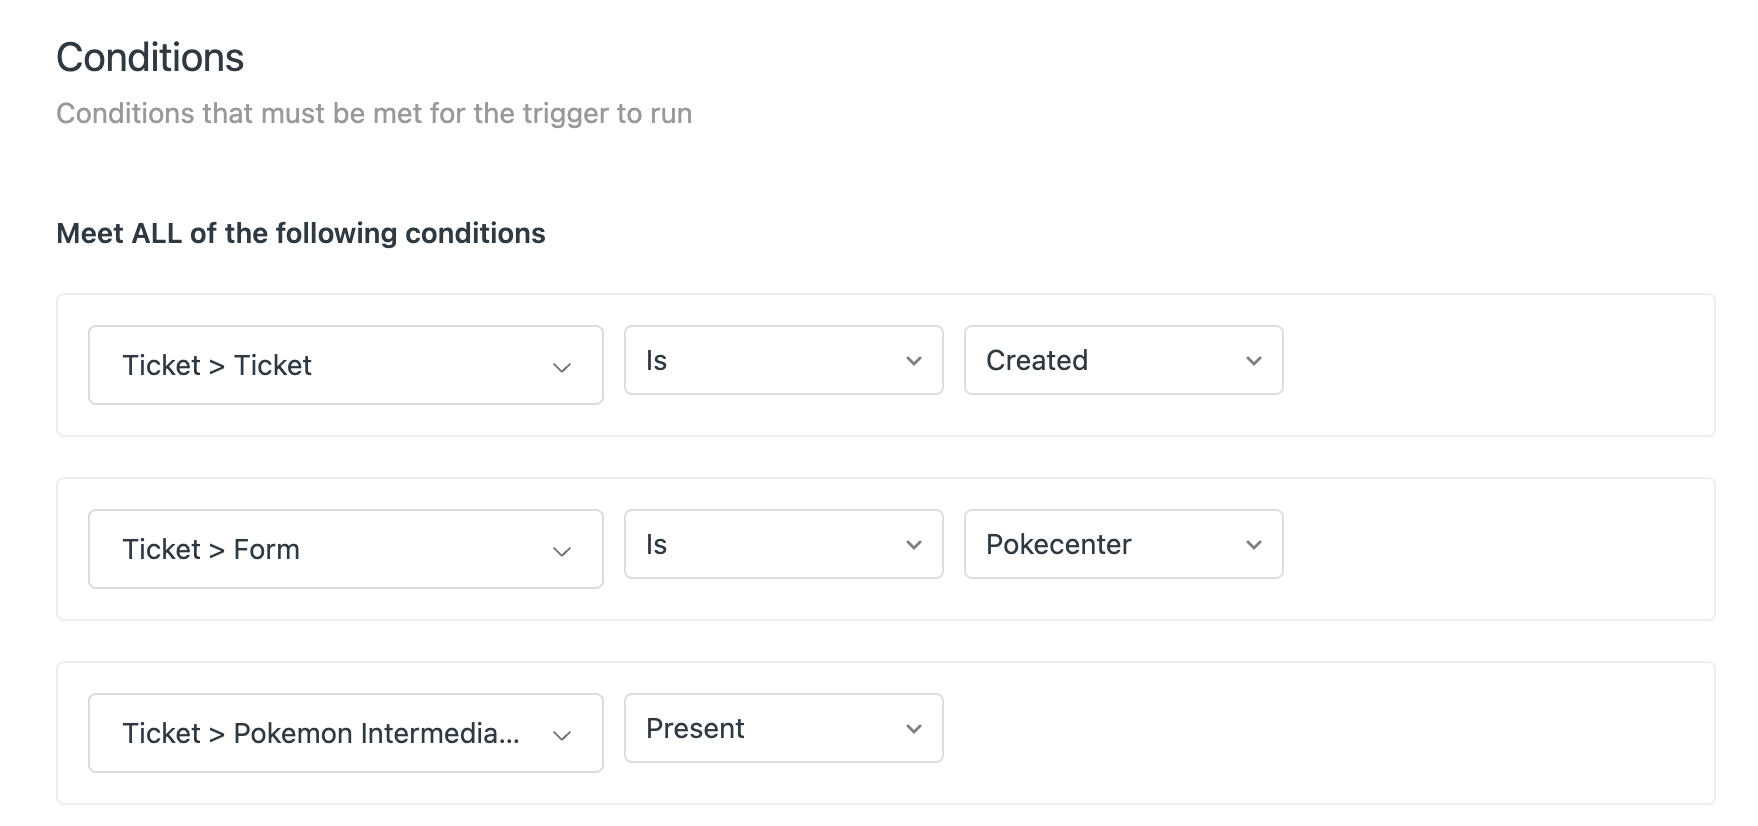
The code below should be added to the new_requests_page.hbs of your Help Center theme.
Setup
We start by checking which form is displayed so we're sure we only change our Pokémon form. This also keeps the code sorted per form if we modify multiple forms.
$( document ).ready(async function() {
  const urlParams = new URLSearchParams(window.location.search);
  const ticket_form_id = urlParams.get('ticket_form_id')

  if (ticket_form_id == '10992076994578'){
    ....
  }
});
Next we'll hide our Intermediate Field and add an empty dropdown which we'll later fill with the Custom Object Records.
const intermediate = '14512152430226' //ID of our ticket field
$('#request_custom_fields_'+intermediate).hide(); //hide custom fields
$('#request_custom_fields_'+intermediate).after(`
  <select id="select_pokemon">
    <option>--</option>
  </select>
`);
Since we might want to use the new Zendesk Guide JWT option we also need to generate a JWT token
const jwt = await getJwt();
async function getJwt(){
  fetch("/api/v2/help_center/integration/token.json")
  .then(response => {
    var json =  response.json();
    return json.token;
  })
}
We need to load the data from our Worker to get access to the records.
const base = 'https://customobjectsproxy.verschoren.workers.dev';

var api_url = "/api/v2/custom_objects/pokemon/records.json?per_page=100&sort=id"; //the sort value makes sure we sort by the external_id

await getRecords(api_url);

async function getRecords(path) {
  var url = base + path;
  $.ajax({
    url: url,
    dataType: 'json',
    headers: {
      "Authorization": `Bearer ${jwt}`,
      "Content-Type": "application/json"
    },
    success: function(response) {
     //handle response
    }
  });
}
//returned response
{
"custom_object_records": [
{
"id": "01HD0W1CWVCW3JYQFM91MWM1GY",
"name": "Charmander",
"external_id": "4"
...
},
...
]
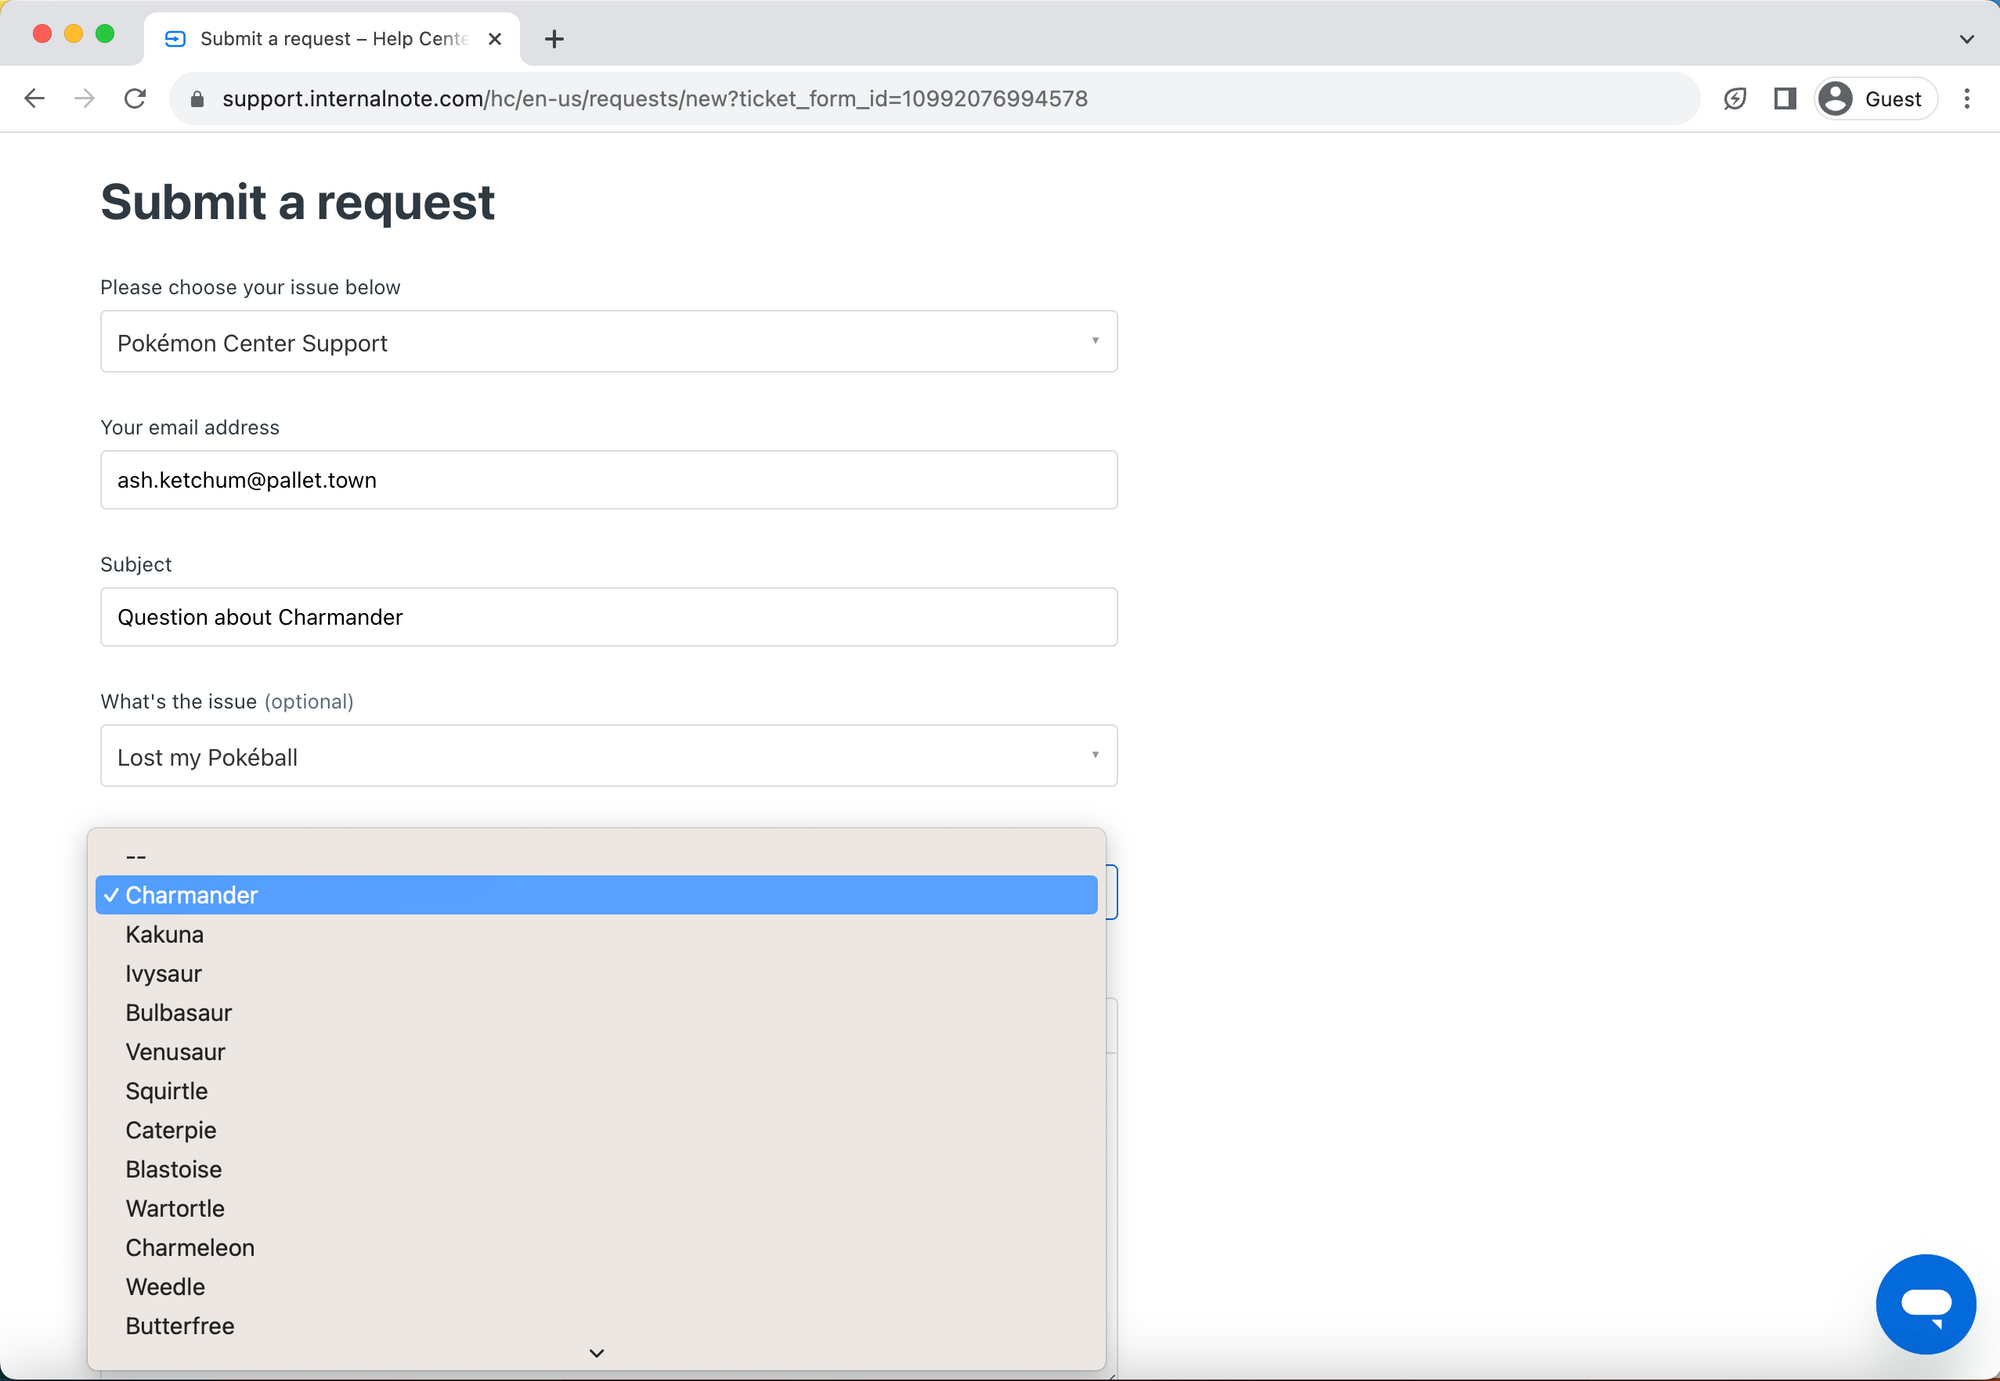
} Once we've captured the data by fetching the api_url we'll loop through the records to append them to our dropdown.
//add to dropdown
$.each(response.custom_object_records, function (i, record) {
  $('#select_pokemon').append(`
    <option value="${record.id}">${record.name}</option>
  `);
});
Since it's possible we have more than a 100 records, we can use the meta.has_more key to check if there are more records, and if there are, we'll run our code again.
Since we proxy the requests to our worker we need to change the links.next url to use our worker base URL instead of the Zendesk URL.
//check if more than 100
if (response.meta.has_more == true) {
  var next = response.links.next.replaceAll(/https:\/\/(\w+\.)*zendesk\.com/g,'');
  getRecords(next);
}
And finally (finally!) we need to react to changes in our dropdown to set the intermediate field:
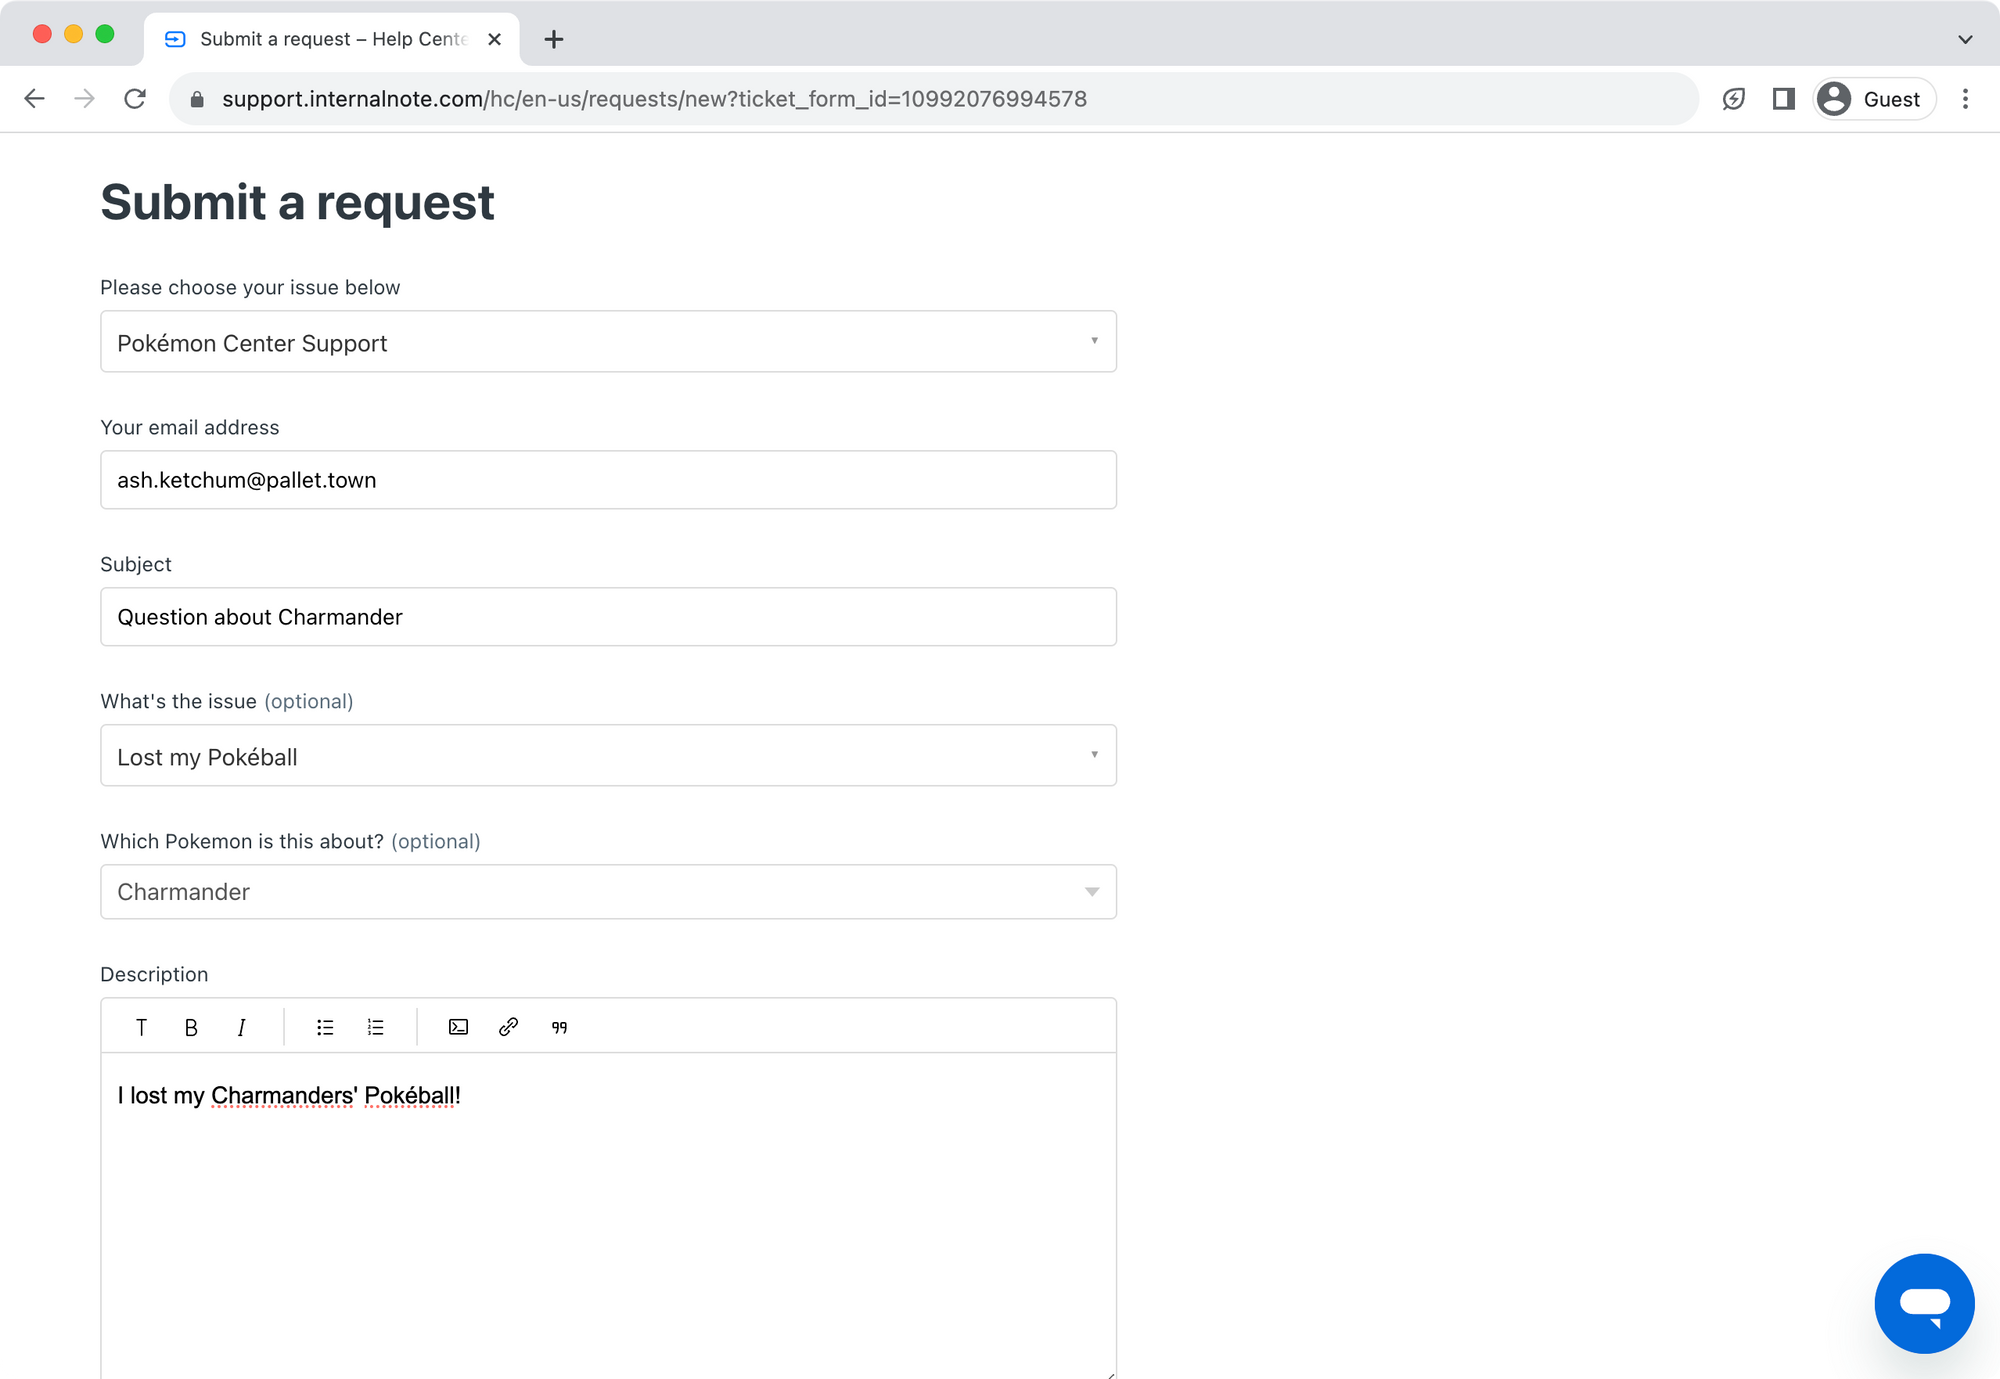
$('body').on('change', '#select_pokemon', function(){
  $('#request_custom_fields_'+intermediate).val(this.value);
});
The Result
Now that we've done the work, let's see how this all combines into one flow for our customers.
In the screenshots below you'll see a trainer go to our form, select his Pokémon type from the dropdown, fill in all other fields and submit the form.
On the Agents' site, they see a filled in Lookup Field linked to a Custom Object. The sidebar app we build in a previous article shows the Pokémon's information, and the native Record Preview also shows our record information.
Where we take it from here
This flow is a bit long and complex, but in the end allows you to present custom objects to end-users and have a native and automated experience for your agents.
You can expand the Proxy Worker to allow for more types of objects, and then clone the trigger to allow for more intermediate-to-lookup field mapping. Off course, this also requires you to update the Help Center code to get the right objects and fill in the right intermediate field.
Like I mentioned earlier, I really hope we get native lookup fields sooner rather than later so I can delete this fourth article and replace it with a native flow. But until then, this offers a working solution.
Wrap up
This article wraps up the Custom Object series. In the series we started with an introduction to Custom Objects and showed how to create object types and import records.
We then moved to how Agents interact with records and added a custom app that displays the data more nicely.
The series then moved to showing how we can augment user profiles with record data, and allow for priority changes based on the linked records.
And finally we allowed customers to interact with objects and choose values in ticket forms.
So now, I pass the control to. Which types of custom objects will you add to your Zendesk instance? Leave a comment to the article or send me an email with your results!
And if this series was useful, please consider sharing it with your colleagues and partners!