
Quick Look at the Zendesk Relay App for outbound WhatsApp messages
The new Relay app from Zendesk makes sending outbound messages over WhatsApp via Sunshine Conversation available to all Zendesk users without custom coding or development.

Quick Look at the Zendesk Relay App for outbound WhatsApp messages
The new Relay app from Zendesk makes sending outbound messages over WhatsApp via Sunshine Conversation available to all Zendesk users without custom coding or development.

On this page
At Relate this year Zendesk has a Zendesk Labs booth with previews of new ideas they were working on. The Zendesk Labs initiative builds and tests out concepts before they're ready to go into the main Zendesk Suite.
Examples are the Conversational Commerce concept, or now the new Relay App for Zendesk.
This new Marketplace app from Zendesk allows you to send out messages over WhatsApp and SMS to customers making use of templates and the Sunshine Conversations API.
It's a free app that takes care of both creating templates and sending those messages in bulk to your customers.

What's possible
Similar as to how you can leverage the Sunshine Conversations API to by-pass the 24 hour limitation for customer communication, you can also use this API to send outbound messages to your customers.
You can use this to send out marketing messages, order confirmations, delivery updates or any other type of outbound message to WhatsApp (or SMS) users.
I explained a similar flow in an earlier article, but now the same is possible with a native and much more powerful app by Zendesk itself.
 Thomas Verschoren
Installation
The process for installing the app is fairly well documented in the support article linked below. It does require admin access to your Zendesk instance and a working WhatsApp for Business account linked to both Zendesk and your Meta Business Manager.

Enable custom objects
This app stores a lot of its configuration data in Custom Objects. So if you haven't yet, go to the Admin Center and enable Custom Objects first!
And if you're interested in Custom Objects, take a look at my Custom Objects introductions series!
Thomas Verschoren
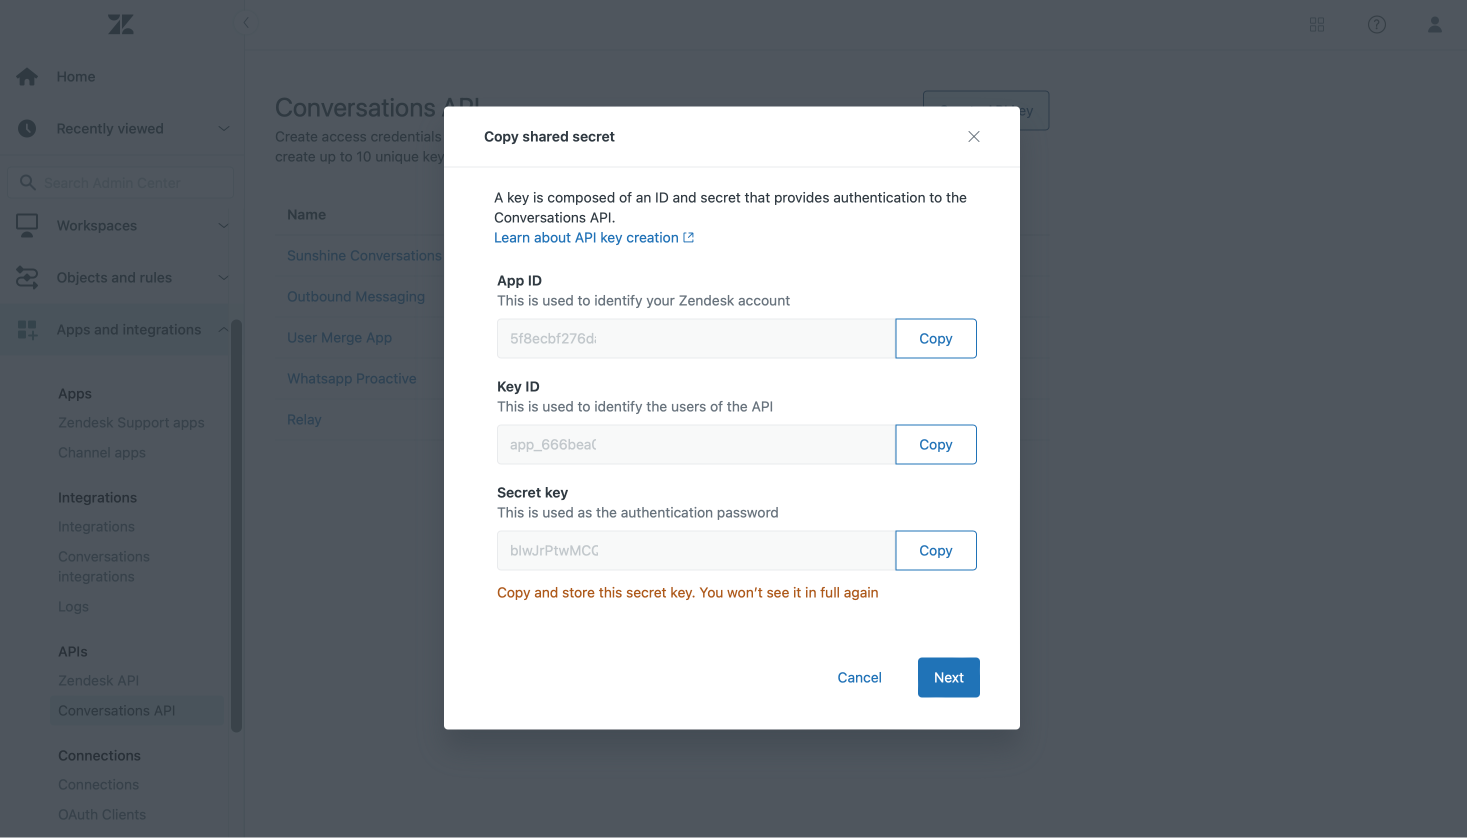
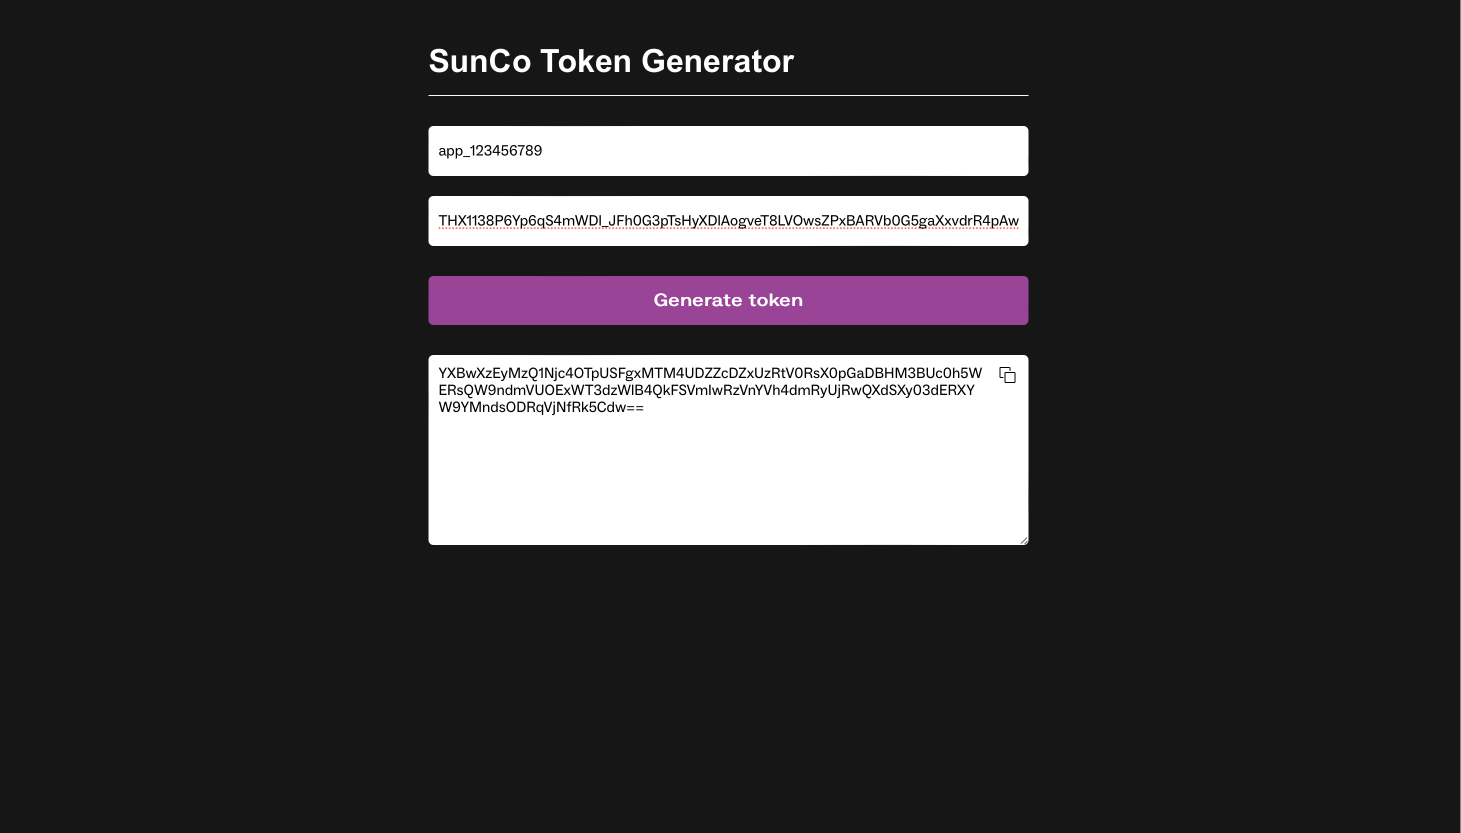
Creating an Authorization Token
First step is creating the authorization key by adding a new Conversations API token.
Since the apps' installation settings require a base64 encoded combination of the Key ID and Secret key it's easiest to go to this Sunshine Conversation token generator to create the encoded key/secret token.
WhatsApp Namespace ID
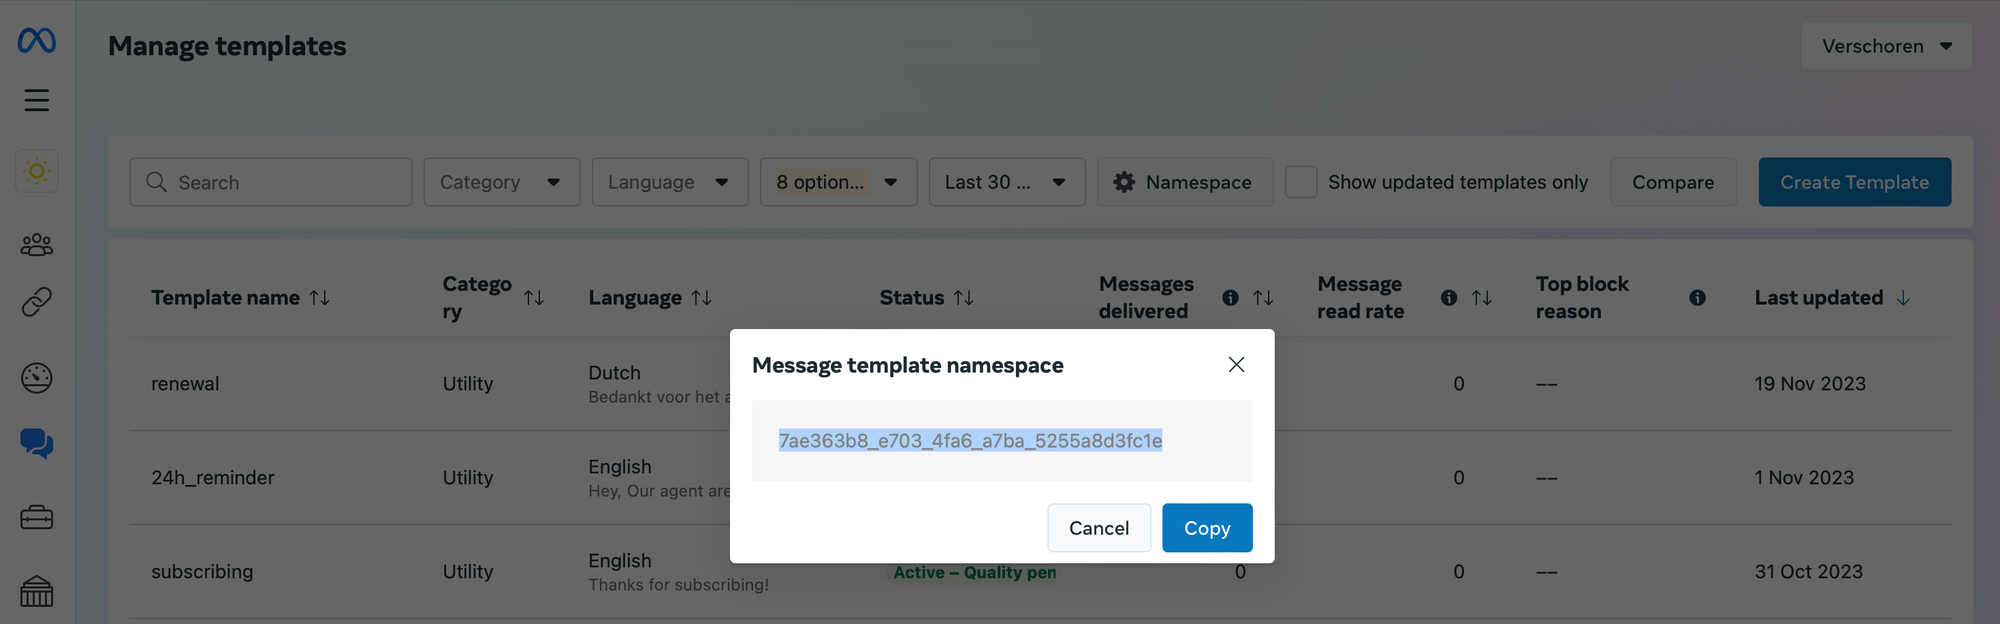
The documentation mentions that the WhatsApp Namespace ID is optional, but I noticed it doesn't seem to work as reliable without it, so best to go to the Meta Business Messenger and grab the ID from WhatsApp Manager | Account Tools | Message Templates. Once on that page, you can click the ⚙ Namespace button to copy the ID.
Adding the app
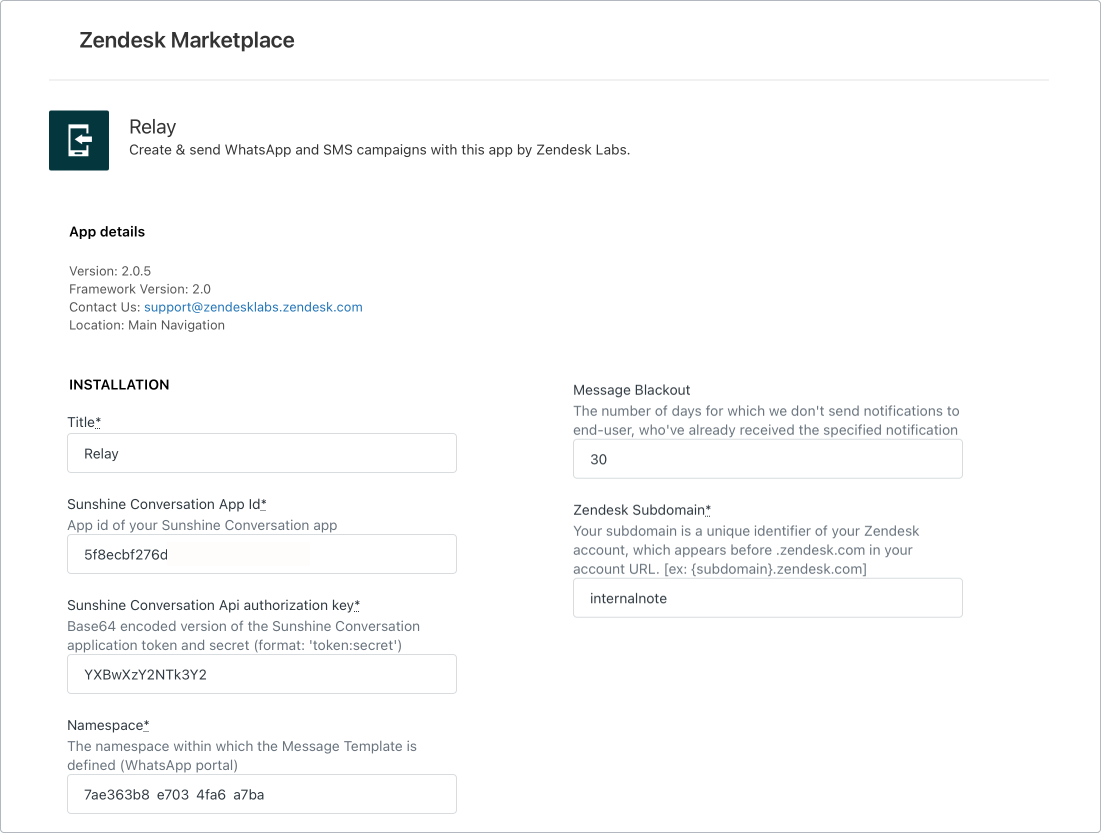
Once you've collected the required tokens and IDs you're all good to setup the app.
There's a few caveats I noticed:
- The Zendesk subdomain should be your main domain, and not a subdomain of one of your brands. The API calls failed for me when I used a different domain, even though the WhatsApp channel I used was linked to another brand.
- While testing, best to set the Blackout value, which defines how often you can send the same message to a customer, to zero. This way you can test with the same customer until you're happy with the result!
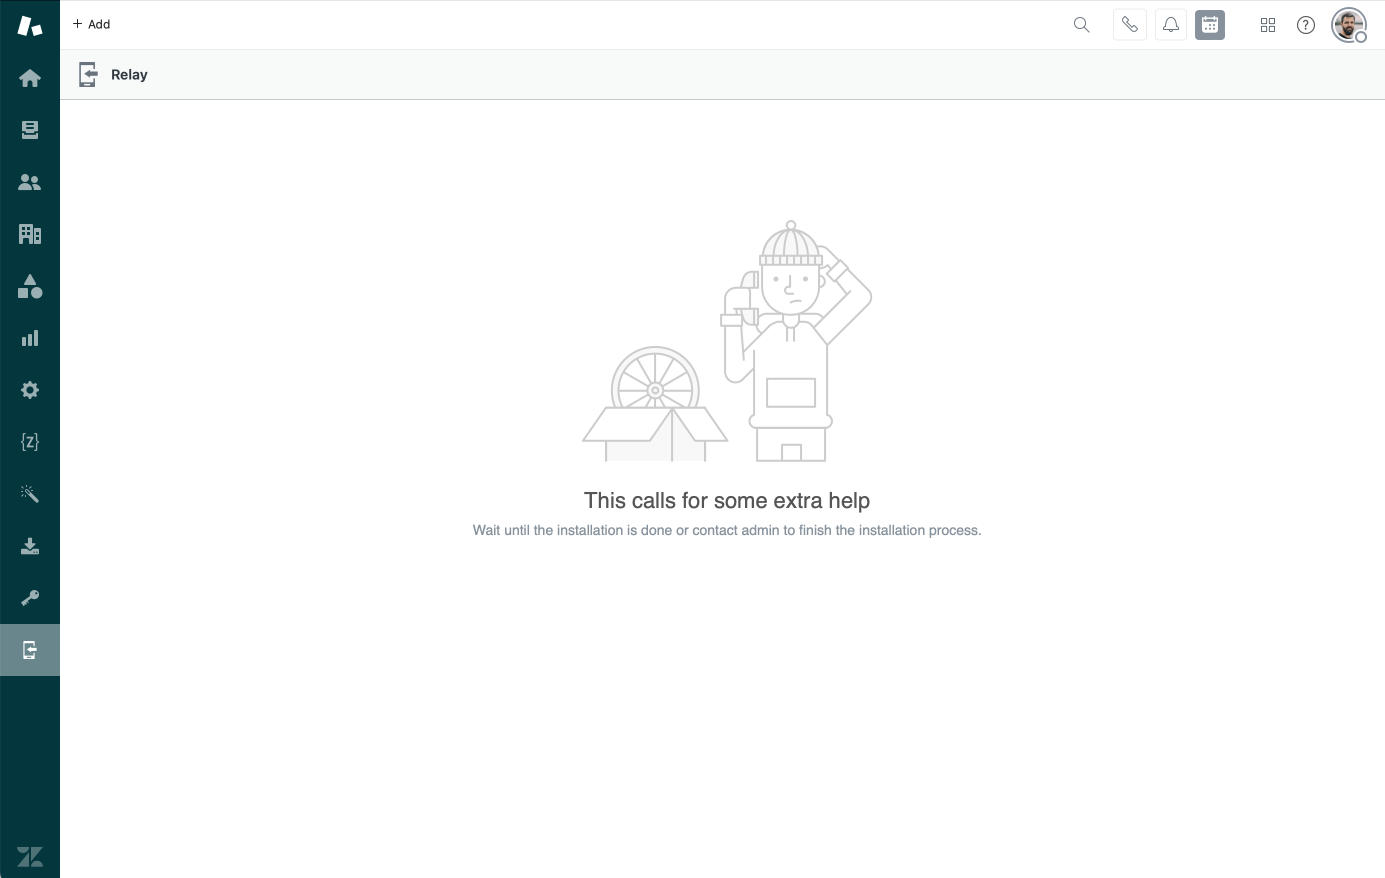
Once you've setup the app you can jump to your Agent Workspace and open the Relay app. It's located in the navbar on the left.
At first launch the app will take a few moments to load your Meta/WhatsApp data and configure itself. This process took ~two minutes for me, so don't worry if it takes a while.
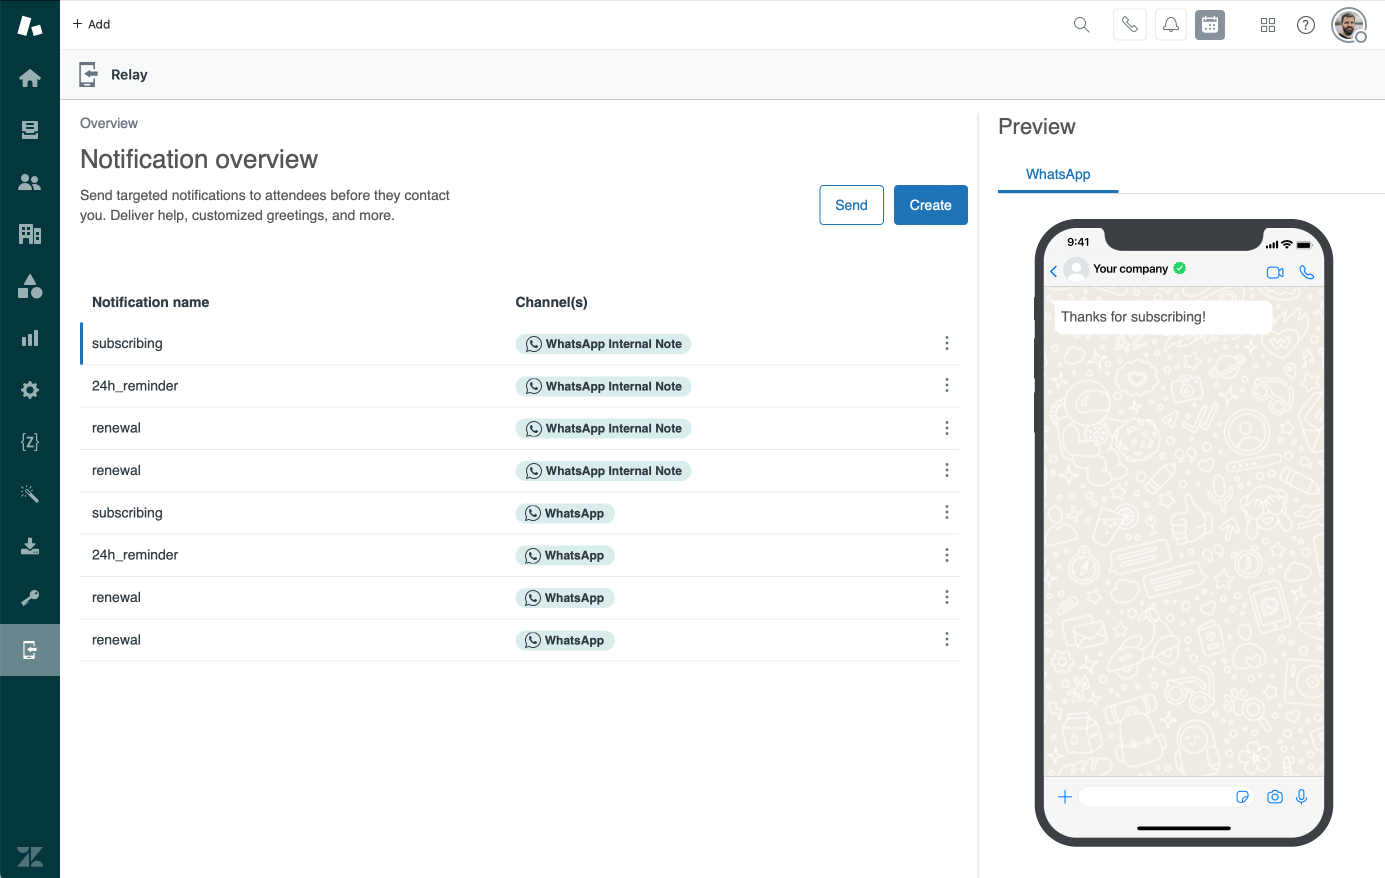
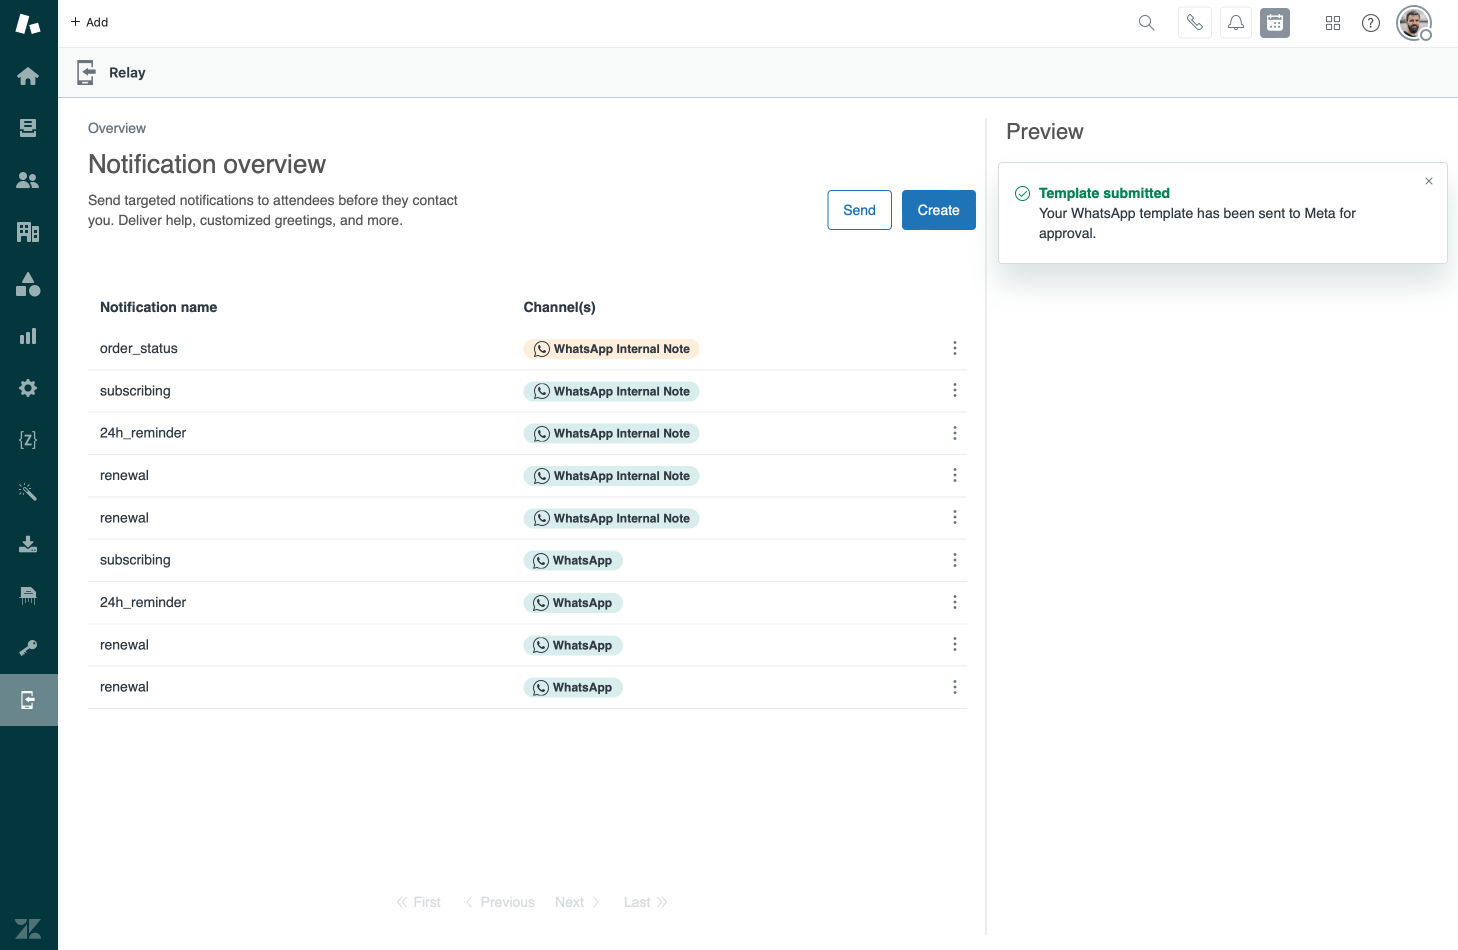
After wrapping up the initial configuration, you'll be greeted with a list of your existing templates (if any) and the option to create new ones or send a message.
Creating templates
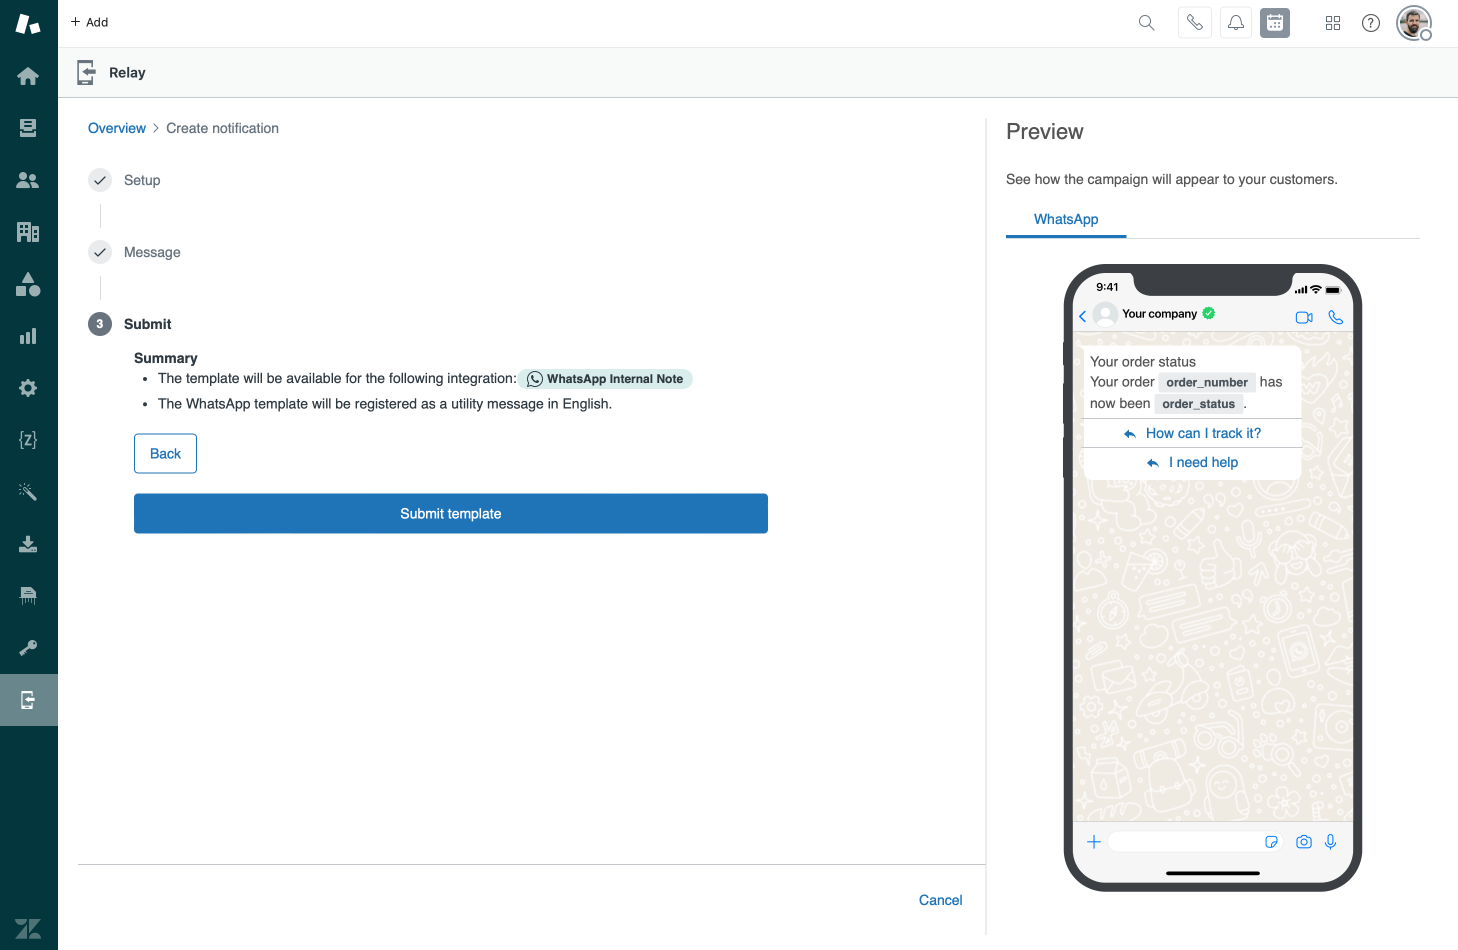
WhatsApp has strict rules on who can send messages to customers, and what those messages can contain. Before we can send out a proactive messages we first need to create a template which has to be approved by Meta.
This approval process takes only a few minutes so it's not that big of a hassle.
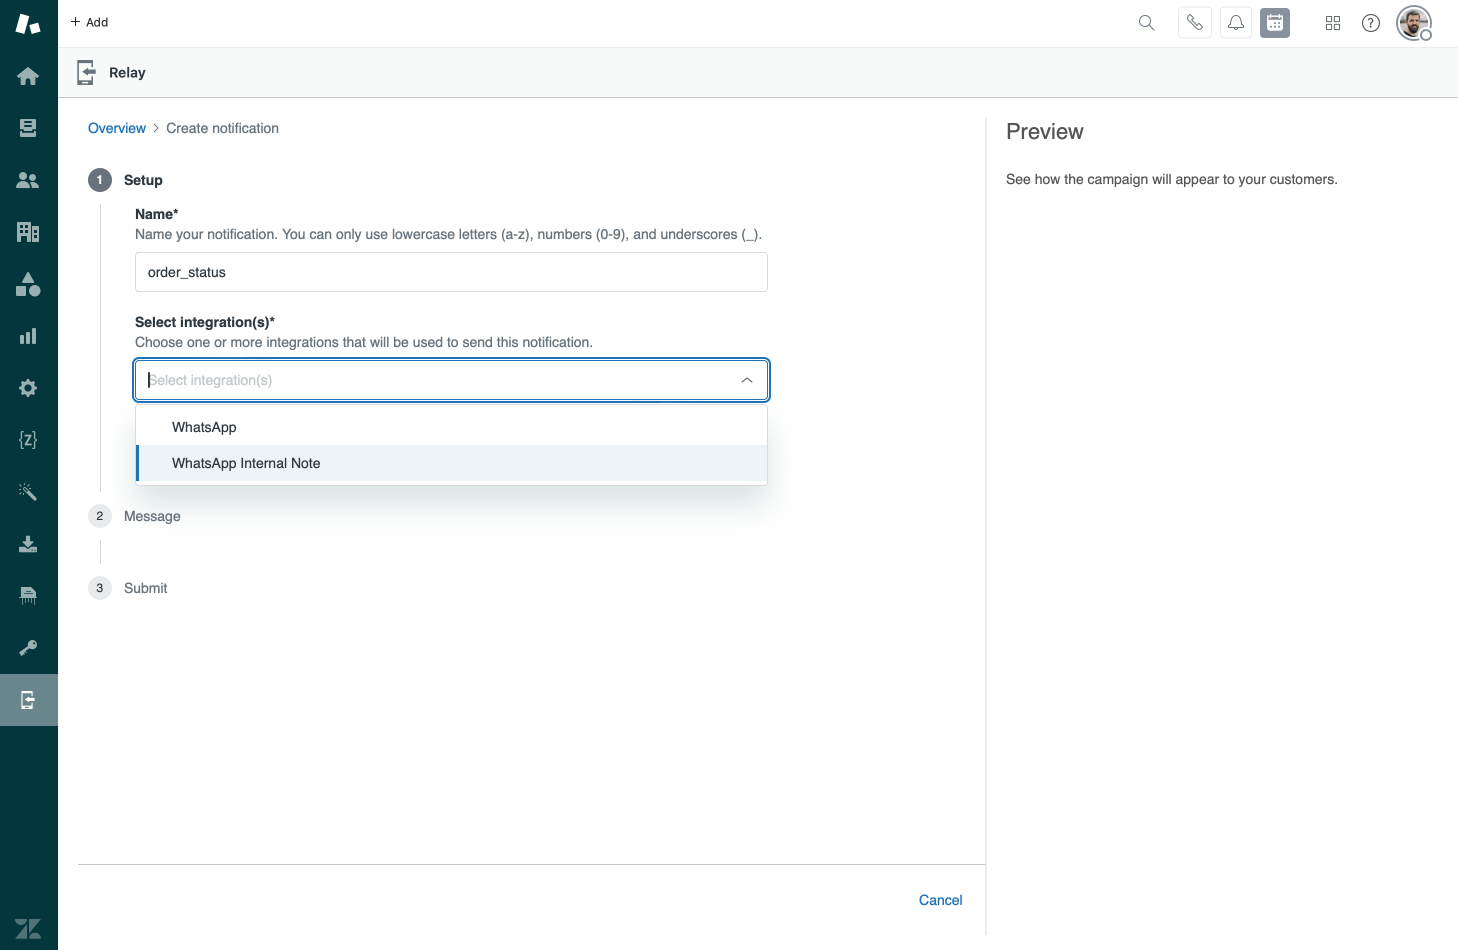
So, to create a new Template, click the Create button on the apps main screen. Give your new template a name, and select the channel it should apply to.
Next you'll be asked to select a category. Make sure to select the right one, since this will impact your template approval!
- Marketing: used to promote your product or service to customers. Useful for sending out promotions, discount codes e.a.
- Utility: used for transactional emails like order confirmations, shipment updates e.a
- Authentication: used for sending out password reset codes, 2FA codes, e.a
- Service: used in customer care scenario's to send out CSAT, bypass the 24 hour window, e.a
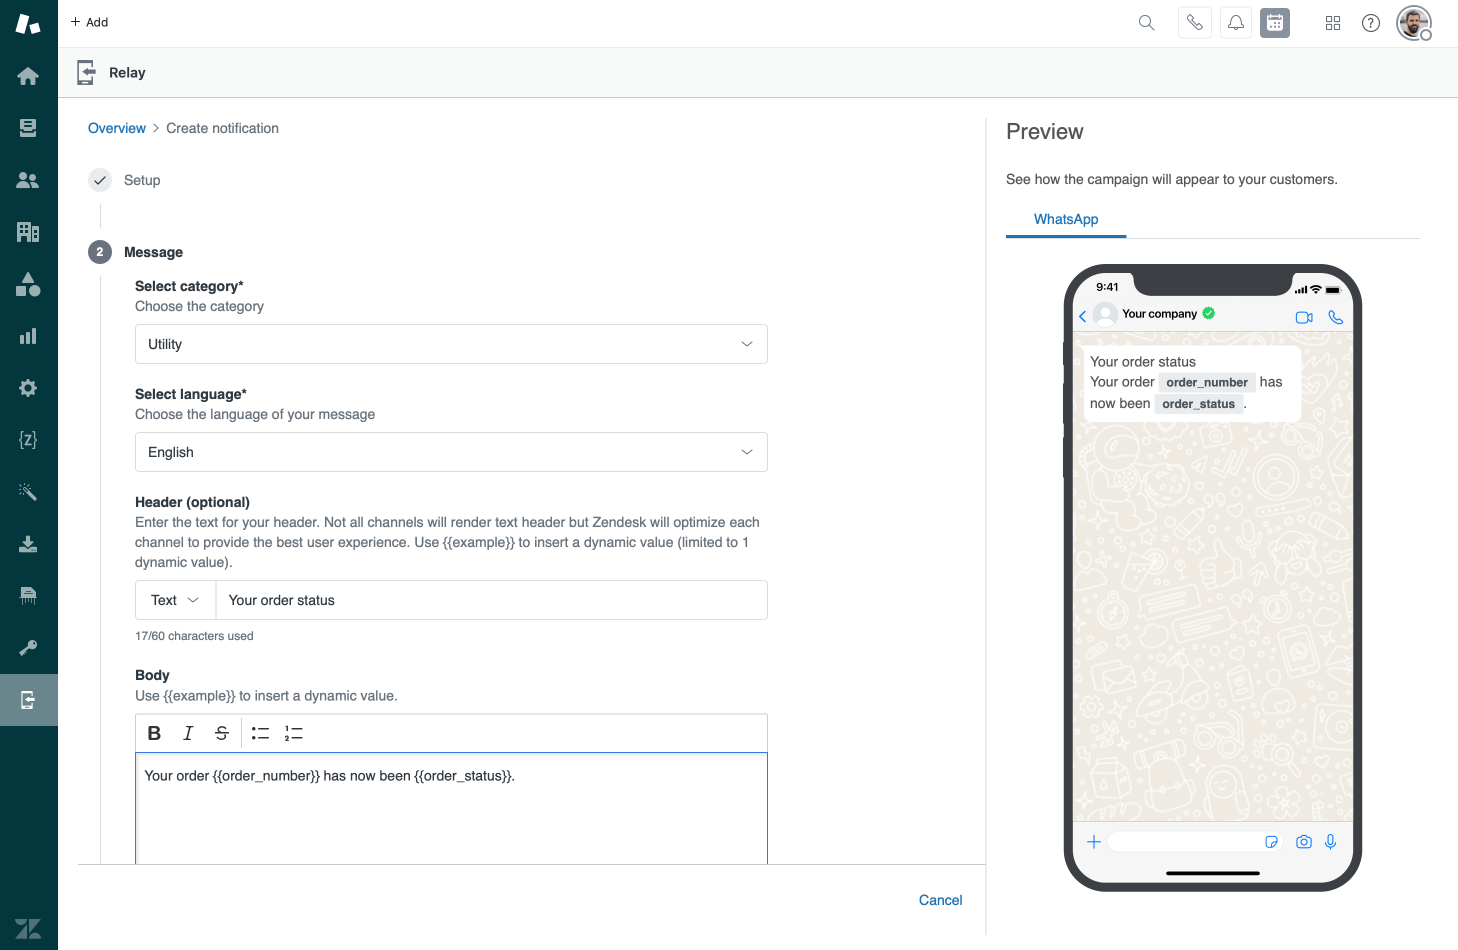
When filling in your message template you can make use of dynamic values. E.g. if you want to send the customer the following:
Your order #1138 has been shipped. Track its status via the link below
We can add {{order_number}} as a placeholders in the text.
Your order #{{order_number}} has been shipped. Track its status via the link below.When we submit our message the app will offer text fields where we can add 1138 and as a value and dynamically insert it into our message.
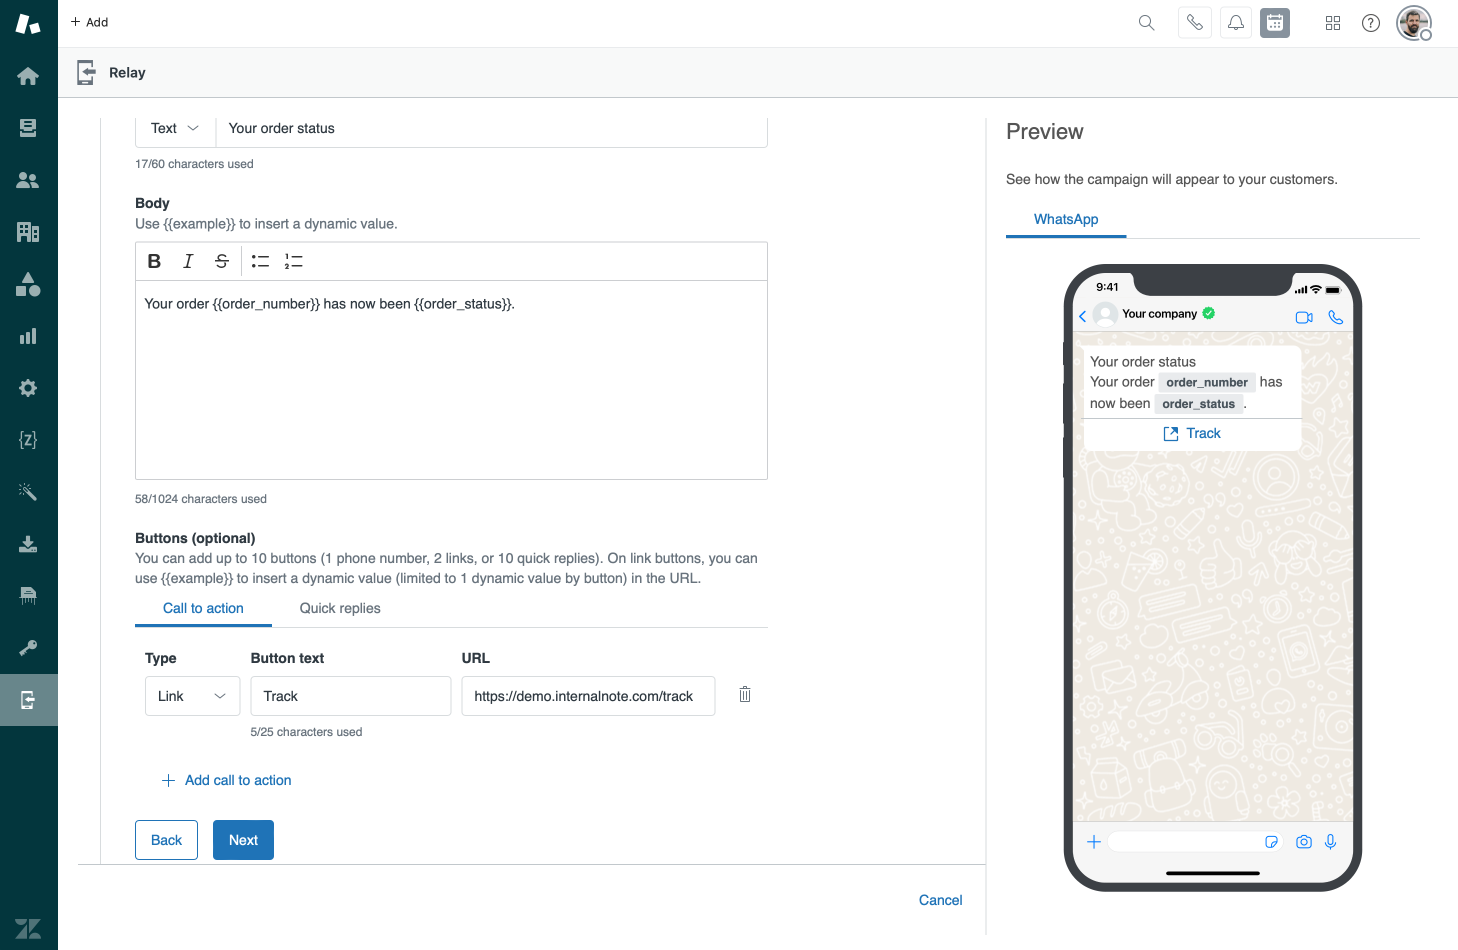
Similarly we can add a Call to Action button that adds a tracking link, or we can add Quick Replies for the customer to easily confirm or escalate a message. Since messages are send out over the same WhatsApp channel we use to receive requests in Zendesk, any response from the customer will be picked up by the Zendesk Bot or an Agent.
Note that your URLs can also contain those placeholders, so https://track.me/{{order_number}} is a valid URL to enter in this field.
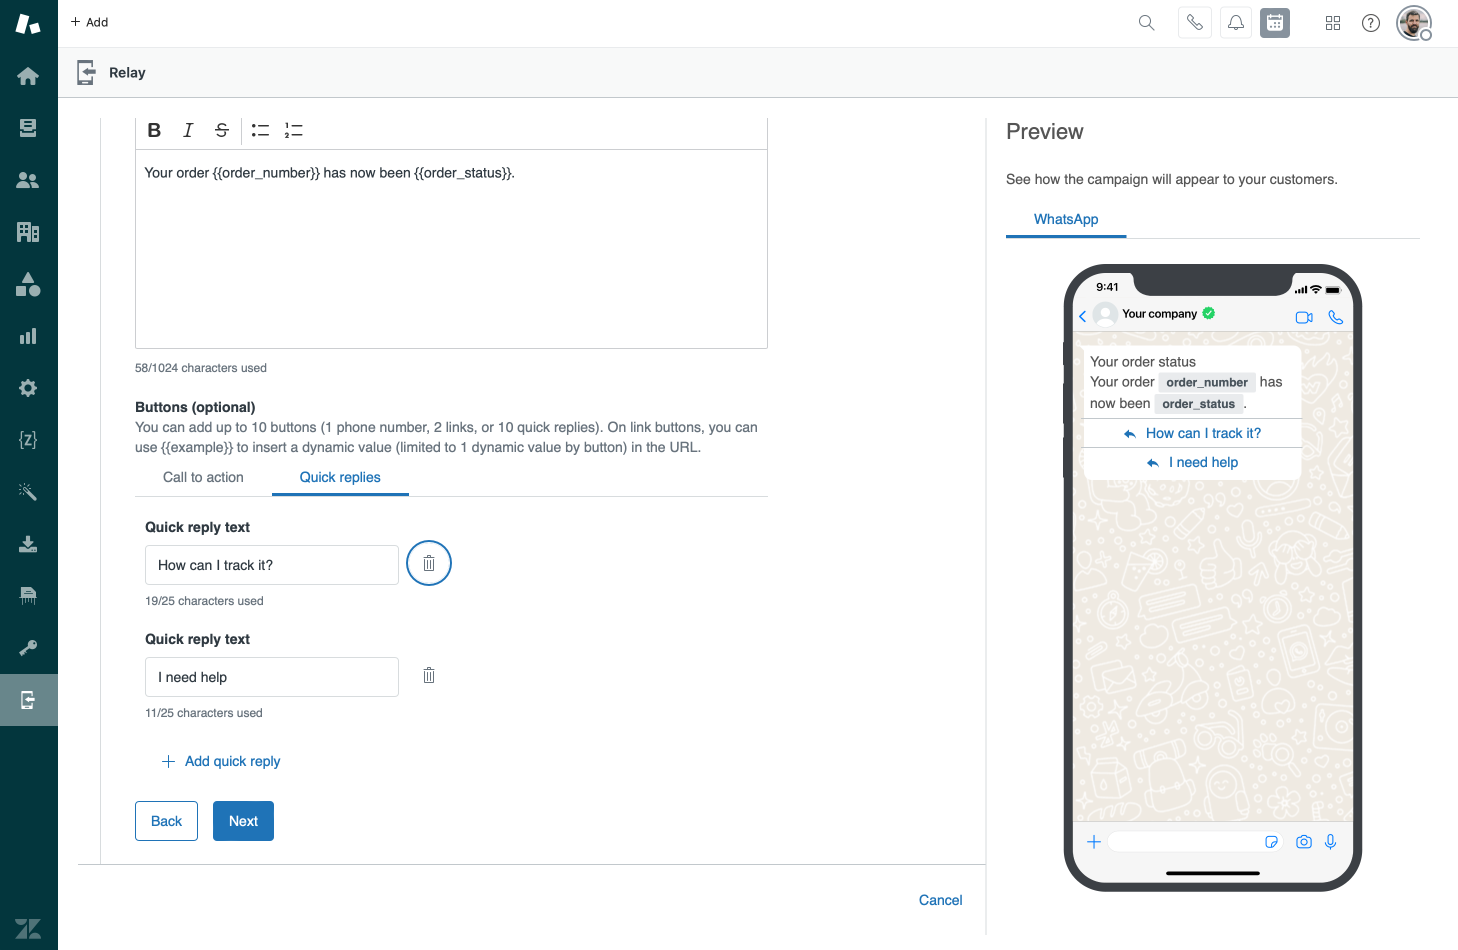
After filling in the template we can submit it for review with Meta. As mentioned above this approval flow often takes minutes and you can clearly follow along with its status from within the Relay app.
Sending messages
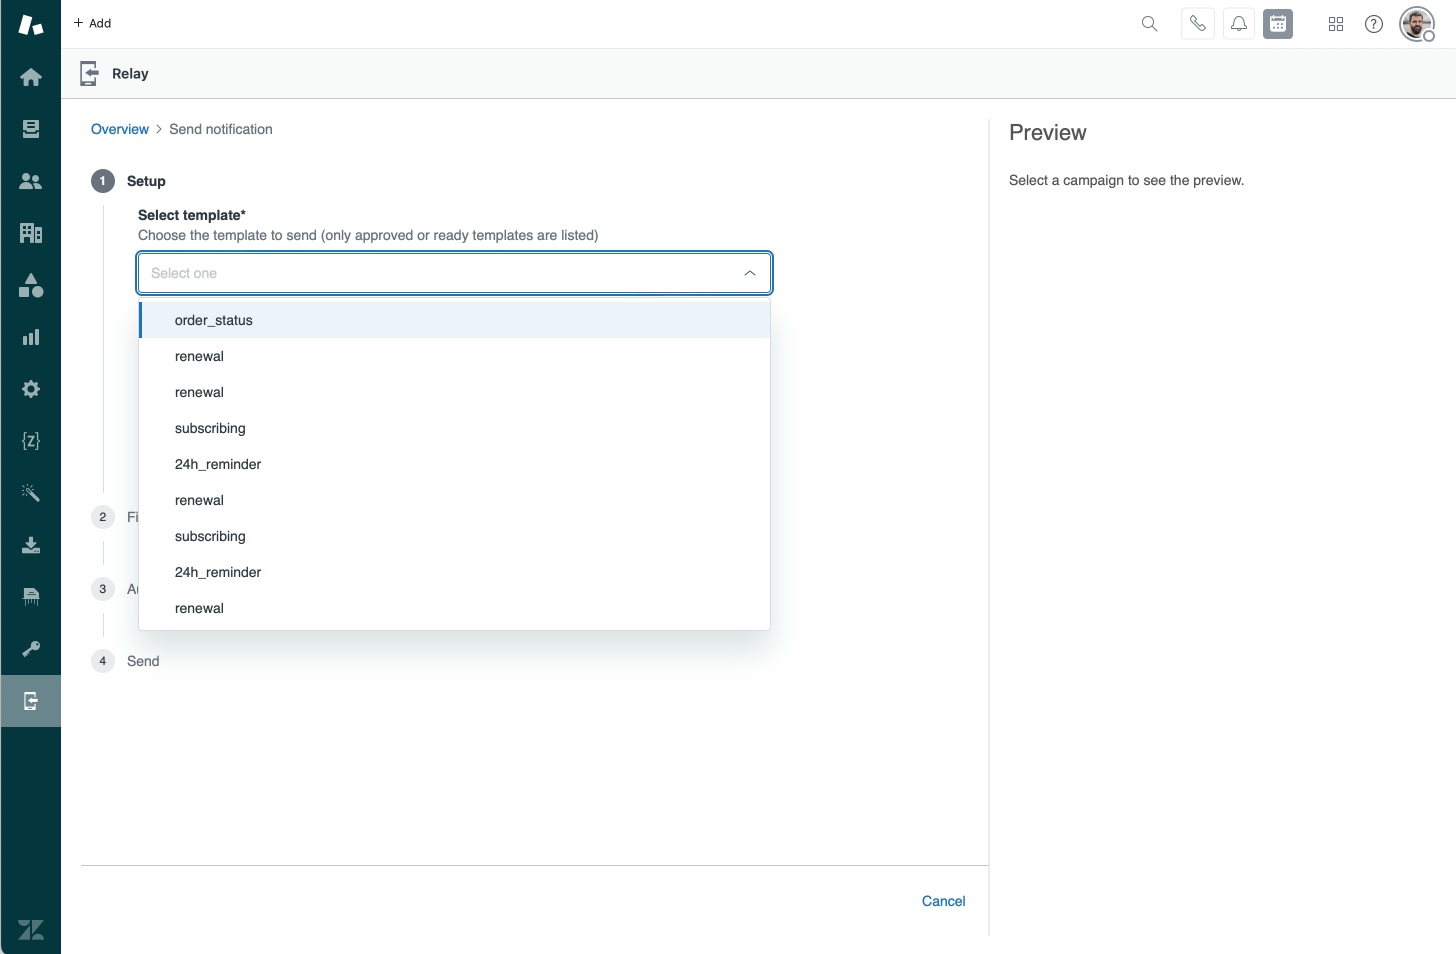
Selecting a template
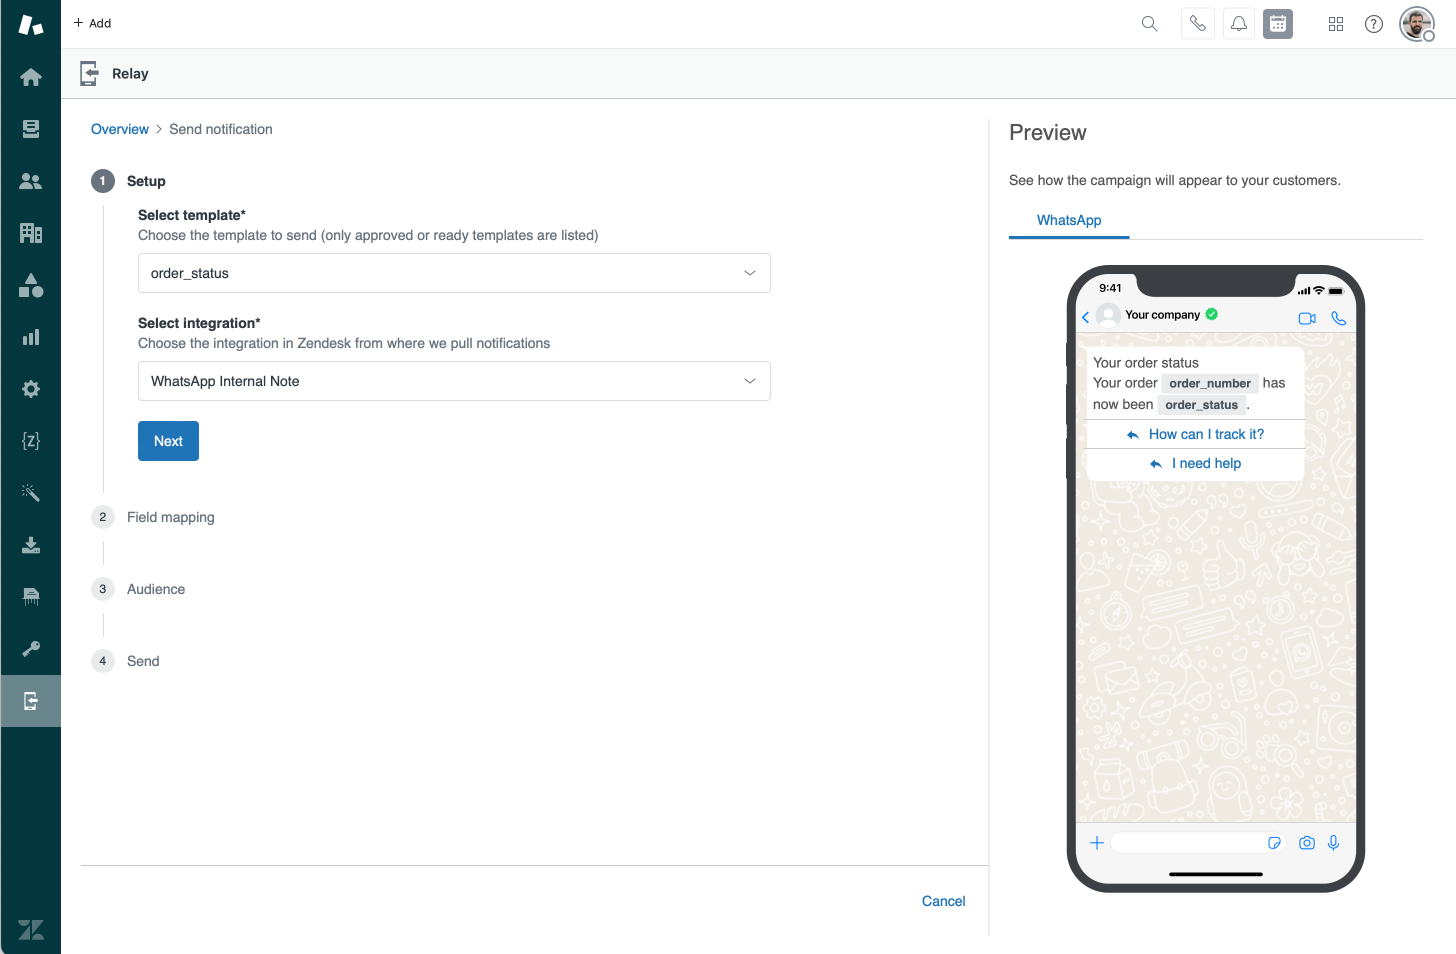
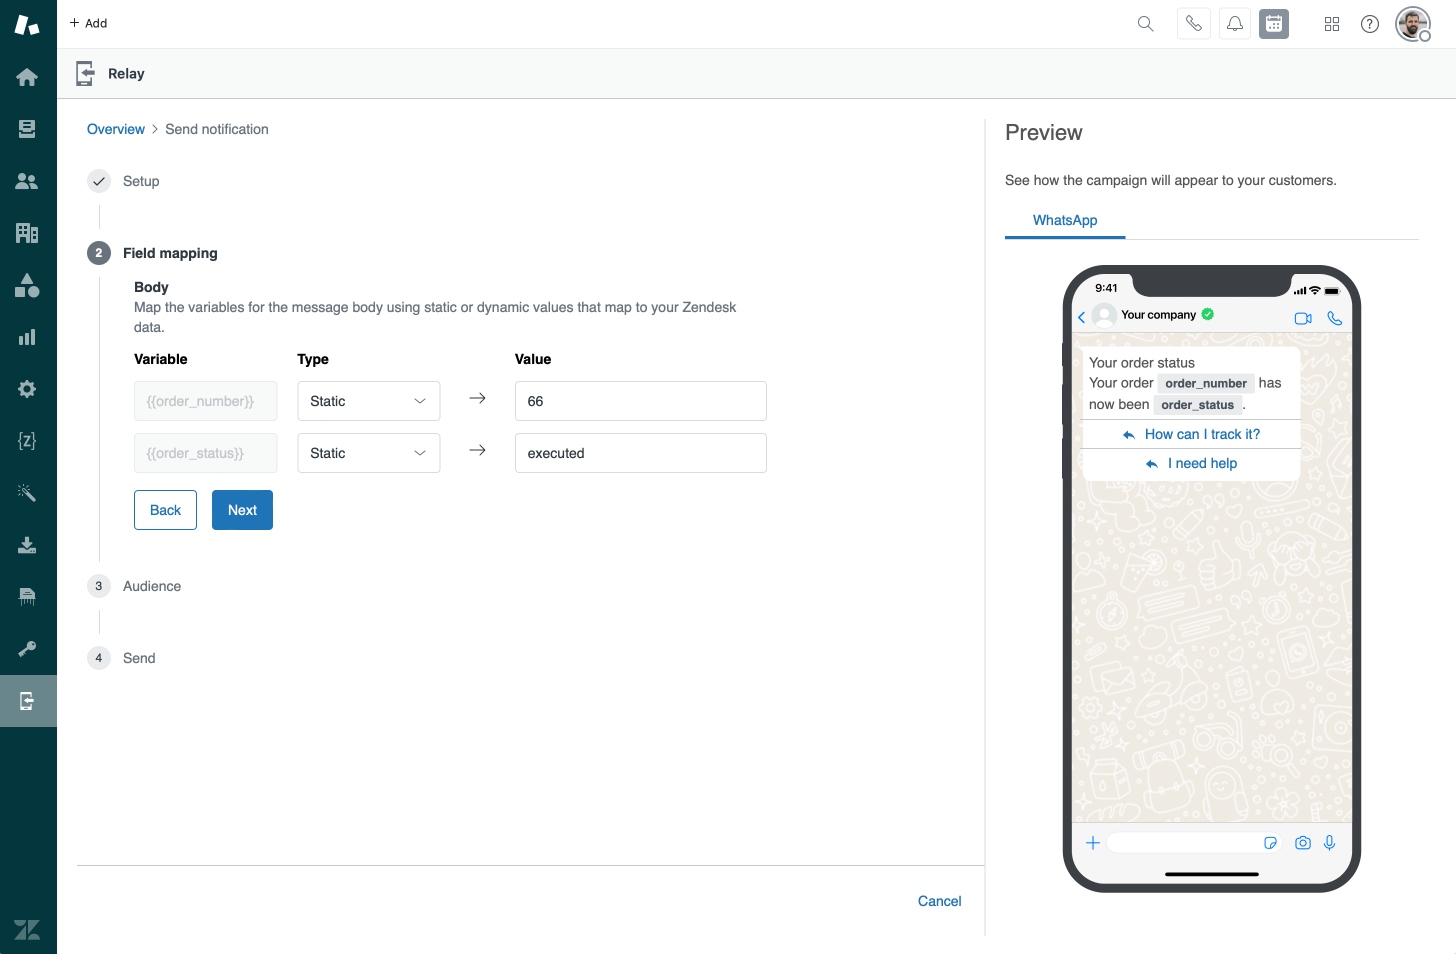
Once you've got your templates configured you're ready to send out your messages. The first step is selecting a template and choosing a channel from the list.
If your template contains placeholders, Relay will present you with a form to input your order number, delivery date or other elements. The preview on the right nicely previews the result.
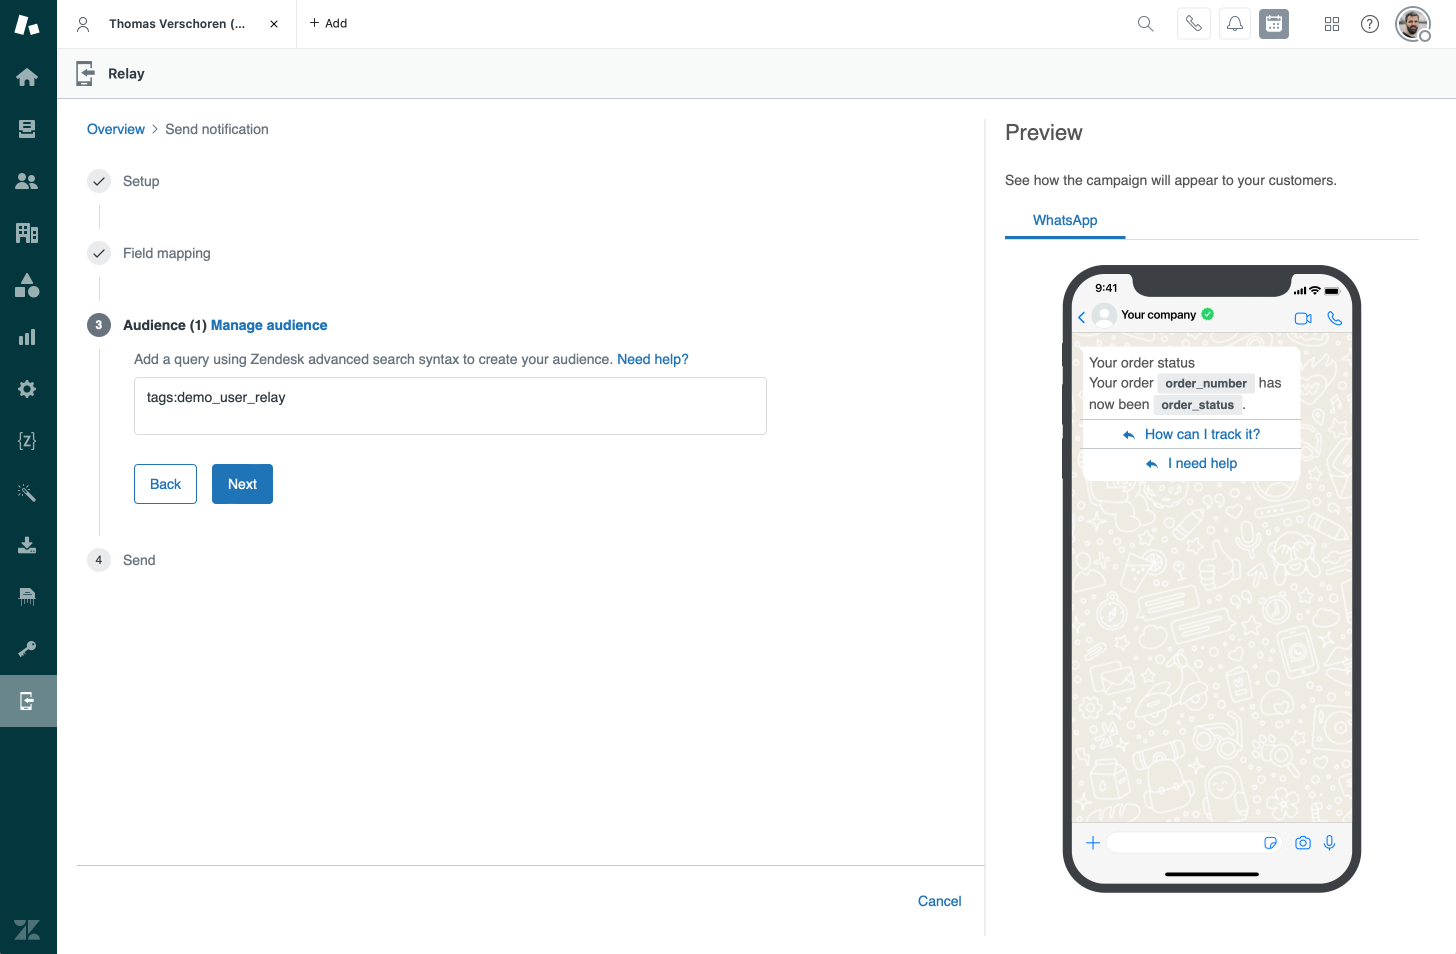
Selecting users
After configuring the contents of our message, it's time to select the recipients. Weirdly, instead of offering a list of users or an option to import users, we're shown a text field that accepts a search query.
If you've entered a valid entry – no error messages or useful information here – the Next button will become active, and the Audience title will show the amount of recipients between (brackets).
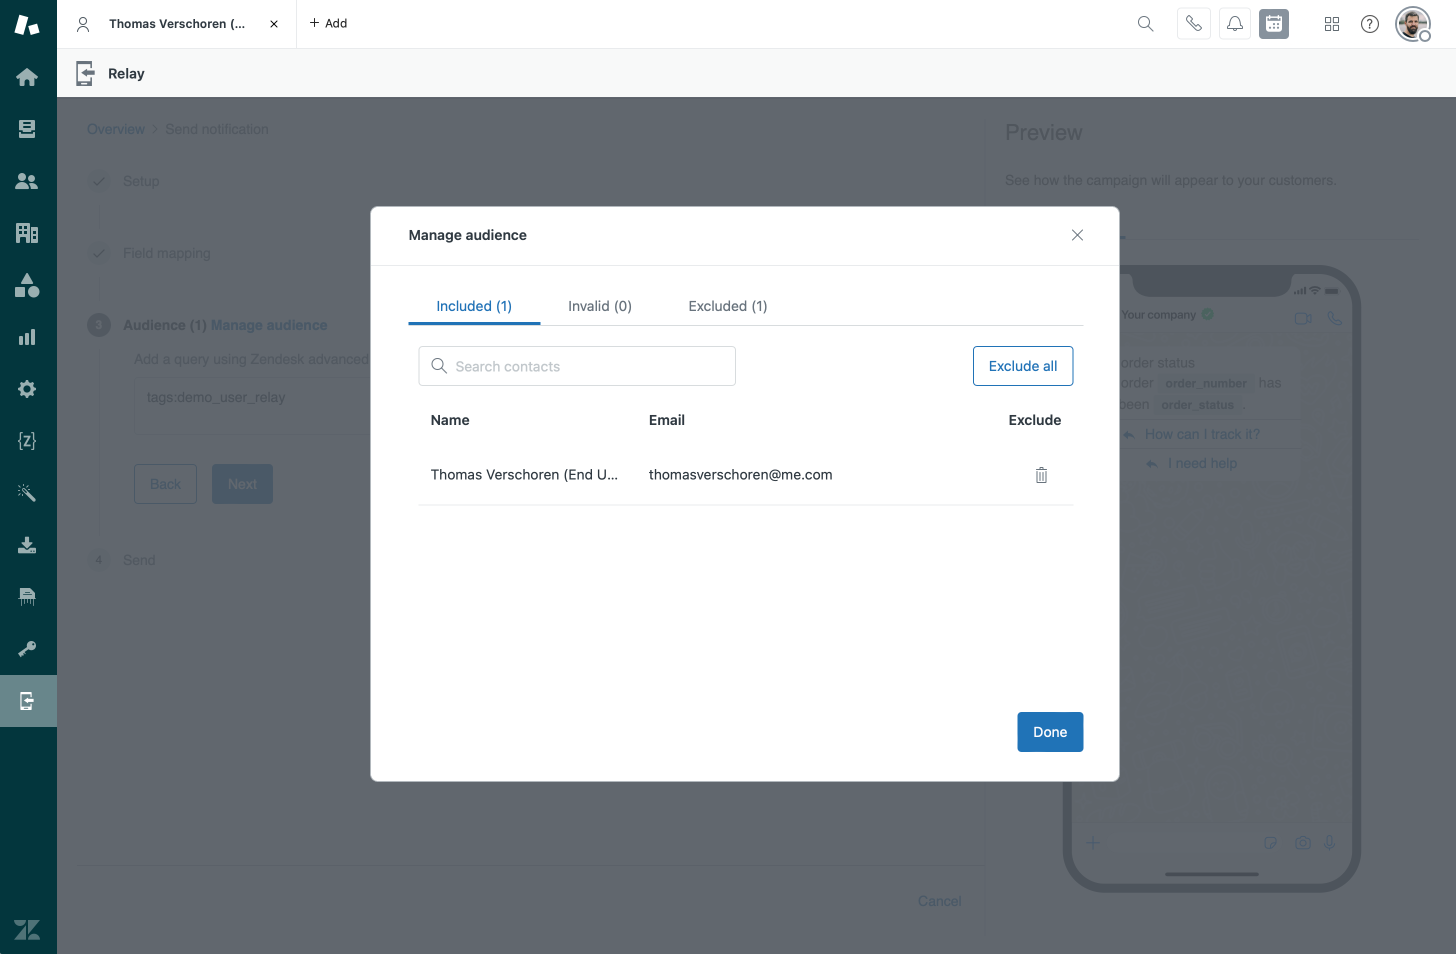
Clicking the Manage audience link will show a modal view that lists all recipients, and allow you to exclude specific users from the list.
Useful search entries
If you've never used the Zendesk search syntax, well, it's not that difficult to grasp. The article below gives a full overview of all the options, but I've listed the most relevant for Relay below.
A useful query is the syntax to list a whole list of phone numbers in one search query. It's similar to importing a list of users, with the only caveat that these users have to exist in Zendesk as end-users already.
name:"John McClane"to send a message to a user with that nametags:viportags:"vip jedi"to select users with a specific tagemail:[email protected]to select a user with that email. To select multiple repeat the query.email:[email protected] email:[email protected] email:[email protected]. The same trick works for selecting multiple phone numbers by usingphone:+1234567890and repeating that query.created:2024-05-21if you want to send all new usersplan_type:platinumfor all users where the custom field Plan Type is platinum
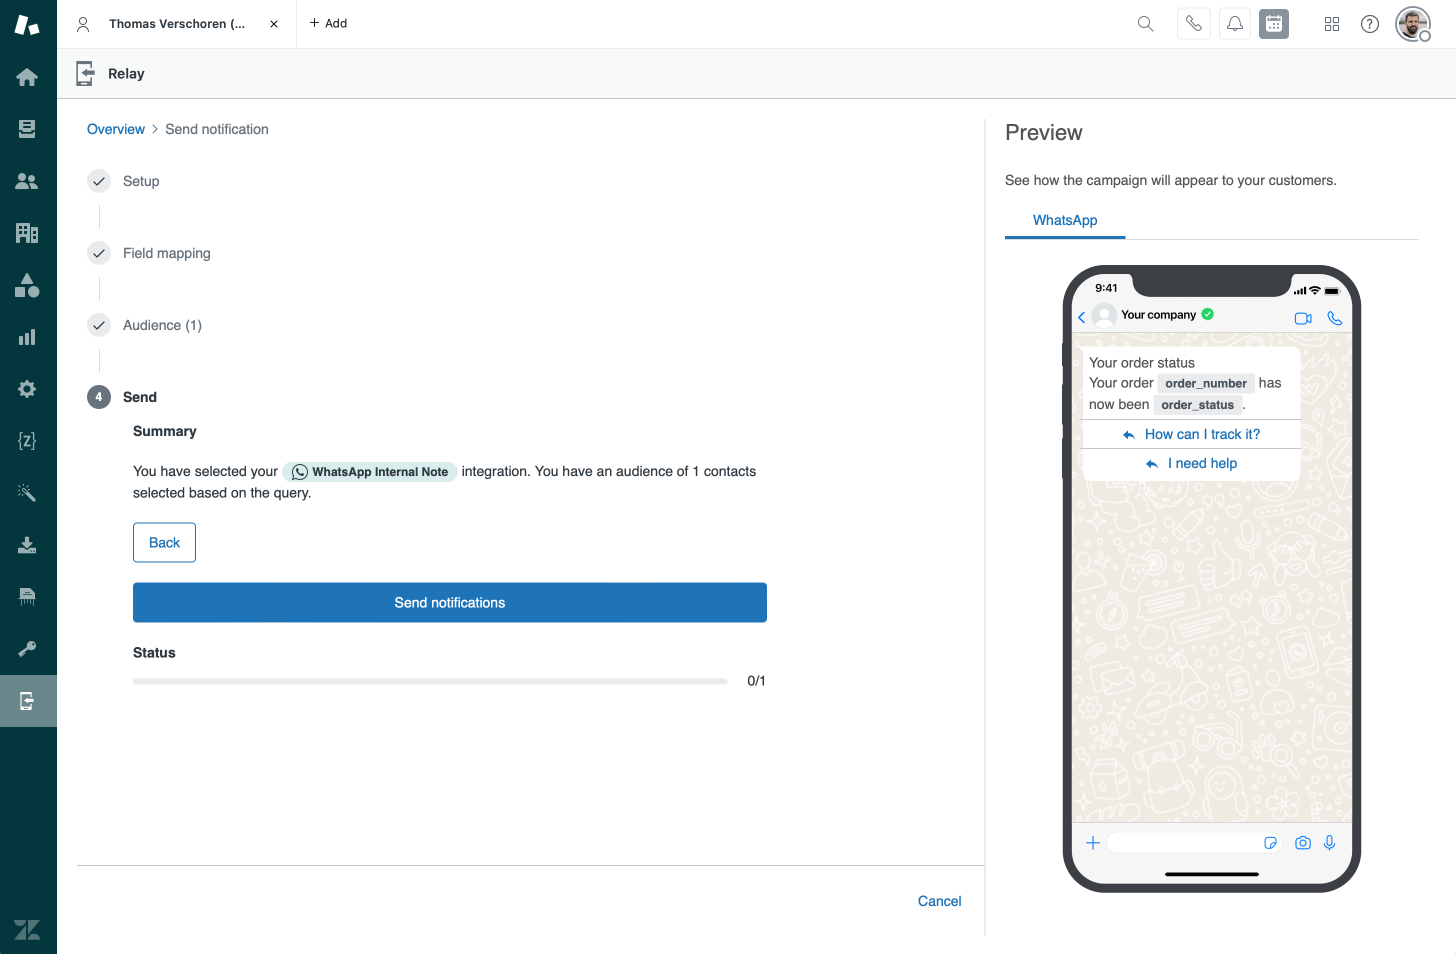
And finally, after selecting the template and our audience, we're ready to send our message to all users:
Limitations
The Relay app is developed via Zendesk Labs, and you notice this when using the app. It does what it promised to do, but it feels like a proof of concept and not as a fully developed and robust solution.
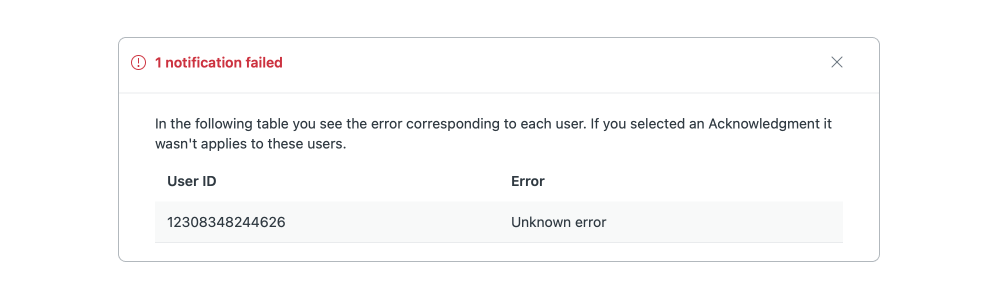
For some reason I can't send a message to my own personal WhatsApp number. But with only this helpful error message and no logs or console errors, it's just impossible to troubleshoot why.
Similarly, the process of manually encoding and adding the tokens, instead of leveraging a nice oAuth flow also feels a bit clumsy.
But, since this is a Labs app on the Marketplace and not a core part of Zendesk Suite like Proactive Messages is, it's understandable. Although I do hope some of the setup and error experience gets some attention in future updates.
Speaking of future updates, there's a few features I'd love to see:
- Add scheduling. It would be nice to be able to schedule messages in advance.
- Add the ability to importing users in the audience step, and add these as end-users in Zendesk.
- Make these messages available as an action in native automations or triggers.
- Allow for setting placeholders in templates based on user fields, organization fields or linked custom objects.
Conclusion
So yeah, that's Relay. A nice and free app on the Marketplace that allows for some simple outbound reach over WhatsApp (or SMS). It makes using the included Sunshine Conversation abilities available to all Zendesk admins, even those who can't or don't want to build their own integrations to handle this.