
Zendesk Custom Objects - Part 2: Tickets
This is a four-part series on Zendesk's new Custom Objects feature. The articles cover setup, data import, using Custom Objects in forms and with agents, expanding user profiles, and displaying Custom Objects in Help Center forms.

Zendesk Custom Objects - Part 2: Tickets
This is a four-part series on Zendesk's new Custom Objects feature. The articles cover setup, data import, using Custom Objects in forms and with agents, expanding user profiles, and displaying Custom Objects in Help Center forms.

On this page
In this four part series we'll explore the new Custom Objects from an admin, agent and end-user standpoint.
Custom Object Series
The first article showed you how to set up custom objects, how to structure and link the data, and how to import data into Zendesk.
This article will show you how to use Custom Objects in forms, how to show the data to Agents, and will include a custom sidebar app that will show the records in a more visual way.
Custom Objects for Agents
Agents interact with customers via tickets in the Agent Workspace. The Agent Workspace offers a unified inbox off all active conversations, and provides context with the Intelligence Panel and Custom Fields in Forms.
With Custom objects we can expand those traditional forms and fields with more rich objects. Instead of a customer referencing a specific product or asset in a field, we can have that field be linked to an actual Custom Object record and show the agent all related data like it's vendor, location, purchase date e.a.
Similar to how an agent can see a customers' profile via the Essentials Card, we can use the new Record Preview Feature to get a preview of a linked record right next to a ticket. Or, if a record needs to be modified we can give agents edit rights to records to they can update a phone number, name or description.
In this article we'll expand our Pokédex Object and allow agents to link Tickets to specific Pokémon, and check their stats.
Showing custom objects in a form
The first step to link Custom Objects to Tickets is by creating so called Lookup Fields. We've already used them in the previous article to link types to pokemon but this time we'll use them to link tickets to pokemon.
Lookup fields in forms work similar to drop downs. They offer agents list of options to choose and they are stored in the ticket metadata for future retrieval and/or reporting.
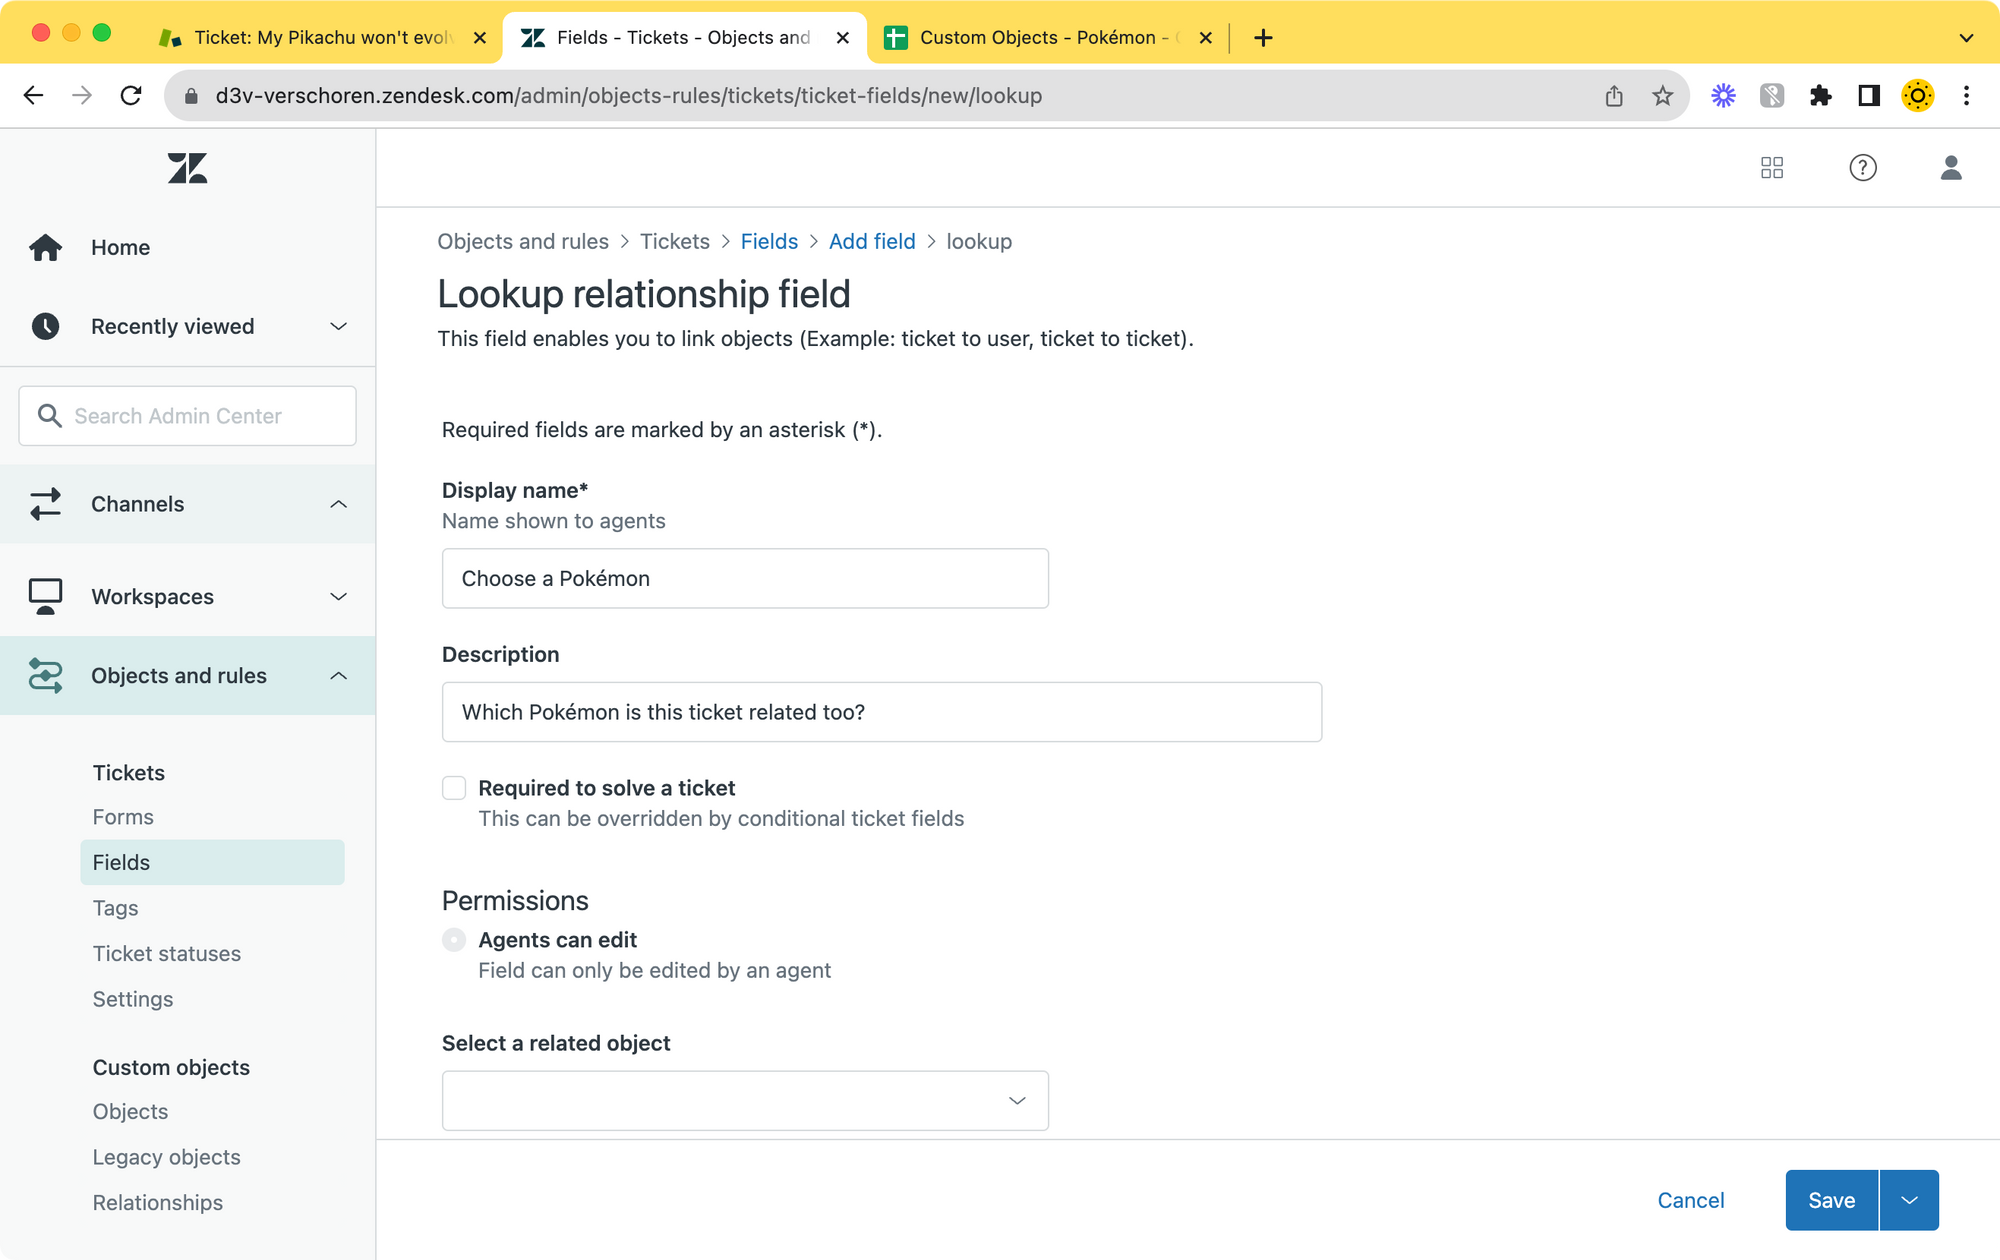
Adding a Lookup field
To create a Lookup field go to Admin panel > Objects and rules > Tickets > Fields and add a new Custom Field. Choose Lookup Relationship as its type.
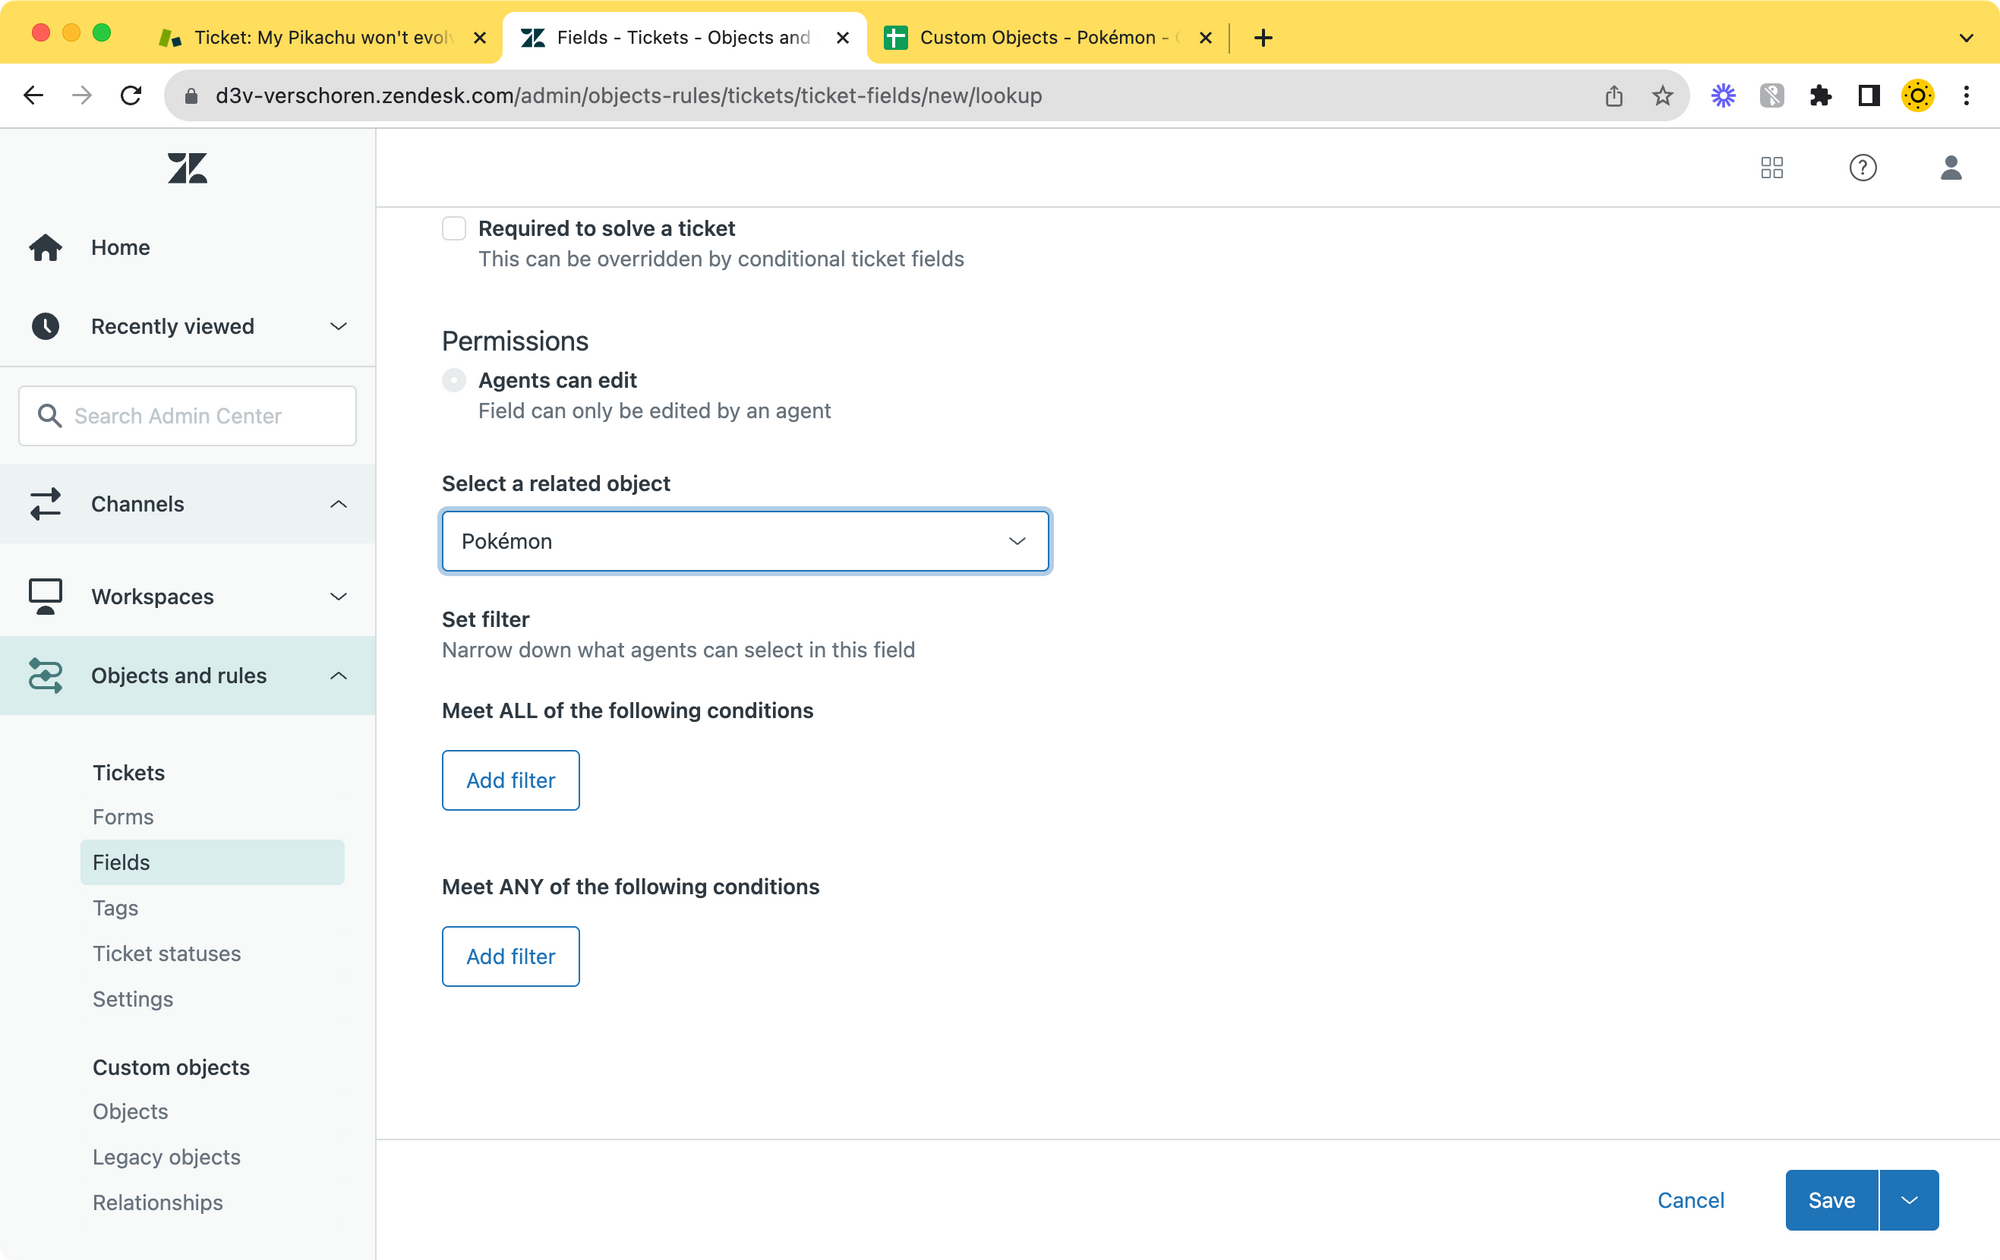
Give the object a clear name, e.g. "Choose a Pokémon" and link it to the Pokémon object we created in the previous article. You can ignore the filter for now.
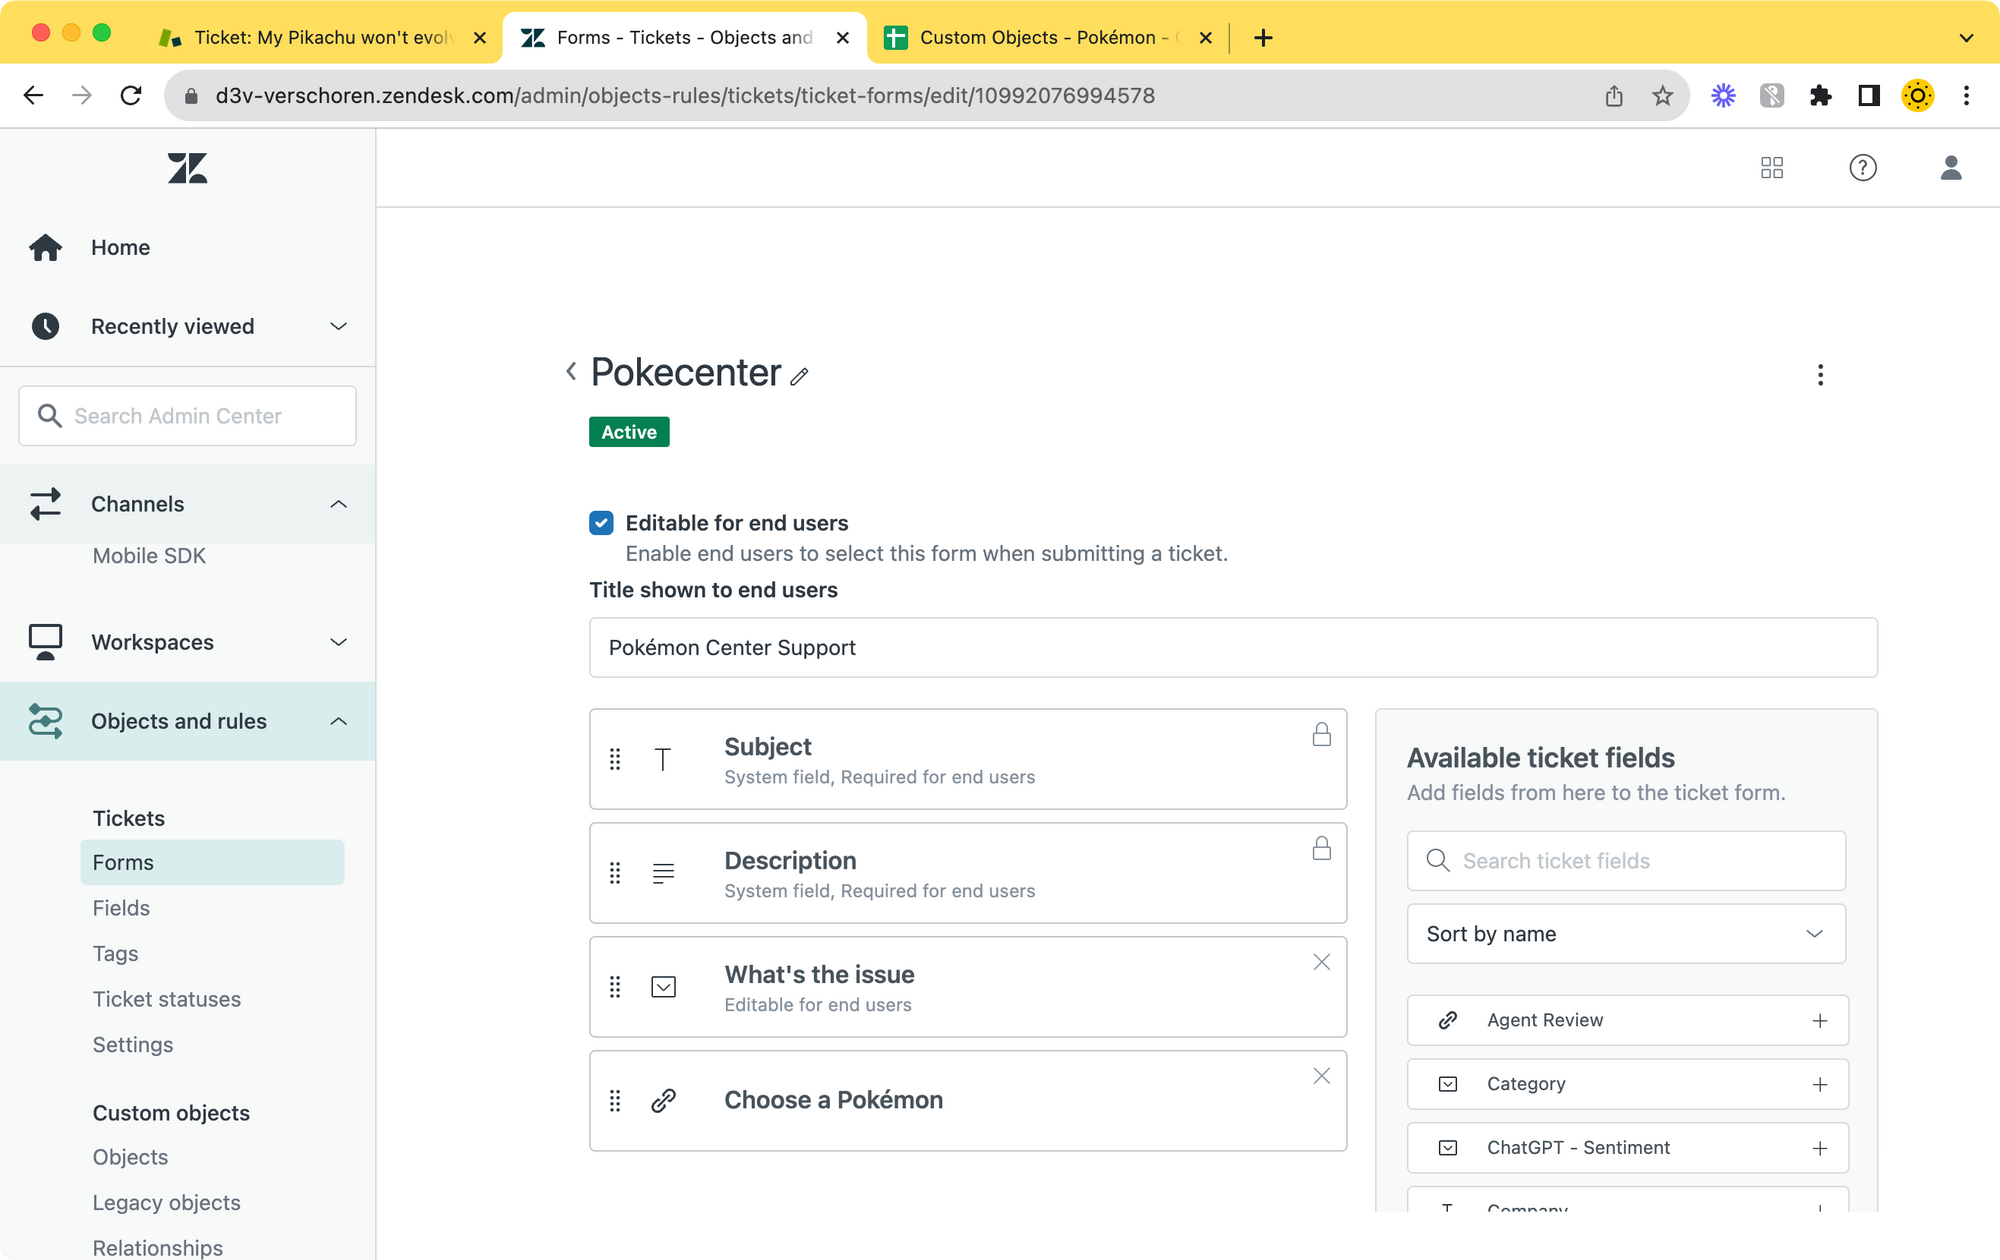
Once saved, go to Admin panel > Objects and rules > Tickets > Forms and add the Lookup field to a new or existing form. For this demo I created a Pokécenter Form which includes the Lookup Field, a dropdown with a few options and the default Priority and Type fields.
Viewing Objects when interacting with Tickets.
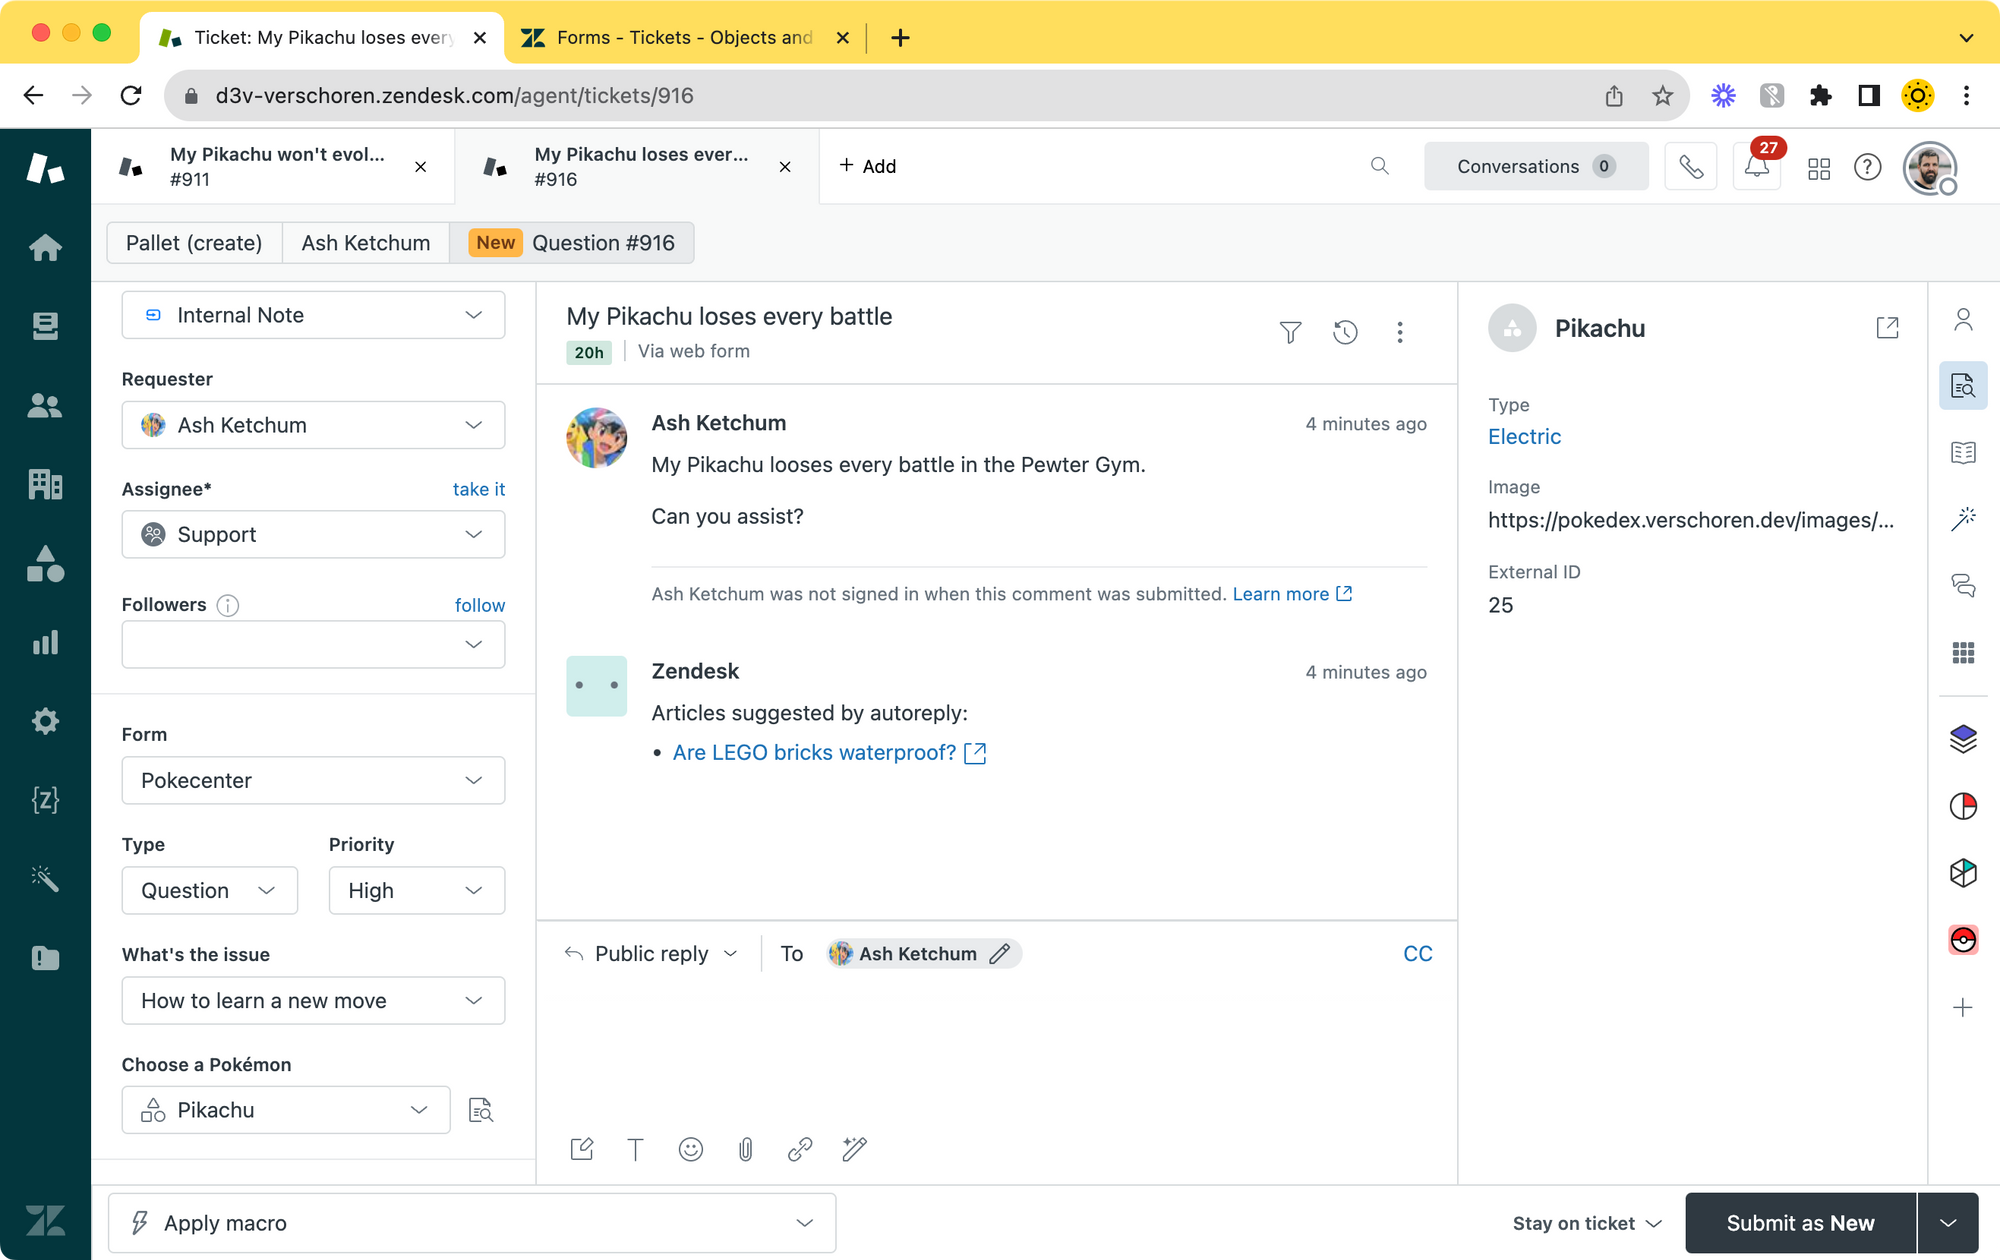
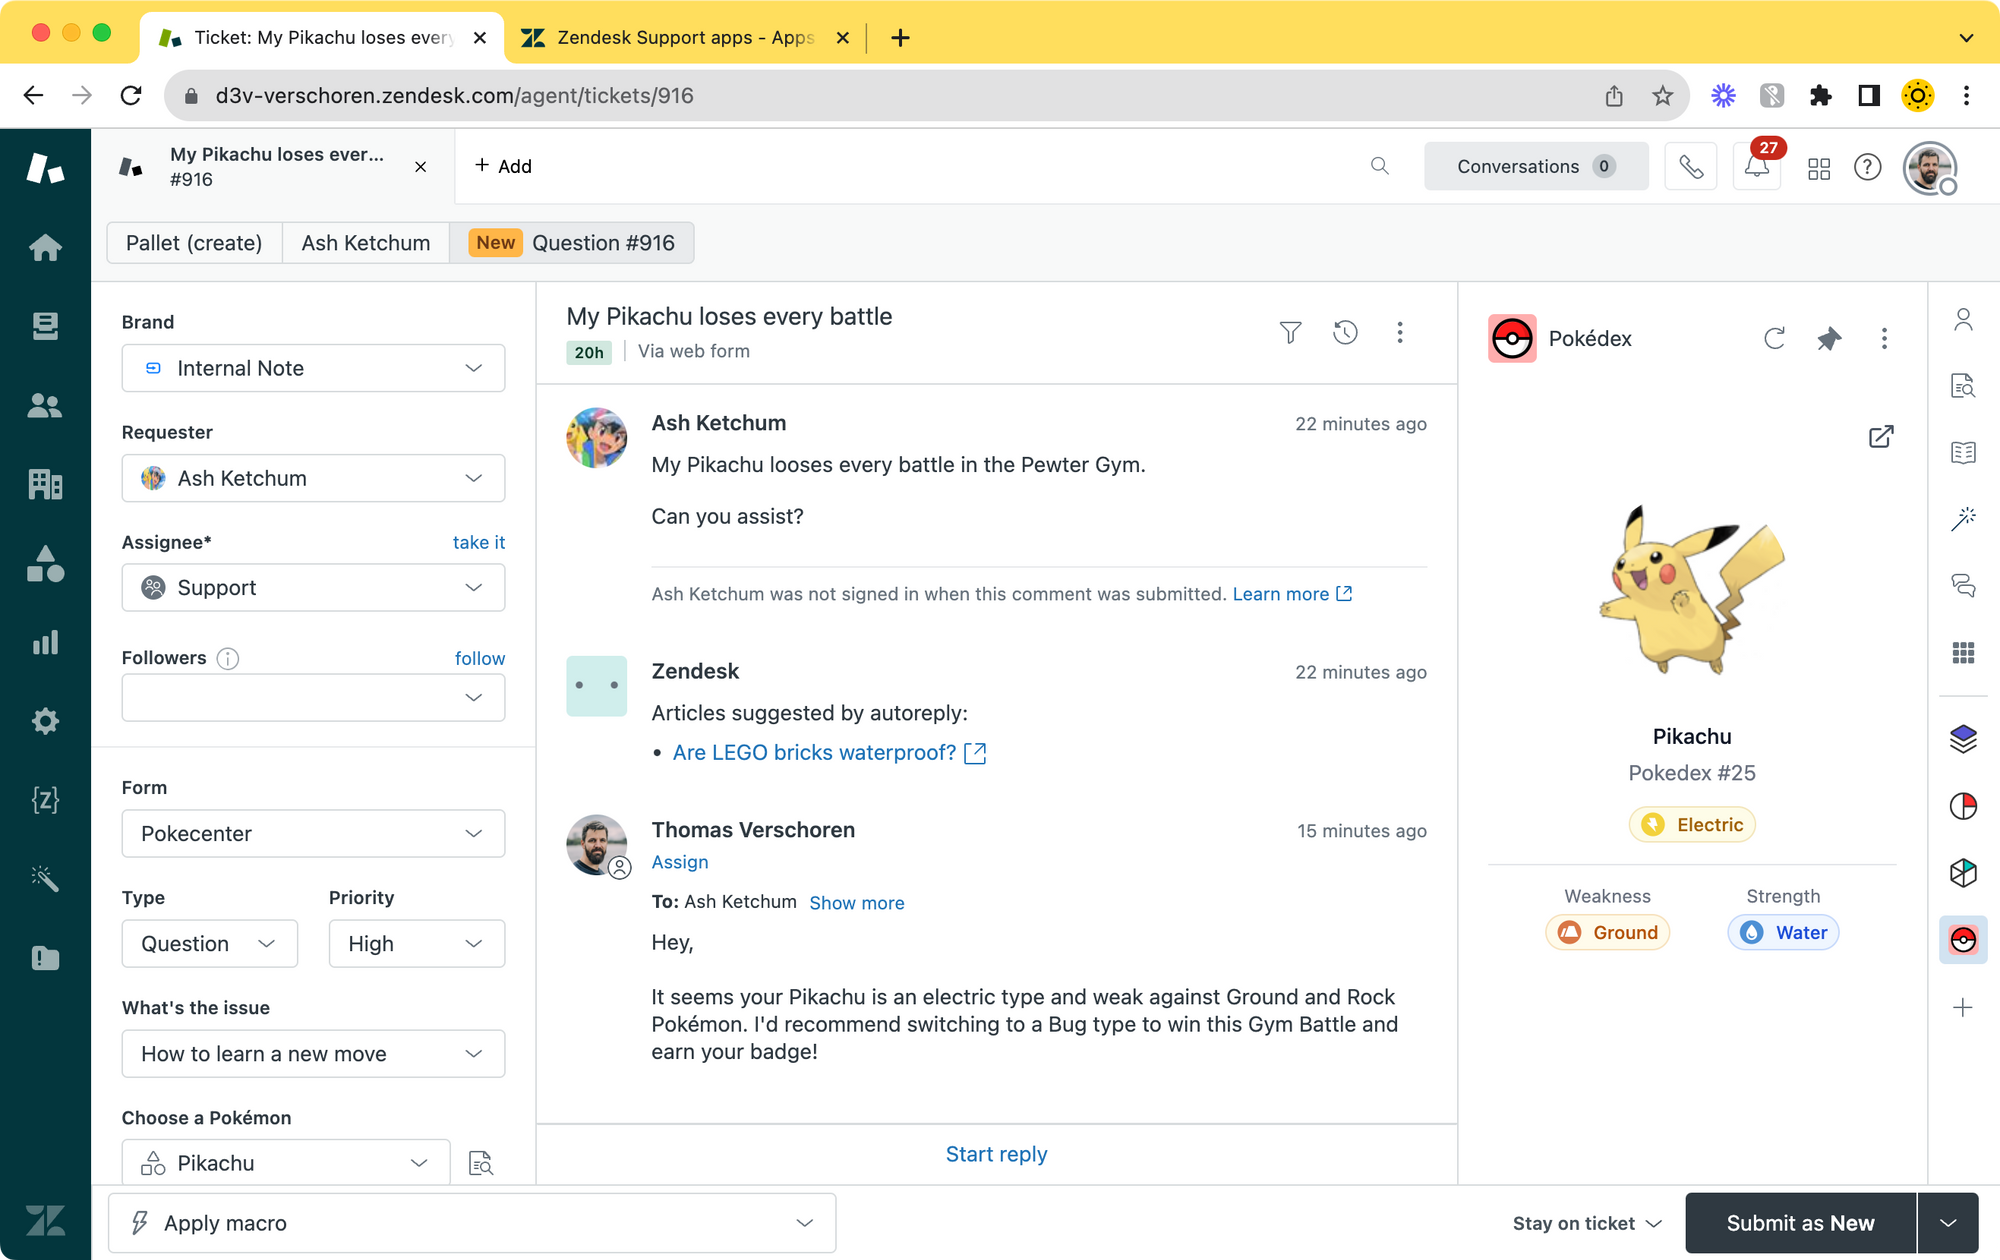
Now that we have added our Lookup Field to the form, we can have agents interact with that field.
Take a look at the flow below. A customer has asked a question about a Pokémon. Our agent first uses the Lookup Field to search for the Pokémon in question and adds him to the ticket.
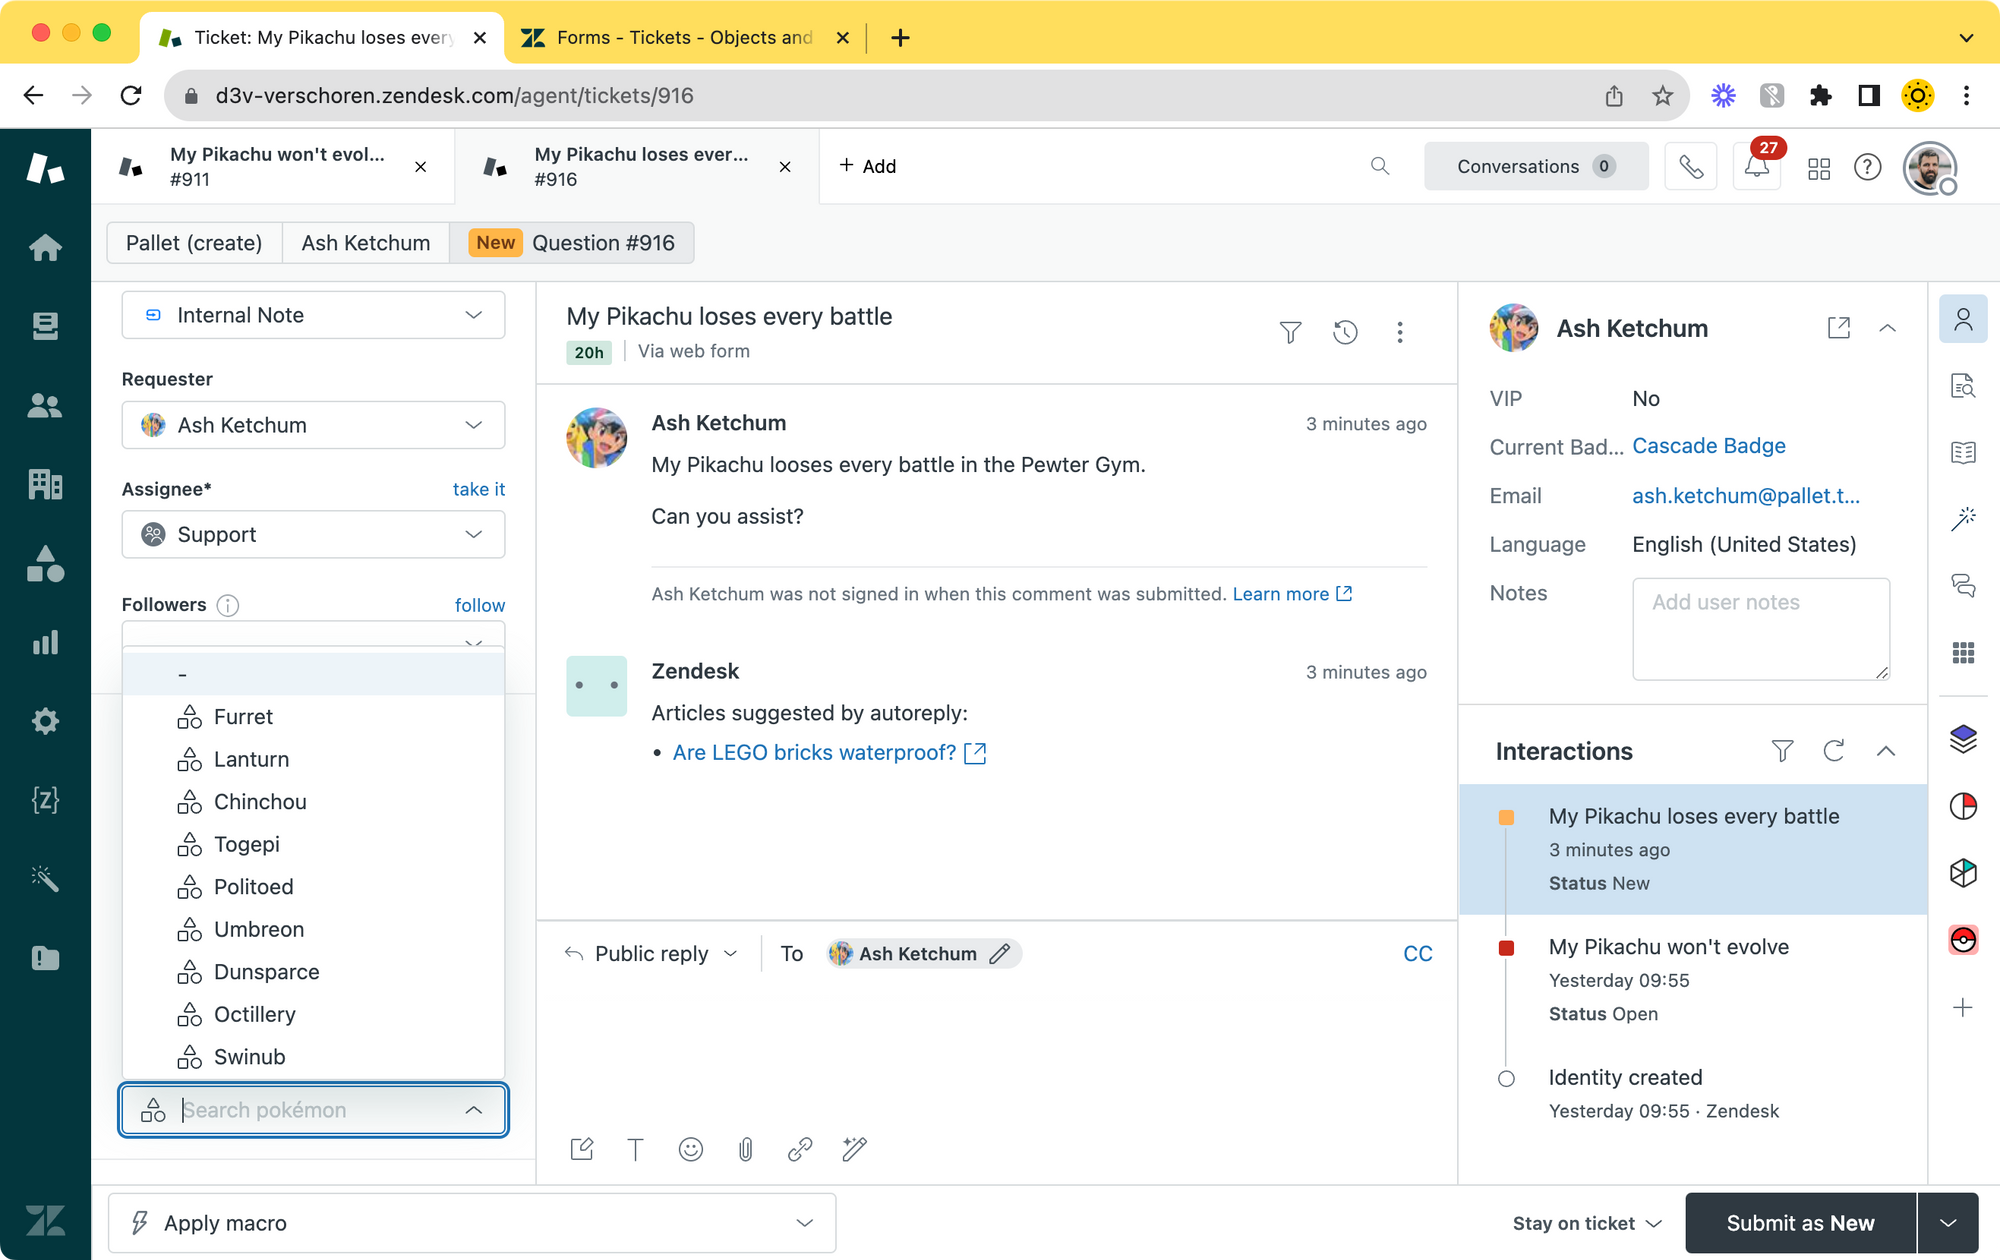

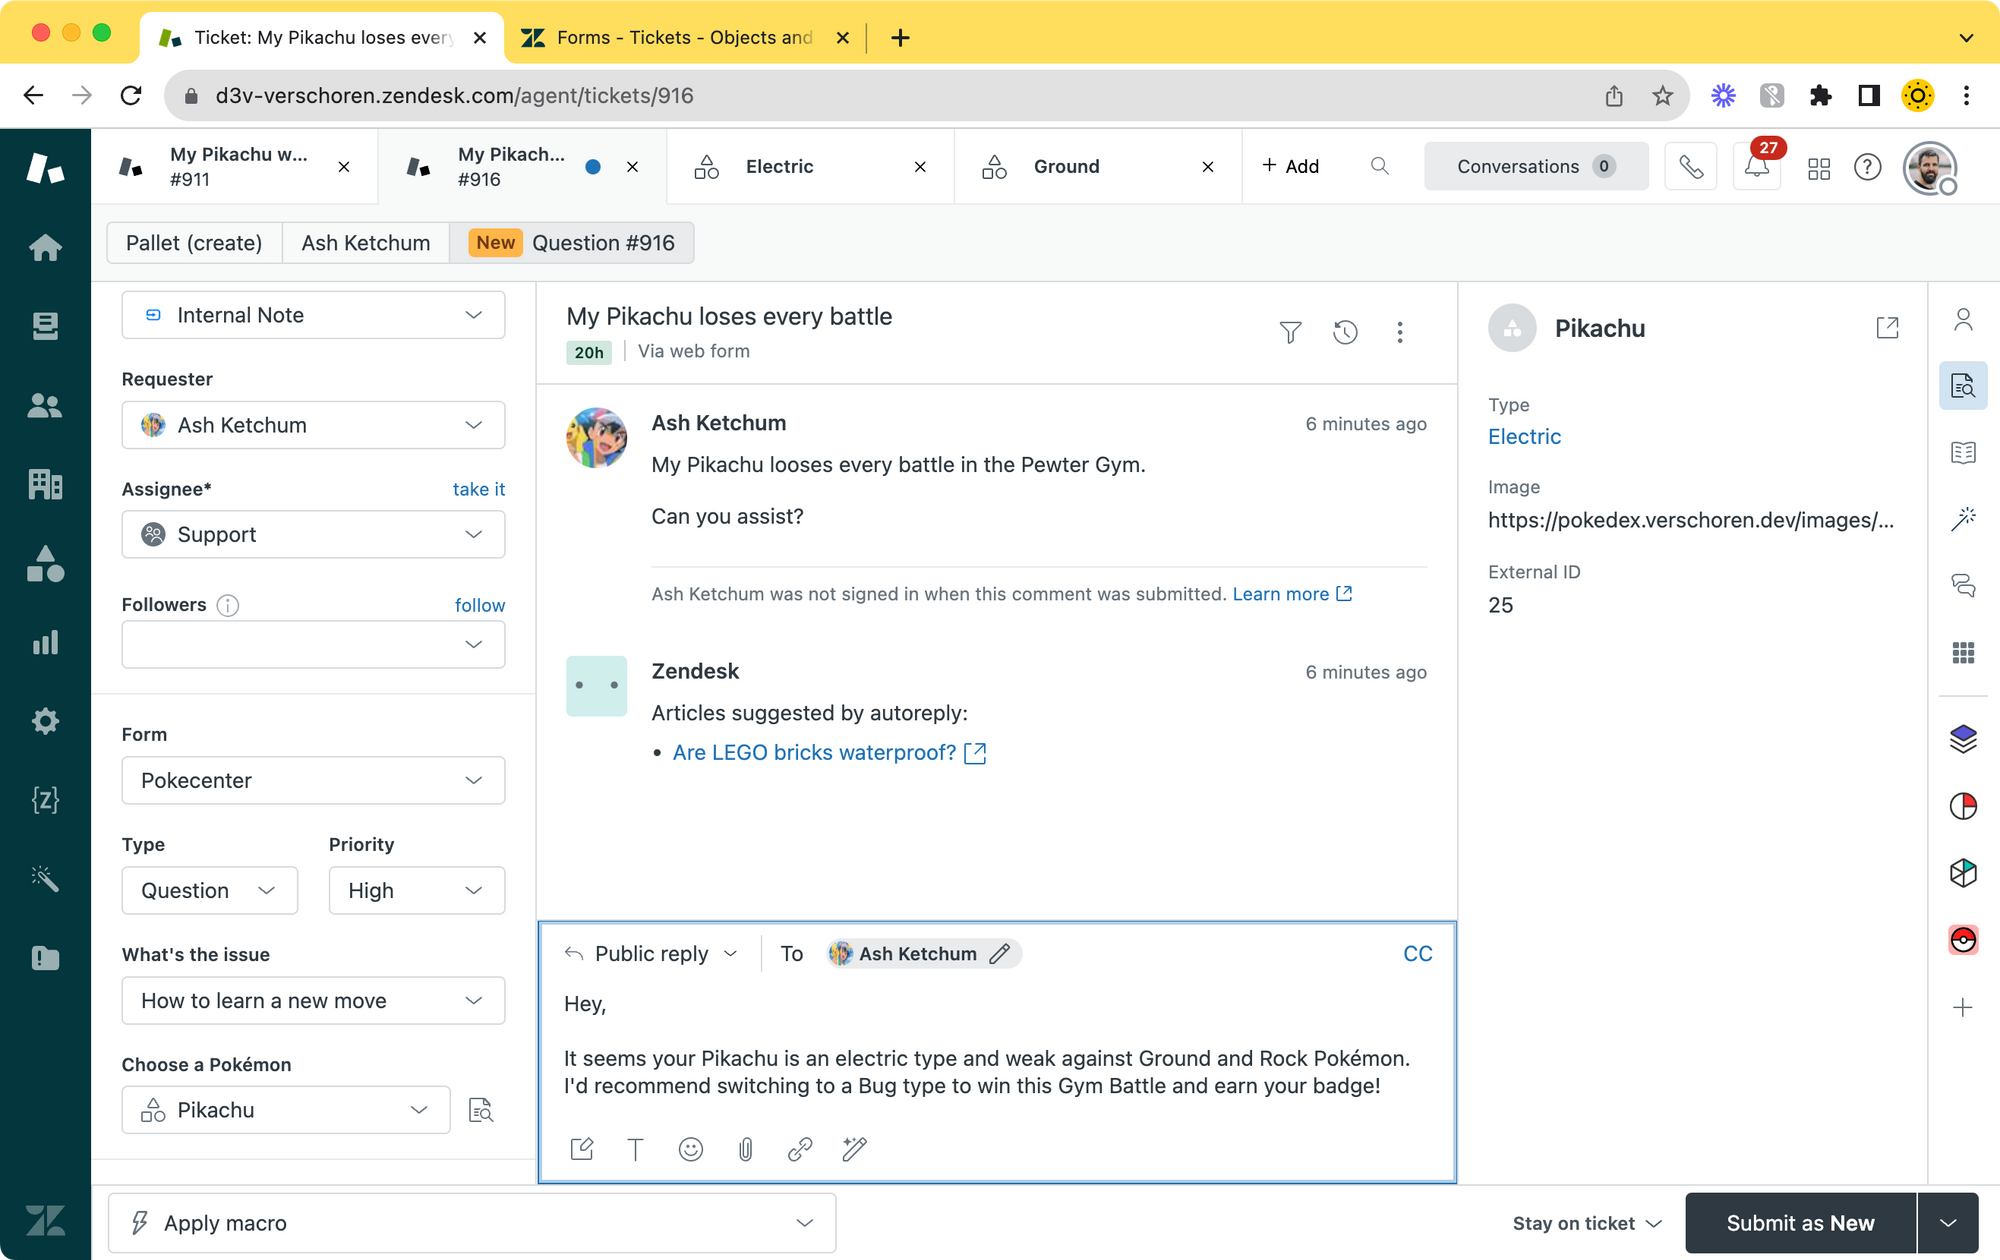
You'll notice that once they add the Pokémon, a new icon appears next to the ticket field. Clicking that icon will open the new Record Preview. Since the customers' question is related to the Pokémon type, the agent can click on the linked type and check out its data easily and provide an answer to the customer.

Viewing linked objects
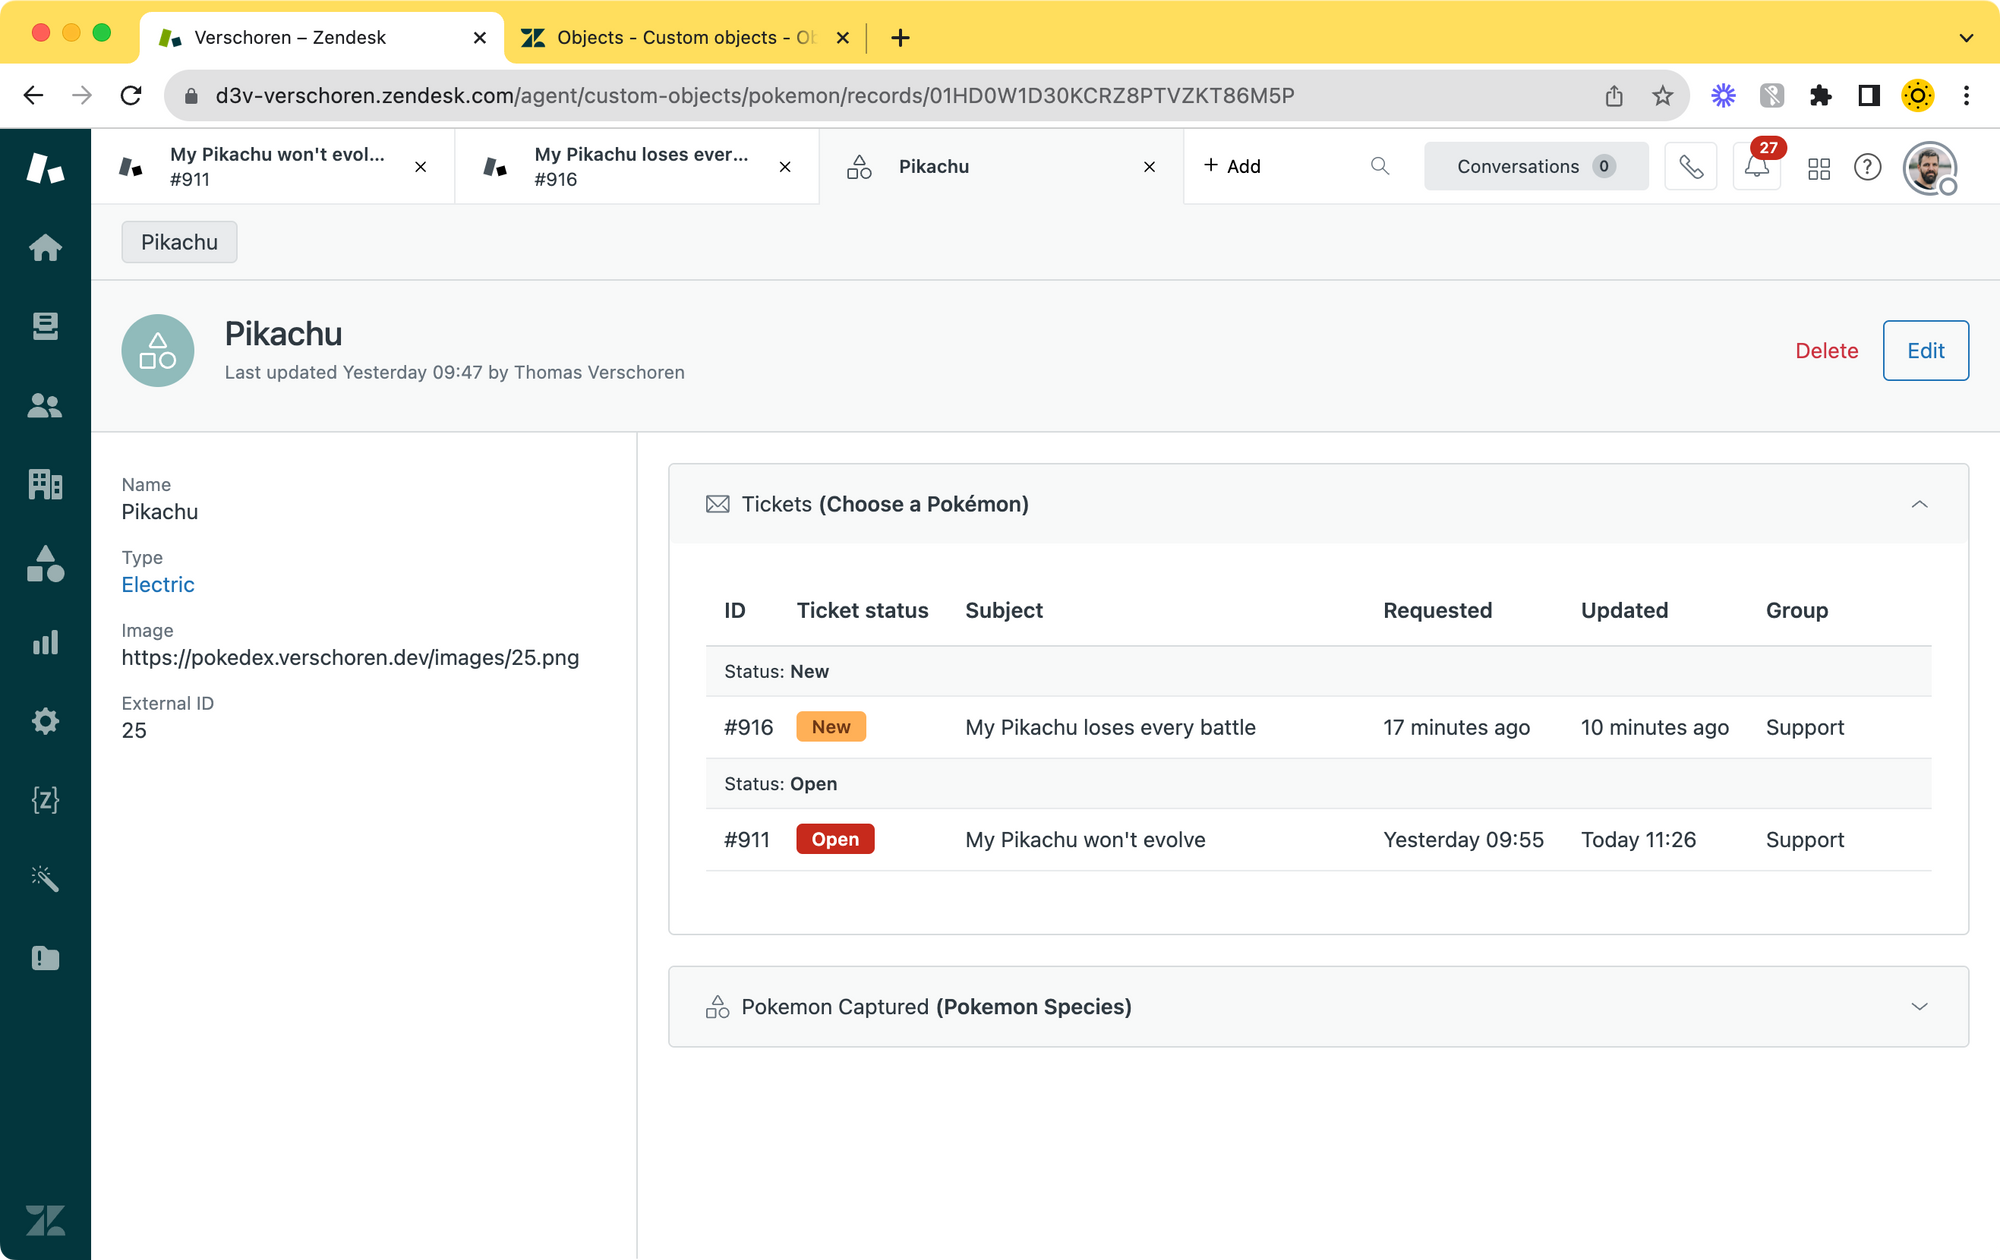
It might be useful in some flows to not only be able to see what Pokémon is linked to a ticket, but to find all tickets linked to a specific Pokémon.
This can be done by going to the Object Inspector in the navbar, selecting the Pokemon object and searching for a specific one. When you open its record, you'll find the record data on the left, and the right side of the view shows all linked objects. In our case: all the tickets that refer to our Pikachu.
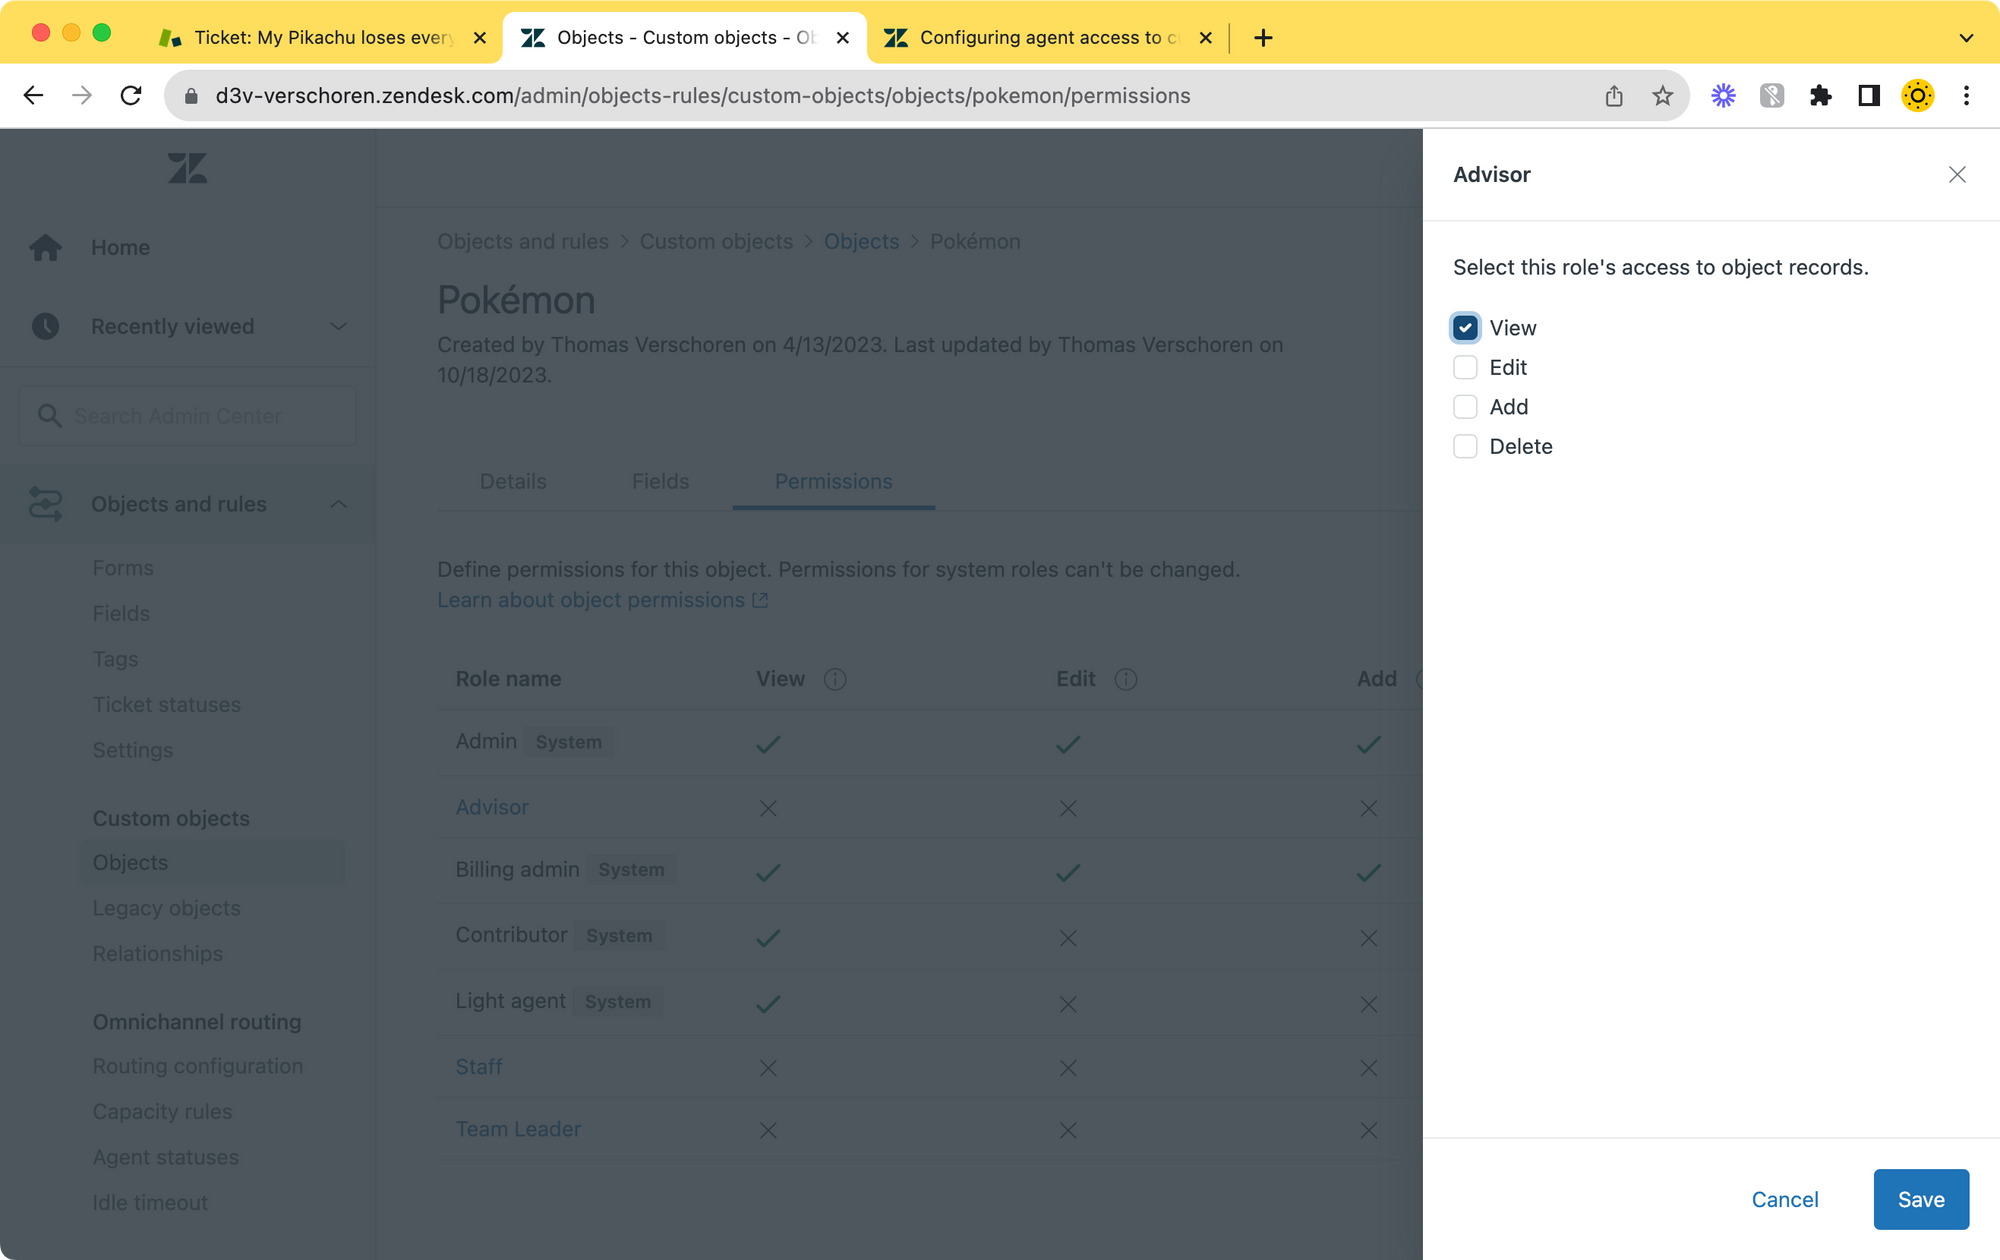
Permissions
You'll notice that it was the agent who added the Pokémon to the ticket, and not the customer filling a form. This is due to a currently limitation in Custom Objects where we can only make custom objects visible, editable or deletable for Agent in your Zendesk environment.
The fourth article in this series will show a work around for this, but out of the box it's the agents doing the work here.
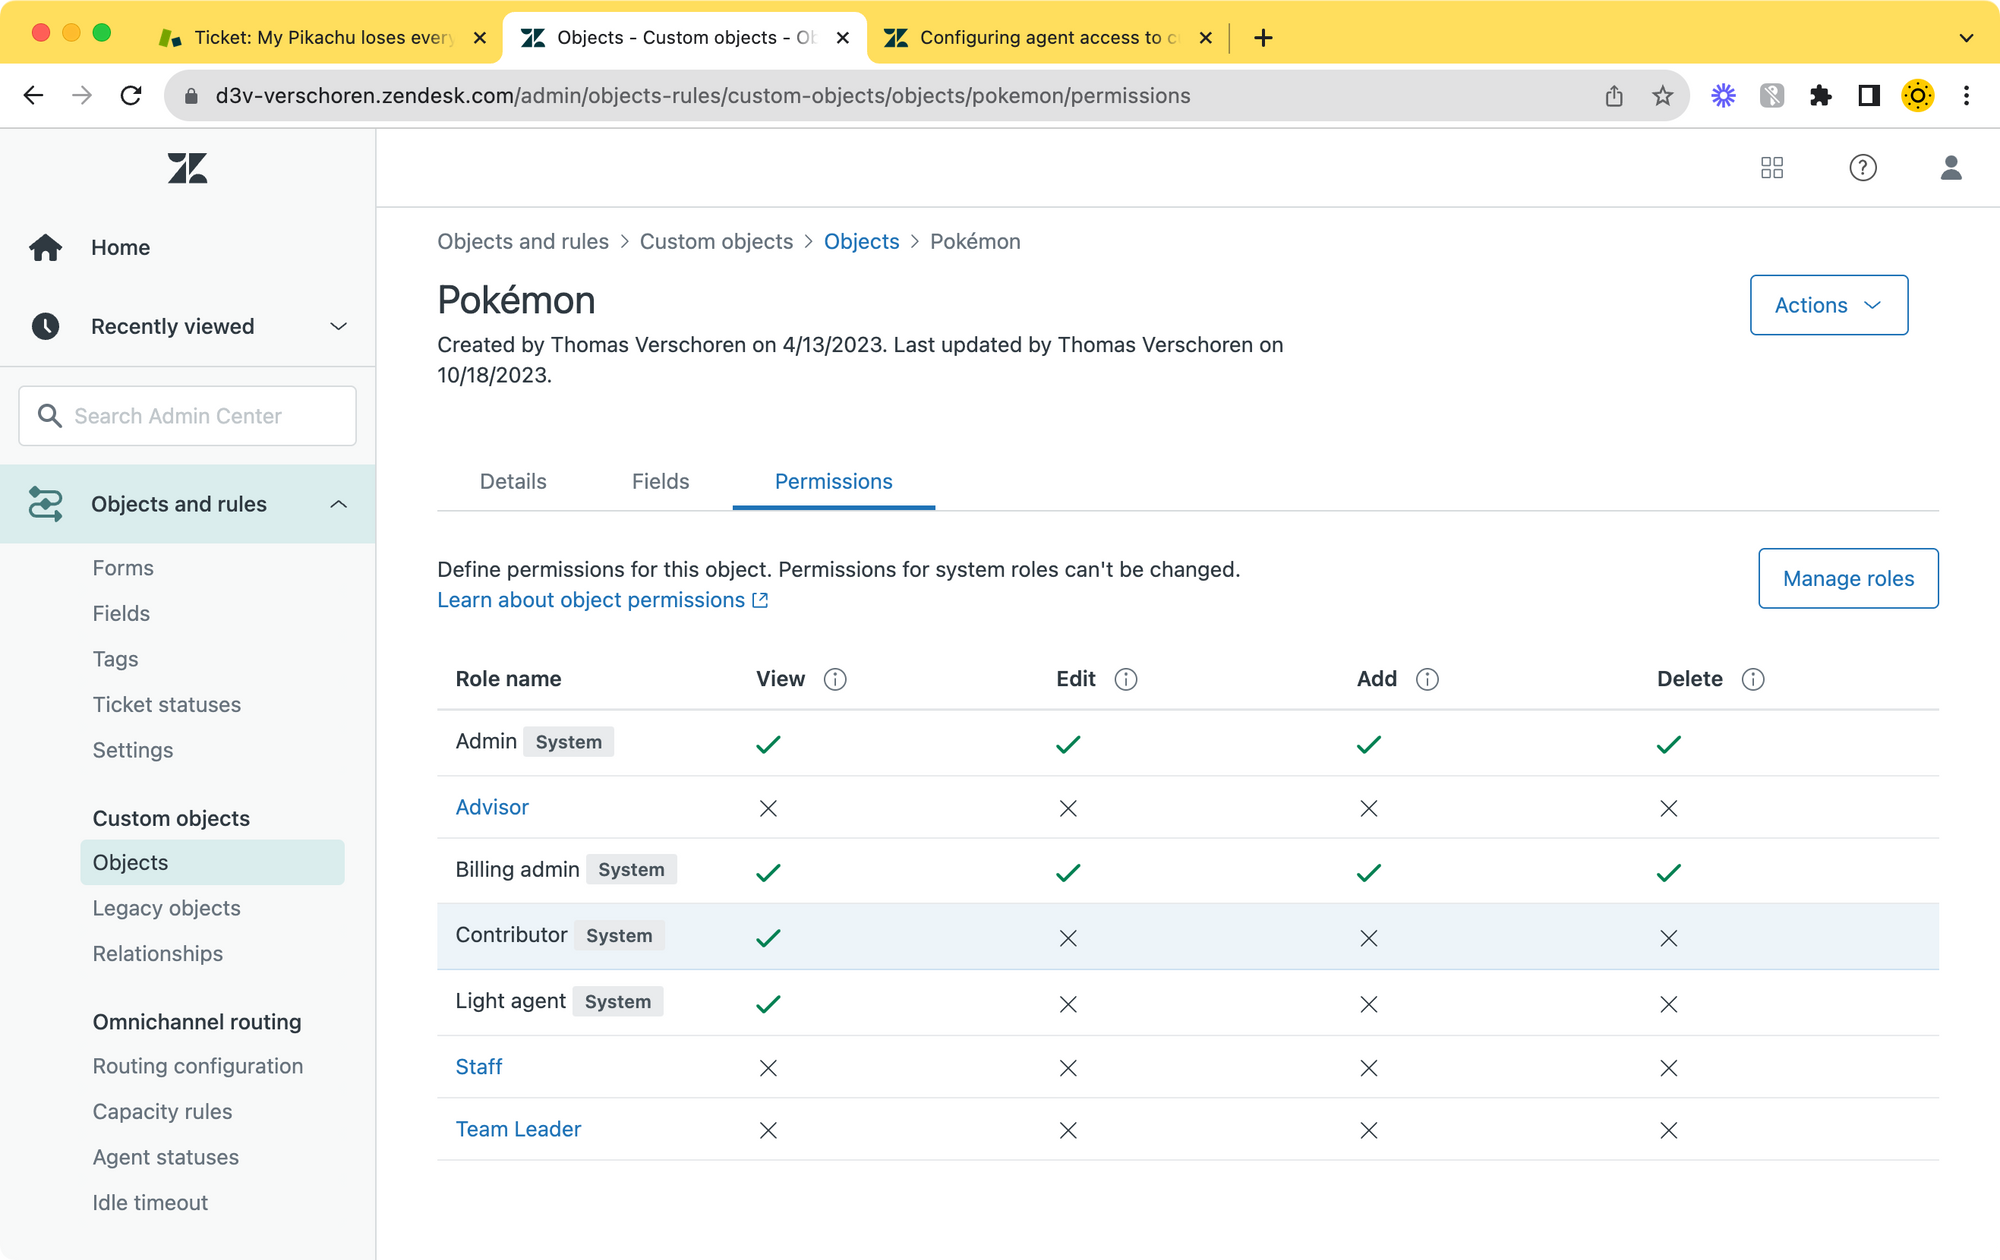
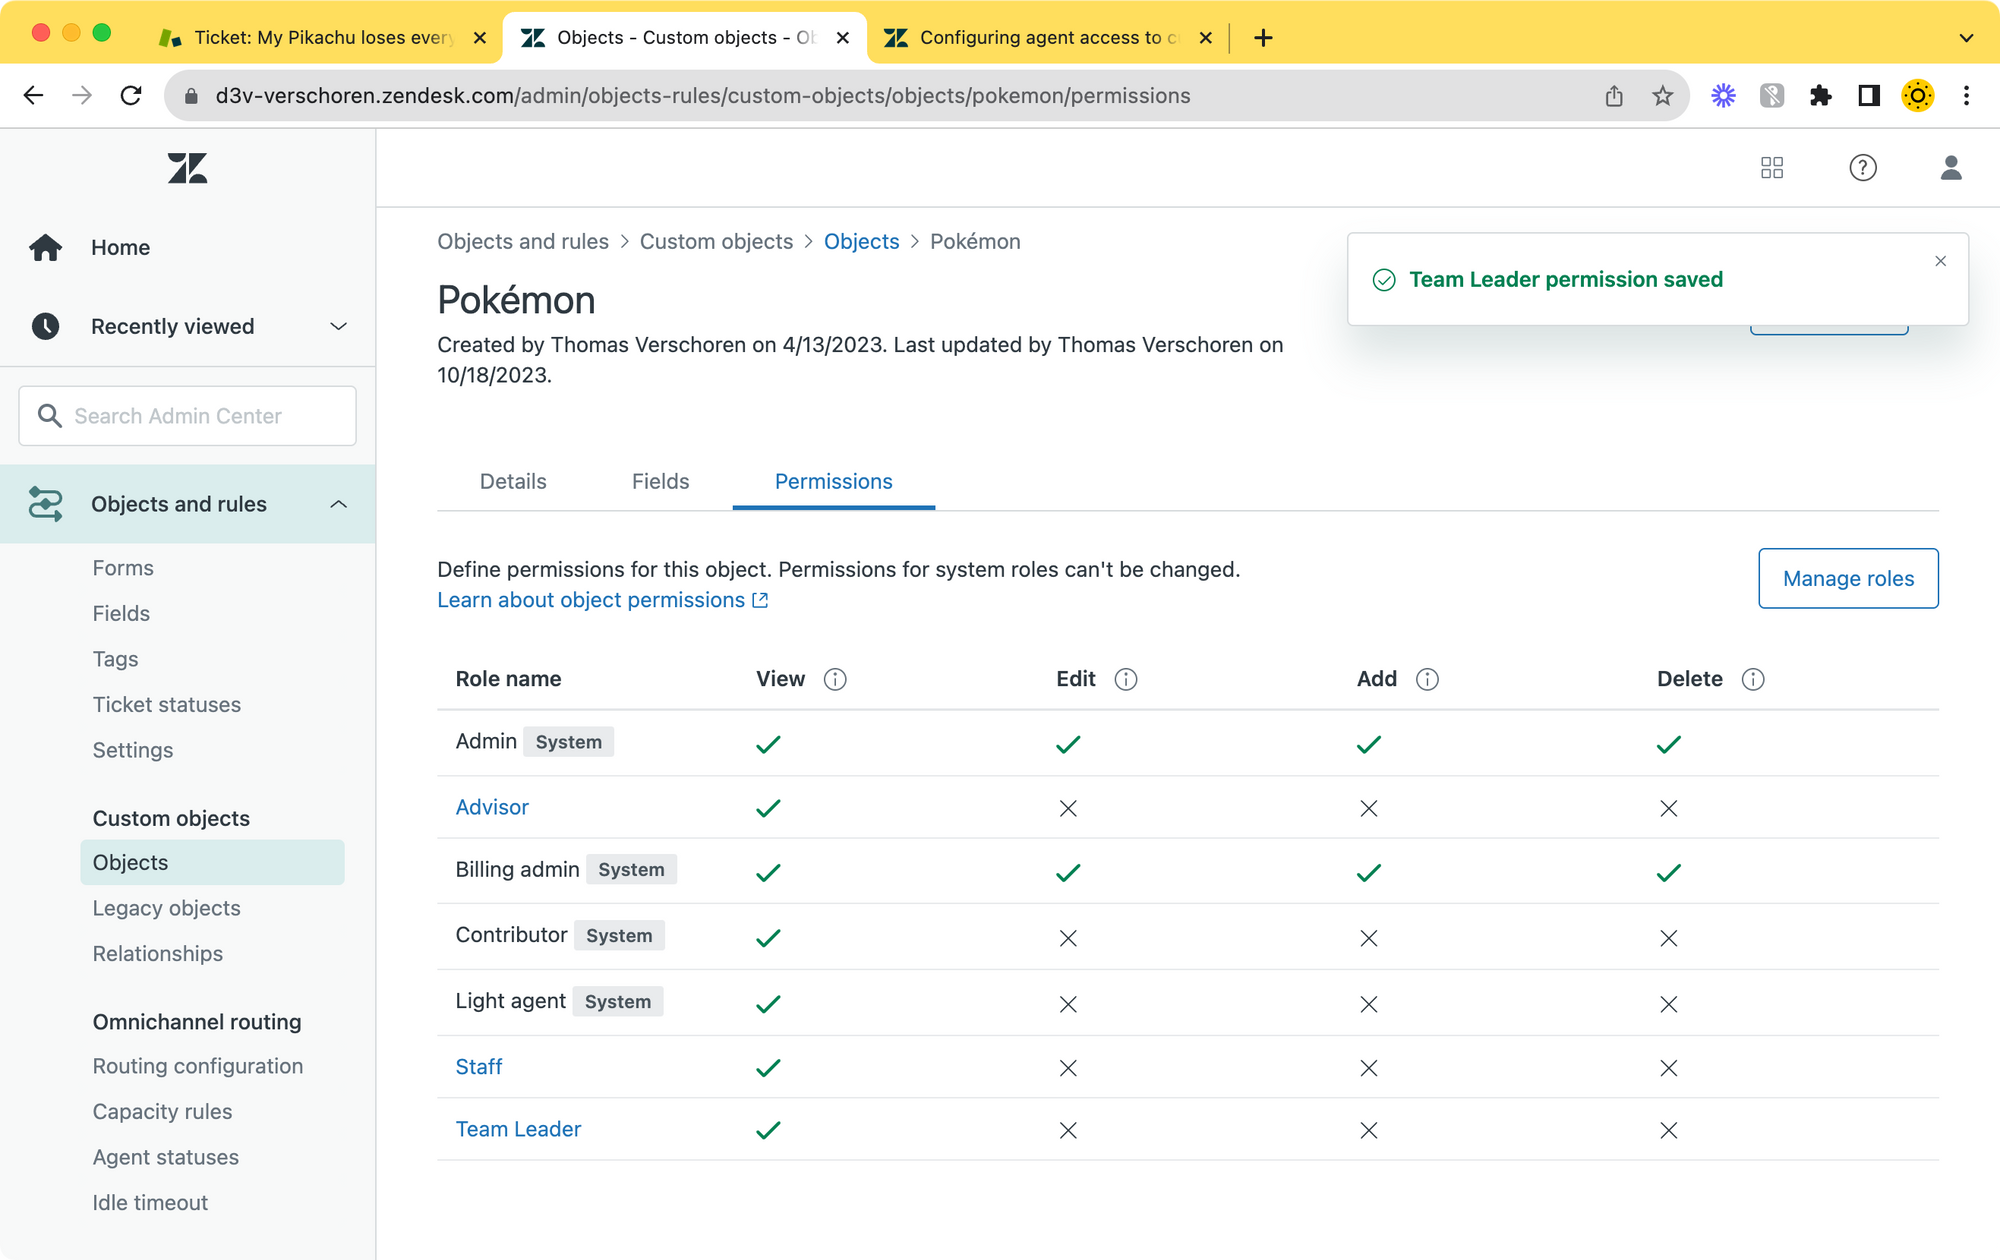
Setting end-users aside, we do need to validate the correct permissions for our other agents before they can interact with the custom objects. This is done by managing the object in the Admin Panel and navigating to the Permissions Tab. Here you can set View, Edit, Delete or Add rights to the Object.
Your situation will vary, but I've setup this Object with View rights for all users, and only admins have the ability to add, edit or delete records.
Note that you do not need edit rights to be able to link tickets and object records! Edit records only apply to changing data within a record. For example: changing Pikachu to a Grass type.
Create a custom sidebar app
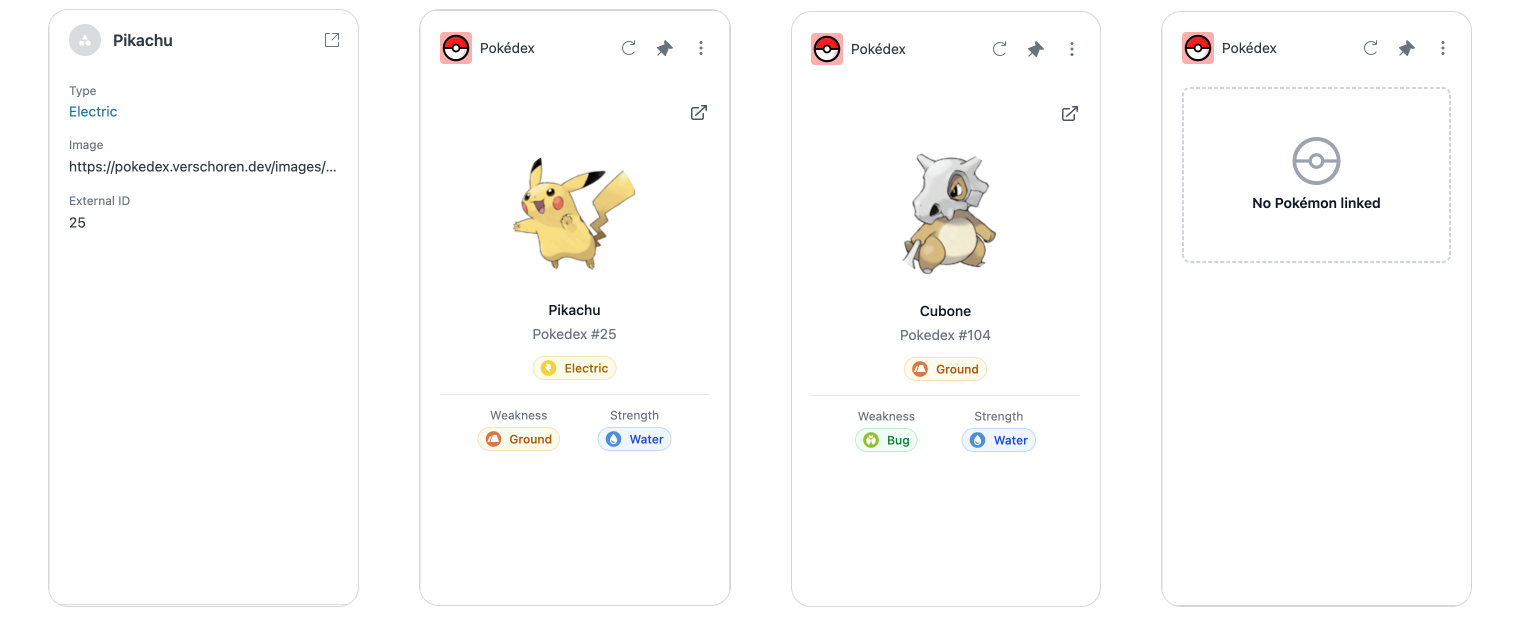
So far we've covered linking records to tickets and seeing the data in the Agent interface. As you noticed in the flow above, the agent can link a Pokémon, view its data in the Record Preview. By clicking the Type in the preview we can then see a Pokémon's type and discover its strength and weaknesses.
But even though this built-in interface is nice, there are things that could be better. Our object has an image field that contains a link to an image of the Pokémon. And our agents need to click a few times to discover a Pokémon's strength and weaknesses.
These items aren't showstoppers, but it would be nice to create a more visual representation of the data for our agents.
As you can see, this Agent Workspace contains a custom sidebar app that shows a photo of the linked Pokémon, clearly shows its type in a visual way, and even shows its strength and weakness in one overview.
You can find a full code sample of the app in the repository below.
 verschoren
Getting a linked object
This app lives next to a ticket and makes use of the ZAT Client to read the ticket data of the current ticket.
We first use client.get('ticket.customField:custom_field_123457890') to retrieve the value of the Lookup Field. Note that 1234567890 is the ID of the Ticket Field, which can be found via the Admin Panel.
If a Pokémon was linked, this will return the Record ID of the linked Custom Object. We then use the Zendesk API to retrieve the entire record of the linked Pokémon via /api/v2/custom_objects/pokemon/records/{{record_id}}.json
let pokemon = await getPokemon();

async function getPokemon(){
    var linked_pokemon = await client.get('ticket.customField:custom_field_14502103878802').then(async function(custom_field){
        return custom_field['ticket.customField:custom_field_14502103878802'];
    })
    if (linked_pokemon == null){
        return null;
    } else {
        return await client.request({
            url: '/api/v2/custom_objects/pokemon/records/'+linked_pokemon+'.json',
            type: 'GET',
            dataType: 'json'
        });
    }
}
//returned data
{
  "custom_object_record":
    {
      "id": "01HD0W1D30KCRZ8PTVZKT86M5P",
      "name": "Pikachu",
      "custom_object_key": "pokemon",
      "custom_object_fields": {
        "image": "https://pokedex.verschoren.dev/images/25.png",
        "type": "01HD0T5GE1QDVPB97XWTJV5WT2"
      },
      "external_id": "25",
      ...
    }
  }
}
Once we have our pokemon we also need to load the data of the linked type object. Since Zendesk does not (yet) allow to side load linked records, we'll need to make a second API call to retrieve the pokemon_type data.
let pokemon_type = await getType(pokemon.custom_object_record.custom_object_fields.type);

async function getType(type_id){
    return await client.request({
        url: '/api/v2/custom_objects/pokemon_type/records/'+type_id+'.json',
        type: 'GET',
        dataType: 'json'
    });
}
//returned data
{
"id": "01HD0T5GE1QDVPB97XWTJV5WT2",
"name": "Electric",
"custom_object_key": "pokemon_type",
"custom_object_fields": {
"color": "yellow",
"strength": "01HD0T5GCHTCSFFS3G3AMGVMRH",
"weakness": "01HD0T5GDZ95H63AKDXK7FFQY9"
},
...
}And finally, since we also need the strength and weakness we can use getType() again to load the data for the two linked pokemon_types.
let weakness = await getType(pokemon_type.custom_object_record.custom_object_fields.weakness);
let strength = await getType(pokemon_type.custom_object_record.custom_object_fields.strength);
Showing the data
As you can see, interacting with Custom Objects via API is not that complex. The same IDs are uses across custom fields and records, making it easy to retrieve records and their data.
Now that we have gathered all data for our linked record, we can use that data to render a nice preview of the record for our agents that include both strengths and weaknesses and a nice photo of the Pokémon.
Wrapping it up
There's a few final niceties we can add to our app to wrap it up.
First off, we add a link to the Object Inspector so we can view our Pokémon record in the native full screen viewer.
$('#view').attr('href',`https://yourdomain.zendesk.com/agent/custom-objects/pokemon/records/${pokemon.custom_object_record.id}`);Secondly, we want our app to update whenever a Pokémon has been added to the ticket, removing the need of a manual refresh by the agent:
client.on('ticket.custom_field_14502103878802.changed', function(e) {
  init();
});What's next?
We've now seen how we can have Agents interact with Custom Objects in the Agent Workspace, and how we can use the build in Record Preview or a custom sidebar app to show rich context to agents while working with tickets and Custom Objects.
The next article in this series will dive into expanding user profiles with Custom Objects. We'll explain how you can use them to trigger different priorities based on linked records, and how to show linked objects to users next to their profile and tickets.