How to embed Zendesk in your customer experience - Integrating Internal Note with Zendesk
How to embed Zendesk in your customer experience - Integrating Internal Note with Zendesk

On this page
Most people look at Zendesk, or any other CX platform, and might see it as a standalone environment where their agents interact with customers. And while this might have been true in the early 2000s, it's wrong today.
Today, Zendesk functions as a resolution platform. It connects to your content, your customers, and your wider business operations. Your knowledge base feeds your AI Agents. Your website data enriches conversations. Your CRM informs routing decisions. In this article, I'll walk you through how I've integrated Zendesk across the full Internal Note experience, and what you can take from that for your own setup.
Similarly, where the Help Center used to be a standalone destination to search articles, it has now evolved into the Knowledge Graph. It aggregates content from your website and help centre articles, and connects to platforms like Confluence, SharePoint or Notion to provide a broader range of knowledge. That in turn allows for a higher resolution rate for knowledge-based questions. The Help Center itself has evolved too. Gone are the days of a list of search results. It's quickly being replaced with a generated answer at the top of your search results.
Where content and the Help Center were once tightly interlinked, that web experience is now just one of the ways your customers and agents can interact with your data. AI Agents pull from those same sources to generate responses. Agent Copilot uses it for suggested replies.
And while search is the original interface, conversations are the new way most customers interact with your company. The Zendesk Web Widget, Mobile SDK and the ChatGPT app allow you to easily embed the Zendesk experience in your apps and websites, while the rich API platform offers codeable ways to talk to Zendesk.
Zendesk's platform integrates deeply with your business' operations.
Its Action Builder platform allows you to pull in data from your CRM or order system, while also allowing you to send data to Slack, Google Sheets, Jira or a myriad of other platforms. Beyond simple data exchange, Action Builder supports full automation workflows. These can be triggered by ticket events, status changes or conversation signals. Within them, you can use native connectors for platforms like Salesforce, HubSpot and Slack, or define Custom Actions to call any API endpoint you need. Where a native connector doesn't exist, a Custom Action covers the gap. No hosting, no external scripts, just configuration inside the platform.
Action Builder isn't just there to do this though. It's also there to gather context. Combined with our Conversational platform, it can pull in metadata to enrich your conversations. It can be used to inform routing or move forward in procedures, removing manual input steps for your customers and agents.
And to offer this kind of support to your customers, you need to know who they are. By linking Zendesk to your current customer database, importing users, enriching profiles and enabling authentication, your AI Agents and team know who the customer is, what their context and preferences are, and can offer deeper, more personal support.
All of these are available right out of the box in the Zendesk Resolution Platform. But knowing where to start leveraging these integration capabilities might seem daunting. So in this article I'm going to show you how I use these capabilities to run Internal Note, and how I deeply integrated this website with Zendesk to offer a more personalised and more powerful experience to you, the reader. Most of what I do here is equally applicable to your website, so you can use this for inspiration, or as a guide.
Knowledge Graph
Internal Note is first and foremost a content blog. Similar to how your own website's blog or newsroom might serve as a good additional source for your Knowledge Graph, I wanted to leverage Internal Note as a source of content for my Help Center and Echo, my AI Agent.
But the opposite is true too. While people might search for Internal Note content via the AI Agent, the AI Agent needs information from the broader Zendesk platform to fill in gaps the content doesn't address. An article about a certain topic might raise questions that our support documentation can answer.
So when indexing content to use across your Knowledge Graph, try to look for both the obvious (support content) and the supportive (blog content, marketing landing pages,...), while staying away from duplicate content.
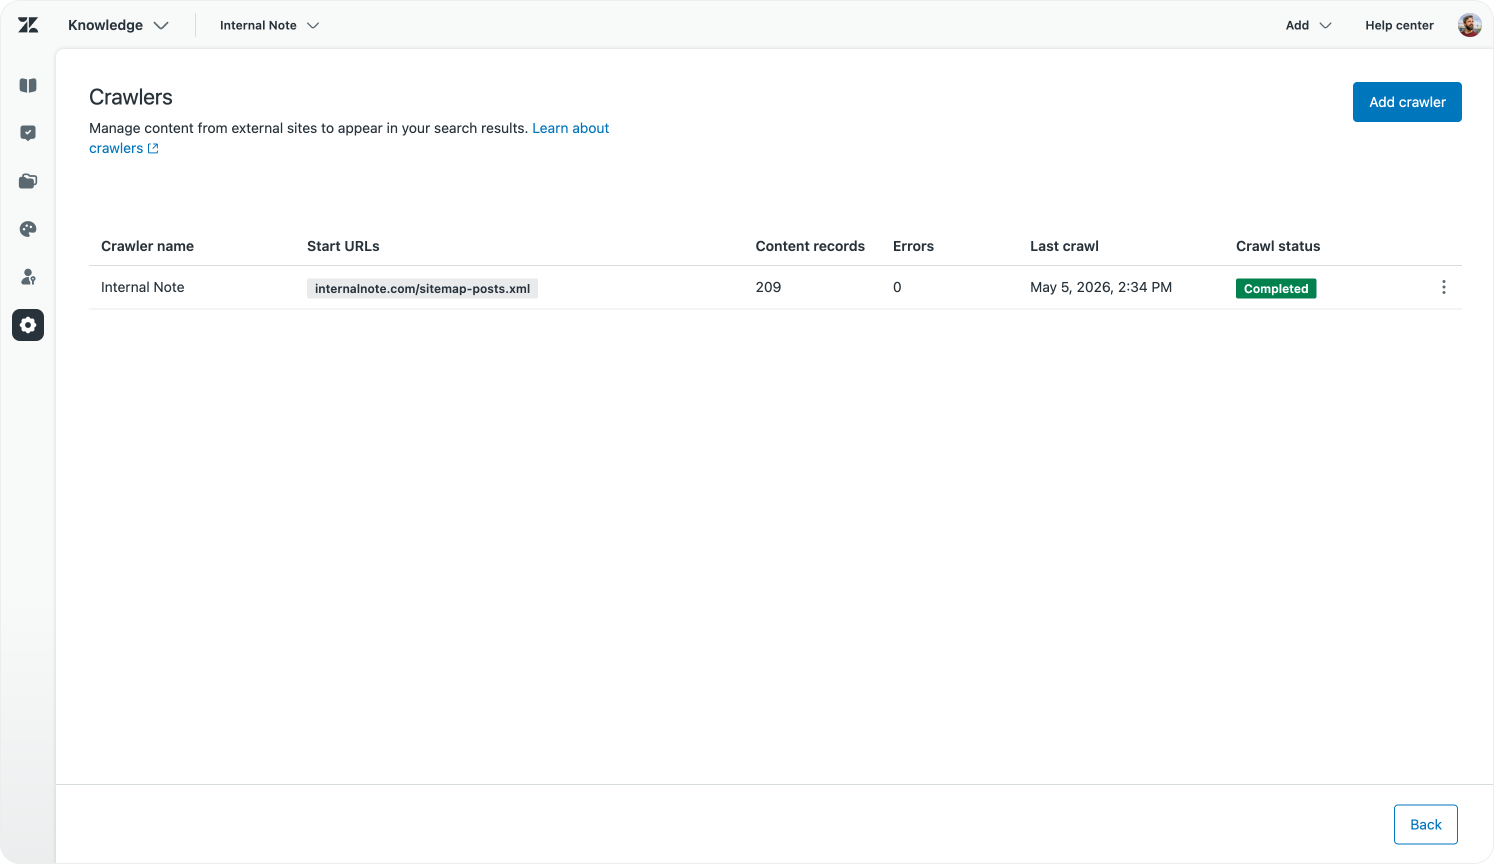
Index content via Federated Search
Adding any external website to Zendesk's Knowledge Graph is done via Federated Search. This used to be an Enterprise feature, but is now available to all customers. By adding your website's sitemap as a source, Zendesk will index all public content and make it available across your Help Center as an additional Knowledge Source.
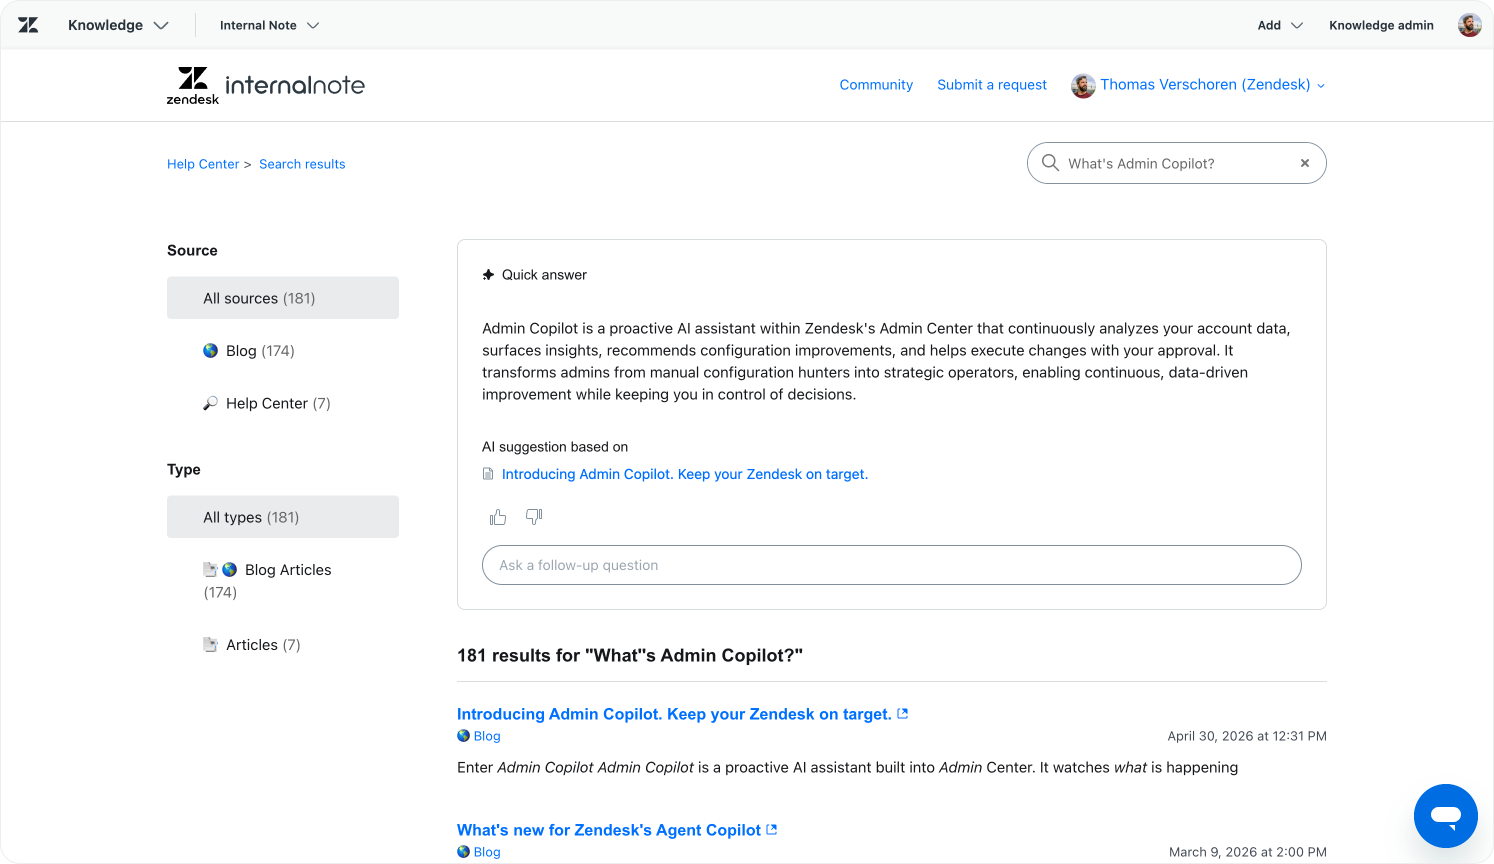
Surface generated answers with Quick Answer
After doing so, when I search my Help Center the Quick Answer will also use content sourced from Internal Note, while the search results will contain links to articles.
Quick Answer is Zendesk's generative search capability. When a visitor searches the Help Center, they don't get a list of links. They get a synthesised answer, pulled from all indexed content. That includes your Help Center articles and any external sources added via Federated Search. It works similarly to how an AI Agent generates a response, but it happens in the search context, at the top of the results page, without needing to start a conversation. For visitors who want a fast answer before reading further, that's a meaningfully better experience than a page of blue links.
Since my Help Center now knows my entire website's content, it actually offers better search results than my website's own search does. I'm considering replacing the site search entirely with one that lands on my Help Center's results page. Quick Answer's capabilities alone make it worth considering for your site too.
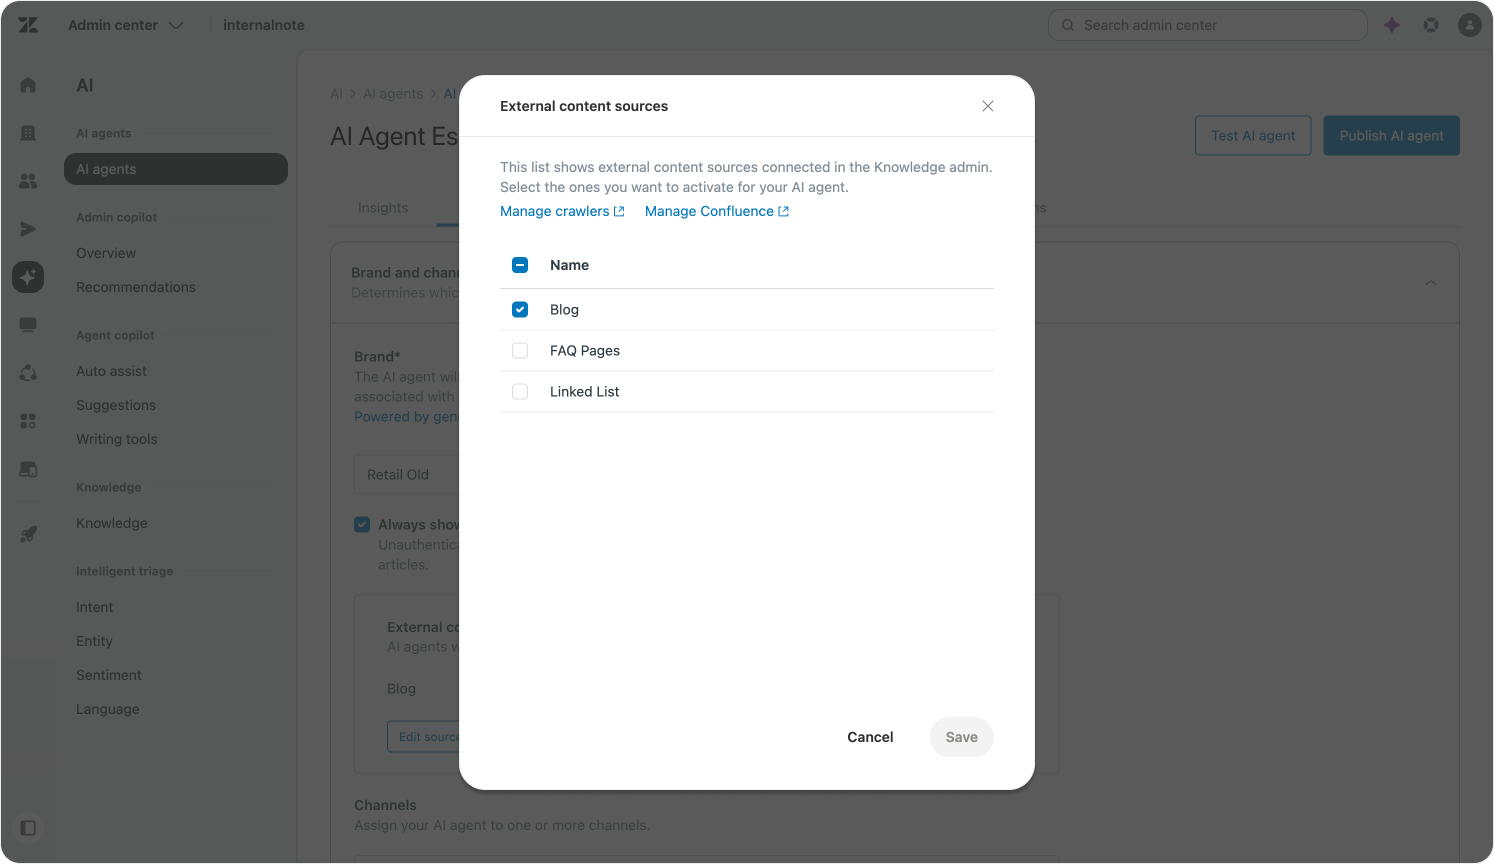
Add your website to AI Agents
Once a website is added via Federated Search, you can also go to your AI Agent Essential in Admin Center and add the website as an additional external source for the AI Agent. It'll then source from both your Help Center and website to generate responses.
For now, Zendesk's AI Agents Advanced leverage their own indexed knowledge sources to generate knowledge replies to customers. You can add your Zendesk Help Center or your website to the list of indexed sources and the system will make that content available to your replies and use cases.
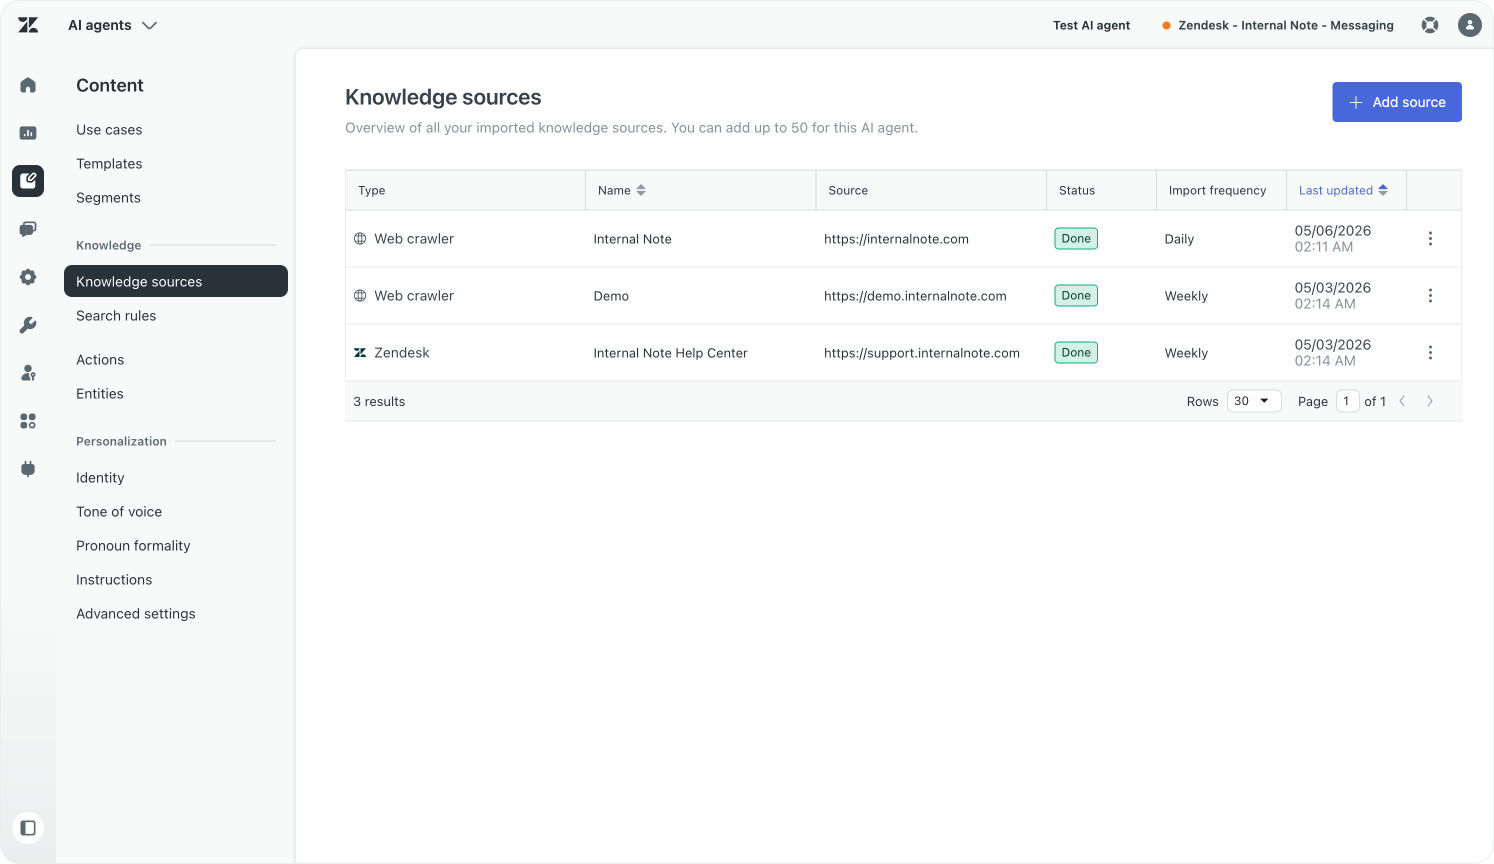
Answer questions with Knowledge Reply
By default the Knowledge Reply will pull from all indexed resources to reply to the customer. You can however use Search Rules based on customer segment or conversation context to limit replies to only specifically applicable resources. This is extremely useful when you have a single AI Agent that serves multiple user segments. For example, my AI Agent mostly only uses internalnote.com to react to enquiries, and only rarely dives into the broader support.zendesk.com resource. The same logic applies wherever you have multiple audiences being served by the same agent.

Summarise content on demand
But while offering Knowledge Replies is nice, the real power comes when we integrate Knowledge into Use Cases. The content on this website is longform and detailed. Any reader who wants to know about a specific detail for a certain topic can ask my AI Agent, Echo, and it'll respond with an answer covering only that specific paragraph or section.
But sometimes readers want to know what an article is about before spending the time reading it. And while I could write a TLDR; myself, since we have an AI Agent right there, we can also leverage Use Cases and their new Knowledge Reply blocks to do that work for us.
You can write a Use Case that uses Search Rules or specific guidance to pull from a specific article, and then instruct it to generate a summary. It's a simple process, but it solves an actual ask from readers. This concept is also applicable to your own scenarios. A use case that summarises a new product release while always framing it in the value that update brings. Or a use case that lists current marketing promotions, filtered to the current user's segment. The list goes on.
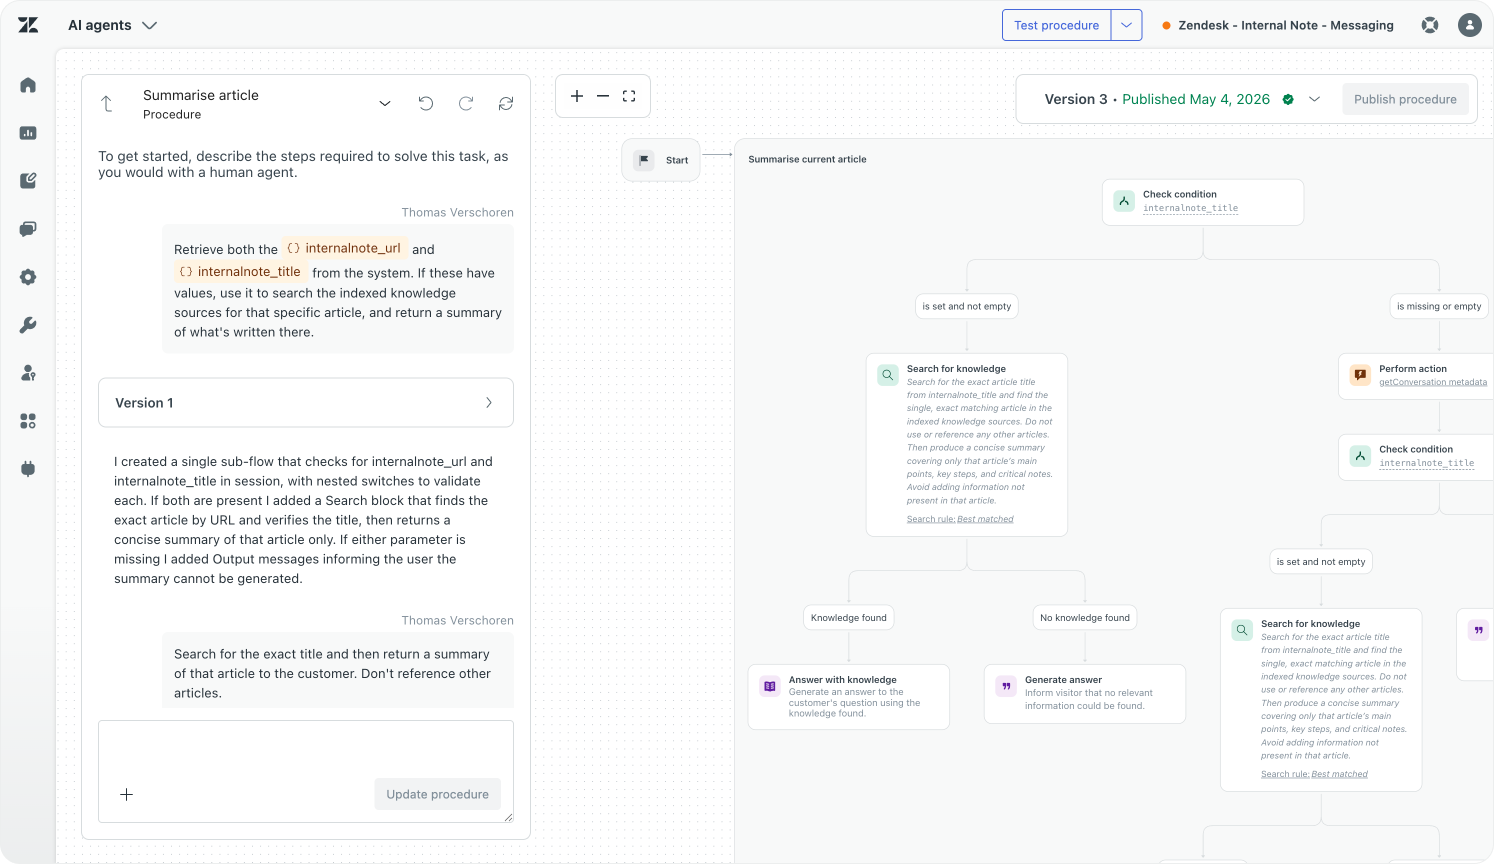
This summary flow also leverages conversational metadata to understand which webpage and article we're talking about. This metadata is passed via the Zendesk Web Widget (see below).
Embed Help Center content on your website
So far we've mostly described how we can pull external content into Zendesk. But the opposite is equally important. If you use your Help Center to make announcements, offer product updates or highlight important changes, you might want to embed that information on your product, marketing or customer pages.
While embedding the Zendesk Widget is the best way to offer inline support, sometimes you just want to show a list of articles. I'm doing exactly that on Internal Note.
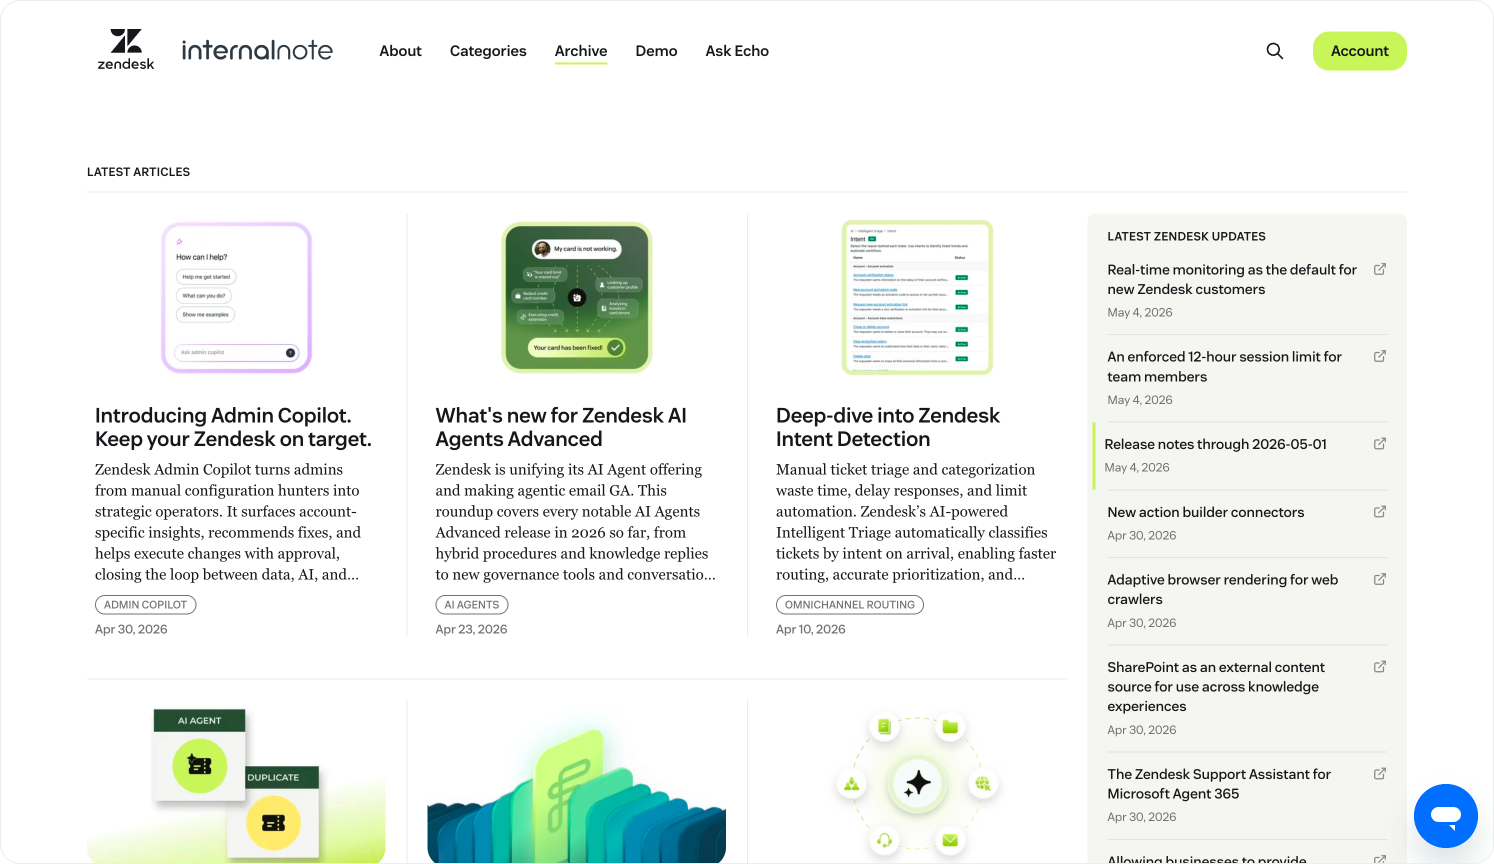
On my home page I show a list of recent product announcements pulled from our Help Center. Because while I try to write about all updates on the platform, our release cadence is such that there is always more released than I get the chance to write about. By embedding our release notes on Internal Note, readers get a quick way to see what's happening alongside my own content. The same approach works for any company that wants to surface support content, release notes or product updates outside the Help Center itself.
Pull content via the Help Center API
Enabling this is Zendesk's API layer. Most, if not all, data and configuration elements in the Zendesk Platform are accessible over API, meaning you can build your own interface or UI to render that data. So similar to how the Help Center has grown from a website into a graph that empowers the Help Center, AI Agents and Quick Answers, you can use it as a data source for your website too.
The code below is a simple version of how I use the Help Center API endpoints to pull in articles from four specific sections that highlight our release notes, what's new announcements and developer updates. I then combine them into a single object, sort them newest first and render them out.
const API_BASE_URL = 'https://yourdomain.zendesk.com/api/v2/help_center/sections';

const sectionIds = ['4405298833818', '4405298889242', '4405298877338', '4405298847002'
];

(async () => {
    try {
        const fetchPromises = sectionIds.map(async (id) => {
            const res = await fetch(`${API_BASE_URL}/${id}/articles.json?per_page=10&sort_by=created_at&sort_order=desc`);
            const data = await res.json();
            return data.articles || [];
        });

        const results = await Promise.all(fetchPromises);

        const allArticles = results
            .flat()
            .sort((a, b) => new Date(b.created_at) - new Date(a.created_at))
            .slice(0, 10);

        setCachedData(allArticles); //Cache the data to lower API usage
        renderArticles(allArticles); //Show articles in the UI
    } catch (error) {
        console.error('Error fetching Zendesk announcements:', error);
    }
})();
Once the articles are fetched, I render them out on the page.
const listHTML = allArticles.map(article => {
	const cleanedTitle = cleanTitle(article.title);
	const formattedDate = formatDate(article.created_at);

	return `
		<li>
			<a href="${article.html_url}" target="_blank">
					<span>${cleanedTitle}</span>
					<span>${formattedDate}</span>
			</a>
		</li>
	`;
}).join('');

announcements.innerHTML = `<ul>${listHTML}</ul>`;
A note on security and caching
What is important when doing this is to take caching and security into account. I'm pulling in public Help Center content, so there's no API token being exchanged, allowing me to call this code client-side. If you want to access content locked to specific user segments, or from a Help Center that requires sign-in, you'd need to run this server-side and make sure you only run it for applicable users.
Additionally, you're calling the Zendesk API, and every environment has usage and rate limits. So I use a setCachedData() function to store each fetch in localStorage for at least 12 hours. This way most readers only fetch articles once a day, making sure I do not overload any API endpoints.
Pulling Help Center content into your website creates a useful feedback loop. Your readers get a live view of what's changing on the platform. Your Help Center becomes a content engine, not just a support destination. And because it's API-driven, the presentation is entirely yours to define.
This approach works well for release notes and announcements. But it applies equally to documentation pages, onboarding flows or product tooltips. If the content lives in your Help Center, it can live on your website too.
The key benefit is a single source of truth. Your support team maintains the content once. You distribute it wherever it's needed.
Integrating conversations
Indexing your content is one way to integrate your company and Zendesk better, and to leverage the work that other teams are doing to support your customer support operations, and vice versa.
The second step is to make your support teams more easily accessible to your customers. Especially now that AI Agents are taking over more and more of the work, and self-service is turning into automated resolutions, there's no reason to hide your support channels anymore.
Make support available everywhere with the Web Widget
By embedding the Zendesk Web Widget on every page of your website you make customer support available where customers run into a problem. And while the idea of making support available anywhere might invoke the idea of "customers will reach out without deflection", the fact that AI Agents are there to offer answers pulled from knowledge or procedures actually turns that idea on its head. A more accessible support channel will not lead to more escalated conversations, as long as your knowledge and processes are set up to handle your most common use cases.
Embedding the Zendesk widget can be as easy as adding a one-line snippet to your website's <head> or <footer>.
<!-- Start of the Zendesk Widget script -->
<script id="ze-snippet" src="https://static.zdassets.com/ekr/snippet.js?key=1234-5678-9100-1138-05041977"> </script>
<!-- End of the Zendesk Widget script -->
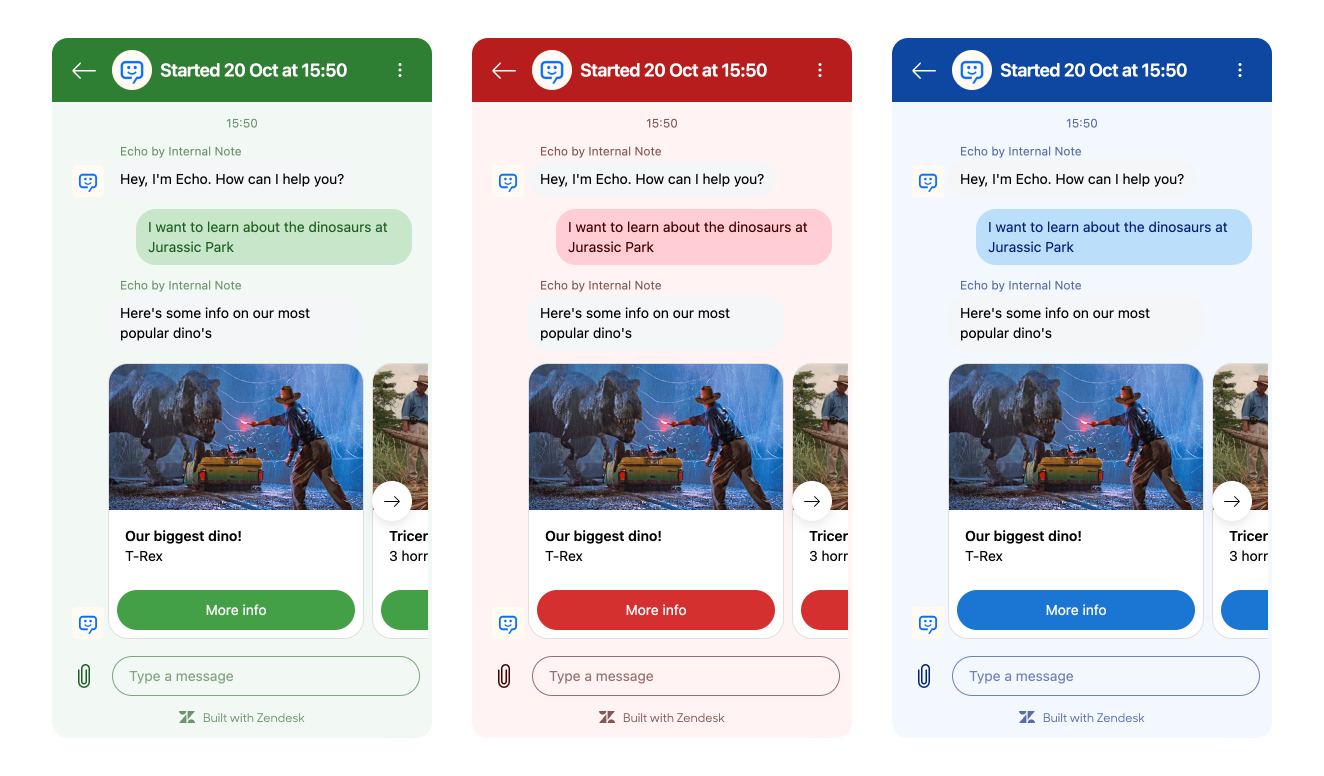
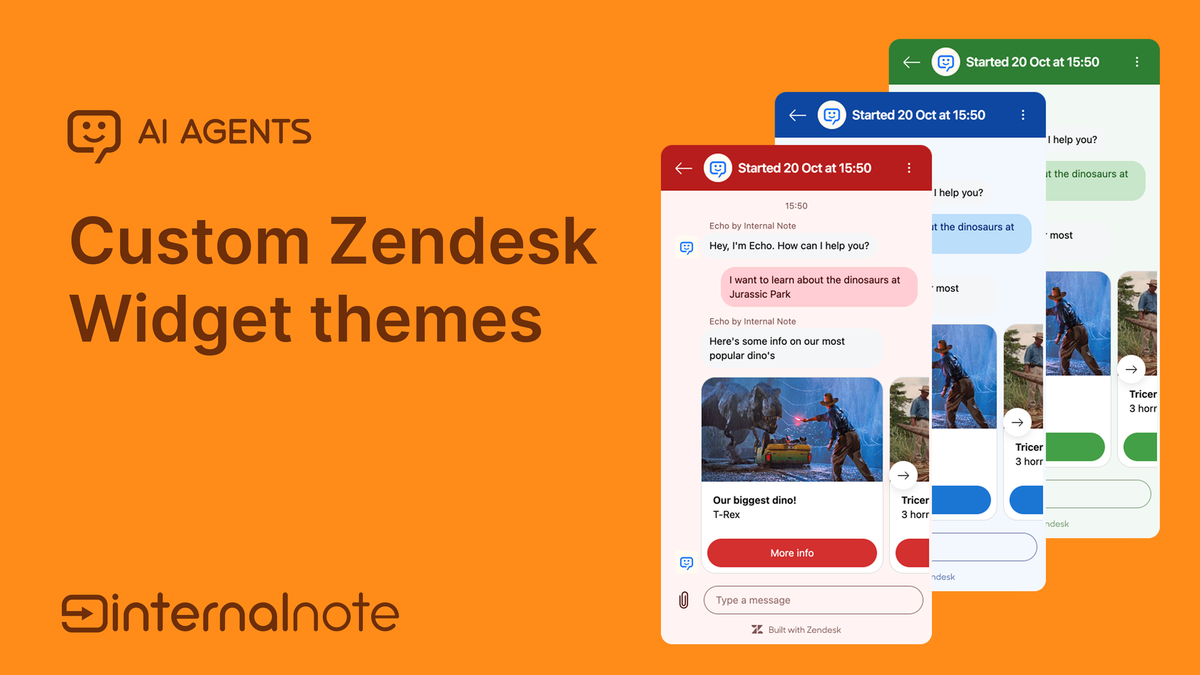
Match your brand with widget theming
However, with a little bit more effort you can turn this into a branded experience that aligns with your website's design, making it feel far more integrated.
I wrote an entire article on the topic, while also offering an interactive demo page to play around in
Turn email replies into support conversations
Another way to make your support more easily accessible is by making sure replies actually end up in Zendesk. An email announcing a product update or release, a marketing email with promotions, or a newsletter might raise actual questions from customers.
With AI Agents Advanced's new Agentic email capabilities, or the email auto-replies from AI Agent Essentials, you can leverage the platform to handle these questions at scale. So instead of sending out updates from a no-reply address, why not send them from one that offers automated support, or escalations when needed?
That's what I do at Internal Note. Every article I write gets sent to subscribers too (Haven't joined yet? Do so today, it's free!)
And when a reader replies with comments, feedback, product questions or notes a typo, either Echo or I reply. If neither of us know the answer, those questions come up as use case suggestions in my Admin Copilot and Analytics, allowing me to address the gap, fix the issue and close the learning loop.

Replace your search with an embedded AI experience
I mentioned earlier that I'm considering replacing my website search with Quick Answers from Zendesk's Help Center. There is however a better way to offer this kind of generative search today, and that's the Zendesk Web Widget's Embedded mode.
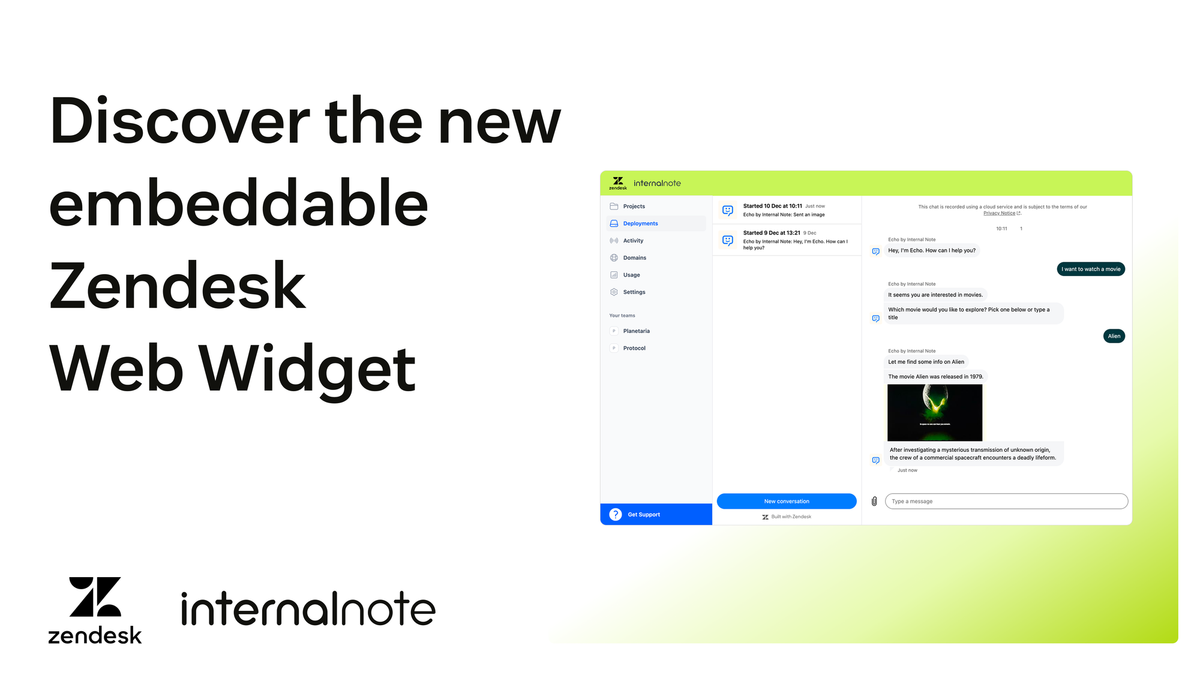
Newly announced last year, it allows you to replace the classic Zendesk widget experience with an embedded experience right within your website, rather than the modal appearance in a corner of the page.
zE('messenger', 'render', {
	mode: 'embedded',
	conversationList: {
		targetElement: '#echo-conversation-list'
	},
	messageLog: {
		targetElement: '#echo-message-log'
	}
});
I built such an integration for Internal Note on my Ask Echo page. It offers a full-page experience to interact with Echo, allowing you to search, ask a question or use one of the predefined prompts. You can apply the same pattern to any page where a conversational search experience would serve your visitors better than a traditional results list.
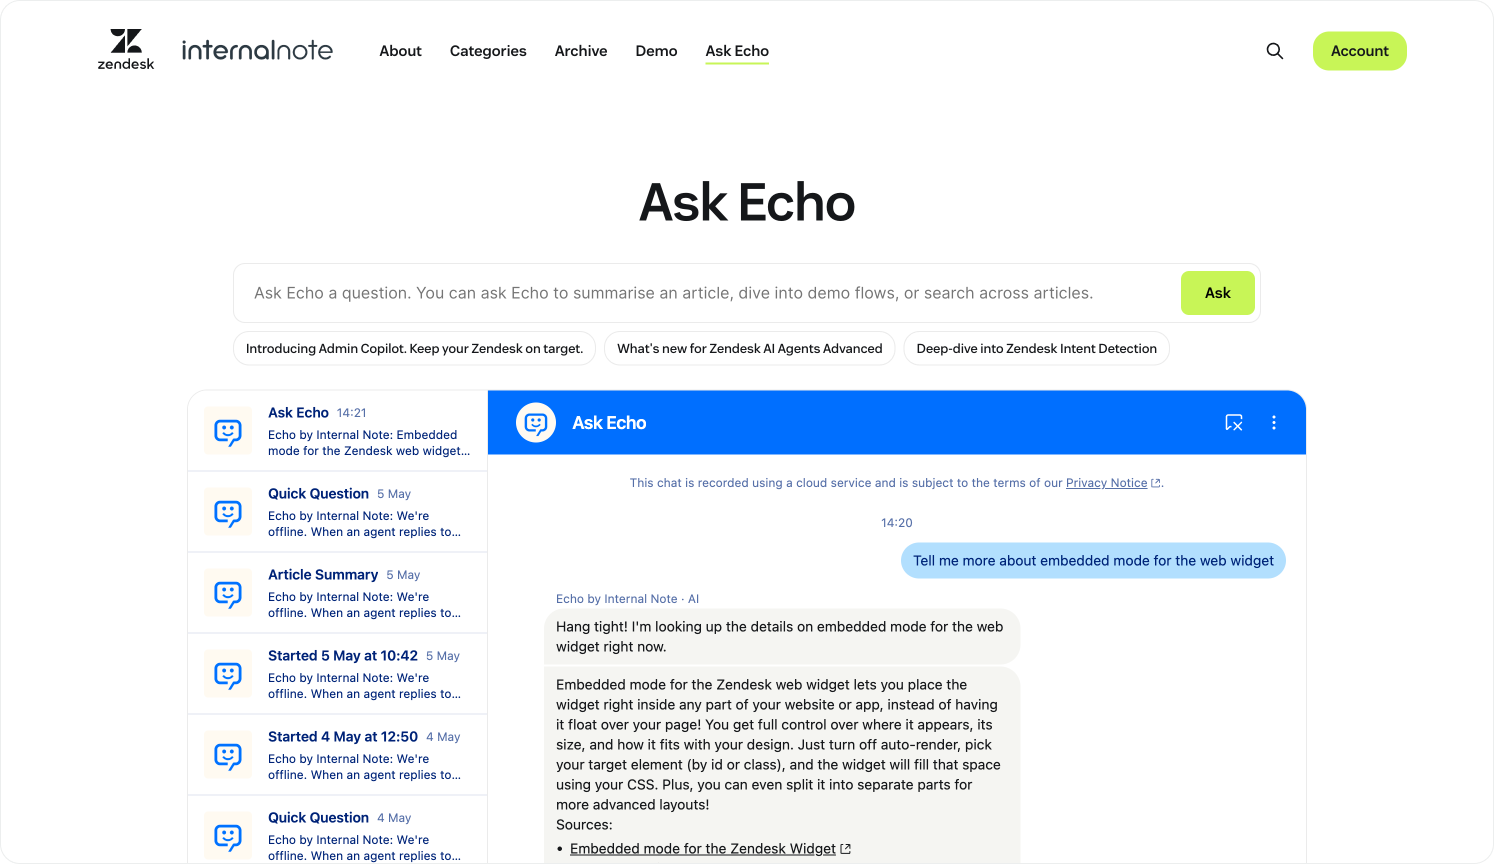
This experience combines the widget's embedded mode with its new capability to start a new conversation programmatically and pass metadata to the AI Agent alongside it.
zE('messenger:ui', 'newConversation', {
	displayName: 'Ask Echo',
	message: {
		content: {
			type: 'text',
			text: question
		},
		metadata: {
	    url: page_url,
	    title: page_title
		}
	}
});
Personalisation
While Zendesk is there to help you automate your resolutions, your customers or employees live within the broader ecosystem of your company. So if you want to offer more personal support, it's important to let the platform, your AI Agents and your team know who the customers are they're talking to.
You can do this in a couple of ways. One way is importing users into Zendesk in advance so that whenever a conversation is started you immediately know who they are, whether they're a VIP, what their account number is, and so on. If adding all customers up front isn't possible due to volume, lack of API access, or privacy and regulatory reasons, you can also do ad hoc enrichment by leveraging Zendesk's Action platform.
These elements are useful for answering questions automatically. If we know they are a user of product X, we can use segments in AI Agents Advanced to narrow the answers to knowledge sources that fit that segment. Similarly, within Omnichannel Routing we can raise the priority for paid customers, or even take their Service Contracts into account for B2B environments. If a user has an assigned account manager we can add them as a follower, or we can simply route a customer to the right region's support team.
Sync your customer database to Zendesk
For every subscriber that joins Internal Note, I sync their information to my Zendesk environment. This allows me to prioritise questions or feedback from readers, while pushing others to other support channels. You can apply the same approach to any user base, whether that's customers, subscribers or employees.
(Unrelated to Zendesk: I do this by invoking a Cloudflare Worker via a webhook triggered from my publishing platform whenever a user is modified.)
var user: {
	email: subscriber.email,
	name: subscriber.name,
	external_id: subscriber.id.toString(), // Linking your DB ID to Zendesk
	skip_verify_email: true // Optional: trust the source,
	tags: ['subscriber'];
}

await fetch(`${API_BASE}/users/create_or_update.json`, {
		method: 'POST',
		headers: {
			...AUTH_HEADER,
			'Content-Type': 'application/json'
		},
		body: JSON.stringify(payload)
});

const result = await response.json();
Enrich customer profiles on demand
Instead of running a script that pushes users to Zendesk, you can also leverage Zendesk's Action Builder platform. You can set up a workflow that fires when a ticket is created, pulls in user data via a Custom Action (API), and then updates the ticket requester, and optionally updates the ticket priority or routing at the same time.
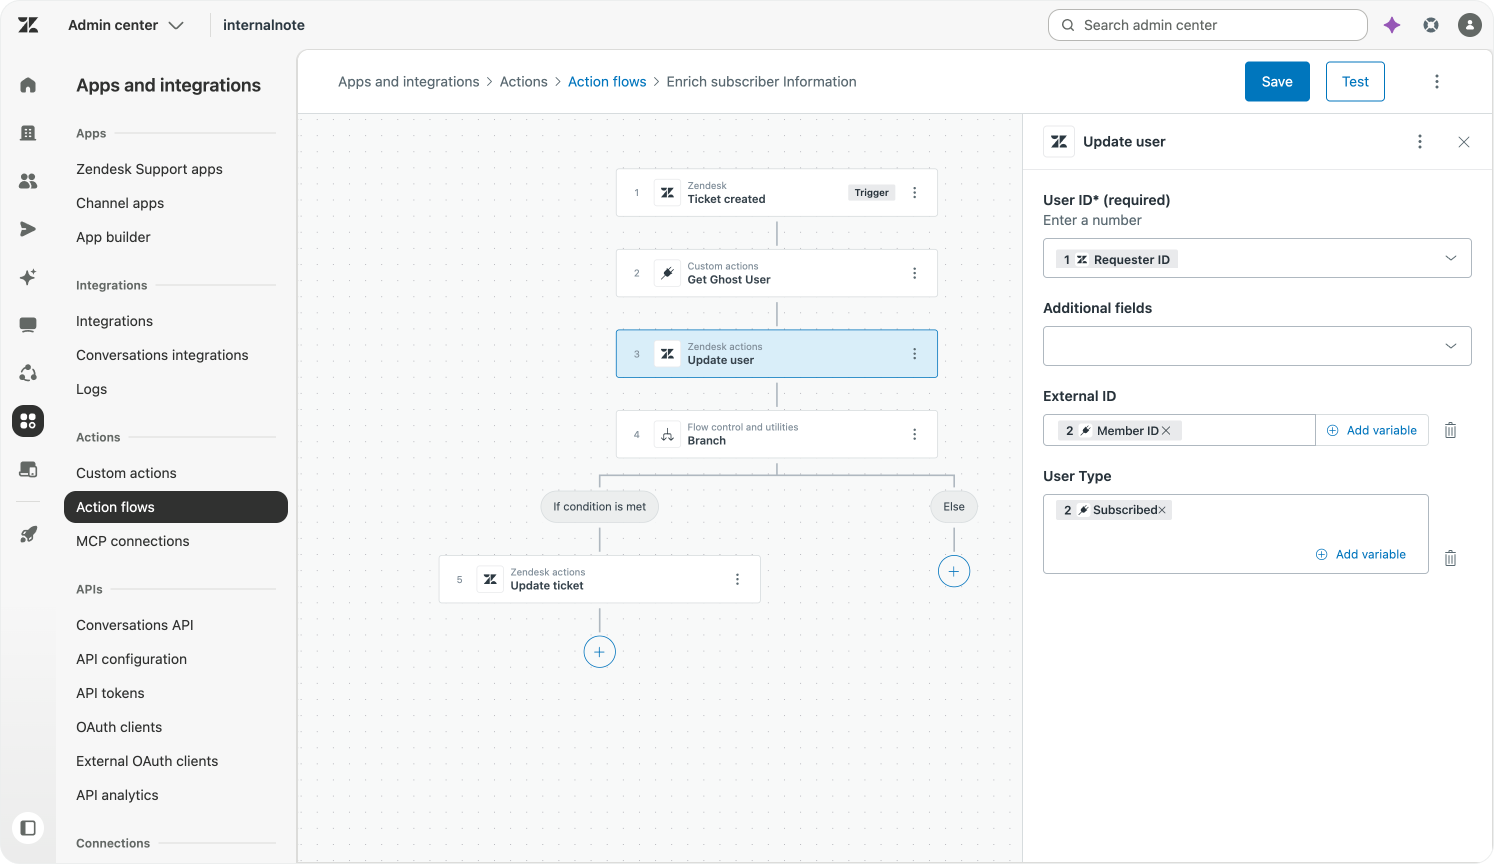

I used to rely heavily on external scripting, but I've been gradually moving all that logic over to Action Builder. It's part of the platform, does away with a lot of Zendesk API code, replaces it with native parameters, and makes it a completely auditable part of the ticket workflow.
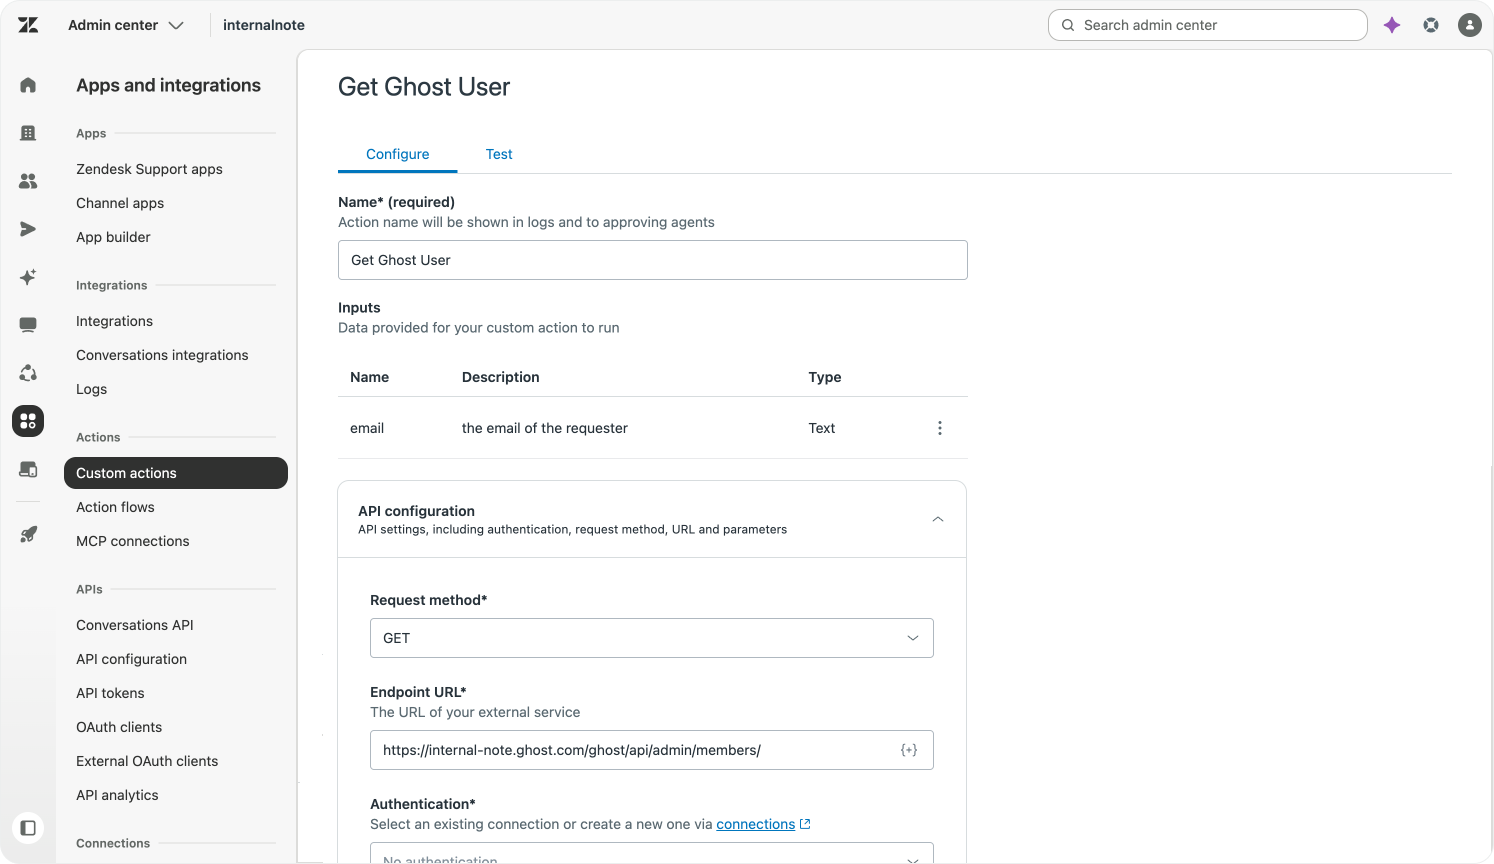
The only custom work that's left is defining the APIs to get data from the platform. But even there, the Custom Action wins out over writing and hosting the code yourself.
Recognise logged-in customers with SSO
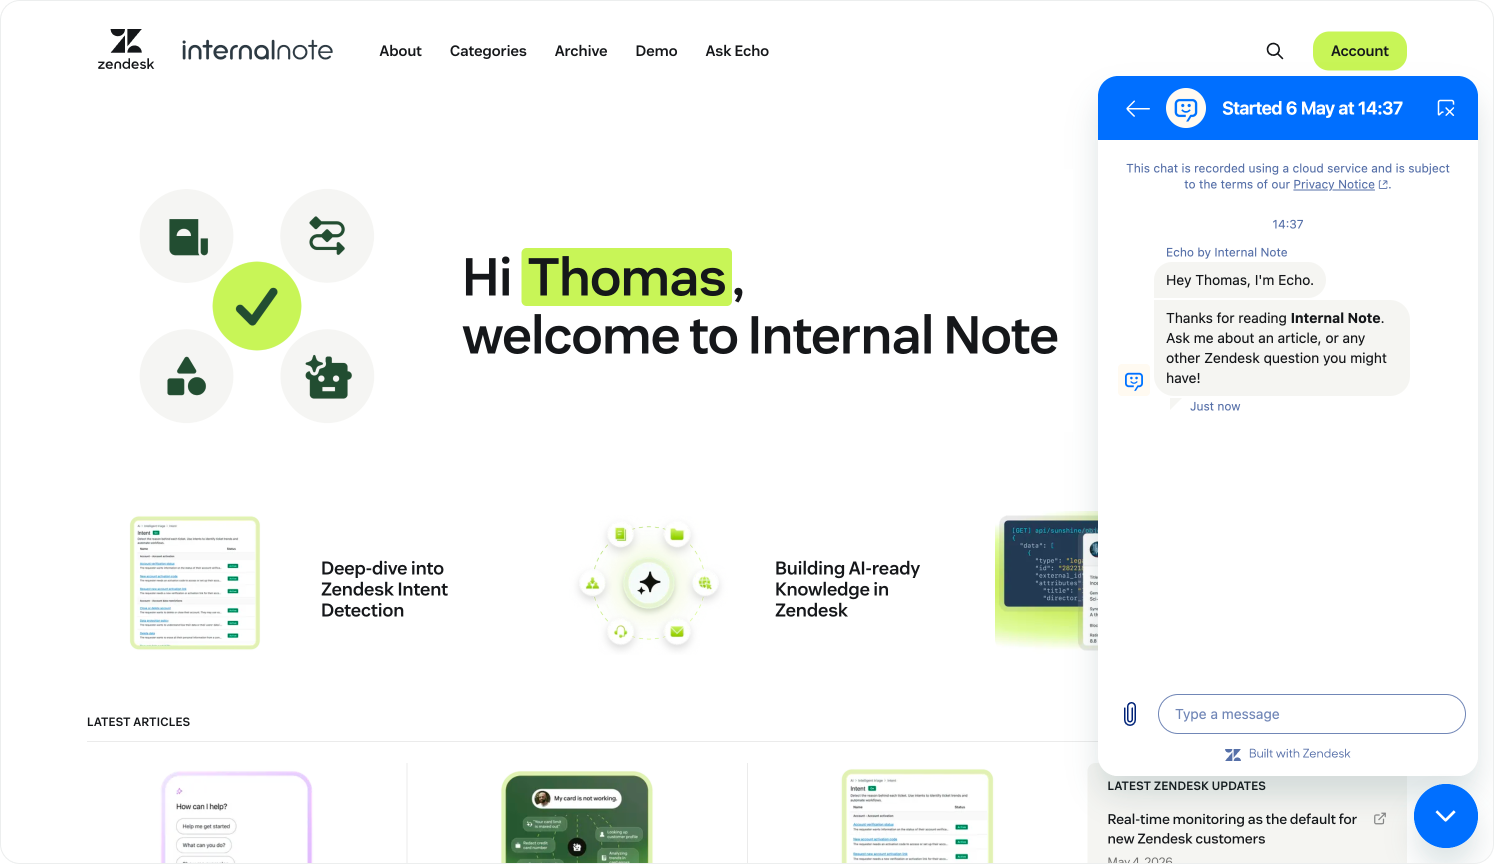
Once users are part of the Zendesk platform, we can leverage its single sign-on capabilities to authenticate customers when they raise a request. For example, whenever a subscriber is logged into Internal Note, I not only greet them by their first name right on the welcome page, but I also pass that information via a JWT token to the Zendesk Widget, authenticating the session. If your platform already has authenticated users, the same pattern applies directly.
If the user didn't exist yet, doing so would create them. But if they existed already, it would also show any previous conversations they had with the AI Agent in the widget's home screen.
Setting up SSO takes a bit of development work to retrieve customer information, create the token and sign it. But that effort is worth it, if only for the more personal experience it gives the customer by showing them their past interactions with your AI Agent and team.
On top of that, since we can now trust we're talking to the actual user, we can make flows that retrieve information for that customer, like order statuses, a lot more smoothly, since we already know they are who they said they are.
var member = {
	name: memberData.name,
	email: memberData.email,
	external_id: memberData.external_id
}

const jwtToken = await authenticateZendeskUser(member);

zE('messenger', 'loginUser', function(callback) {
	callback(jwtToken);
});
Greet customers by name in the welcome reply
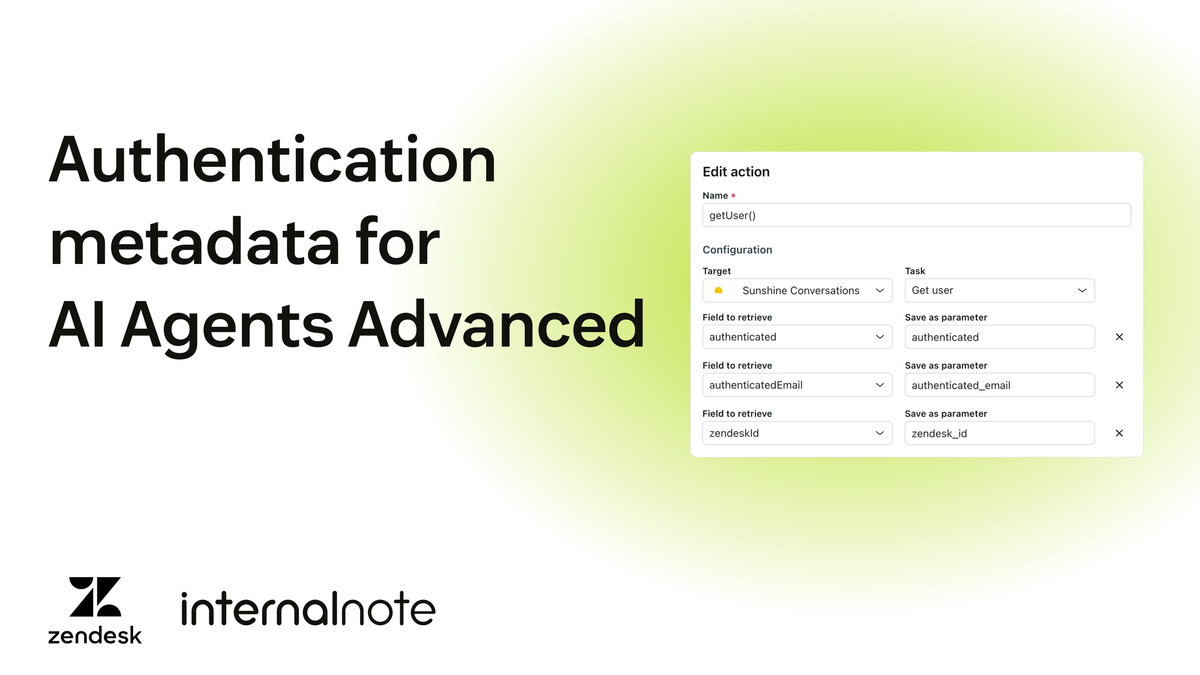
While showing their name on the blog is one thing, what really makes it personal is having the AI Agent greet them by name. We can do this by modifying the welcome reply in AI Agents Advanced and adding conditional logic that checks for the authentication state, stores that metadata as conversational parameters, and uses it to render the welcome reply.
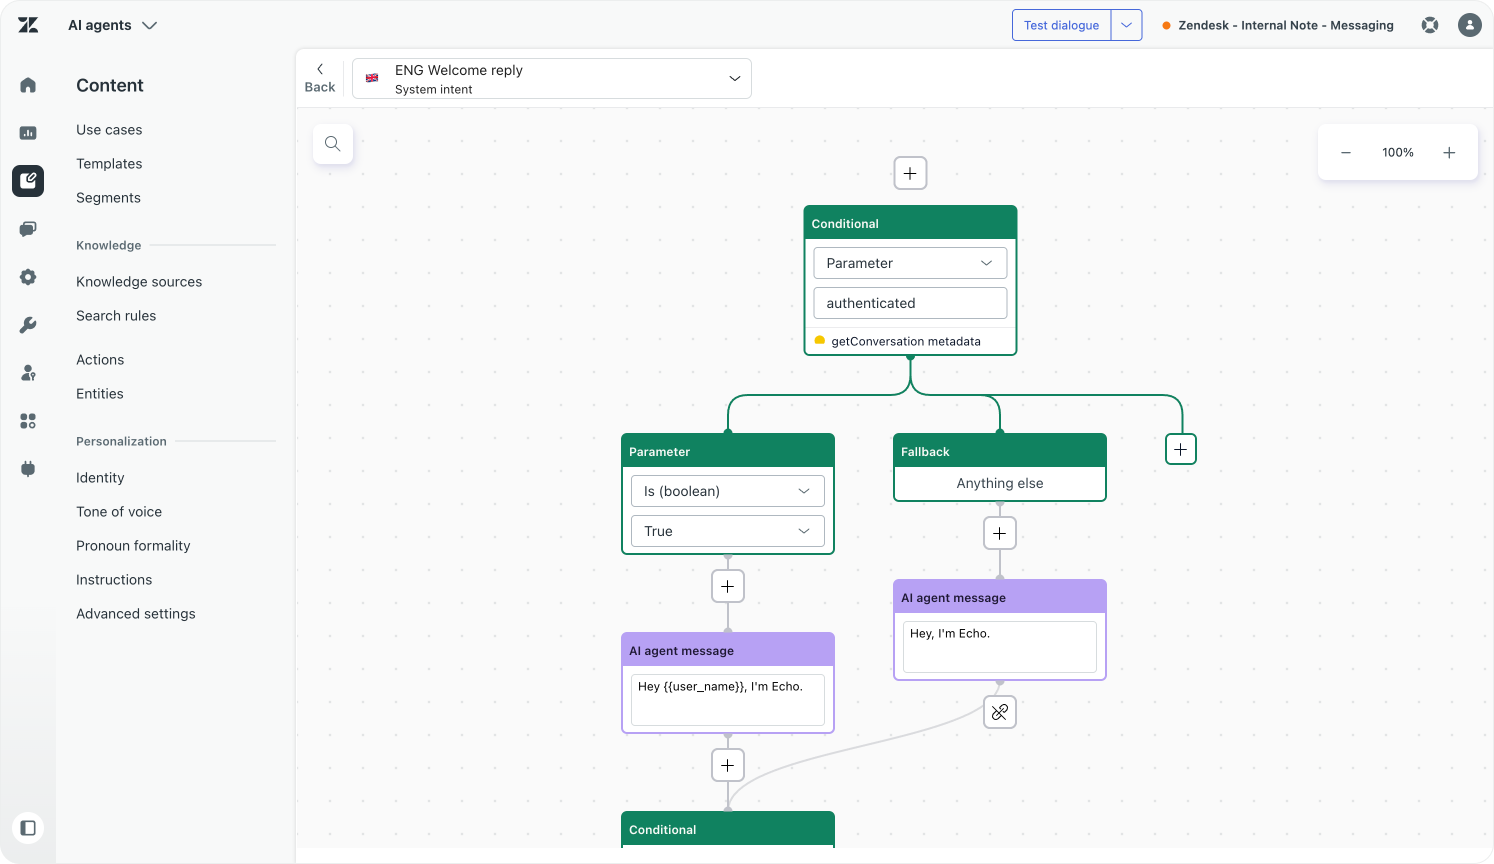
To know more about leveraging authentication metadata, take a look at this article.
Context
So far we've addressed enhancing your knowledge graph, integrating your support channels, and personalising your interactions as ways to integrate Zendesk's platform into the rest of your business. All of these are flows I've also enabled on Internal Note, so give them a try!
The last big element is context. Customers not only look up information. They are often trying to accomplish a goal. Gathering all the context will help you narrow down a resolution faster.
Give your AI Agent page-level context
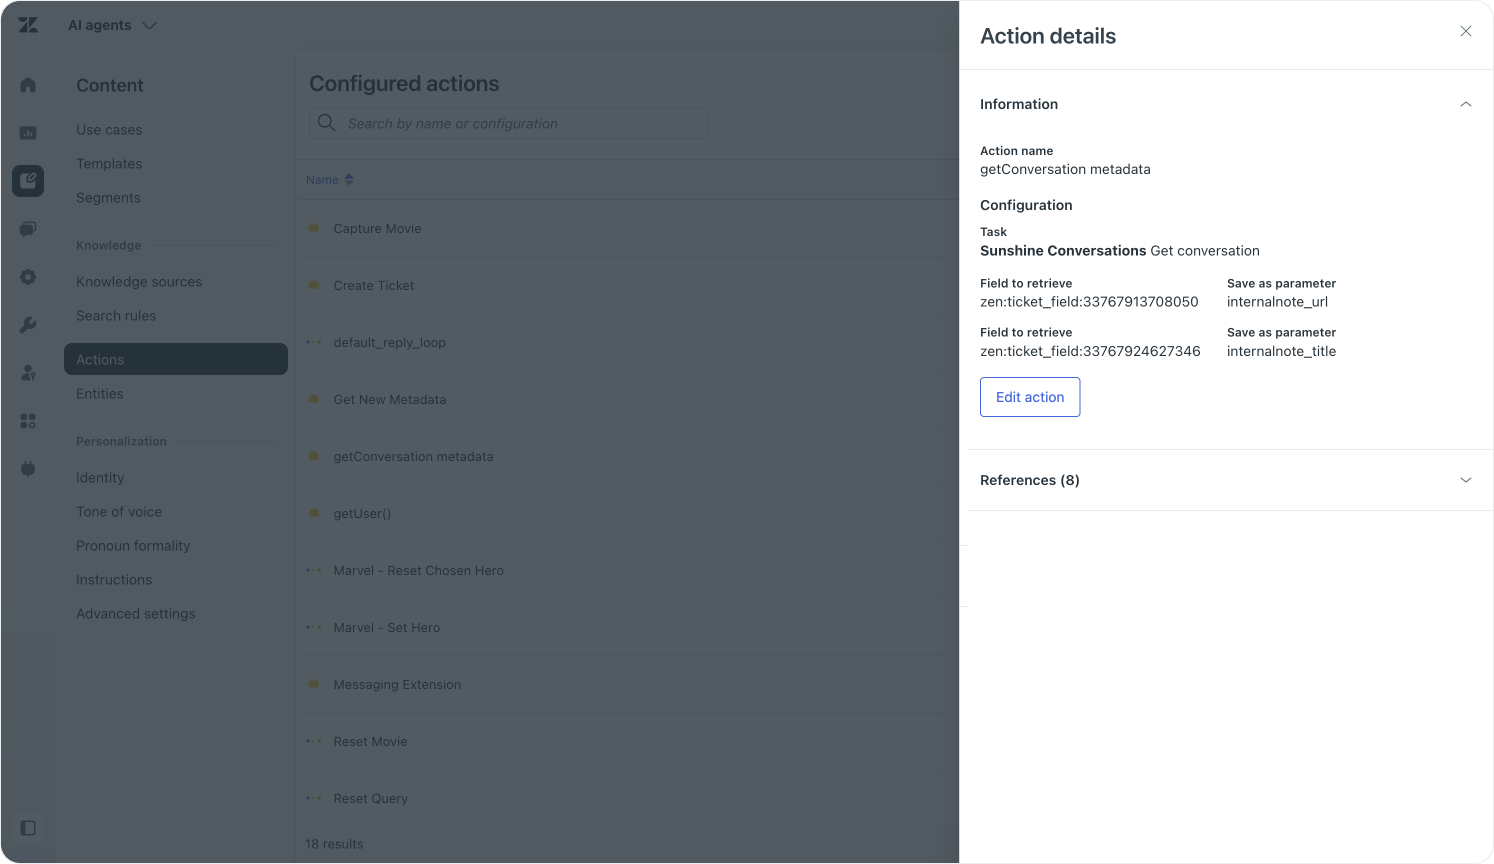
One way to do this is by passing conversational metadata to the web widget. On Internal Note I push the current page URL and title to ticket fields, so they are available to the AI Agent (and Agents in Agent Workspace) as context.
zE("messenger:set", "conversationFields", [
	{ id: "33767913708050", value: "{{url}}" },
	{ id: "33767924627346", value: "{{meta_title}}" }
])
I use them to provide a context-aware welcome reply that includes this information as part of the message. You can use this to say "it seems you're having trouble checking out" if customers invoke the widget from the checkout page, or "Are you looking to book a night at our London hotel?", immediately giving your AI Agent the context it needs and giving the customer a better experience right from the get-go.
Route directly to a use case based on page context
While showing this in the welcome flow is one approach, you can also use this to directly route to the right use case for some situations.
For example, I used this approach on some pages to trigger the right demo flow right from the start.
And you could tweak your welcome reply so that, if we detect the modify booking page, we directly route to the "Change booking" use case, bypassing the regular welcome message. Just be careful, a customer might be looking at one page while pondering a question about an entirely unrelated topic.
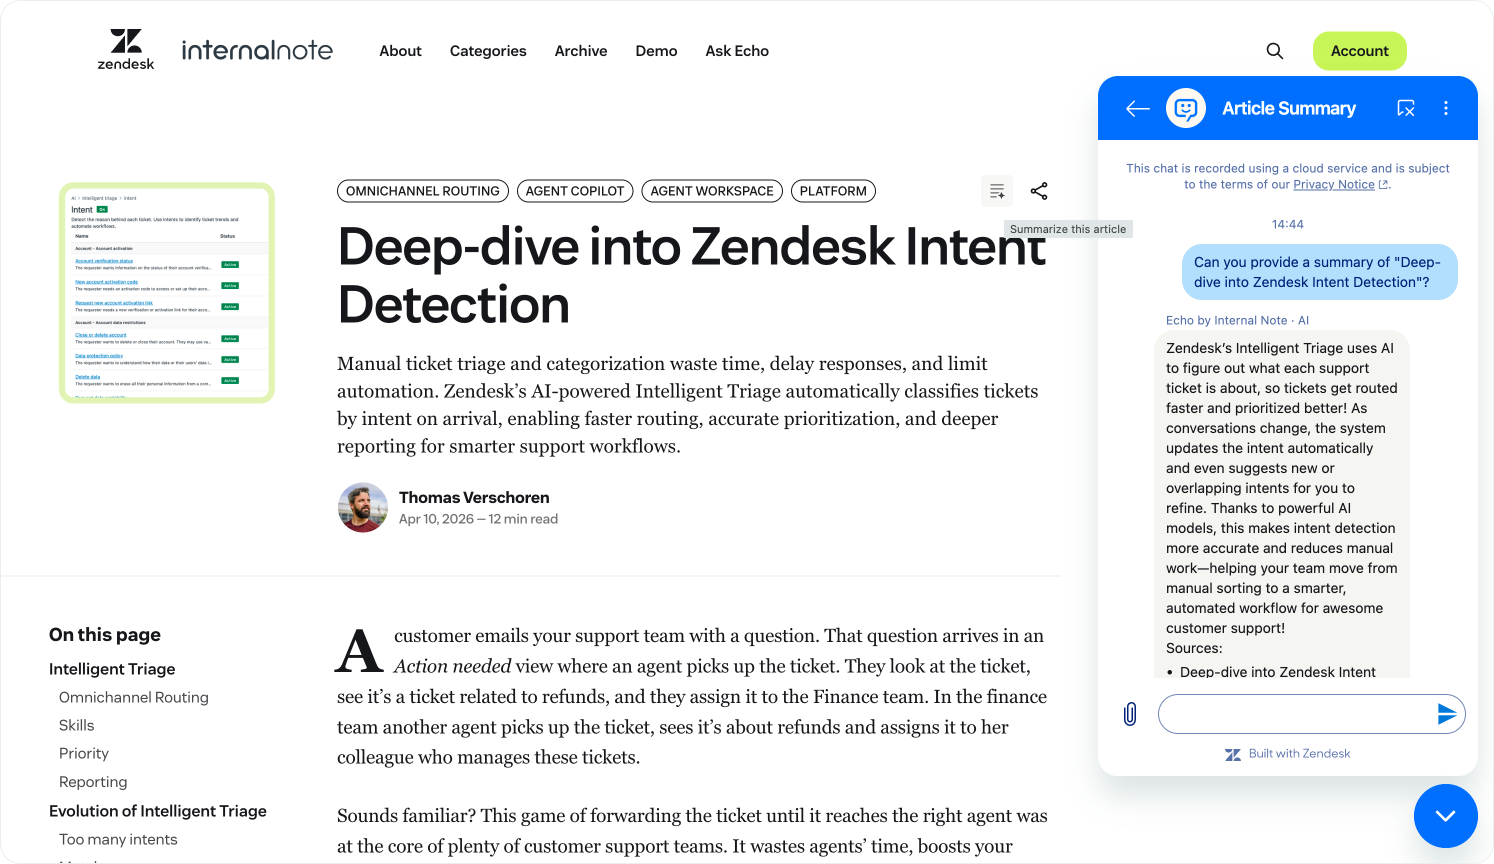
Combining it all: the summary button
I've also combined these elements into one feature on my blog: the summary button above each article. When clicked it starts a new conversation that asks for a summarisation of the current article:
zE('messenger:ui', 'newConversation', {
	displayName: 'Article Summary',
		message: {
			content: {
				type: 'text',
				text: `Can you provide a summary of "${articleTitle}"?`
			},
			metadata: {
				url: page_url,
				title: page_title
			}
		}
});
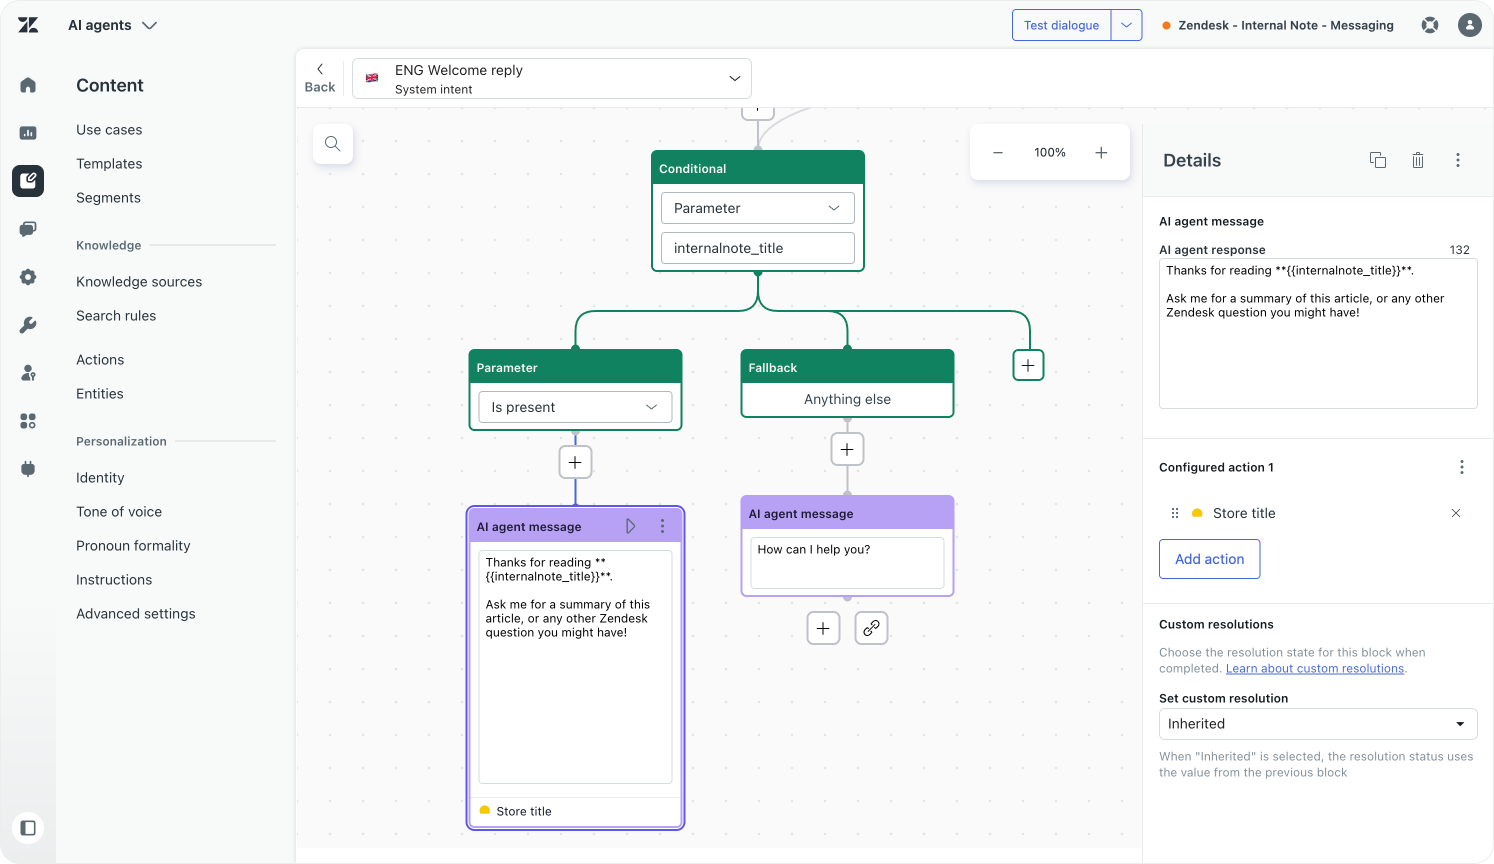
This triggers my "Create a summary" use case that uses a Knowledge Reply block to generate a summary of that specific article for the user.
A more generalised version of this pattern could be "Refund this order", which triggers your refund use case and immediately passes the right customer and order information.
Integrating across the platform
What I've shown in this article covers four areas: knowledge, conversations, personalisation and context. None of these are traditional ticketing interactions. All of them treat Zendesk as a platform to build on, not a tool to log tickets in.
That's what the Resolution Platform actually means in practice. Your Help Center isn't a support destination. It's a content engine that powers AI Agents, Quick Answer and your website at the same time. Your Web Widget isn't a chat button. It's a conversational interface you can embed anywhere. Your user data isn't just a contact record. It's context that makes every interaction more precise and more personal. Zendesk connects all of it.
Everything I've built here has a counterpart in your business. A knowledge graph fed by your documentation, your blog, your product pages. A Web Widget that knows which page a customer is on and what they've asked before. AI Agents that recognise who a customer is and tailor every interaction to their context. You don't have to implement all of it at once. Each of these capabilities stands on its own and delivers value independently. But the more of them you connect, the more the platform works as a whole.
And the platform is still evolving. The integrations in this article are largely about connecting Zendesk to your existing content, channels and customer data. The next frontier is what happens when the platform doesn't just connect those things, but actively reasons across them.
Think about what that means in practice. Not just surfacing the right article, but rewriting it to fit the customer's context. Not just routing to the right use case, but assembling the right resolution from everything the platform knows. Support that doesn't just respond to what a customer asks, but anticipates what they need based on who they are, what they've done and where they are in their journey.
That's where the Resolution Platform is heading. And the integration work you do today, connecting your knowledge, your channels, your users and your context, is what makes that possible when it arrives.